
You are looking for information, articles, knowledge about the topic nail salons open on sunday near me how to record acoustic bass on Google, you do not find the information you need! Here are the best content compiled and compiled by the Chewathai27.com team, along with other related topics such as: how to record acoustic bass double bass mic, micing a double bass, best condenser mic for bass, double bass pickup or microphone, direct upright bass sound, upright bass di box, ribbon mic on upright bass, u87 on upright bass
Contents
How do I record my bass audio?
The easiest way to record a bass guitar is to plug it into an instrument input on your audio interface. This method is sometimes called Direct Injection (DI for short), and for genres such as pop, blues, and rock, it is extremely effective.
How do you record bass well?
- Tune up! …
- Break in new strings ahead of time. …
- Record Amp and DI. …
- Use an appropriate mic for bass. …
- Adjust phase of combined DI and miked-up bass tracks. …
- Limit and/or compress. …
- Don’t over-compress/limit. …
- Don’t Print effects without a dry version as well.
How do I record my acoustic guitar perfectly?
- Use a condenser microphone. …
- Avoid too much bass. …
- Be aware of the sweet spot. …
- Use New Strings. …
- Record Direct. …
- First Fret Brilliance. …
- Record in Stereo. …
- Double-track with different mic techniques.
How do you record bass at home?
The easiest way to record bass is to just use DI. DI stands for direct insert. It’s when you plug the instrument directly into your audio interface. It’s really that simple!
What level should I record bass?
You should aim for peaks of -12dbfs and you should change your strings. If you want “brightness” and “attack” new strings are your friend. Also the output of a di is mic level, not instrument or line level, you can plug your bass straight into the instrument level jack without the di.
Do you need a DI to record bass?
Be aware, though, that unless the bass guitar has active pickups, you’ll need to use a DI (direct injection) box to match impedances and boost the low-level signal from the instrument. Plug the bass into the instrument (jack) input of the DI box and take a feed from the box into the input of the amp.
How many bass tracks should you record?
If you have the preamps, mics, and tracks to do it, you might want to record as many as four bass tracks — a DI and three mics — and somewhere in the blend of those four individual tracks, you’ll find the tone you need for each song.
How do I plug bass into my computer?
The easiest way to connect your electric guitar or bass to your computer is to use one of the small guitar audio interfaces on the market. Just connect the cable from your instrument to the interface and you’re ready to rock.
Where should I mic my upright bass?
The spot under the bridge, between the strings and the deck, is a good position to mount a microphone. This position represents most of the elements of the bass sound we want to capture – low end as well as ‘bite’ when the strings are plucked or bowed.
Are condenser mics good for bass?
Large diaphragm condenser mics like an AKG 414, or a U87 are definitely worth a try on bass amps, because they have really nice mid tones and a much crisper transient response to the dynamic mics.
Should you double track acoustic guitar?
Doubling acoustic guitars produces a lush, full sound that adds texture and density to your mix. Try using a capo on the double so you have a higher inversion and a more complex chord voicing. Also try a different guitar, like a smaller body or a different tuning, even a 12-string or Nashville-tuned guitar.
Should I record acoustic guitar in stereo?
Simply put, if you want to record the best possible range of high and low frequencies for your acoustic track, using stereo recording is your best bet, otherwise you will end up with a fraction of the frequencies that are not nearly as wide in range.
How do I record bass on my laptop?
If you are using a Mac or PC, just launch a DAW such as Logic Pro or Reaper. It should instantly recognize the iRig2 as an input device. Now assign it to a track, arm it for recording, and you should be all set. Next you will want to assign a bass amp simulator like Amplitube to the track.
How do I plug bass into my computer?
The easiest way to connect your electric guitar or bass to your computer is to use one of the small guitar audio interfaces on the market. Just connect the cable from your instrument to the interface and you’re ready to rock.
How do you record a subwoofer?
Usually with a subwoofer, you’ve got a line-level signal (somewhere) that you can record directly. Most mics can record bass. If it’s “loud” you might want to use a dynamic mic like the SM57/58 or a kick-drum mic.
How To Record Bass | Focusrite
- Article author: focusrite.com
- Reviews from users: 12132
 Ratings
 - Top rated: 3.2
- Lowest rated: 1
- Summary of article content: Articles about How To Record Bass | Focusrite Updating …
- Most searched keywords: Whether you are looking for How To Record Bass | Focusrite Updating
- Table of Contents:
What are you looking for
How To Record Bass
Footer menu
Sub-footer
Recording Electric Bass: 10 Quick Tips & Techniques For Capturing The : Ask.Audio
- Article author: ask.audio
- Reviews from users: 2415 Ratings
- Top rated: 4.9
- Lowest rated: 1
- Summary of article content: Articles about Recording Electric Bass: 10 Quick Tips & Techniques For Capturing The : Ask.Audio Updating …
- Most searched keywords: Whether you are looking for Recording Electric Bass: 10 Quick Tips & Techniques For Capturing The : Ask.Audio Updating Recording electric bass can be more straightforward than drums or guitar, but there are still potential issues that can trip you up. Here’s 10 tips & techniquesrecording bass, electric bass recording tips, how to record bass guitar, studio recording techniques, tips for recording bass, upright bass, production bass, how to produce bass guitar, compress bass guitar, bass guitar effects, learn studio production,
- Table of Contents:
1 Tune up!
2 Break in new strings ahead of time
3 Record Amp and DI
4 Use an appropriate mic for bass
5 Adjust phase of combined DI and miked-up bass tracks
6 Limit andor compress
7 Don’t over-compresslimit
8 Don’t Print effects without a dry version as well
9 Use Plug-Ins to Enhance Recording
10 Don’t Fear the Upright
Discussion
Basic Recording Techniques: Upright Bass – YouTube
- Article author: www.youtube.com
- Reviews from users: 35747 Ratings
- Top rated: 4.1
- Lowest rated: 1
- Summary of article content: Articles about Basic Recording Techniques: Upright Bass – YouTube Updating …
- Most searched keywords: Whether you are looking for Basic Recording Techniques: Upright Bass – YouTube Updating http://www.audio-technica.comThe complex dynamic sound of the upright bass makes it one of the trickiest instruments to capture – especially if isolation is …upright bass, pro audio, audio technica, upright bass recording, audio-technica recording techniques, audio-technica basic recording techniques
- Table of Contents:

How to Record Acoustic Bass Guitar | TalkBass.com
- Article author: www.talkbass.com
- Reviews from users: 32153 Ratings
- Top rated: 4.5
- Lowest rated: 1
- Summary of article content: Articles about How to Record Acoustic Bass Guitar | TalkBass.com This veo, How to Record Acoustic Bass Guitar presents principles and comparative demos of tracking it with: Acoustic – with microphone; Pickup … …
- Most searched keywords: Whether you are looking for How to Record Acoustic Bass Guitar | TalkBass.com This veo, How to Record Acoustic Bass Guitar presents principles and comparative demos of tracking it with: Acoustic – with microphone; Pickup … Lately I’ve experimented with how to track the acoustic bass guitar. None of the usual recording books / resources cover this topic. Too bad because…
- Table of Contents:

Principles of micing acoustic bass guitar – Gearspace.com
- Article author: gearspace.com
- Reviews from users: 8321 Ratings
- Top rated: 4.3
- Lowest rated: 1
- Summary of article content: Articles about Principles of micing acoustic bass guitar – Gearspace.com I acquired a Taylor AB-1 acoustic bass guitar last summer. I’m exploring ways to optimally record the bass with both pickup/DI and mic techniques. Yest. …
- Most searched keywords: Whether you are looking for Principles of micing acoustic bass guitar – Gearspace.com I acquired a Taylor AB-1 acoustic bass guitar last summer. I’m exploring ways to optimally record the bass with both pickup/DI and mic techniques. Yest. Principles of micing acoustic bass guitar, gearspace, gearspace.com, gearslutz, gearslutz.com, recording, studio, microphone, mic pre, compressor, equalizer, pro tools, DAW, Cubase, SSL, Neve, Helios, review, reviewsI acquired a Taylor AB-1 acoustic bass guitar last summer. I’m exploring ways to optimally record the bass with both pickup/DI and mic techniques. Yest
- Table of Contents:
Similar Threads
The Remote Possibilities Mic Locker List
Bock 151 vs Bock 251 vs Soundelux 251
DPA 4061 On Orchestra
Post your finished demos here
Gear discussed
on this page
in this thread

Recording Magazine Resources: Recording the Upright Bass
- Article author: recordingmag.com
- Reviews from users: 6461 Ratings
- Top rated: 4.8
- Lowest rated: 1
- Summary of article content: Articles about Recording Magazine Resources: Recording the Upright Bass Since there is more to an upright bass than bass, try placing the mic closer to the brge. Use a nice condenser of some kind, moving it around until it … …
- Most searched keywords: Whether you are looking for Recording Magazine Resources: Recording the Upright Bass Since there is more to an upright bass than bass, try placing the mic closer to the brge. Use a nice condenser of some kind, moving it around until it … Recording the Upright Bass: As a result, for recording, we are often challenged with many different bass sounds for many types of music. Warmth and…
- Table of Contents:
What really matters
Where does it come from
Double up on the double bass…
Proximity to the situation
To direct or not to direct that is the question
A final bow
Bottoms up!
Miking an acoustic bass: Technique one – Audio Recording Techniques Video Tutorial | LinkedIn Learning, formerly Lynda.com
- Article author: www.linkedin.com
- Reviews from users: 33059 Ratings
- Top rated: 4.8
- Lowest rated: 1
- Summary of article content: Articles about Miking an acoustic bass: Technique one – Audio Recording Techniques Video Tutorial | LinkedIn Learning, formerly Lynda.com Mic position is everything when recording acoustic bass. Just like with an acoustic guitar close miking the f-hole makes the sound muddy with no definition. So, … …
- Most searched keywords: Whether you are looking for Miking an acoustic bass: Technique one – Audio Recording Techniques Video Tutorial | LinkedIn Learning, formerly Lynda.com Mic position is everything when recording acoustic bass. Just like with an acoustic guitar close miking the f-hole makes the sound muddy with no definition. So, … Join Bobby Owsinski for an in-depth discussion in this video, Miking an acoustic bass: Technique one, part of Audio Recording Techniques.
- Table of Contents:
From the course Audio Recording Techniques
Miking an acoustic bass Technique one
Practice while you learn with exercise files
Download courses and learn on the go
Contents

Access to this page has been denied.
- Article author: www.sweetwater.com
- Reviews from users: 40173 Ratings
- Top rated: 3.1
- Lowest rated: 1
- Summary of article content: Articles about Access to this page has been denied. Take a Listen · Telefunken U47 · Shure KSM353 · DPA d:vote CORE 4099 · AEA R84A · Warm Audio WA-84 · Audio-Technica ATM350UcH · AEA R44CE · Neumann U 47 … …
- Most searched keywords: Whether you are looking for Access to this page has been denied. Take a Listen · Telefunken U47 · Shure KSM353 · DPA d:vote CORE 4099 · AEA R84A · Warm Audio WA-84 · Audio-Technica ATM350UcH · AEA R44CE · Neumann U 47 …
- Table of Contents:
See more articles in the same category here: https://chewathai27.com/toplist.
Recording Electric Bass: 10 Quick Tips & Techniques For Capturing The
1. Tune up!
Slightly out-of-tune strings on a bass may not jump out as much as on guitar (especially in chords), but when that bass line is sitting under other parts in the mix, even slightly off-pitch notes will make their presence known, and sometimes be harder to track down (why does this song sound a little “off”?). I’d use a tuner (h/w or s/w), but I’d also always verify by ear, before hitting record, and I’d check tuning periodically as the session progresses—just as with drums, hard players can easily put the instrument out after a few energetic takes.
Fig 1 Use a tuner but always let your ears have the final word.
2. Break in new strings ahead of time
Aside from tuning issues, new bass strings, especially roundwounds, can be very bright, and this may result in a lot of finger noise and fret buzz. If they’re changed a day or two before the session, and the bass is played a bit to break them in, there may be less likelihood of problematic noise. In fact, while many players think of them as old-school, flatwounds can sometimes be the best choice, when a fat deep bass sound is called for—it’s worth a thought.
3. Record Amp and DI
The easiest way to record bass is to just plug it straight into the console/interface—of course, using the correct instrument-level input or dedicated DI box, and not a standard line input. This will provide a nice, clean, deep tone, but it will likely lack the growl and grit that’s often desired—for that, you’ll want the sound of an amp. While you can always use a bass amp sim plug-in later, in the mix (see below), there’s nothing like the pants-flapping wall of low-end sound coming out of a real bass amp, if one is available. But most engineers will record both—a DI’d signal, and a miked-up amp. They can be combined later on, for the best of both worlds—the clean, round, depth from the DI, with the edge and midrange punch of the amp (but see below, for a caveat).
Audio Example 1 A bass part recorded with a DI; through an amp; and both combined:
4. Use an appropriate mic for bass.
If you are recording the output of a bass amp, try to use a mic that will capture more of the low-end than a typical stage mic. An SM57/58 will work, but a mic with a more extended low-frequency response would be a better choice. The Sennheiser 421 is often used, as is the classic kick drum mic, the AKG D112, which has a bumped-up response tuned specifically for low-pitched instruments. I prefer the Electro-Voice RE-20 (you know, the “announcer’s mic”)—it’s more neutral, and it has an extended low-end response, so you’ll get not just boom, but real depth.
Fig 2 Some mics suitable for bass: L-to-R: Electro-Voice RE-20; AKG D112; Sennheiser 421.
5. Adjust phase of combined DI and miked-up bass tracks
If you do record the bass both via a DI and a miked-up cab, and combine them later, as suggested above, you’ll want to pay attention to the relative phase of the two tracks. Even if the mic is placed very close (an inch or so) to the amp’s speaker, that track will still be slightly delayed (on the order of milliseconds), due to that small distance, relative to the DI track. Small delays like this can cause comb-filtering when the tracks are combined (at close to equal levels), which produces cancellations and reinforcements in the frequency spectrum that can impart a nasal, hollow, or slightly “flangey” sound, weakening the tone. You can see the time difference if you line up the waves in the DAW and zoom way in. You can either advance the amp track (via editing) or delay the DI track (via editing or a plug-in) until the two line up—the resulting tone should be fuller, and ultimately sit better, with a more solid low end, in the mix.
Fig 3 The waveforms of a DI’d and a miked-up bass track.
6. Limit and/or compress
If ever there was a candidate for compression, bass is it. This instrument has a wide dynamic range (even more so when slap techniques are employed), but it usually needs to sit at a very steady level in the mix. But should compression be applied during recording, to control the levels going down, or later, during the mix, to insure the best blend in the track? Well, the answer is probably both, but with potentially different approaches to squashing the signal. During recording, a Limiter might be the ticket, to control transient peaks that might overload ADCs, producing pops and spikes that can ruin a take. A classic fast VCA compressor/limiter (like the dbx 160) could be employed to handle peaks, without really reducing the player’s dynamics at this early stage. Then when mixdown rolls around, more gentle compression can be introduced (like the smooth squash of an optical compressor like the LA-2A), to tighten up the dynamics, as needed for that particular mix. Applying the right kind, and amount, of compression/limiting at all stages will assure you get nice clean recordings, that can be properly squeezed into the mix when the time comes.
Fig 4 A fast comp/limiter (dbx 160), good for recording; a more gentle opto compressor (LA-2A), good for mixing.
7. Don’t over-compress/limit
On the same topic, if you do apply some compression during recording, be careful not to overdo it. At this stage, you don’t need to hear any effect, it should just transparently control peaks. If you apply the amount of squeeze that may be needed for the mix as the part is going down, it might cramp the player’s style—better to leave that for later. Plus, if the signal is over-compressed here, it may bring out the normal squeaks and finger & fret noises so much that it becomes difficult to eliminate them later—this is especially true if the player is really a guitarist who also moonlights on bass. Guitarists who try their hand at bass parts often haven’t mastered an experienced bassist’s technique for damping the strings, and the little playing noises I referred to, as well as distracting undamped harmonics, can end up overpowering the recording if heavy limiting/compression brings them up (I recently struggled mightily to deal with a bass track that suffered from this flaw).
Audio Example 2 A bass that was over-compressed during recording, with accentuated finger & fret noise:
8. Don’t Print effects without a dry version as well
This is sort of a corollary to the DI+Amp suggestion. While effects on bass aren’t as common as with guitar parts, some bassists will come in with these big rigs of effect boxes, and want to record “their sound”, which often is clearly overprocessed for the song. Rather than argue the point, let the player hear the sound he’s used to during tracking, but be sure to also grab a nice clean signal, prior to all the effects, usually straight off the bass via a DI. That way, if your concerns prove all too true come mixdown, you can turn to the dry track, and recreate those favored effects to a more appropriate degree, with studio tools. Even if the effected bass sounds good to you, many pedals and MI effect boxes are noisy, and you might have to recreate the sound anyway, to avoid problematic buzz or hiss from the player’s cool-but-dirty toys.
9. Use Plug-Ins to Enhance Recording
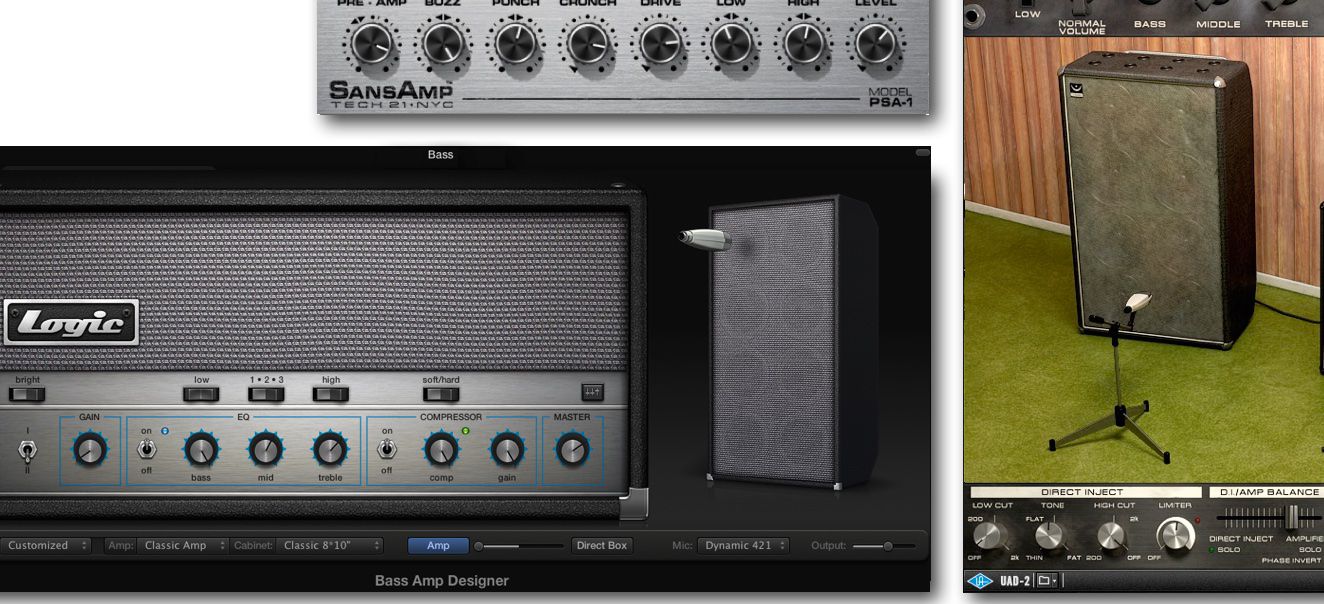
Even when the bass track(s) are well-recorded, and sound good, you may want to enhance the bass tone for mixdown with your favorite bass-friendly plug-in processors. Besides the obvious EQs and compressors, there are many distortion processors and amp sims out there suitable for bass. Sometimes a simple tube-warming effect is all you need to add a little subtle fatness, like the many plug-ins that simulate slight tube drive or tape saturation. I always liked the Tech 21 SansAmp on bass, and Pro Tools includes a well-modeled plug-in version of that unit. Most of the popular guitar amp modelers also include options that can add some nice grit & girth to clean bass tracks, including Softube’s Bass Amp Room and Logic’s built-in B.A.D.—Bass Amp Designer—which, like most bass amp sims, includes models of classic bass amps like the Ampeg SVT and Fliptop, along with modern bass amp & cabinet emulations. Any of these can add that finishing touch to a good bass part, and there are many freeware options as well, for those on a tight budget.
Fig 5 Some plug-ins for bass: Pro Tools’ SansAmp emulation; Logic’s B.A.D.; Softube’s Bass Amp Room.
10. Don’t Fear the Upright
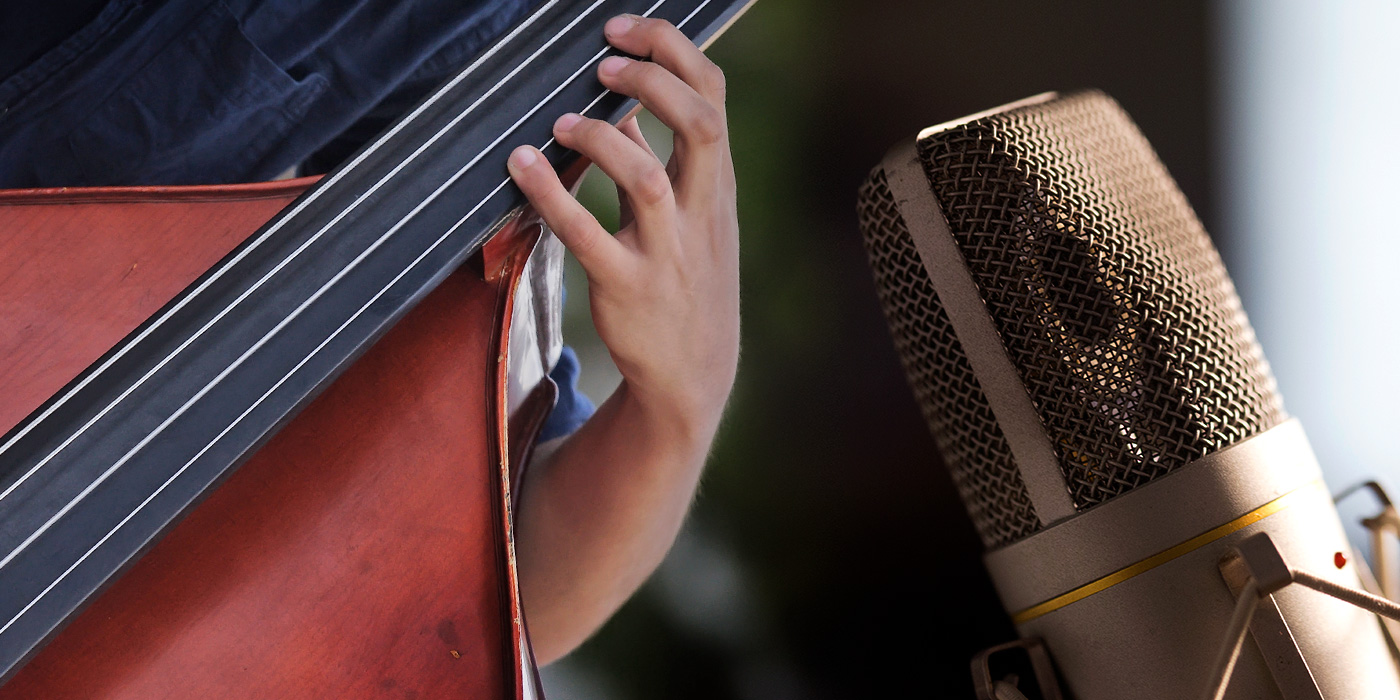
For the last tip/technique, I’m going to shift gears and talk about recording acoustic—upright—bass. This may seem more daunting, but many of the same techniques apply—I’ll mention a few quick items that would be specific to the big box. While the dynamic mics I mentioned above might work fine (especially on stage), a good large-diaphragm condenser would be appropriate in the studio, to capture the high end and air of the acoustic instrument as well as the lows. On stage, the relatively low acoustic volume of the instrument may preclude more distant mic positioning, but you can wedge a small (pencil-type) mic into the bridge, with appropriate foam padding, and this, surprisingly, can often provide excellent sound and much better isolation.
Fig 6 An upright bass with a mic wedged into the bridge, for better isolation in noisy environments (courtesy of DPA Microphones).
Most upright players (at least the ones who gig regularly) will also have a pickup installed, and once, again, the combination of mic (depth, air) and pickup (midrange punch and growl) can be a winning combination.
And on that (low) note, I’ll wrap up. While many bass parts nowadays are probably laid down with samples and synths, by keyboard players and guitarists, what you’ll get from a real bassist is more than just his sound, it’s the magic in his fingers, and his bass-players’ sense of just what to play to perfectly complement the song—it’s certainly worth a little extra effect to take advantage of what the true masters of the low-end have to offer.
Learn about producing bass lines in this video course HERE.
How to Get a Kick-Ass Acoustic Guitar Recording – Audio Issues
There’s a difference between getting a shimmering acoustic guitar recording versus recording a powerful rock electric guitar.
Recording acoustic guitar requires a totally different method than recording the electric guitar. That’s why this following article has a combination of different tips and techniques to try out when you’re going for that shimmering sound of a warm acoustic.
The Simple Secrets Behind Recording Acoustic Guitar (And Everything Else for That Matter!)
You’ve probably heard an acoustic guitar recording a hundred times before.
You know what it sounds like.
But have you ever wondered how each part of the instrument makes up the sound you hear when somebody is playing it? The brilliance of the strings, the resonance of the wood, and the amplification of the body all contribute to what you perceive to be an “acoustic guitar sound.”
That’s what you have to keep in mind when you point your microphone and start recording. Your microphone is going to pick up the certain characteristic of the area where you point, so getting the best soundscape possible into your microphone is your best bet for a great acoustic guitar recording.
And this doesn’t only apply to acoustic guitars, but all instruments.
Pre-Production
First things first. A crappy sounding guitar is always going to sound like a crappy sounding guitar. If you’re serious about recording acoustic guitar, then make sure you have an instrument worth recording.
Before you even start recording your acoustic guitar, do the following two things. I’m not kidding. If you don’t do this, then your acoustic guitar will suffer for it.
I’ll wait.
Re-string your guitar – If you’re recording an acoustic that has had the same old strings for the last two years, they’re going to sound dull and muffled. All the high-end is lacking, and that sheen of brilliance has gone and is never coming back. Restring it, and suddenly the instrument will come back from the dead. Some people like old, dead strings but I don’t recommend it. You can always cut a little brilliance from your recording during mixing, but you’ll never add brilliance to an already dead sound.
Tune your guitar – Do I really need to say this? Before you start recording guitar, please tune it. And if you’re working with a capo, make sure to tune the guitar with the capo on. Some capos tend guitar a little sharp or flat so tuning with the capo on is recommended.
Different Characteristics of the Acoustic Guitar
The acoustic guitar can “roughly” be divided into three different sonic spots.
1. The Highs
Pointing a microphone by the first frets will capture the high-end of the strings. Since most of the body of the instrument comes from, well…the body, a microphone placed at the first fret will sound brilliant but lack everything else. Don’t underestimate the advantage of capturing the string sound. In combination with other microphones, it can sound quite good.
2. Low-End
A microphone too close to the soundhole will produce a boomy sound, which is usually unusable. Additionally, a microphone pointing at the back of the guitar will also have some low-end character.
3. Mids and body
A microphone placed midway between the end of the body, and the strings will produce a sound with a lot of middle range. Sometimes this is desirable, especially in conjunction with a string microphone to get a full sound, even in stereo, but it can also be a little too mid-range-y.
The Three Steps to Getting a Great Guitar Recording
It’s easy really. That’s why this part of the article is quick and simple for you to digest:
Make sure you get the right instrument that sounds best for the job. Pick the best microphones you have that you think will work. If you only have one microphone, that’s the best one for the job. You’ll just need to move it around a little more to get the best sound out of your instrument. Take some time to move the microphones around to get the best mic placement.
Use the First Fret Trick for a Brilliant Acoustic Guitar Recording
When you’re doing an acoustic guitar recording, you’re going to want the most out of your full-bodied instrument.
The nature of it being an acoustic instrument means that you will need some fairly capable mics if you want to capture the whole sound of the acoustic guitar – Everything from the deep lows to the bright highs.
A great way to record an acoustic is with either an X/Y stereo pair or with the M/S microphone technique.
X/Y Stereo Technique
The X/Y technique is one of the simplest stereo recording techniques out there. It’s simple to use and hard to screw up. The X/Y technique uses two condenser microphones touching each other at a 90-120° angle.
By keeping them as close to each other as possible you reduce any phase difficulties, resulting in a pleasant stereo sound.
The M/S Technique
The middle side (M/S) technique is a different type of coin- cident pair technique. It combines two different types of mi- crophones and some after the fact processing to make the performance into stereo.
We still need two condenser microphones, but one of them needs to have a gure eight pattern.
The cardioid microphone is used as you would normally mike up an instrument. Place it like you were only using one microphone, at the spot where the instrument sounds the best. Once you’ve found the sweet spot for that microphone, it’s time to place the bi-directional microphone. The bi-directional one is used as a room mic that picks up everything that’s going on around the instrument.
The M/S technique works well if you are recording in great sounding rooms. Since the bi-directional microphone picks up the room sound, it’s most advantageous for the final sound if that room sound is good.
After setting up the mics like this, there are a few studio tricks you need to do in order to get a stereo sound.
Once you have a good level inside your DAW with both microphones recording at the same time, follow these steps:
Make sure you are listening in mono while you do this. Most DAWs have a way of switching into mono. Create an Aux Track and send the bi-directional micro- phone track to it via a post-fader send. Insert an EQ or a plug-in that has a phase switch and ip the phase on the aux track. Solo both the bi-directional microphone and the aux track and pan both of them dead center. If you have a post-fader send to the aux track that has its phase ipped; you shouldn’t be hearing any sound coming from either channel. Flip your DAW back to stereo. Pan one of the tracks hard left and the other hard right while keeping the cardioid microphone in the center.
Now you should have the same stereo image panned hard left and right with the cardioid condenser picking up the center. The cardioid mic picks up all the attack and body of the instrument while the bi-directional microphone picks up the room sound.
How to Record at Home: Recording Acoustic Guitar In Mono and Stereo With Condenser Microphones
In this supplemental video you’ll hear the various differences in miking techniques using a condenser microphone to record acoustic guitar. In addition, I’ll show you exactly how to route your recordings for a wide and spacious M/S stereo recording.
Sparkling Highs
Even though all those techniques are perfectly valid and are often enough to capture your acoustic, sometimes there is a little lacking in the sparkling brilliance section.
Sparkling brilliance is the intricate sound from the nuances of the strings. It’s the crystal clear highs of the top strings and the relationship between the frets, strings and finger work.
If a guitarist is playing very gracefully, with all of his finger movements perfect, you might want to capture those subtleties. Try the first fret trick the next time you are dealing with such an acoustic guitar recording.
This technique is also great if you want to capture some of the brilliance of the strings, for an added high-end sheen.
The First Fret Trick
1. Get a small condenser with a great frequency response in the higher frequencies and place it near the 1st fret. If your guitarist is using a capo, then place it on the first fret after the capo.
2. By using a bright condenser mic on the first fret, you capture all the highs and details that the strings generate. Move the microphone closer or farther depending on how close you want the sound.
3. Try angling the mic to pick up more of the higher strings if you want a brighter sound. A few inches here and there might make it sparkle a bit more. You might get that extra brightness you need.
4. Left alone, it has a pretty bodiless sound since this microphone only captures the string noise. But added together with either an X/Y technique or an M/S, it can give added depth and brilliance to an otherwise normal-sounding guitar.
5. Also, try it alongside a normal condenser that’s pointed at a sweet spot somewhere else on the body. Having a large condenser pointing towards the sound hole, or just at the 12th fret will fill out the frequencies that the first fret condenser is lacking.
See if this trick will get you a little closer to that magical acoustic guitar sound you hear in your head. Recording acoustic guitar isn’t easy, so I hope you are willing to experiment with different techniques until you find the sound you are looking for.
Top Ten Tips for a Great Acoustic Guitar Recording
Since it’s an acoustic instrument – as opposed to a plugged-in electric one – there are a few different techniques that you need to keep in mind when tracking an acoustic. Read on for my top ten recording tips for an easier acoustic experience.
1. Use a condenser microphone
Condenser microphones are more suitable for recording acoustic guitar than the dynamic microphone. The sensitivity of the condenser helps capture the sound of the acoustic guitar as accurately as possible.
2. Avoid too much bass
It’s a common misconception that the best sound from the acoustic guitar is captured at the sound-hole. Normally, a microphone pointed at the sound-hole results in too much bass.
3. Be aware of the sweet spot
The sweet spot is at the 12th fret, normally where the neck joins the body of the acoustic guitar. Recording acoustic guitar with a microphone pointed at the sweet spot usually captures a good blend of highs, lows, and mids.
4. Use New Strings
New strings are a must if you want to record a clear and brilliant acoustic guitar. No amount of mixing is going to fix an acoustic guitar with old and worn strings. However, brand-brand-brand-new strings might be a little bit too brilliant so make sure you strum the guitar for a few hours to let the sound sink in.
5. Record Direct
If you are looking for an alternative sound and your acoustic guitar has a plug, it might be a good idea to record direct. Just plug your guitar into a DI box and use some of the great guitar recording software that’s available to spice up your acoustic guitar sound. I’ve also found using an amp simulator can give you a really different acoustic rock guitar sound.
6. First Fret Brilliance
To capture the delicate sound of the string a microphone placed at the first fret can pick up the intricacies of the strings. This can bring a whole new dimension to your acoustic guitar sound.
7. Record in Stereo
Recording acoustic guitar in stereo will capture a much fuller and wider sound than only using one microphone. Using the X/Y technique is the easiest technique to get a wide and spacious stereo acoustic guitar recording.
8. Double-track with different mic techniques
If you are double tracking the same guitar part for added depth, try experimenting with different microphone techniques. Not only will it give your guitar parts added depth by double-tracking, but the difference in sound might create some interesting textures.
Beware of phase issues during mixdown if you go this route. Combining all these different signals might cause phase issues so keep an ear out for any weird thinning of the sound when you combine the tracks.
9. Use ribbons for a different sound
Ribbon microphones, if you have access to them, can give your acoustic guitar sound a smoother and different sound than recording with a condenser.
10. Subtle position changes nail that perfect sound
The way recording works is that even the slightest microphone change can affect the sound. By just subtly changing the position or direction of the microphone you can find that perfect acoustic guitar sound you are looking for.
How to Easily Produce a Kick-Ass Guitar Recording
I bet you’re a bit like me when it comes to producing guitars: You obsess over how they sound and want to make sure they’re the best they can be. You want a shimmering acoustic guitar and powerful rock guitars.
When I was playing hard rock as a teenager, I obsessed over getting those thick, distorted guitars I heard from Tool, A Perfect Circle, 30 Seconds to Mars and Deftones. Or the incredibly distorted lead guitar tones from In Flames or Soilwork. Those octave chords were so distorted but still so clear in the mix. It baffled me, and I’m sure you understand the feeling if you’ve ever tried to recreate those tones in the studio.
Today, I record a lot of acoustic guitars, and it’s the same obsession all over again. The clean acoustic guitar tones from all those classic rock bands of the ’70s, that’s what I’m hunting for now. The strumminess of the multi-tracked acoustic guitars from The Traveling Wilburys. The pristine fingerpicking of Simon & Garfunkel.
Guitar sounds are quite the obsession, wouldn’t you agree?
Now, I’m not sure if this next part is for you, but I wish I had somebody who taught me the shortcuts of guitar production when I was starting out. I’m sure most people would.
That’s why I’m happy to share with you a new course from Mark Marshall, all about Producing & Recording Electric Guitar.
You’ll level up your guitar tone, recordings, and productions with over 9+ hours of in-depth training on all aspects of electric guitar.
There are a ton of variables that can impact the tone and quality of your guitar recordings — from setup, guitar type, string gauge, amps, and pickups, to processing, effects, miking and more. In this course, you’ll not only learn about guitars, effects, microphones and recording techniques, but also how to effortlessly create awesome and unique guitar tones to take your productions, recordings, performances, and mixes to the next level.
If you’re a guitarist looking to greatly expand your knowledge and learn what they don’t teach you in guitar lessons and music school, this course is for you.
If you’re an audio engineer or producer who knows the value of expanding your musical toolkit and wants to learn the building blocks of all things guitar, this course is for you.
Increase your confidence in creating great guitar tones from scratch
Learn about popular mics, amps, and guitar recording techniques
Learn essential EQ, Compression and gain staging techniques
Discover specific processing chains used in various styles of music
Learn the hardware and software variables that affect your guitar tone
Explore the sonic and technical differences between various effects
Learn tips and tricks for getting the most out of software & amp simulators
Learn how to get classic guitar tones by The Beatles, Bowie & more
Confidently choose the best guitar, amp and effects depending on your goal
Explore the differences between various guitars, bridges, capos & more
Learn tips, tools and tricks for getting a wide range of different guitar tones
Two Special Bonuses for Audio Issues Readers:
Because you’re an Audio Issues reader, I’m putting together two exclusive bonuses for you if you buy through my link.
Free Bonus #1 – Acoustic Guitar Recording Strategies: A crash course in acoustic instrument recording
Mark Marshall’s course focuses on electric guitar, but I didn’t want you folkies who focus on the acoustic guitar to go wanting.
That’s why I’m giving away my Acoustic Guitar Strategies video masterclass.
In this video, we compare four different acoustic guitars to find the one for the job. Also, I show you various microphone techniques and how the acoustic guitar sounds depending on where you point the mic. Finally, we conclude with some simple stereo mic techniques. Best of all, many of the methods in the acoustic guitar video are readily applicable to many other acoustic instruments.
Here’s what you’ll learn:
What you can learn from listening to four different acoustic guitars and how they would work in different genres of music
Where to point the microphones when you want more mids, body, low-end or string sound
How the “sweet spot” earned its name as the best starting point for recording acoustic guitars
Why you would want to try an unorthodox technique like miking the guitar by the guitar player’s ears
The easy “no-phase-worry” technique for recording stereo acoustic guitar
How to make sure you get your microphones in phase whenever you use a spaced pair (for guitar or any other instrument for that matter).
Free Bonus #2 – Quick Guitar Tips for a Cooler Guitar Production
In addition to the acoustic guitar strategies video, I’m also throwing in my Quick Guitar Tips video that teaches you some quick mixing tips to enhance your guitar productions.
Here’s what you’ll learn:
How to use modulation to create subtle depth in guitar lines
How to use delays and panned reverbs to add space to solos
How to EQ the guitar to find its character frequency and make it sit with other instruments
All you have to do to get these free bonuses is to get your copy of the Producing & Recording Electric Guitar through my link before Friday, and then email me your receipt.
How would you feel if you knew exactly how to produce the guitar sound you have in your head?
If that’s the feeling you want, what happens next is you grab Producing & Electric Guitar right now and start creating killer guitar productions for yourself and all of your guitar playing clients.
Enjoy!
Björgvin
Principles of micing acoustic bass guitar
The issue here, to me, is a definitional one.
When I think of fretless BG, in my head I “hear” Jaco’s tone, touch, phrasing, or maybe Alain Caron’s if I’m thinking about a more processed contemporary musical setting.
When I think slap/funk jazz bass, I “hear” Marcus Miller or Stanley Clarke in my head.
When I think DI’d articulate jazz upright, I “hear” Ron Carter, or Eddie Gomez in my head.
On the other hand, when I think “dark, full, profound, jazz upright so deep that you just know that this is what is below the infinite progression of the philosopher’s stacked turtles,” I “hear” Charlie Haden.
…etc…
I think that acoustic bass guitar lacks an iconic tone model, because, to my knowledge, there has not been one or several figures of towering talent and undeniably distinctive acoustic bass guitar voice who has created music so compelling that we think “Now, that is what an acoustic bass guitar is supposed to sound like!”
Maybe I’m wrong, and I’d be very happy if you were to point me to such a transformational genius that I might have missed (and I’m quite serious about that; please do).
Short of that, can you point us towards any recordings of acoustic bass guitar playing that you really like and want to emulate? (And there have been some fine recordings; I’m not saying that there haven’t been.) If you tell us what you like and want, perhaps we’ll be able to take a listen and guide you towards achieving that sound world.
Or, perhaps, you are ambitious and want to find your own sound that is unlike any role models (and maybe even become a role model yourself); if so, experimentation will be the key, along with introspection and getting feedback (verbal or written, not amplified) by using “your” new sound in musical situations in order to guide your search.
Personally, out of my cheap and not very good acoustic bass guitar, I aim for “clear, full, solid, yet crisp and acoustic sounding, with a sense of the space that the guitar is in.” About like an excellent baritone guitar (listen to the Pat Metheny baritone tracks discussed here a few weeks ago), only deeper. I haven’t really gotten that sound yet (and probably never will until I get a better instrument), but at least I have some idea of what I like and what I am aiming for.
So you have finished reading the how to record acoustic bass topic article, if you find this article useful, please share it. Thank you very much. See more: double bass mic, micing a double bass, best condenser mic for bass, double bass pickup or microphone, direct upright bass sound, upright bass di box, ribbon mic on upright bass, u87 on upright bass