
You are looking for information, articles, knowledge about the topic nail salons open on sunday near me how to gravel vac a shrimp tank on Google, you do not find the information you need! Here are the best content compiled and compiled by the Chewathai27.com team, along with other related topics such as: how to gravel vac a shrimp tank how to clean a shrimp tank, how often to clean shrimp tank, how to vacuum shrimp tank, gravel vacuum shrimp tank reddit, shrimp tank maintenance, shrimp poop aquarium, how to clean shrimp poop in tank, how to clean tank with baby shrimp
Contents
How do I change the gravel in my shrimp tank?
Place the gravel into the bucket. Fill the bucket with tap water. The water should completely cover the gravel. Stir and move the gravel around (use a stick if necessary).
How often should you clean a shrimp tank?
If you see your shrimp swimming all around the tank like fish after a water change, this means that they are not happy with the new water you have added. With that said, is important to do water changes at least once a week to avoid a buildup of waste (two 30 percent changes each week is better than one 50% change).
Should you clean shrimp poop in aquarium?
The dirt on the bottom itself doesn’t need to be cleaned up often at all, and cleaning under rocks isn’t really necessary, to me. Silt/dirt can help sustain good bacteria in the tank. Another possibilty is that your tank may have too many shrimp in it (how many are there?), or they’re being given too much food.
Can you have shrimp on gravel?
For Neocaridina shrimp tanks, you can use any kind of fish tank gravel or sand you please, but sand will build-up less debris than gravel will. When it comes to selecting aquarium sand, we actually like to recommend using pool filter sand.
Is gravel vacuuming necessary?
Along with installing the proper filtration systems to maintain water quality, it’s also important to clean the gravel at the bottom of your tank to keep conditions healthy for your fish. The simplest way to carry out this procedure is by using a gravel cleaner, or gravel siphon.
How often should gravel be changed in aquarium?
If you have a healthy and well-balanced fish tank, you may be able to go for several months without cleaning the gravel. However, even with a highly efficient tank, it is a good idea to clean gravel at least once every two to three months.
How do you clean shrimp?
Using a small paring knife, cut a shallow incision along the top of the shrimp all the way down to the tail. Use the tip of the knife to lift out the vein in the shrimp. Discard the shells and veins. Rinse the shrimp with clean water, if needed, and rest them on a paper towel to dry.
Shrimp Tank Maintenance (Full Cleaning) – YouTube
- Article author: www.youtube.com
- Reviews from users: 32336
 Ratings
 - Top rated: 4.4
- Lowest rated: 1
- Summary of article content: Articles about Shrimp Tank Maintenance (Full Cleaning) – YouTube Updating …
- Most searched keywords: Whether you are looking for Shrimp Tank Maintenance (Full Cleaning) – YouTube Updating This is what i do when I really want to get down clean and touch up my shrimp tanks. Takes a little time but it’s worth the effort when you start to see so m…breeding cherry shrimp, soo shrimp breeders, shrimp tank maintenance, aquarium cleaning, aquarium shrimp, cherry shrimp
- Table of Contents:

Using A Gravel Cleaner In A Shrimp Tank – YouTube
- Article author: www.youtube.com
- Reviews from users: 32102 Ratings
- Top rated: 4.7
- Lowest rated: 1
- Summary of article content: Articles about Using A Gravel Cleaner In A Shrimp Tank – YouTube Updating …
- Most searched keywords: Whether you are looking for Using A Gravel Cleaner In A Shrimp Tank – YouTube Updating In this video I will be demonstrating using the cheap DIY gravel cleaner that I made in the last video: https://www.youtube.com/watch?v=_KEQvN0KRe8. This hel…Shrimp, nano, gravel cleaner, aquarium, fish tank, syphon
- Table of Contents:
Shrimp / Fish Tank Substrate / Gravel Siphoning / Cleaning – YouTube
- Article author: www.youtube.com
- Reviews from users: 29328 Ratings
- Top rated: 3.7
- Lowest rated: 1
- Summary of article content: Articles about Shrimp / Fish Tank Substrate / Gravel Siphoning / Cleaning – YouTube Updating …
- Most searched keywords: Whether you are looking for Shrimp / Fish Tank Substrate / Gravel Siphoning / Cleaning – YouTube Updating http://www.cflaquatics.comStep by step video on how to properly siphon the substrate in your aquarium. After siphoning your substrate you will need to add in…Shrimp, Substrate, Siphon, red, yellow, freshwater, neon, yellow shrimp, Fish, Blue, aquarium, water, how to, guide, clean, gravel, sand, moss, java moss, driftwood, rocks, siphoning, saltwater, tank, fish tank, tube, bulb, bucket, clip, large, small, dwarf, Neocaridina (Organism Classification), davidi, Heteropoda (Organism Classification), snail, micro sword, aquascaping, water change, cleaning
- Table of Contents:

How to Change the Substrate in the Tank – Shrimp and Snail Breeder
- Article author: aquariumbreeder.com
- Reviews from users: 48187 Ratings
- Top rated: 3.1
- Lowest rated: 1
- Summary of article content: Articles about How to Change the Substrate in the Tank – Shrimp and Snail Breeder Updating …
- Most searched keywords: Whether you are looking for How to Change the Substrate in the Tank – Shrimp and Snail Breeder Updating Different ways of how to change the substrate in the tank step-by-step, pros and cons, and what we can do to increase the chances of doing it successfully.Changing the substrate in the tank is one of the most dreadful and stressful experience not only for the fish and shrimp but for the…
- Table of Contents:
What are the Beneficial Bacteria in the Tank
What is a Mini-Cycle in the Tank
How long does mini-cycle last
Where Does Beneficial Bacteria Live
Two Ways of Changing the Substrate in the Tank
Preparation Tools
Preparation Tips
Changing the Substrate in the Tank
When should we add our pets back
Can We Change the Substrate without Quarantine Tank
Can I use Old Water After Changing the Substrate
Bottle Trick with Sand
Trick with Active Substrates for Shrimp Tanks
In Conclusion
ABOUT ME
LEGAL INFO

How To Clean A Shrimp Tank? – Acuario Pets
- Article author: acuariopets.com
- Reviews from users: 47101 Ratings
- Top rated: 3.5
- Lowest rated: 1
- Summary of article content: Articles about How To Clean A Shrimp Tank? – Acuario Pets Most people recommend using a gravel vacuum to clean a shrimp tank. However, you can use a power filter or airline … …
- Most searched keywords: Whether you are looking for How To Clean A Shrimp Tank? – Acuario Pets Most people recommend using a gravel vacuum to clean a shrimp tank. However, you can use a power filter or airline … Cleaning a shrimp tank can be pretty easy and hard at the same time. If you know the basics, the job gets pretty easy. However,…
- Table of Contents:
How to Clean Shrimp Tank
How to Gravel Vacuum a Shrimp Tank
Airline Tubing
How to Clean Tanks with Baby Shrimps
What Effects The Cleanliness Level of The Tank
How Often To Clean Your Tank
Conclusion
About Me
LEGAL INFORMATION

How to vac or clean bottom of shrimp tank?? | Shrimp and Crab Forum | 464270
- Article author: www.fishlore.com
- Reviews from users: 12350 Ratings
- Top rated: 3.0
- Lowest rated: 1
- Summary of article content: Articles about How to vac or clean bottom of shrimp tank?? | Shrimp and Crab Forum | 464270 So as some of you know I am trying some shrimp tanks. … I am just going by something richiep sa and don’t gravel vac my shrimp bowl. …
- Most searched keywords: Whether you are looking for How to vac or clean bottom of shrimp tank?? | Shrimp and Crab Forum | 464270 So as some of you know I am trying some shrimp tanks. … I am just going by something richiep sa and don’t gravel vac my shrimp bowl. So as some of you know I am trying some shrimp tanks. My question today is how some of you clean up bottom of tank and vac w shrimpletts. I have put filter…
- Table of Contents:

How To Clean Shrimp Tank Substrate | Shrimp Science
- Article author: www.shrimpscience.com
- Reviews from users: 38565 Ratings
- Top rated: 4.8
- Lowest rated: 1
- Summary of article content: Articles about How To Clean Shrimp Tank Substrate | Shrimp Science How often should you vacuum? … There isn’t a rule to determine how often you should gravel vac, it’s different for every tank. Generally, if you’d like to clean … …
- Most searched keywords: Whether you are looking for How To Clean Shrimp Tank Substrate | Shrimp Science How often should you vacuum? … There isn’t a rule to determine how often you should gravel vac, it’s different for every tank. Generally, if you’d like to clean … Learn how to keep your shrimp tank substrate clean, get tips for vacuuming the gravel, and learn why you might want to start doing a gravel vac every so often
- Table of Contents:
How to gravel vac
Why vacuum the gravel
How often should you vacuum
Contents

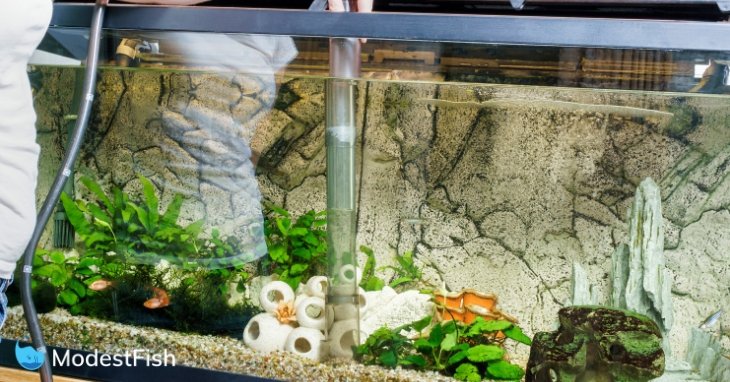
Best Aquarium Vacuum Cleaners Tested & Reviewed (2022)
- Article author: modestfish.com
- Reviews from users: 1848 Ratings
- Top rated: 3.6
- Lowest rated: 1
- Summary of article content: Articles about Best Aquarium Vacuum Cleaners Tested & Reviewed (2022) The gravel tube is attached to a gun-like … great on my 40 gallon shrimp tank, … …
- Most searched keywords: Whether you are looking for Best Aquarium Vacuum Cleaners Tested & Reviewed (2022) The gravel tube is attached to a gun-like … great on my 40 gallon shrimp tank, … I’ll walk you through and review the 5 best types of gravel vacuums: standard, long, mini, self-priming, and battery powered so you can pick the best one
- Table of Contents:
1 Aqueon Aquarium Gravel Cleaner Large (Best For Tanks 40 Gallons+)
2 Fluval Easy Vac Gravel Cleaner (Best For 30 Gallon+ Planted Tanks)
3 Hygger Aquarium Gravel Cleaner (Best for Heavily Planted Tank)
4 LL Products Gravel Vacuum for Aquarium
5 Python Pro-Clean Gravel Siphon Kit with Siphon Squeeze (Best DurableHeavy Duty Option)
6 Lee’s Regular Economy Gravel Vacuum (Best Budget Option)
Which Gravel Vacuum Is Best
How Were the Gravel Vacuums Tested
Do You Really Need a Gravel Vacuum
Parts of a Gravel Vacuum
How To Use a Gravel Vacuum
Do You Need a Gravel Vacuum if You Don’t Have a Gravel Substrate
Leave a ReplyCancel Reply
Recent Posts
Disclaimer
Amazon Associates Program
See more articles in the same category here: Chewathai27.com/toplist.
How to Change the Substrate in the Tank
Changing the substrate in the tank is one of the most dreadful and stressful experience not only for the fish and shrimp but for the hobbyist as well. If you have had the ‘pleasure’ of doing it before, you can understand the scope of potential problems it can cause and why we often keep putting this off.
Unfortunately, lots of people do not understand that changing the substrate can disrupt the nitrogen cycle in the tank or put it through a mini-cycle as the bacterial levels build up again.
In this article, I will talk about different ways of how to change the substrate in the tank step-by-step, pros and cons, and what we can do to increase the chances of doing it successfully.
However, before we jump into discussions, I need to start off with some basic explanations regarding beneficial bacteria and ‘mini’ cycles. It can be especially helpful for those who are new to this hobby.
What are the Beneficial Bacteria in the Tank?
Ammonia is released by fish, shrimp, snails, etc. as waste products, which produce ammonia. Beneficial bacteria are used to cycle our tank because these bacteria eat ammonia and nitrites products. So, the accumulation of high concentrations of ammonia and nitrites, which is toxic to fish and other aquatic organisms, is prevented by nitrifying microorganisms (Beneficial bacteria). This is called a nitrogen cycle.
Basically, the nitrogen cycle is THE MOST important process in the aquarium. It refers to the establishment of beneficial bacterial colonies. Therefore, our goal is to keep it as stable as possible.
There are many species of beneficial bacteria but all of them can be divided into two main categories:
Nitrosomonas sp. AOB (Ammonia Oxidizing Bacteria,) that converts our ammonia into nitrites.
nitrates NOB (Nitrite Oxidizing Bacteria, Nitrospira ) that converts our nitrites into
However, sudden and big changes in the tank can disrupt this cycle, and harm the beneficial bacteria. Depending on how badly those beneficial bacteria were hurt, we can have a so-called mini-cycle, or in the worst-case scenario, even the cycle crash.
Read more about it in my article – Everything about Beneficial Bacteria in Aquariums.
What is a Mini-Cycle in the Tank?
Mini-cycle (also know as New tank syndrome) is the result of an insufficient amount of beneficial bacteria compared to the existing bioload in the tank.
We can often see mini-cycles in newly set-up aquariums when they are caused during the introductory phase by adding too many fish at once.
That is why it is never recommended to fully stock the tank right after the cycling process. We have to keep in mind that the tank is not established and that the bacteria colony is not large enough yet to consume a lot of bioload.
Although in a well-established tank it is a lot harder to cause these mini-cycles to occur, it can still happen if we remove some part of nitrifying bacterial colonies from the tank.
How long does mini-cycle last?
In most cases, mini-cycles last anywhere from a few days to a few weeks. Mini-cycling is different for each tank, just like cycling.
Where Does Beneficial Bacteria Live?
There are two popular misconceptions regarding beneficial bacteria:
They exist in the water column of the tank. This is wrong. They exist in the filter of the tank. This is also wrong to some degree.
Beneficial bacteria attaches itself to any surfaces throughout the aquarium, it is on the décor, live or fake plants, driftwood, rocks, tubes, heaters, glass, substrate, and, of course, in the filter of your tank.
Every other surface you may have within your aquarium targets for bacterial growth.
Although it is true that the majority of your bacteria is living in your filtration system, it does not always mean that it can be enough to handle all the bioload in the tank by itself.
The substrate also covers a huge portion of the tank, therefore, changing the substrate in the tank can be detrimental to the aquarium’s bacterial colonization because it is going to be a big hit to the nitrogen cycle.
Two Ways of Changing the Substrate in the Tank
Changing the substrate is a very debatable topic. Even though everybody does it their own way, there are 2 main techniques of doing it:
1. Partial substrate change.
This method is often used with large tanks, or when it is not possible to relocate the livestock. Therefore, people change 1/3 or ¼ of the substrate once every week.
PROS CONS Suitable for any tank The process may last for weeks Safer Very messy Does not require a holding tank Very stressful for the fish
2. One-time substrate change.
This method cannot be used in all tanks. The main advantage is that it can be done in one hour with good preparation.
PROS CONS Suitable for small to medium sized tanks Risky Fast Requires a holding tank Less messy Stressful for the fish
Preparation Tools
To change the substrate, you need to have a plan and a checklist of materials you need.
New substrate (Sand, gravel, soil, or dirt)
Quarantine or holding tank (large enough to keep all your fish, shrimp, snails, etc.).
Aquarium water buckets or canisters.
Buckets with dechlorinated water.
Nets.
Large sieve.
Buckets for the old substrate.
Scoop or small dustpan to remove the old substrate.
Spray bottle.
Tweezers.
the Python water changer Siphon (for example,(link to check the price on Amazon).
Seachem Prime Seachem Stability Water treatment (for example,, or similar products).
Preparation Tips
Whenever it is possible, install the second filter in the main tank 2 weeks before that. This time will be enough for bacterial colonization. Consider it as your safety net. Do not feed fish the day before you decide to change the substrate. It will reduce the amount of waste produced in the quarantine or holding tank. Do not change the substrate in the tank in the evening. If anything goes wrong, it will be harder to fix. Make sure not to clean filter sponges or other filtration components at the same time! It will reduce the amount of beneficial bacteria. Even more, I would not recommend cleaning it at least 2 weeks before that as well. Prepare your new substrate. It must be clean and free from any detritus. If you do not do that, expect to have milky water for weeks!
Important: We can often see that the substrate is marketed as “pre-rinsed” or “pre-cleaned” by manufacturers. DO NOT trust them. Even though the substrate itself can be clean, their bags often contain dust, debris, grit, or other residues from the workshop it was packaged in. We do not want any of that in our tanks.
How to Prepare Sand for a Tank
If you forget to rinse your sand, your tank can turn into an uninhabitable cloudy mess. It’s normal for sand to take some time to settle to the bottom of a tank. However, it will take way longer for the sand to settle if you forget to rinse it.
When I was a beginner trying out sand, I made the mistake of not rinsing my sand before adding it to the tank. My sand never settled naturally and I ended up removing it entirely to try again.
The rinsing process to clean sand is really easy.
First, you take your sand and sieve it into a bucket.
Next, fill the bucket with water. Go ahead and pour out the water. The water should start out cloudy and gradually become cleaner as you continue to rinse the sand.
Be careful not to lose your sand during the rinsing process.
Repeat the process by adding and dumping water until the water starts running out clear.
Important: When you think that sand is absolutely clean – rinse it again! I am completely serious. Sand has lots of tiny detritus particles. This is not funny to have sand-storms in the tank.
Depending on how much sand you have, it usually takes from 15 minutes to 1 hour.
How to Prepare Gravel for a Tank
Place a sieve, over the bucket, and fill it half full of gravel.
Start pouring water over the gravel in the sieve, while gently shaking it. Do it until the water runs clear and you are satisfied with the result.
Place the gravel into the bucket.
Fill the bucket with tap water. The water should completely cover the gravel.
Stir and move the gravel around (use a stick if necessary).
Leave it in the bucket for 5 – 10 minutes. It will soften up any dust and debris that may be on the gravel.
Note: If you have some serious doubts regarding the gravel or you picked it yourself (do not do that!), use a bleach. Mix bleach and water in the proportion of 1:10. Do not soak gravel in bleach more than 15 minutes, it may start breaking due to the chemical reaction. Rinse the gravel several times with tap water to make sure all the bleach be washed away.
How to Prepare Soil for a Tank
First of all, you need to do your research because some products can leach ammonia. Therefore, before changing the substrate in the tank, we have to get rid of it.
Place the soil into the buckets.
Fill the buckets with tap water. The water should completely cover the soil.
Rinse it in the buckets. Stir in very vigorously! Ideally, you need to do it at least 2 times a day because ammonia concentrates in the lowest section of the substrate.
test kit (see the price on Amazon) When yourreads 0, you need to wait at least 1 week before using it. (Keep stirring it at least 1 time a day).
For example, if you check my article “Top 5 Substrates For Planted Aquariums” you will see that many products leach ammonia.
Changing the Substrate in the Tank
Once everything is ready and all preparations are done, it is time to actually change the substrate in the tank.
Drain half of the water into your buckets. Take out driftwood, rocks, decorations from the tank and place them in the buckets with the aquarium water. Remove your fish, shrimp, snails, etc. to the quarantine or holding tanks. Cover the quarantine tank with a blanket to reduce the stress of your pets. Move your filter to the buckets with the aquarium water. Move plants to the buckets with the aquarium water.
Note: If there are many small fish and/or shrimp in the tank, we might have to remove plants before removing the animals. It can be close to impossible to catch them in the plants. The problem, though, it will make water cloudier, making them also hard to catch. Vacuum the old substrate in the tank really thoroughly. Otherwise, it can turn the water really murky. Drain the rest of the water to other buckets. At this stage, there should be nothing left in the tank but the old substrate. Use a scoop or a small dustpan to remove the current substrate. If you see that the process takes more time when you expected. Use a spray bottle with the aquarium water (or dechlorinated water) to spray the inside walls of the tank. It will help beneficial bacteria to survive. DO NOT clean the inside walls of the tank! Add a new substrate to the tank. We are ready to start filling the tank with the water. Put something (for example, I use an ordinary plate) on the substrate to prevent any disturbance. Use new dechlorinated water to fill the tank. Add driftwood, rocks, décor. Move back your plants. Use tweezers if you need to root them. Install filtration and lighting. Add Seachem Stability (or similar products) to compensate for the loss of beneficial bacteria. Done
When should we add our pets back?
Check your water parameters for the next week before adding the animals. Depending on the substrate, it may leach ammonia even after it was at 0 in the bucket.
That is why it is very important that the quarantine or holding tank should be cycled as well! We never know how long we will have to keep them there. If it is not cycled, everything will die there.
Can We Change the Substrate without Quarantine Tank?
In some cases, people do not have another cycled tank to keep their fish for a week or more. What can they do?
Generally, you can only hope for the best that the filter has enough beneficial bacteria to avoid mini-cycle.
The algorithm of changing the substrate remains the same. Except that all animals should be put back in the main tank right after the process is done. In addition:
Cover the tank with a blanket to reduce the stress level.
Do not feed them this day.
water conditioner Use any(like Seachem Prime or similar) to bind ammonia and prevent any spikes.
water changes Regularly test your water to see if the cycle has crashed. You may have to do dailyto reduce nitrates, etc. in the tank.
Note : If you keep shrimp, big, and (or) frequent water changes can cause molting problems : If you keep shrimp, big, and (or) frequent water changes can cause
Larger tanks have more chances to avoid mini-cycles. The main advantage of the larger system is that the more water volume and the more surface area you have, the more forgiving it will be.
Can I use Old Water After Changing the Substrate?
People often use old water after changing the substrate. Is it reasonable?
I do not think so.
As I have already said, the water actually does not hold the beneficial bacteria so you do not need to keep it. The only reason to use it – because our animals are already acclimated to it. However, this argument is valid only for a short period of time.
Bottle Trick with Sand
This trick can be used only when we are partially changing the substrate in the established tank.
Take a plastic bottle and fill it with sand (about 2/3).
Submerge the bottle into the aquarium and let the water fill the rest of the volume.
Turn the bottle over and let the sand come out from the bottle exactly where you want it to be.
While the sand comes out, it is replaced by water. When water goes through the sand it rinses it and keeps all the detritus in the bottle.
Carefully remove the bottle with dirty water.
Trick with Active Substrates for Shrimp Tanks
Some shrimp species (mostly Caridina species like Crystal shrimp, Blue bolt shrimp, etc.) require active substrate. Active (buffered) substrate means that the substrate alters water chemistry (pH).
The buffering capacity of the water (KH) neutralizes the acidic soil.
Depending on how much of a buffering system in the water, the active substrate may last from several months to 2 years. Nonetheless, eventually, any active substrate stops being active and becomes inert.
In order to avoid the problem of changing the substrate, or at least make it simpler, some professional shrimp breeders use a bare bottom tank (or very thin inert substrate) with a large pot filled with active substrate.
Therefore, every time they need to remove or change the substrate in the shrimp tank, they simply take out the pot and replace it with another one.
If you decide to use this trick, DO NOT forget to prepare the soil beforehand! It may leach ammonia. In addition, you need to have some beneficial bacteria as well, otherwise, you may get a mini-cycle.
Although it may not look really nice. Nonetheless, it is efficient and it works.
In Conclusion
Changing the substrate in the tank can be a real pain, especially in large aquariums. If we do not do it the right way, the tank may take months to balance back out. It is a big job and I would not advise doing it without meticulous preparation.
How To Clean A Shrimp Tank? – Acuario Pets
Cleaning a shrimp tank can be pretty easy and hard at the same time. If you know the basics, the job gets pretty easy. However, if you don’t know what to do if there are shrimp babies in the tank, then cleaning can get pretty dangerous!
Most people recommend using a gravel vacuum to clean a shrimp tank. However, you can use a power filter or airline tubing to do the job.
Cleaning a shrimp tank can be a little tricky considering the hideous baby shrimps. So, you have to be careful and use some techniques to clean the tank without causing harm to the shrimps. I recommend you to read the whole article to know about the cleaning techniques properly.
How to Clean Shrimp Tank?
Most shrimp keepers once in a while come across this question. A clean tank means happy shrimps. And happy shrimps mean happy you!
Cleaning a shrimp tank can be quite a tricky task if you use a vacuum or your tank contains baby shrimps. So, you better follow some common ways to avoid getting unwanted problems.
You can use a power filter that comes with an intake covered with netting. It’s a good way of cleaning the water while preventing the shrimps from getting sucked in.
Gravel vacuuming is another option to clean the dirty gravels. Most of the shrimps’ leftover foods and poops gather around these gravels. However, you have to be careful with the shrimps.
Another option is the airline tubing. But this is best if there is not much dirt in the tank.
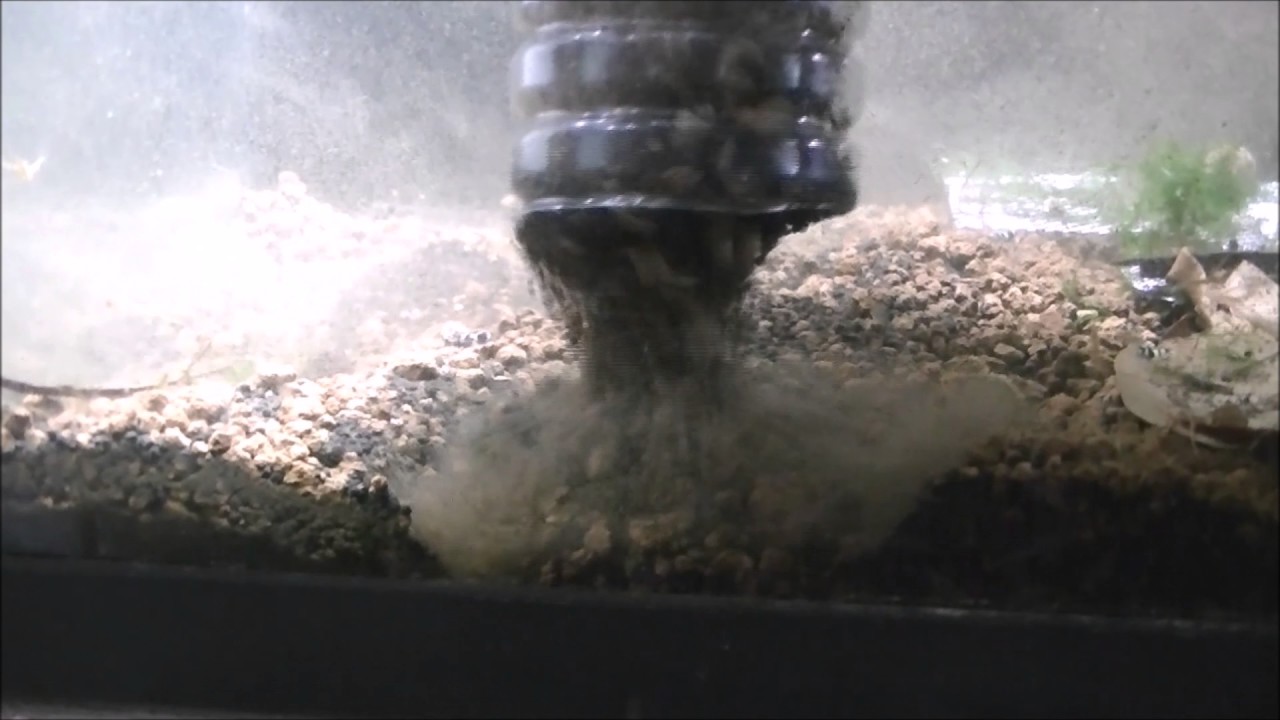
How to Gravel Vacuum a Shrimp Tank:
Gravel Vacuum is one way of cleaning your shrimp tank in case you get sudden TDS spikes. However, substrate vacuuming might cause some harmful things to release in the tank. So, there are some things you should maintain before vacuuming the gravel. Like:
Make some movements above the place to get your shrimps to move out of the way.
Make sure to hold the vacuum at least 1 inch up from the substrates so that you don’t release any bacteria cloud accidentally.
Continue doing this but focus only on small areas so that the shrimps don’t get sucked in.
After you are done, make sure to check the vacuum bag in case any of the shrimps were sucked in accidentally. If so, release them in the tank as soon as possible.
Airline Tubing:
Another way of cleaning the tank is an airline tubing. This only works for sucking out a small amount of dirt like shrimp wastes or leftover food.
Airline tubing can be a little hard considering the job it does. You can tie the airline tubing to a chopstick to move it easily. Also, the increased weight will help you with keeping the tube nearer to the bottom of the tank. Airline tubing is ideal if you are concerned about the baby shrimps getting hurt or releasing any bacteria cloud.
How to Clean Tanks with Baby Shrimps:
It’s always a great challenge to clean the shrimp tank while making sure that the baby shrimps don’t get hurt. Naturally, they are too small and too hard to notice. So, there are some things you should maintain while cleaning a shrimp tank with baby shrimps.
First of all, identify all the places where the shrimp babies are hiding. They like to hide in different places. So, give a quick scan to the whole place.
It’s very often that baby shrimps are sucked into the vacuum or whatever sucking device you are using to clean the tank. To avoid that, you can put a cloth on the mouth of the device. This technique has proven to be keeping all of the shrimp babies safe.
Baby shrimps can’t get away every time you change the water of the tank. So, in this case, you can use a bucket with a net to pour the water. In that way, the shrimps will get stuck in the net and you won’t have to worry about throwing any of them out. However, use a white bucket to identify if any of the little ones slip through the nets.
What Effects The Cleanliness Level of The Tank?
There are a number of factors that decide whether you should clean your tank or not.
One of the most important factors is how much food you give to your shrimps every day. More food technically means more wastes. Your shrimps don’t even need food every day! So, it’s recommended to give your shrimps food 3-4 times a week. A sufficient amount of food will keep the tank clean of leftover foods and poops.
The size of the tank plays an important role in how often you will have to clean it. A small tank will require frequent cleaning since the small spaces build up dirt easily. A big tank has a lot of space for the dirt to scatter around.
Plants can be a good idea if you don’t want to change the water very often. Plants are great in absorbing ammonia that lessens the nitrate in water. Hence, the water doesn’t require frequent change. Some of these plants are moss balls, anacharis, water lettuce, and duckweed. They are very easy to keep with a little maintenance. If you want to check out my safe plants list for shrimps, click here.
Some people have snails and other fishes to enhance the beauty of their tanks. But you should know that these are living beings who require food and release poop a lot. So, with these extra creatures, you will have to clean your tank more often.
How Often To Clean Your Tank?
Shrimp Tank is easier to maintain than most other fish tanks. You don’t need to clean those very often but you can maintain a timeline of cleaning different parts regularly.
The prefilter sponge should be cleaned once every 2 weeks and the filter once every month. You should change the water 2-3 times every 2 weeks depending on the amount of dirt and wastes.
These are only general times of cleaning different parts of the shrimp tank. The rest depends on your maintenance of the tanks and the factors mentioned above.
Conclusion:
I hope now you have got your answer to the question “How to clean shrimp tank”. While there are a number of ways to clean it, you should always pick the one that’s easier for you, less harmful for your shrimps, and is appropriate to clean the dirt.
How to vac or clean bottom of shrimp tank??
Well people sorry.I have removed the self starting valve from the vacuum and continue to deep vacuum tanks that have gravel just like it had no shrimp.A white bucket or three means I spend a long time catching shrimp and fry that take a free ride down the hose.I removed 26 BN pleco fry leaving another dozen BN fry from a 60 litre / 16 gallon tank today that has 40 odd endler fry with a few adult females and well over 500 shrimp. Do the maths / math 45 Bn pleco fry 500 shrimp 45 endlers . Seriously you have to get stuck in and clean the bottom of the substrate once in a while.yes I cleaned the one sponge filter but just looked at the box filter.Deep cleaning gravel is not something you need to do every month but when you do you have to get stuck in and clean to properly in my opinion.( edit yes I used the vacuum to transfer some of the 30 mm / 1.18 inch BN fry. and dumped half the old water back into the tank)
So you have finished reading the how to gravel vac a shrimp tank topic article, if you find this article useful, please share it. Thank you very much. See more: how to clean a shrimp tank, how often to clean shrimp tank, how to vacuum shrimp tank, gravel vacuum shrimp tank reddit, shrimp tank maintenance, shrimp poop aquarium, how to clean shrimp poop in tank, how to clean tank with baby shrimp