
You are looking for information, articles, knowledge about the topic nail salons open on sunday near me how big should buds be at 4 weeks on Google, you do not find the information you need! Here are the best content compiled and compiled by the Chewathai27.com team, along with other related topics such as: how big should buds be at 4 weeks 4 weeks into flowering pictures, how big should buds be at 5 weeks, Flowering stage, stages of bud growth pictures, Defoliation week 3 flower, flowering stage week by week pictures, week 3 flowering pics, Royal Queen Seeds
Contents
What should my buds look like at week 6?
Week 6-8: Buds Ripen, Pistils Darken
It’s normal for some of the bottom leaves to begin to turn yellow as the plant continues to put its energy in the leaves and buds getting the most direct light, though the plant should still be mostly green from top to bottom even in week 6-8.
What week Do buds get big?
Week 6-8: Ripening of Buds
The buds will grow largest during this time, which is why it is important not to provide any nutrients that promote vegetative growth.
What should my buds look like at 5 weeks?
Week 5. In week 5 of flowering, you can observe the buds all over your plant becoming thicker. You may also spot new buds growing in new places such as along the main cola. With buds abounding, your cannabis plants will get fatter every day.
What happens at 4 weeks of flowering?
Week 4 concludes the end of the post-veg stretch, which means that you are done training these plants. Further, as you can see, the stalks and branches are firming up and becoming stiffer.
Why are my buds so small?
Stress is the number one cause of popcorn buds.
Any kind of stress, be it from poor watering, a lack or excess of nutrients, the environment, pests, plagues, or improper care, can affect a plant’s ability to grow big, dense flowers.
Why arent my buds getting bigger?
One possible reason your buds may have stopped maturing is the plant is “re-vegging.” “Re-vegging” means the plant is returning to the vegetative stage in which the plant only grows stems and leaves. Re-vegging happens most often when plants are somehow getting light during their 12-hour dark period.
Do buds grow at night or day?
Cannabis plants need short days (or more specifically long nights) in order to start flowering and make buds. Most indoor growers give their plants 12 hours of darkness and 12 hours of light each day to initiate budding and continue with that 12/12 light schedule until it’s time to harvest.
What does week 3 of flower look like?
More growth and stretching of the plants in Week 3
This rapid, almost non-stop growth is all a sign of the post-vegetative stretch that these plants go through after switching to the 12/12 light cycle. All of this growth is an indication that you are on the right track.
Will buds grow in last 2 weeks?
Final stage
In the last two weeks, the buds will mainly mature and grow no more in size. The white trichomes (small resin-secreting stalks/hairs) on the buds will now slowly turn brown.
How do you fatten up buds before harvest?
To some degree, more light translates to fatter buds and higher yields (you’ll need to pay attention to the distance between your grow light and plants or your plant may suffer from light burn). Increasing light intensity is the most effective way to fatten up buds.
What week of flowering Do buds smell?
Short Answer: The smell starts at 3-6 weeks old (depending on strain) even in the vegetative stage. But the smell gets much worse after plants start flowering/making buds. The leaves of a cannabis plant smell a little, but the buds smell a lot.
How long is flowering stretch?
The flowering stretch. This usually occurs in the first two weeks of bloom and is when the plant shoots upwards. In some strains, it may almost double its height before it focuses on producing the bud. Since larger plants will often produce more buds, most growers want to encourage this stretch period.
Is it OK to remove fan leaves during flowering?
Yes you should – but with the correct technique. A proper thinning will remove 20-40% of the mid to upper foliage every 5-7 days. Removing these fan leaves opens up light and produces better air exchange to the lower canopy.
How often should I water during flowering?
| Plant stage | Water every # of days |
|---|---|
| Germination | 4-7 |
| Seedling | 3-7 |
| Vegetative | 2-4 |
| Flowering | 2-3 |
Do buds grow in Week 6?
Changes from Week 5 to Week 6
Your buds in Week 6 will be noticeably bigger than they were in Week 5. At this point, these plants are deep into flower, and are really maturing day by day.
What to expect last 2 weeks of flowering?
THE FINAL 2 WEEKS OF FLOWERING. If you grow strains with an average flowering time, the majority of bud development will occur by the 6th week of bloom. In the last two weeks, the buds will mostly be ripening and not really growing much more in size.
Cannabis Flowering Week By Week – The Guide By Royal Queen Seeds – RQS Blog
- Article author: www.royalqueenseeds.com
- Reviews from users: 49004
 Ratings
 - Top rated: 4.4
- Lowest rated: 1
- Summary of article content: Articles about Cannabis Flowering Week By Week – The Guide By Royal Queen Seeds – RQS Blog For most cannabis strains, the flowering period will last about 7-9 weeks, although some sativas require even longer for their buds to … …
- Most searched keywords: Whether you are looking for Cannabis Flowering Week By Week – The Guide By Royal Queen Seeds – RQS Blog For most cannabis strains, the flowering period will last about 7-9 weeks, although some sativas require even longer for their buds to … Watching your cannabis plants flower is both exciting and daunting. Click here for an in-depth overview on how to guide your plants through the bloom phase.
- Table of Contents:
The First Few Flowering Weeks (Weeks 1 2 and 3)
Weeks 6 7 and 8 (Late Flowering Stage Right Before Harvest)
Pro Tips For A Better Harvest
Happy Budding!
Week-by-Week Cannabis Flowering Stage Timeline | Grow Weed Easy
- Article author: www.growweedeasy.com
- Reviews from users: 12855 Ratings
- Top rated: 4.2
- Lowest rated: 1
- Summary of article content: Articles about Week-by-Week Cannabis Flowering Stage Timeline | Grow Weed Easy Updating …
- Most searched keywords: Whether you are looking for Week-by-Week Cannabis Flowering Stage Timeline | Grow Weed Easy Updating Learn what your cannabis should look like (with pictures) so you can maximize marijuana yields by focusing on the right factors each week of the flowering stage. Know what to expect!
- Table of Contents:
A Week by Week Guide to the Cannabis Flowering Stages
- Article author: apotforpot.com
- Reviews from users: 15566 Ratings
- Top rated: 4.6
- Lowest rated: 1
- Summary of article content: Articles about A Week by Week Guide to the Cannabis Flowering Stages Updating …
- Most searched keywords: Whether you are looking for A Week by Week Guide to the Cannabis Flowering Stages Updating Understanding the process makes growing easier. This article will go in-depth into the cannabis flowering stages, so you can harvest higher quality buds.
- Table of Contents:
Week 1-3 The Flowering Stretch
Week 3-4 Formation of “Budlets”
Week 4-6 Fattening of the Buds
Week 6-8 Ripening of Buds
Week 8 and Beyond The End of Flowering
Cannabis Growth Stages From Germination to Harvesting
It’s better Homegrown
Latest Posts
Get grow tips and plant of the month right in your inbox!
Puff Puff Pass the News
Related Articles
The Growth Stages of a Cannabis Plant
What Are Sugar Leaves on a Cannabis Plant
Where Do Cannabis Buds Grow
How to Water Cannabis Plants
We built the ultimate kit to grow weed at home
Cannabis Flowering Week By Week – The Guide By Royal Queen Seeds – RQS Blog
- Article author: www.royalqueenseeds.com
- Reviews from users: 45575 Ratings
- Top rated: 4.7
- Lowest rated: 1
- Summary of article content: Articles about Cannabis Flowering Week By Week – The Guide By Royal Queen Seeds – RQS Blog Updating …
- Most searched keywords: Whether you are looking for Cannabis Flowering Week By Week – The Guide By Royal Queen Seeds – RQS Blog Updating Watching your cannabis plants flower is both exciting and daunting. Click here for an in-depth overview on how to guide your plants through the bloom phase.
- Table of Contents:
The First Few Flowering Weeks (Weeks 1 2 and 3)
Weeks 6 7 and 8 (Late Flowering Stage Right Before Harvest)
Pro Tips For A Better Harvest
Happy Budding!
Week 4 of Flower | Week-by-Week Guide to Flowering Cannabis
- Article author: www.oklahoma-cannabis-company.com
- Reviews from users: 41853 Ratings
- Top rated: 3.2
- Lowest rated: 1
- Summary of article content: Articles about Week 4 of Flower | Week-by-Week Guide to Flowering Cannabis Updating …
- Most searched keywords: Whether you are looking for Week 4 of Flower | Week-by-Week Guide to Flowering Cannabis Updating In this blog, we examine Week 4 of the cannabis flowering stage, with pictures and videos. This is part of a Week-by-Week series on flowering cannabis indoors.
- Table of Contents:
Changes from Week 3 to Week 4 Continued Growth and Further Development of Bud Sites
Week 4 represents the peak of bushy overgrowth
The End of the Post-Vegetative Stretching and Training
Subscribe To Our Newsletter
You have Successfully Subscribed!
SUBSCRIBE
You have Successfully Subscribed!

Buds look small 4 weeks of bloom HELP PLEASE! <3 - THCFarmer
- Article author: www.thcfarmer.com
- Reviews from users: 38281 Ratings
- Top rated: 4.8
- Lowest rated: 1
- Summary of article content: Articles about Buds look small 4 weeks of bloom HELP PLEASE! <3 - THCFarmer MB is an 8-10 weeks strain according to the net and you will most likely see weight and size increase in those last two weeks of flowering. ...
- Most searched keywords: Whether you are looking for Buds look small 4 weeks of bloom HELP PLEASE! <3 - THCFarmer MB is an 8-10 weeks strain according to the net and you will most likely see weight and size increase in those last two weeks of flowering. Hy everyone those on the pics are 5 mataro blue 26 days from flipping to 12/12... Are the buds dooin fine for 4 weeks? Thank you!
- Table of Contents:
Week-by-Week Cannabis Flowering Stage Timeline | Grow Weed Easy
- Article author: www.growweedeasy.com
- Reviews from users: 11132 Ratings
- Top rated: 4.4
- Lowest rated: 1
- Summary of article content: Articles about Week-by-Week Cannabis Flowering Stage Timeline | Grow Weed Easy Learn what your cannabis should look like (with pictures) so you can … Their “vegetative stage” lasts about 3-4 weeks, so as long as you … …
- Most searched keywords: Whether you are looking for Week-by-Week Cannabis Flowering Stage Timeline | Grow Weed Easy Learn what your cannabis should look like (with pictures) so you can … Their “vegetative stage” lasts about 3-4 weeks, so as long as you … Learn what your cannabis should look like (with pictures) so you can maximize marijuana yields by focusing on the right factors each week of the flowering stage. Know what to expect!
- Table of Contents:
Cannabis Flowering Stage – Best Week By Week Guide
- Article author: doraagri.com
- Reviews from users: 24222 Ratings
- Top rated: 4.0
- Lowest rated: 1
- Summary of article content: Articles about Cannabis Flowering Stage – Best Week By Week Guide In general, the cannabis leaves should still be lush and green at week 3-4 flowering stage. Week 4-6: Buds Start Fattening. …
- Most searched keywords: Whether you are looking for Cannabis Flowering Stage – Best Week By Week Guide In general, the cannabis leaves should still be lush and green at week 3-4 flowering stage. Week 4-6: Buds Start Fattening. This cannabis flowering stage guide will introduce the budding process of your cannabis step by step and will tell you what & how to ensure the best bud quality.
- Table of Contents:
First Signs of Cannabis Flowering Stage
Week 1-3 Transition to Flowering
Week 3-4 Bud Form
Week 4-6 Buds Start Fattening
Week 6-8 Pistils Darken & Buds Ripen
Week 8+ End of Flowering Final Flush
Attention in Cannabis Flowering Stage
Most Hot Products for Cannabis
Biostimulant Products
Get News for Harvest
Product Categories
Subscribe For Harvest
Contact
want more details
Fill in your details and we’ll be in touch
Week 4 buds aren’t that big what size should they be | Rollitup
- Article author: www.rollitup.org
- Reviews from users: 3545 Ratings
- Top rated: 3.2
- Lowest rated: 1
- Summary of article content: Articles about Week 4 buds aren’t that big what size should they be | Rollitup 4weeks into flowering should buds be bigger to me there not the size I was hoping they would be first time growing tell me what you think. …
- Most searched keywords: Whether you are looking for Week 4 buds aren’t that big what size should they be | Rollitup 4weeks into flowering should buds be bigger to me there not the size I was hoping they would be first time growing tell me what you think. 4weeks into flowering should buds be bigger to me there not the size I was hoping they would be first time growing tell me what you think
- Table of Contents:
Week 4 of Flower | Week-by-Week Guide to Flowering Cannabis
- Article author: www.oklahoma-cannabis-company.com
- Reviews from users: 13225 Ratings
- Top rated: 4.1
- Lowest rated: 1
- Summary of article content: Articles about Week 4 of Flower | Week-by-Week Guide to Flowering Cannabis Changes from Week 3 to Week 4: Continued Growth and Further Development of Bud Sites … If you watched the veo, then you can see how exciting … …
- Most searched keywords: Whether you are looking for Week 4 of Flower | Week-by-Week Guide to Flowering Cannabis Changes from Week 3 to Week 4: Continued Growth and Further Development of Bud Sites … If you watched the veo, then you can see how exciting … In this blog, we examine Week 4 of the cannabis flowering stage, with pictures and videos. This is part of a Week-by-Week series on flowering cannabis indoors.
- Table of Contents:
Changes from Week 3 to Week 4 Continued Growth and Further Development of Bud Sites
Week 4 represents the peak of bushy overgrowth
The End of the Post-Vegetative Stretching and Training
Subscribe To Our Newsletter
You have Successfully Subscribed!
SUBSCRIBE
You have Successfully Subscribed!
How far along should buds be at 4 weeks?
- Article author: www.thctalk.com
- Reviews from users: 26856 Ratings
- Top rated: 3.3
- Lowest rated: 1
- Summary of article content: Articles about How far along should buds be at 4 weeks? Ok, 25 days into flower (nearly 4 weeks), I’ve only got one grow under … post pic’s of 4 week flowering plants and their buds are further … …
- Most searched keywords: Whether you are looking for How far along should buds be at 4 weeks? Ok, 25 days into flower (nearly 4 weeks), I’ve only got one grow under … post pic’s of 4 week flowering plants and their buds are further … buds, weeks, flowering, showing, started, plants, prob, stage, fact, crystal, fear, assuming, weekers, indica, good, flipping, counted, simply, small, growers, meaning, times, flipped, updae, pics, 8/12/11, 15/12/11, update, 29/11/11, count, properly, time, 12/12/11, sake, arguements, reasonOk, 25 days into flower (nearly 4 weeks), I’ve only got one grow under my belt so I don’t have much to compare to… but I’ve seen a few post pic’s of 4 week flowering plants and their buds are further developed than mine!!
I’d be grateful if you guys could have a gander at my last diary entry (5 pics) and tell me what you reckon?
Maybe I’m being a little para?
(400w duel spec hps, biobizz nutes, temps have been spot on all the way through (extreme range 18-26 degree’s) Humidity 40-50 - Table of Contents:
Answered How far along should buds be at 4 weeks
The reason your plants look small for 4 weeks is because at the mo they aren’t at 4 weeks
You flipped on the 291111 and looking through your pics your updae at 81211 they still weren’t showing Your update at 151211 was showing s sometime in between those times will be when you had first buds and thats from where you count day 1 of flowering
So lets say right in between for arguements sake they started flowering properly some time around the 121211 meaning you’ve been flowering for 2 weeks 1 day And your plants look a lot better for that stage
In fact with the crystal on one of em I’d prob say more 3 weeks but not quite 4 IMO
So have no fear you simply counted from flipping like a lot of new growers do (I did when I started) still a good 6-7 weeks to go (assuming they’re indica 8-9 weekers)
The Following User Says Thank You to Loopy301081 For This Useful Post
The Following User Says Thank You to Icon For This Useful Post
The Following User Says Thank You to Up_in_smoke For This Useful Post
The Following User Says Thank You to tempa For This Useful Post
See more articles in the same category here: https://chewathai27.com/toplist.
Cannabis Flowering Week By Week
Slip-ups during the flowering phase can significantly affect the size and quality of your harvest. With a few simple tricks, however, you’re guaranteed a great harvest every time.
When the light cycle provides your cannabis plants with longer hours of uninterrupted darkness, they enter the flowering stage. Your plants will stop growing and instead put their energy into producing buds (flowers). Outdoors, this will normally happen when the days get shorter around the end of summer. When you grow indoors, flowering will begin once you switch your lights to 10-12 hours of darkness.
For most cannabis strains, the flowering period will last about 7-9 weeks, although some sativas require even longer for their buds to mature.
What happens during flowering and at what exact time can somewhat vary depending on the particular strain you are growing. So don’t expect your plants to follow this schedule to the T; see it more as a general guideline that you can go by. Let us look at the flowering phase of cannabis week by week.
Video id: 484384420
The First Few Flowering Weeks (Weeks 1, 2 and 3)
When the flowering period starts, it isn’t an abrupt change in your plants’ growth. Cannabis won’t just stop growing and then go into flowering right away. In these first weeks of flowering, many cannabis strains may indeed undergo a considerable growth stretch. This is important to know when it comes to feeding your plants properly, but also if you want to give them sufficient space to grow.
(Week 1) (Week 2) (Week 3)
Week 1 (Transition Stage and Stretch)
In the very first weeks of flowering, your cannabis plants will be in the transition stage. Thinking that winter is not far away and that she will soon have to carry a big load of bud, your plant will likely grow rapidly. Some strains can almost double in height during this time. Because of the fast growth that your plant is undergoing now, this early flowering phase is also known as the stretch phase.
While your plant is putting in quite some overtime to gain size and height, she will grow a number of new leaves mostly at the top of the main colas. Your cannabis plant is busy growing “green stuff,” like leaves and stems so she can become stronger and sturdier.
Important things to know in this early stage of flowering.
Although your plant has officially entered the flowering phase, she will now have an increased need for growing nutrients. You should not abruptly change your nutrient schedule and use flowering nutrients from one day to the next. It is usually recommended that you continue to give growing nutrients for at least one more week once flowering starts.
With the stretching of cannabis in early flowering, you may possibly want to think about training techniques such as low stress training (LST). This is where you bend the stems down and away from the centre of the plant so you can get an even canopy for a more efficient use of your grow lights. This can help you obtain much better yields later on.
Week 2
In week 2 of flowering, you may spot the first white pistils growing on your female cannabis plants. These fine and wispy white hairs will develop at those locations where the big fan leaves meet the main stem. It is these fine hairs that will later become buds.
If your cannabis plant happens to be a male, it won’t grow these “hairs,” but will instead grow small pollen sacs. Should you grow regular, non-feminized plants where you don’t know their gender, now is the time when you should “sex” your plants so you can separate the males from the females. The males won’t grow buds and will also pollinate your females, causing them to grow seeds. This is something you do not want to happen.
To properly feed your plants once they start to flower and to initiate the first signs of growing buds, you should check your nutrient manufacturer’s schedule. It is normally around this time at week 2 where you will have to increase flowering nutrients to help your plants reach their maximum yield potential.
Week 3
Your cannabis plants have still not entirely stopped growing and will now be about 50% bigger than what they were just three weeks earlier. Although still stretching a bit, the stretch will now gradually slow down and soon come to a complete halt.
At the locations on the plant where you previously saw some hairs, you can now see the first signs of real buds developing. There still won’t be many resin glands and trichomes on your plants, which means that the smell won’t be too pungent yet either.
This phase of flowering where your plant is starting to spend increasingly more energy on growing flowers is particularly critical. Make sure that the nutrients you give are appropriate and check the labels for the recommended dosages.
As your plants become more picky, you should check for potential deficiencies that could manifest in various ways, such as discoloured, yellowing leaves or loss of leaves entirely. At the same time, you should also check your plants for signs of possible overfeeding (“nutrient burn”) that could show up around this time as well. Nutrient burn will usually show in the tips of the leaves becoming discoloured. If this happens, you need to cut down on feeding.
(Week 4) (Week 5)
Week 4
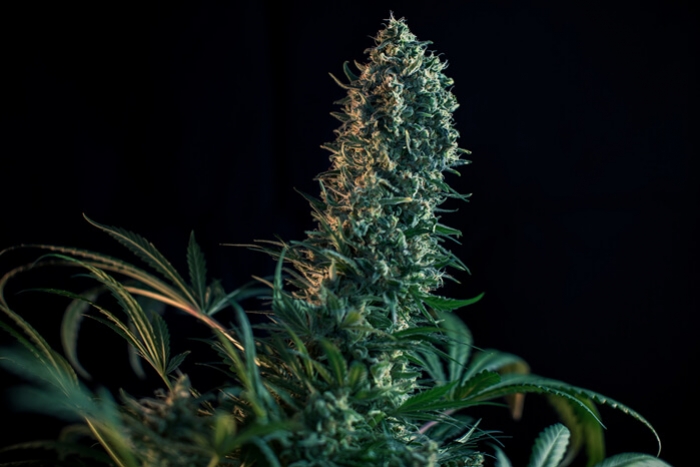
At week 4 of the flowering stage, your cannabis plants will likely have stopped growing altogether and are now spending all their energy on growing buds. There will still be white hairs sticking out from the buds, but the buds themselves will become bigger and fatter with each day. With more and larger buds growing, your plants will now produce more trichomes, making the odour a lot more noticeable at this stage.
Since your cannabis plant will have stopped growing, you won’t have to pay attention to training your plants any longer. Where you bent down branches before, now you may possibly consider holding them up should they require structural support.
Week 5
In week 5 of flowering, you can observe the buds all over your plant becoming thicker. You may also spot new buds growing in new places such as along the main cola. With buds abounding, your cannabis plants will get fatter every day. This is a surefire sign you are in full flowering mode. At this point, your plant will have a very intensive odour. Ensure that you have a good ventilation system in place if you grow indoors or in a region that doesn’t allow for legal cultivation.
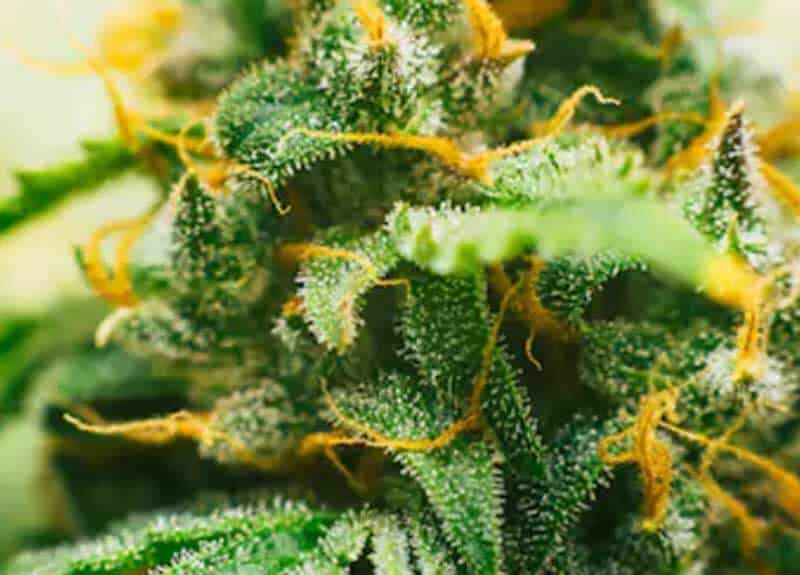
Some of your cannabis plants’ previously white pistil hairs may now be turning darker into a brownish or amber colour. At the same time, when you check the trichomes of your plant, you may spot some of them becoming opaque. The trichomes becoming milky white and the hairs turning darker are all signs of your plants not being too far from harvest.
(Week 6) (Week 7) (Week 8)
Weeks 6, 7 and 8 (Late Flowering Stage, Right Before Harvest)
Not all cannabis strains require the same amount of time for their flowering, but many varieties will be ready to harvest in these last three weeks. There are, however, not too many strains that will be ready before week 8.
Flushing Your Cannabis Plants
Depending on the flowering time of your particular strain, the time for flushing your cannabis plant is normally two weeks before harvest. When you “flush,” you stop administering nutrients and give the plant only plain, pH-balanced water in these final weeks. This will get rid of (flush out) salts and minerals in the soil which will make for a better and more pure-tasting bud. Otherwise, your smoke will be quite harsh and can have an unpleasant, chemical taste.
Check Your Plants For The Right Harvest Time
To find out when it’s time to harvest your plant, you can use a jeweller’s loupe or a small microscope to regularly check your plants’ trichomes. You can observe whether the trichomes turn from clear to a milky white colour. If many of the trichomes you see are still clear and transparent, it means it’s still too early for harvest. But when most of the trichomes have an amber colour and an opaque clarity, this means that the THC content of the buds is at its maximum and the plant is ready for harvest.
Pro Tips For A Better Harvest
Guiding cannabis plants through their flowering phase can be intimidating, especially for rookie growers. Follow these simple tips to ensure you always end up with a great harvest:
Video id: 484384984
Sexing Your Plants
Most growers identify the sex of their plants in the final week of vegging or the early weeks of flowering. Remember, males develop pollen sacs that look like small balls, and need to be culled or separated from your females if you want to avoid them getting pollinated.
Also, keep an eye on your female plants as they flower to catch any hermaphrodites. While it’s not common, some cannabis plants may develop both female and male flowers, while others may develop stamen (colloquially known as “bananas”) as a final attempt to create seeds in response to heavy stress.
Fix Problems Before Flowering
If you’re an indoor grower, you have the advantage of controlling when your plants start to flower. Make sure to use this to your advantage and only ever flip your plants to flowering when they’re 100% healthy. You don’t want to be correcting nutrient deficiencies or fighting pests and diseases while your plants are budding.
If you’re growing outdoors, you have less control over when your plants start to flower. Instead, you’ll want to pay close attention to the calendar and fix any issues before the end of summer.
Make The Transition Into Flowering As Smooth As Possible
Flowering plants require different humidity levels and temperatures than vegging plants. Rather than changing the temperature, humidity, and light cycle at the same time, we recommend gradually changing the temperature and humidity over two days, then letting your plants grow accustomed to these changes by leaving them in veg for just a few extra days before flipping your lights.
Get Your Lighting Right
Cannabis plants like red and orange wavelengths during flowering (between 580–700nm) to encourage the ripening of their flowers. For best results, use a grow light with this spectrum during the bloom phase.
Don’t Transplant Close To Bloom
Transplanting shocks your cannabis plants. Always avoid transplanting right before or during the flowering phase to avoid damaging your yield potential.
Trim Excess Foliage
Before flowering, make sure to train and trim your cannabis plants a bit to allow as much light as possible to reach its bud sites. Now, every grower has their own approach to trimming, but we like Kyle Kushman’s recommendation: “If the tip of a branch doesn’t break at least 50% of the height of the plant, it’s gone”. The idea here is to help your plant concentrate its energy only on the bud sites that’ll produce the best product.
Also, remember to always trim yellow or dead foliage during flowering. While your plants should stay lush and green up until about week four, some of their foliage will stop thriving as they devote more energy to bud production. This is completely normal, and you can safely remove any leaves that turn yellow or dry out completely.
Keep Humidity At 45%
Bud rot is a serious issue that can ruin an entire harvest. To protect your plants and optimise their growth, keep the relative humidity of your grow room at 45%.
Closely Monitor Temperature
Flowering cannabis plants like daytime temperatures of 20–23°C and nighttime temperatures of around 15–18°C. Make sure to watch out for sudden drops or spikes in temperature when you turn your lights on/off. Sudden drops can shock your plants, while sudden rises can cause condensation to form on the surfaces of your buds, leading to bud rot.
Use A Carbon-filtered Airflow System
Supplementing with CO₂ during the bloom phase can enhance growth and yield. If you can, aim to keep CO₂ levels at 1,000–1,200ppm during flowering.
Avoid Nutrient Bur
You can’t compensate for nutrient burn during flowering. Make sure to follow a strict feeding calendar and remember to stop feeding two weeks before harvest and flush your plants.
Support Heavy Buds
It’s not uncommon for flowering plants to buckle under the weight of their buds. Use bamboo stakes and string to support heavily loaded branches and ensure they get as much light as possible.
Avoid Light Burn
Like with nutrient burn, you can’t compensate for light burn during flowering. Remember to keep your lights a good distance from the top of your canopy. Light burn not only damages healthy foliage but can cause calcium deficiencies in the early flowering phase. If the tops of your plants start to bleach during flowering, it’s likely you need to lift your lights!
Use Fulvic Acid During Preflowering
Using fulvic acid in the late veg/early bloom phase can help increase the size of your buds early on. Also, remember to give your plants more calcium during bloom in both hydro and soil setups.
Happy Budding!
Growing weed can seem complicated and challenging. Cannabis plants, after all, are sensitive, and a single slip-up during the bloom phase can significantly impact the size and quality of your yield. To guarantee a great harvest every time, remember to bookmark this guide to the flowering phase and read it over before you flip the lights on your next batch of plants!
Week-by-Week Cannabis Flowering Stage Timeline
Week-by-Week Timeline of the Cannabis Flowering Stage: 12/12 to Harvest (with Pictures)
by Nebula Haze
Table of Contents
Growing Marijuana Flowering Stage Timeline
Week 1-3 – Transition to Flowering
Week 3-4 – Budlets Form
Week 4-6 – Buds Start Fattening Up
Week 6-8 – Buds Ripen, Pistils Darken – some strains spend longer in this stage
Week 8+ – Flowering Ends, Final Flush, Harvest
Introduction to the Cannabis Flowering Stage
Do you want to know what to expect when growing marijuana in the flowering stage? First, let’s talk a little bit about the beginning of your plant’s life so you can understand exactly how the flowering stage comes in. During the phase known as the vegetative stage (the first stage of life for marijuana), a cannabis plant grows about how you’d expect… like a weed! In the vegetative stage, a cannabis plant only grows new stems and leaves, and can grow several inches a day with the added ability to recover from just about anything.
Even if you run into major problems in the vegetative stage, you can bring your plant back from the brink of death simply by addressing the problem and giving your plant some TLC.
In the vegetative stage, your cannabis plant only grows stems and leaves and is resistant to problems. It grows like a weed!
However, things aren’t so rosy in the cannabis flowering stage. In the flowering stage, your cannabis plant grows very differently and is much more sensitive to problems. The tricky thing about the flowering stage is that you don’t have much room for error and big mistakes can lower your yields.
In order to maximize your yields, it’s important to know what to focus on during each part of the flowering stage. It’s also really helpful to know what to expect so you know when something is going wrong!
Week-by-Week Timeline of the Flowering Cycle (with pictures)
This marijuana flowering stage “walk through” will explain exactly what to expect week-by-week while your plant is making buds, and it’ll tell you what you need to do to ensure you get to harvest with the best bud quality and yields possible!
Week 1-3: Transition to Flowering
When growing cannabis indoors, the flowering stage begins when you change your grow lights to a 12/12 light cycle (12 hours light, 12 hours darkness each day). Getting those 12 hours of uninterrupted darkness each day gives your plant the signal that it’s time to start flowering. In a way the plant “thinks” winter is coming because the days are getting short.
Note: It’s common to think that a cannabis plant getting 12 or less hours of light is what initiates flowering, but it’s actually uninterrupted darkness that does the trick! If the plant gets any light during the dark period, even for just a minute, it won’t make buds! In fact, a flowering plant may even revert back or express hermaphroditism if it gets any light at night!
Outdoors, it’s also the days getting shorter that cause a cannabis plant to start making buds in late summer, but outdoor buds develop on different schedules depending on the local climate. This tutorial is meant to explain how a cannabis plant usually develops when grown indoors, since that is done under controlled conditions, and plants tend to grow the same way.
For the purposes of this tutorial, the flowering stage starts the day you switch to 12/12
Autoflowering strains of cannabis don’t need special light periods to start flowering, however the cannabis flowering timeline in this tutorial is a good general guideline for indoor auto-flowering strains, too. Their “vegetative stage” lasts about 3-4 weeks, so as long as you start counting at week 3-4 from seed (when they start getting their first pistils) this flowering timeline will generally apply to autos too, though sometimes they finish up faster.
During the first few weeks after being switched to a 12/12 schedule, your plant will be growing like crazy and rapidly gaining height. In fact, a cannabis plant can (and frequently will) almost double in height after the switch to 12/12. This period of super-fast and often stretchy growth is sometimes referred to as the “flowering stretch.”
Example of flowering stretch – what to expect
Pre-Stretch – just before 12/12
Post-Stretch – 4 weeks after 12/12
Although your female plants will start sprouting lots of white pistils, they usually won’t start growing “real” buds with substance quite yet. If you’re new to growing cannabis, it’s very important to note that only female cannabis plants make buds.
Did you know you can figure out if a plant is male or female while it’s still in the vegetative stage?
If your plant is male, it will start growing distinct pollen sacs and should be removed from the grow room immediately to prevent it from pollinating your female plants and causing ‘seedy’ buds. Learn where to get feminized (all-female) seeds online so you don’t have to worry about male plants.
Remove any plants growing pollen sacs instead of pistils, because they are male and won’t make buds. Plus they can pollinate your female plants and cause them to grow seeds! What if my plant is growing both pistils and pollen sacs?
Female plants should be growing pistils wherever a fan leaf meets a main stem. They look like white wispy hairs emerging from the joints
During the first few weeks of the flowering stage, you will see bunches of single leaves forming at the tops of your main colas (like in this pic). Soon white pistils will start coming out of the middle of the bunches, and they will become your main buds!
During week 1-3 of the flowering stage, your plant will mostly be producing new stems and leaves as it grows taller. Right now your plant is still very resilient and can handle problems just like in the vegetative stage. However, it’s still very important to avoid problems and take great care of your plant!
As part of the stretch, your plant will be growing out its bud sites. Stunting growth at this point could cause the plant to make smaller and fewer bud sites than it would if it were healthy and growing fast.
If you have more room in your grow space under the light to spread your plants out, or if you are running out of headroom, it is important to gently bend stretching stems down and away from the center of the plant to help maintain a flat canopy (a technique known as low stress training).
During the stretch, gently bend new stems down to try to maintain a flat, even canopy
If you keep up with it during the stretch, you can prevent any one stem from getting much taller than the others
When stems are new, they are flexible and easy to bend, but they quickly harden up and turn woody. By keeping a close eye on your plant and bending any too-tall branches down and away from the center of the plant as soon as you can, you will maximize your yields since that flat shape will most efficiently use your grow lights. If all your main bud sites are spread out and about the same height, you can increase your yields by up to 40% or more!
Spreading out your bud sites and maintaining a flat canopy can increase cannabis yields by as much as 40%…or even more!
At this point, you only have a few weeks left until you lose the ability to do any further training, so don’t miss this last opportunity to control the shape of your plant, especially if you’re running out of room!
Week 3-4: Budlets Form
The mad stretching of the first few weeks will start to slow down in week 3-4, but your cannabis plant will still be growing upward. At this point you’ll actually start to see real buds instead of just hairs (I like to call them “budlets” during this stage) and all the pistils will be white and sticking almost straight out.
“Budlets” start forming where buds will be, with white pistils sticking straight out
Your plant is going to start getting a little picky about the environment and nutrients in week 3-4 so it’s important to keep a close eye on your garden. You need to make sure your plant stays healthy all the way to the end of the flowering stage, and you’ve still got more than a month to go so you don’t want your plant to run into any major health problems now!
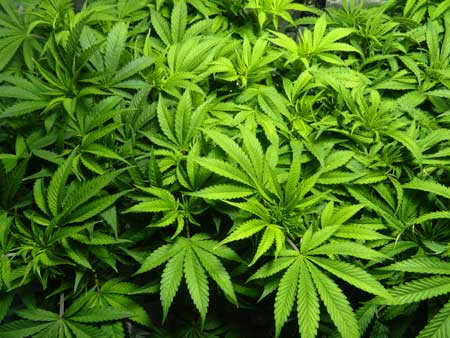
Be especially aware of leaf symptoms, for example: discolored/yellow leaves, or if your plant starts rapidly losing leaves. It’s completely normal to lose a few leaves at this stage, especially leaves that aren’t getting light (which often look like they may have a nutrient deficiency and then fall off, but it’s just your plant cannibalizing the leaf since it isn’t getting any more light). That being said, overall your entire plant should still be lush and green in week 3-4 while your budlets are forming.
As your plant continues through the flowering stage, it’s normal to see a few yellow or discolored leaves near the bottom of the plant, especially in the places where the leaves are no longer getting light. This isn’t anything to worry about if it’s just a few leaves as the plant is putting its energy to the top of the plant and the buds.
But it’s not normal for your plant to be yellowing or losing leaves rapidly like this
Diagnose sick plants as soon as possible!
Another thing to be aware of is nutrient burn. This is what happens when you give your plants too-high levels of nutrients – the tips of all the leaves actually get “burned.” While a little bit of nutrient burn won’t hurt your plant, it’s important to try to avoid it if you can. Your plant can never recover the parts of the leaves lost to nutrient burn, so if you accidentally give too much nutrients in the future, the burning will start “climbing” up the “fingers” of the leaves. Cannabis leaves tend to look much less appealing/pretty as more of each leaf gets burned. However, even cannabis plants with severe nutrient burn can produce good bud, so don’t give up if you run into thi problem!
Try your best to avoid nutrient burn (burnt leaf tips caused by too-high levels of nutrients), as it can only get worse as the flowering stage continues
When nutrient burn starts getting bad, it can actually start discoloring your sugar leaves (the small single-finger leaves emerging from your buds). If nutrient burn reaches the base of the sugar leaves, you won’t be able to trim it off at harvest so your buds will end up with yellow/brown spots where all the leaves were burned.
Nutrient deficiencies can also cause the same problem if left unchecked. This doesn’t necessarily affect the potency but buds don’t look as good as they could have.
So to grow bud you’re proud of, you’ll want to be aware of avoiding nutrient burn from the beginning. Since your plant isn’t really growing many more leaves, you need to really care for the ones it has left.
If they haven’t already, your plants may start to smell!
Some strains like Blue Mystic and Northern Light are known for having relatively low smells, but many strains can start getting pungent quickly!
Learn more about controlling smells in the grow room.
Week 4-6: Buds Start Fattening
Your budlets are fattening and soon you will have buds with substance! They will still have nearly all white pistils sticking straight up in every direction, but the buds themselves will be getting fatter every day.
By weeks 4-6, the stretch is almost over and you no longer need to pay attention to training your plant. Instead of trying to keep the colas down, from now on you’re doing the opposite – trying to hold any buds up if they start getting too heavy for your plant!
If you’re having trouble fitting your plant in your space within a safe distance from your light, your training options can start looking very grim.
If your plant has grown into the light, you may have to consider last-resort solutions like supercropping (a high-stress training technique of forcing stems to bend at a 90° angle) which you normally should never do this late in the flowering stage.
Since you don’t get many more new leaves, you need to think of your remaining leaves as armor – insurance against any nutrient or leaf problems.
Although you don’t want an excessively leafy plant, and strategic defoliation (for advanced growers) can be helpful to expose bud sites, it’s important to make sure that you let your plant keep enough leaf coverage to power the growth of buds. It may need a little extra help if something happens!
Although defoliation may be used to expose buds sites, make sure your plant still has enough leaves (“armor”) to last until the end of the flowering stage to power the growth of buds, and as insurance against any possible nutrient or leaf problems.
Although most of the pistils will probably still be mostly white by the end of week 6, the buds are getting bigger and denser every day!
Week 6-8: Buds Ripen, Pistils Darken
From now on your plant won’t be making any new leaves or stems. It has completely switched gears away from vegetative growth and all its energy will be focused on growing buds from now until harvest.
It’s normal for some of the bottom leaves to begin to turn yellow as the plant continues to put its energy in the leaves and buds getting the most direct light, though the plant should still be mostly green from top to bottom even in week 6-8.
At this point, your plant may start getting much more picky and sensitive to nutrient problems, including those caused by incorrect pH at the roots. Now is not the time to slack off on caring for your plants!
If your leaves are already turning yellow in week 6-8 it’s too early! Early leaf yellowing is likely caused by either a nutrient problem or light burn (which are both much more common in marijuanas flowering stage). React quickly to problems so you don’t hurt your yields!
Quickly diagnose sick plants & don’t ignore problems!
Another common problem to watch out for at this stage: if you see a whole new bud or “spire” emerging out of the side of an old bud that’s already developed, it’s usually a sign of heat or light damage.
“Foxtailing” like this is caused by too much heat or light – it’s not normal bud growth! If you see this it means you need to control your temperature and light levels to prevent further damage!
Learn more about marijuana foxtails caused by heat or light stress
From now until harvest it’s extra important to avoid too-high levels of light or heat because (in addition to foxtailing) this can discolor/bleach/burn your buds and may even “evaporate” away some of the THC / potency.
If things are going well, your buds should be really hitting their stride at this point. They will grow in size significantly over the next few weeks!
Week 8+: Flowering Ends, Final Flush, Harvest
Home stretch! You’re so close! To make sure things go smoothly until harvest, treat your plant like a movie star and attend to its every need! Very few strains of cannabis are ready to be harvested before week 8, but now we’re at to the point where some short strains are getting close to being harvest-ready!
Many growers do a final flush, which involves giving only plain water to your plants (for a few days up to a few weeks) before harvest.
Once you’ve reached week 8, buds are fattening quickly. Trichomes and pistils are maturing, though new pistils may continue to develop on the buds as they grow.
You are basically just maintaining your plant until harvest. Different strains are ready at different times, but from now on you’re going to pretty much treat them all the same. Keep a close eye on the buds, pistils and trichomes as a whole to help you figure out the best time to harvest to get the effects you are looking for.
Now is Probably the Best Time to Take Bud Pics!
Quick Tip: Want to take better bud pics? Try taking a picture of the bud in the dark with your camera flash on. Learn more tips for taking great bud pictures!
Just around 8-10 weeks is when you get to see the buds in their full glory. It’s also when the smell of cannabis often starts to get overpowering!
Your plants are probably STINKING up everything around them!
At this point it’s completely normal for your plant leaves to start yellowing, sometimes rapidly. As long as the yellowing isn’t affecting your buds and you’re very close to harvest then it’s completely normal. You probably can’t prevent this type of yellowing no matter what you do with nutrients because this is just what a cannabis plant naturally does as it’s wrapping up the flowering stage.
After Week 8 it’s normal to see leaves turning yellow, in fact there’s not much you can do to prevent it. As long as it’s close to harvest and the yellowing is not affecting your actual buds it’s ok!
Raising nutrient levels at this stage is not recommended as it won’t stop the yellowing and can possibly prevent your buds from fattening up as much as they could have (cannabis wants relatively low levels of nitrogen in the flowering stage for proper bud growth).
If buds start getting too heavy and fall over, special tools known as plant yo-yos (pictured to the right) can be hung from the ceiling and will hook around your buds to gently hold them up without damaging them.
Many growers choose to give their plants a 2-week flush before harvest to help make sure the plant has used up any additional nutrients that may affect the taste or smell of the buds.
These buds are ready to start flushing – white pistils have nearly all darkened and curled in
(learn exactly when to harvest so your buds produce the right effects)
Sometimes you’ll need to harvest your plant early due to life situations, or because the plant is unhealthy and buds are starting to look burnt or discolored. If your buds look completely done, and you’re seeing leaf symptoms getting worse, it’s often better to harvest a little early to ensure the best possible quality given the situation.
You may want to harvest your marijuana buds early if they’re starting to get damaged by nutrient or other problems. Sometimes it’s better to cut your losses than let your buds continue to get beat up! If you harvest your plants too early you can improve many unwanted effects by curing them. For example, these buds probably should be harvested before the buds get any further damage.
Harvest buds early if they’re getting damaged!
Harvest day is the best day!
(well, until the day you try your buds for the first time!
Learn how to dry & cure your cannabis plants!
Jump to….
Diagnose Your Sick Plant!
Tips to Growing Top-Shelf Buds
How Long Does It Take to Grow Weed?
Quick Start Guide: Grow Cannabis in 10 Steps
Check These 7 Things & Cure 99% of Marijuana Growing Problems
A Week by Week Guide to the Cannabis Flowering Stages
A Week by Week Guide to the Cannabis Flowering Stages Last Updated: July 13, 2022 By Jason Levin
Whether you’re just starting to grow cannabis or you’ve been at it for a while, it’s a good idea to know what to expect during the cannabis flowering cycle. The cannabis plant has a variety of characteristics during the different stages of its lifecycle – which include germination, the vegetative stage and the flowering stage – but for many home growers, the final flowering stage is the most exciting.
A lot of it is because this stage reveals what the quality and quantity of your harvest will be. Understanding the process makes growing easier. This article will go in-depth into the cannabis flowering stages, so that you can harvest higher quality buds.
The flowering stage begins once the vegetative phase has ended. This usually takes 3-4 weeks, but can vary by the strain, so be sure to consider your strain first. If you are growing your cannabis indoors from photoperiod seeds, the flowering stage starts when you change to a 12/12 light schedule (this is when the plants receive light for 12 hours and are in total darkness for 12 hours).
If you use autoflowering seeds, the plant’s genetics determines when this period begins. Once flowering begins, the cannabis flowering stages last approximately 7-9 weeks. They can be divided into the following sub-phases.
FREE E-BOOK Illustrated Marijuana Grow Guide Download (PDF)
Week 1-3: The Flowering Stretch
When the plants start receiving 12 hours of darkness each day, they “think” that winter is close, and prepare to produce offspring. The first of the cannabis flowering stages, therefore, includes a major spurt of vegetative growth aimed at giving the plant ample size and strength to support those coming buds. This stretch is so dramatic that most cannabis plants double or even triple their height during this time.
This is a good time for your plant. During this flowering stretch, your cannabis plants will still be very resilient and can quickly recover from any problem that they experience. This resiliency also occurs during the vegetative growth stage.
During the flowering stage your plant starts diverting energy from vegetative growth into bud production that it believes will help produce offspring. Without pollen from a male plant, your cannabis plant will use the energy that would go into producing seeds for increasing the size and number of buds that usually contain these seeds.
Some cannabis growers believe the growth spurt during this phase means that your cannabis plants still need the same types of nutrients that were used during the vegetative growth phase, such as nitrogen.
Another school of thought suggests that introducing nutrients needed for bud production such as phosphorous and magnesium can limit the amount of stretch and help jump-start the plant’s budding by having these nutrients available already. Regardless of which you believe, the plant should gradually be switched from a vegetative line of nutrients to a blooming line throughout this period.
You will also notice single leaves starting to bunch up at the top of the main colas of each plant. White pistils will emerge from the middle of these bunches of leaves. This is a sign of new buds being produced.
If you are going to try your hand at training your plants, now is the time. Low stress training (LST) involves bending the stems of the branches gently so that you have a flat canopy at the top. This flat canopy is critical to ensure even distribution of light to all parts of the plant.
For outdoor grows this training is generally unnecessary as the sun will naturally pass across most of the plant’s surface throughout the day. Sections without direct access to light will not produce mature buds and are often removed so the plant can put more energy into the parts that do receive plenty of light.
Week 3-4: Formation of “Budlets”
The flowering stretch (spurt of growth) starts slowing down when your cannabis plants start forming tiny buds (also known as budlets). Now, we enter the second leg of the cannabis flowering cycle. Each stage of the bloom cycle is more critical than the last, so you should be very careful since any mistake or problem can affect your yield or harvest quality.
Use this time to observe your plants carefully for any signs of problems. The easiest signs are the symptoms visible on the leaves. For example, nutrient toxicity or “nute burn” (excess nutrients that cause something that looks like a burn on the leaves) causes the tips of your leaves to become brown or yellow.
If you don’t reduce the amount of nutrients provided, this burn will spread to other parts of the leaves, and the plant may be severely affected. If untreated, your plant will no longer be able to manufacture its own food.
Nutrient deficiencies are slightly less detrimental as too many nutrients (because it’s easier to introduce nutrients to the plant tissue than remove nutrients, and there are some that cannot be removed that are called ‘immobile nutrients’), but you should still keep track of what you feed your plants and adjust as needed as soon as you determine a problem. Your plants can still recover to some extent, but it’s still much better not to have any problems to fix in the first place.
You will also notice that some leaves at the bottom of your plants will become yellow around this time. If only a few leaves are affected, don’t fret. It is normal for some of the bottom leaves to yellow if they aren’t receiving ample light (the canopy is thick at this point). The plant is extracting all the nutrients from those leaves to keep the developing buds well taken care of. Plants are intelligent; they don’t want to waste resources on components that aren’t productive!
These weeks are exciting because they mark the time when the plants begin giving off a more distinct odor.
Week 4-6: Fattening of the Buds
Next up in the cannabis flowering stages is the fattening of the “budlets.” The tiny buds described earlier start to fatten quickly. This fattening happens rapidly, and you will still see the pistils sticking out of them.
The “flowering stretch” is almost no more during these weeks, so there is minimal need for you to continue training your cannabis plants. The plant is now fully focused on its buds.
However, you can still do some training if you notice that the canopy of some of your plants isn’t as flat as you would like it to be. Keep in mind, training during this time can be risky. Unlike during the flowering stretch, any training done now is more stressful to the plant as vegetative growth has mostly stopped. The plant can recover but try as much as you can to avoid this type of training, since it could significantly slow the fattening of your buds.
Since your plants aren’t growing any more leaves at this point, do everything you can to preserve the existing leaves. First, provide the correct amount of balanced nutrients, so that nutrient burn or nutrient deficiency doesn’t cause leaves to yellow or become necrotic. Second, provide enough water since transpiration will be taking place at a high rate. Excess stress from improper humidity, heat, or light levels can also cause leaves to yellow and drop off.
Don’t try your hand at removing leaves (defoliating) unless you are experienced at it and can strategically remove the correct leaves that will expose additional bud sites.
You want to maintain as many leaves as necessary to create a full canopy because if you remove too many after this point, your plant may not have enough foliage to absorb enough light to maximize yields. However, if you have plenty of healthy leaves, there is a “reserve” of leaves that will help the plant continue to thrive.
As this portion of the flowering stage progresses, the majority of the pistils will remain white, signifying that the buds are continuing to get denser and bigger with each passing day.
Week 6-8: Ripening of Buds
When the buds start to ripen, you’re beginning the next cannabis flowering stage. Any vegetative growth has completely stopped by this point, and all energy is devoted to the cannabis plant’s final stages of life. The buds will grow largest during this time, which is why it is important not to provide any nutrients that promote vegetative growth. This would be wasteful and even counterproductive.
Why are nutrients like nitrogen counterproductive at this point? The reason is that these nutrients are not being used to the same extent that they were during the vegetative stage. This causes an accumulation in the leaves that negatively affects the quality of the buds after harvest. If too much nitrogen is present, the plant can even get stressed and revert to vegetative growth or self-pollinate and start producing seeds, which negatively affect the quality and quantity of harvest.
The bottom leaves on some plants begin yellowing and falling off during this stage while other plants begin losing leaves during Week 4-6 of the flowering phase. Nevertheless, you still need to be vigilant so that you don’t mistake a problem for normal leaf loss. If all is as it should be, your plants should stay full and green with just a few bottom leaves discoloring or possibly falling off.
During this portion of the many cannabis flowering stages, you may notice buds that form beneath or on the sides of existing buds. This phenomenon is called “foxtailing,” and while it can be observed naturally with some strains, it is more typically a sign of environmental stress, either from too much light or too high temperatures. Find out which applies to your situation and adjust accordingly.
For example, if your plants grew taller than expected and are now close to your grow lights, then you should raise the lights higher so that the plants don’t suffer from light burn.
Or, if you find that sections of your grow room have a higher temperature than what is recommended for plants at this stage, increase the air flow so that heat can be exhausted more efficiently.
Excess light or temperature can bleach or burn the buds (causing them to be discolored). The buds will also lose some of their potency (THC) since evaporation will cause the plant to lose some of its cannabinoids. Do you still need convincing about the importance of maintaining the right light and temperature levels?
💰 Save Money –
Grow your Own 🌱 Our complete grow kits include everything you need to go from seed to your very own supply of high grade medical cannabis.
Get 10% Off
Week 8, and Beyond: The End of Flowering
The exact week on which you will harvest is mainly dependent on the strain that you are growing. The harvest window is typically around a week long, after which THC will start degrading into CBN, which is less potent and produces a sleepy feeling. Near the end of flowering, the pistils on most strains (but not all) will change from white to orange.
It is a signal that new buds are not being produced by the plant anymore and harvest time is likely close. The trichomes of your plants will turn from clear to milky as they increase in THC, and then start changing color progressively to amber, signifying THC that is degrading into CBN. Both phases of this process overlap somewhat, but most growers believe your plants have reached their full potency level when roughly 5-30% of the trichomes are amber, and the rest are milky.
Be careful with your plants at this point. They are extremely sensitive to the conditions around them during the end of the grow. For example, without ample airflow excess moisture from transpiration can become trapped inside the constantly growing buds, causing the dreaded “bud rot” (botyritis, or gray mold) that often spreads and destroys entire harvests.
It is also common for some buds to become heavier than their branches can support during this phase of the cannabis flowering cycle. You may, therefore, need to support them so that they can stay upright. Use tools to prop your plants up – you can find them online or at many garden supply stores.
The end of the cannabis growing cycle also brings about the most distinctive “weed” odor. You can expect the smell to reach overpowering levels. Do not be surprised if neighbors and visitors ask about the smells drifting from your garage or wherever you are growing your indoor plants. Exhausting all air through a carbon filter can help with odor management.
Shortly before you are ready to harvest your buds, you should flush your plants. Flushing is a simple process where you stop giving your plant nutrients, and instead, feed them pH-appropriate water. You should flush your plants from a few days to a few weeks depending on the length of the strains’ flowering stage and your grow medium. Soil retains more nutrients than hydroponic mediums and so requires a longer flush.
The purpose of flushing is to give the plant a chance to utilize all the nutrients in its system so that they don’t taint the taste and smell of the buds. Flushing can also help remove any salts that have precipitated and built up in the grow medium. In short, flushing provides a final chance to improve the quality of the final harvest.
The flowering stage is rewarding, and if you understand the process, you can gain more from it. As you can see, there are five distinct cannabis flowering stages, each with their own characteristics and requirements. Proper oversight of each of these stages puts you firmly on the path to harvesting the biggest and most potent buds that your cannabis strains are capable of yielding.
Keep in mind, this article only provides a general guide. You’ll still need to tweak your process based on the specific cannabis strain you plan to grow. However, remember that every cannabis strain goes through theses stages – even the easy-to-grow autoflowering strains. The main difference with these strains is the fact that they reach the flowering stage regardless of what light cycle they’re on. For them, the onset of flowering is triggered by their genetic code rather than a change in the number of hours of darkness each day. That is precisely why autoflowering strains come highly recommended by A Pot for Pot.
Growing marijuana can be easy – especially when you understand the cannabis flowering stages. Have fun growing your next cannabis plant, and once you’re done flowering check out our article on harvesting and drying!
Cannabis Growth Stages: From Germination to Harvesting
Besides the flowering stages, cannabis growth consists of a series of stages during the plant’s life cycle. Each stage has its own unique demands, like varying levels of light, nutrients, and water.
It can take between four and eight months to grow a cannabis plant from start to finish fully! This time varies depending on where you’re growing, and if you use an indoor grow room, your plant can flower in only a few weeks!
The quality of your cannabis plant depends on how well you know your plants’ growth stages and life cycle. It all starts with germination.
1. Germinating Seeds
If you want your seeds to germinate effectively, they must be mature enough for germination; immature seeds will rarely do anything. Once your seeds reach maturity, you’ll notice that they appear shiny, hard and dry to the touch, and light to dark brown.
Underdeveloped seeds will look white or green and feel soft.
The germination process is relatively simple—keep the seeds wet and in a dark place. You can also keep your seed wrapped in a damp paper towel or a cup of water and place it inside of a cabinet. Exposing the seeds to moisture helps stimulate the hormones that boost their growth process.
2. The Seedling Stage
The seedling growth stage is a crucial and fragile one. Your cannabis seedlings need 18+ hours of sunlight, mild humidity, and moist soil to grow quickly and adequately. In addition, the seedlings have small root systems, which makes it easy to overwater and damage them.
Once your plant becomes a seedling, you’ll notice it start to produce traditional-looking cannabis leaves. These leaves can be made up of between three and thirteen fingers. Typically, a mature cannabis plant will have between five and seven fingers, but more or less isn’t super uncommon.
The first fingered leaves can be up to four inches above the cotyledon leaves and will typically grow in pairs on opposing sides of the plant’s stem. You’ll treat your cannabis plant as a seedling until it develops leaves containing a full number of fingers.
Healthy seedlings are short, have thick vegetation, and sprout vibrant green leaves. You want to keep your environment free of excess moisture during this growth stage to avoid disease and mold.
3. Vegetative Growth
Once your seedling develops a full set of fingered leaves, the vegetative growth stage begins. After being transferred to a larger pot, you’ll notice the plant’s growth speed up dramatically. Its stem gets thicker and taller, its root system becomes stronger, and it produces more nodes, branches, and leaves.
This is the stage where many growers begin training and topping their plants.
The spacing between the nodes shows the type of cannabis that’s growing. These nodes, which are areas where two branches come off the main stem, develop in pairs. However, the nodes start to alternate once a plant matures, leaving more distance between them.
Indica plants are short and dense, while Sativa plants are lanky and have less leaves. During this stage, it’s crucial to increase the amount of water your plant gets. As it continues to grow and the root system becomes more established, you’ll want to water it further away from the center so that the roots can absorb it more easily.
If you’re growing indoors, you’ll want to keep your cannabis plants on a cycle of 18-hours of light during this stage.
4. Pre-Flowering
One to two weeks after the vegatative growth stage, pre-flowering will start. This stage is when you’ll determine the sex of the plant.
Female plants will have two pistils growing on the buds, and male plants will have small green sacs of pollen around the node areas.
Those sacs will eventually burst, fertilizing the cola of female plants and ruining their trichomes’ psychoactive potential. That’s why we need to remove any intersex or male plants before the flowering begins.
Non-pollinated female cannabis plants will produce Sinsemilla, have no seeds, and produce even more cannabinoids. Sensimilla has a high concentration of the compounds responsible for making us feel good when consuming cannabis. These plants will produce large amounts of resin and seed pods that contain high THC levels.
You can identify Sinsemilla by the white hairs sprouting from bracts near the plant’s nodes. Once it starts receiving less light each day (about 12 hours), its growth will slow, and the plant will enter its flowering stage.
5. Flowering
We won’t spend too much time here—the flowering stages are described in-depth above. However, here’s a quick summary of the cannabis plant flowering stage.
It occurs when the plant starts receiving 10-12 hours of darkness each day. You’ll know that it’s ready for harvesting when the pistils go from white to orange, and the trichome heads will change from transparent to an amber color. A darker amber color indicated higher amounts of CBD compared to THC in the resin.
The trichomes produce terpenes, flavonoids, THC, and other cannabinoids. As the flower sluters continue to develop, they’ll become sticky from the cannabinoid-rich resin. Most cannabis plants enjoy medium humidity, warm weather, and blooming nutrients during the flower stage.
High white to red color ratios provide euphoric THC highs.
High red to white color ratios provide a calmer CBD feeling.
Harvesting
Once you’re ready to harvest, you should cut down your cannabis plant into smaller branches to make the drying process easier. You’ll want to string and hang the cut branches in a dark, cool room to dry.
Typically, cannabis gets dried at humidity levels of 40-50% and hand for one to two weeks. The drying process is necessary to prevent bacteria and fungus from growing, and by removing moisture, you’re preserving the life of your cannabis plant.
The next step is options: curing your plant. This process involves aging the dried cannabis in airtight containers and storing them in temperatures between 50 and 60 °F. Curing typically improves burn quality, flavor, and reduces harshness.
FAQ About Cannabis Flowering Stages
So you have finished reading the how big should buds be at 4 weeks topic article, if you find this article useful, please share it. Thank you very much. See more: 4 weeks into flowering pictures, how big should buds be at 5 weeks, Flowering stage, stages of bud growth pictures, Defoliation week 3 flower, flowering stage week by week pictures, week 3 flowering pics, Royal Queen Seeds