
You are looking for information, articles, knowledge about the topic nail salons open on sunday near me how to build a road in the woods on Google, you do not find the information you need! Here are the best content compiled and compiled by the Chewathai27.com team, along with other related topics such as: how to build a road in the woods types of forest roads, forest road construction manual, clear the road petition, forest road maintenance, corduroy road, forest path
Contents
What is the best way to build a gravel road?
- Determine the road usage: …
- Get the right machinery and operator to work: …
- Use the right materials: …
- Compact the soil properly: …
- Build a base that is solid: …
- Construct the gravel road in layers: …
- Design the road to sustain extreme conditions: …
- Ensure proper drainage:
How do you harden a dirt road?
Add lime and sand to harden dirt. Hardened dirt can be used in many applications, including patios and driveways. Making dirt hard entails adding sand and lime in specific ratios. Using a wheelbarrow to mix all the elements will make your dirt hardening project go easier.
How do you build a road step by step?
…
- Preparation of the existing base course layer. The existing surface is prepared by removing the pot holes or rust if any. …
- Application of Tuck Coat. …
- Preparation and placing of Premix. …
- Rolling. …
- Quality control of bituminous concrete construction. …
- Finished surface.
What is the best material for dirt roads?
3. Use suitable materials. You want a dry and stable base, so soils with high clay content or moisture are not suitable. The road top should have the best quality gravel consisting of a combination of fractured stone, sand and fine particles with a binding characteristic to form a smooth, firm surface.
How do you stabilize a muddy road?
A permanent solution to stabilizing a muddy road is to install permeable pavement. For example, the plastic permeable pavers made by TRUEGRID are able to hold gravel securely in place while providing a dry and level surface to drive on.
What is the cheapest road to build?
Earth Road. The type of low-cost road in which pavement structure is constructed with the soil available at the site is called earth road. ✔ It is also known as the earthen road.
Why do they put gravel on roads?
The “gravel” is actually aggregate that sticks to the emulsion and, after rolling and sweeping, provides a skid-resistant surface to improve safety. As vehicles travel over the newly applied surface, some of the aggregate may come loose under the tires.
How is a road constructed?
Nowadays, roads are usually constructed using asphalt and/or concrete. The construction of modern roads tends to have three distinct processes: setting out, earthworks and paving construction.
How do you make a road on the side of a mountain?
After engineers have surveyed and mapped roads, the mountains must be drilled and blasted to create a level surface for the road to be paved. This method requires roads to be cut into the mountainside, which is done by drilling holes deep into the mountain.
How do you build a gravel road on a slope?
- Excavate 8–12 inches and grade the roadway. …
- Plan and install any culverts you wish to run under the gravel at this time.
- Spread 4 inches of stone or #3 crushed rock. …
- Spread 4 inches of crushed stone #57.
How do you make a good dirt road?
- Understand Your Needs. …
- Build on a Strong Foundation. …
- Choose the Right Materials. …
- Build From the Bottom Up. …
- Drainage, Drainage, Drainage. …
- Apply Proper Palliatives. …
- Maintenance.
how to build a road in the woods
- Article author: woodlot.novascotia.ca
- Reviews from users: 44848
 Ratings
 - Top rated: 3.2
- Lowest rated: 1
- Summary of article content: Articles about how to build a road in the woods A road is built in small sections beginning with cutting the trees, grubbing or removal of debris, ditching, installing culverts, building the base and crown, … …
- Most searched keywords: Whether you are looking for how to build a road in the woods A road is built in small sections beginning with cutting the trees, grubbing or removal of debris, ditching, installing culverts, building the base and crown, …
- Table of Contents:
Building a Road From the Ground Up – YouTube
- Article author: www.youtube.com
- Reviews from users: 7378 Ratings
- Top rated: 3.5
- Lowest rated: 1
- Summary of article content: Articles about Building a Road From the Ground Up – YouTube Updating …
- Most searched keywords: Whether you are looking for Building a Road From the Ground Up – YouTube Updating A look at what goes into building a roadway. From planning and preparation to construction and surfacing, its a complex process which takes a lot of coordina…asphalt, PAIKY
- Table of Contents:

Building a Great Gravel Road: 10 Basic Principles
- Article author: www.mahindraconstructionequipment.com
- Reviews from users: 14717 Ratings
- Top rated: 3.7
- Lowest rated: 1
- Summary of article content: Articles about Building a Great Gravel Road: 10 Basic Principles Updating …
- Most searched keywords: Whether you are looking for Building a Great Gravel Road: 10 Basic Principles Updating Get a detailed insight about how to build a great gravel road, read on the pointers at mahindra construction equipmentgravel road, rural roads
- Table of Contents:
Road Repair – Building An All Weather Road – YouTube
- Article author: www.youtube.com
- Reviews from users: 41544 Ratings
- Top rated: 3.5
- Lowest rated: 1
- Summary of article content: Articles about Road Repair – Building An All Weather Road – YouTube Updating …
- Most searched keywords: Whether you are looking for Road Repair – Building An All Weather Road – YouTube Updating How to build an all weather road through wet areasroad repair, building a road, woods road, gravel, culvert, low spots, mud holes, all weather road, wet areas, land, improvement
- Table of Contents:

DIY Property owners where to build a new road in Hilly Terrain? – YouTube
- Article author: www.youtube.com
- Reviews from users: 3732 Ratings
- Top rated: 3.7
- Lowest rated: 1
- Summary of article content: Articles about DIY Property owners where to build a new road in Hilly Terrain? – YouTube Updating …
- Most searched keywords: Whether you are looking for DIY Property owners where to build a new road in Hilly Terrain? – YouTube Updating Check out our latest Upload! Excavator, Tractor clearing trees! https://www.youtube.com/watch?v=M7nIEwPTGC4 –~–Another exploring video of our new Farm, but…Kapper, Kapper Outdoors, Building a new road, Road in hilly terrain, property owner, hunting land, marking out road, hardwood forest, creek, illinois land, habitat improvement, land management, gps marking, using gps on your land, laying out new road, utv path, atv trail
- Table of Contents:

Homestead Road Building – Off Grid and Free: My Path to the WildernessOff Grid and Free: My Path to the Wilderness
- Article author: inthewilderness.net
- Reviews from users: 36152 Ratings
- Top rated: 4.8
- Lowest rated: 1
- Summary of article content: Articles about
Homestead Road Building – Off Grid and Free: My Path to the WildernessOff Grid and Free: My Path to the Wilderness Busting a road through the woods to your homestead is an expensive proposition. We discuss road building, lay out conserations, … … - Most searched keywords: Whether you are looking for
Homestead Road Building – Off Grid and Free: My Path to the WildernessOff Grid and Free: My Path to the Wilderness Busting a road through the woods to your homestead is an expensive proposition. We discuss road building, lay out conserations, … prepping, homesteading, living off grid, living in the wilderness, off the grid, homesteading books, self-sufficiency, self-reliance, Canadian wilderness adventure book, off-grid books, prepping books, remote Nova Scotia ocean front for saleBusting a road through the woods to your homestead is an expensive proposition. We discuss road building, lay out considerations, culverts and snow plowing. - Table of Contents:
Culverts on the Cheap
Snow Plowing Your Homestead Driveway

Forest Road Construction: A Step by Step Process – Hunt2Prove
- Article author: hunt2prove.com
- Reviews from users: 35632 Ratings
- Top rated: 3.2
- Lowest rated: 1
- Summary of article content: Articles about Forest Road Construction: A Step by Step Process – Hunt2Prove Forest Road Construction: A Step by Step Process · Step 1: Boots on the Ground · Step 2: Aerial & Topographic Map Assessment · Step 3: Assessing … …
- Most searched keywords: Whether you are looking for Forest Road Construction: A Step by Step Process – Hunt2Prove Forest Road Construction: A Step by Step Process · Step 1: Boots on the Ground · Step 2: Aerial & Topographic Map Assessment · Step 3: Assessing … Forest Road Construction is an essential part of managing timberlands. It’s also essential to the longterm profitability of a timberland asset
- Table of Contents:

See more articles in the same category here: Chewathai27.com/toplist.
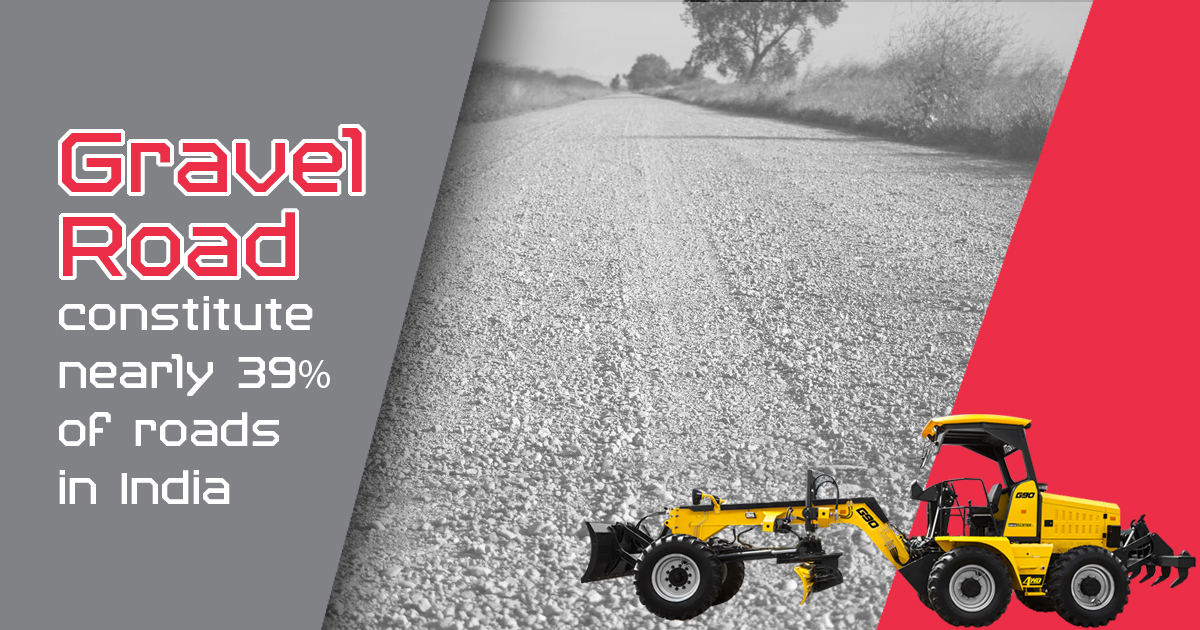
Building a Great Gravel Road: 10 Basic Principles
Building a Great Gravel Road: 10 Basic Principles
Unpaved road surfaced with gravel is known as the gravel road. In India, nearly 39 per cent of roads are unpaved and they are mostly the gravel roads found in rural regions. Hence, it becomes imperative to ensure that the gravel roads that connect most of the rural areas of the country are properly built.
However, building a gravel road is not an easy task. It involves meticulous planning, preparation and usage of specialised equipment. This is to ensure that the road is smooth, has uniform surface which can handle all types of loads and does not break easily in extreme weather conditions.
So, whether you aim to build a short stretch or a complete network of gravel roads covering a large area, it is imperative that you understand the basics of building a gravel road. Thus, in order to get a detailed insight about how to build a great gravel road, read on the pointers below…
1. Determine the road usage:
Which type of vehicles would be using the gravel road will define various things in the gravel road construction process. In fact, if you have this information, then you can easily determine the ideal path and width of the road as well as the required depth of the base material.
Take an example, in case of a gravel road that is intended to support heavy-duty vehicle, the road has to be kept rather straight with less curves and switchbacks to accommodate the limited manoeuverability of the heavy vehicles. Further, it would be much stronger than the gravel road which is intended for light vehicles and low traffic volume.
2. Get the right machinery and operator to work:
A lot depends on the road construction equipment that is used. Like in the case of any other type of road construction project, gravel roads also need the right machinery which can build quality road and extend its service life.
Not only having the right equipment is important but it is equally necessary to hire an experienced equipment operator. Take an example, if you are using a motor grader, then the operating speed of the equipment along with the angle and tilt of the moldboard can either make or break the road. Here, it is worth the mention that only an experienced motor grader operator will know these tactics and principles well. So, the importance of hiring an experienced equipment operator cannot be undermined.
3. Use the right materials:
Just like using the right equipment and operator is important, making use of the right material as per the need is also equally necessary. Like if you wish to have a dry and stable base, then soils with high clay content or moisture should not be used at all. Typically, in order to build a smooth and firm top surface of the road, best quality of gravel consisting of a combination of fractured stone, sand and fine particles with a binding characteristic should be used.
4. Compact the soil properly:
Like grading, soil compaction is also one of the most important processes in gravel road construction. Soil compaction helps in reducing the volume of water and air in the soil. This helps in creating a harder, denser and more durable surface that can resist heavy traffic and extreme weather conditions easily.
5. Build a base that is solid:
It goes without saying that on a stabilised base, a good gravel road is built. In order to obtain a stable foundation, binding agents such as cement, calcium chloride, salt or lime should be mixed into the soil using a stabilising machine. Then the soil compaction process should be carried out to get a firm foundation.
6. Construct the gravel road in layers:
Gravel roads should always be constructed upwards in layers from a stable base. Before applying the final surface layer, the base layer should be allowed to harden and settle. If the base is poor, then the quality of the road would not be good and then no amount of top grading can save that road.
7. Design the road to sustain extreme conditions:
The gravel roads should be designed and built in such a way that they sustain heavy vehicles, high traffic volumes as well as worst weather conditions. In cases where the road would be used by large trucks, make it a point to never use gradients more than 10 per cent. You also need to ensure that the road is wide enough to accommodate all types of vehicles travelling in both directions.
8. Ensure proper drainage:
It is a known fact that those gravel road last longer and require less maintenance that have proper drainage. If crowns and shoulders are properly shaped and there are appropriate ditches, culverts and drains, then water can be easily channelled away from the gravel road surface.
9. Apply surface strengthening solutions
Bituminous surface treatment should be done when you want to make the gravel road smooth and free of cracks, ruts and potholes. This also makes the surface hard, all-weather and water-resistant.
10. Maintain the road regularly:
Regular grading of gravel roads is necessary to keep them in good condition. Common maintenance tasks may include reshaping the road, clearing the drainage system of foliage and rubble and removing any excess material.
Thus, by following the above mentioned points, a great gravel road can be constructed. In addition, construction equipment like motor graders can also help in doing so. Particularly, Mahindra Construction Equipment’s Mahindra RoadMaster G75 which is made in India for the Indian roads deserves a special mention here. It can serve as an ideal grading machine for spreading and grading of earthwork in different types of roadwork including the gravel roads across the nation.
Homestead Road Building – Off Grid and Free: My Path to the Wilderness
Busting a road through the woods is an expensive proposition. You may have to pay a logger to drop trees. You will have to hire a bulldozer to clear the roadway. Then you will need to pay for load after load of gravel that will be hauled by a dump truck. If you are trying to convert a boggy area to a road, you will be astounded at how much gravel the area sucks up before you have a passable road. For spots with high spring run off or year round flows, you may even need to purchase culverts. All these expenses need to be factored in when figuring the cost of homestead road building.
Out of curiosity, I inquired years ago how driveways through the woods are priced in Canada. Per foot was the response. A lot per foot as it turned out. It was an absurd figure. So absurd, I never bothered to put it in my memory vault for future retrieval. Paying a pile of money per foot to bust a trail through the woods wasn’t going to happen in my lifetime.
On the Maine homestead, I had a roughly 2100 foot ( a little less than half mile) long driveway. It was a woods road that led to a small 4 acre potato field. That field was the perfect place to put my new home nestled among the surrounding forest. But before I could reach this clearing, I first had to deal with a few sections of wet ground, each about 100 feet in length. It took dump truck load after dump truck load of gravel to fill in these short sections. I bought “bank run gravel” from the local contractor. Bank run gravel is unprocessed, right out of the ground material containing small boulders, gravel and sand. In wet ground, you want some big material (boulders and rock) to form a good solid base. Then gravel on top to create a relatively smooth, drivable surface.
Culverts on the Cheap
Because cost was paramount, when dealing with wet areas, I opted to build a culvert on the cheap. With the help of a local guy, I dug a wide trench across the road. We dropped several cedar trees across the road at right angles to the road and positioned them parallel to each other in the trench. The trees in the trench didn’t touch each other. I’m guessing the distance between trees was a gap of 12-18 inches at most. I didn’t do this, but I could have put another set of tree stems on top of the ones already in position to build up the height of the culvert. Next we drove some stakes into the ground on the insides of the trench to prevent the logs from rolling into the homemade culvert.
Using slabs that were generated by the portable sawmill which had cut the lumber for my home,I built a top over the logs to box in the culvert. By laying the slabs in a thick layer that was perpendicular to the logs, I created a surface that could be covered by loads of gravel thus creating a corridor from one side of the road to the other that allowed water to flow. It worked for many years but ultimately, the wood started to rot and I installed a steel culvert. But the homemade version is a trick to consider if you are really low on funds. I would opt to do it right the very first time with a proper culvert if you can. The following link is further information on road culverts.
https://www.fhwa.dot.gov/environment/recreational_trails/publications/fs_publications/01232833/struct02.cfm
Location of your access road or driveway will need to be considered carefully. There is a balance between a straight line from point A to point B and a winding, meandering driveway through the woods to get from Point A to Point B. The shorter the driveway, obviously the cheaper the cost but aesthetically, having a buffer or kink in the road that gives some privacy so that traffic doesn’t have a line of site right to the homestead is nice too.
I would suggest flagging out the route of your drive from the town road to your homestead and then getting a number of written estimates for exactly how much cost is involved. You can pace it off to get a sense of the distance you’re faced with. The land itself will dictate to a large extent how much road work will be needed.
Snow Plowing Your Homestead Driveway
For those of you who live in snowy climes, snow plowing will need to be factored in when laying out your driveway. A gentle sweeping turn is much better than a short, abrupt change in direction. At the Maine homestead, I plowed snow with a large blade on a skidder and had the power and maneuverability to deal with any road condition. But for someone in a pickup truck or farm tractor moving snow, you’ll be better off if you have direction changes that will allow you to keep your forward momentum going.
Don’t forget to create pockets along the roadside where you can push accumulated snow well off the road and into the woods or field. Additionally, the width of the road should be wider for those in snowy areas. It is amazing how the snow bank will build on either side of the road from plowing over the course of a winter. Over time, it will be like driving down a tunnel and a wide road with some pockets for pushing snow off to the sides will be a godsend. Remember that once those banks freeze solid, it will be a real chore to break them up to wing them back, so it’s best to wing the snow back as far as possible starting with the first snowstorm.
The last point of consideration is shade over your roadway. Our homestead in Maine had a long road that essentially wound its way through a forest and many large trees formed a shaded canopy in summer. Many sections never saw sunlight including the section of road that wound through the wet cedar stand. Conditions were always damp and the road surface was always wet. Over time, I thinned out the overstory of trees including the cedar trees which allowed sunlight in to dry the road bed. That made a huge difference in the road’s ability to dry out especially in the spring or after rains.
At the Maine homestead, every day, I took a walk down my woods road to fetch the mail. The lengthly drive had a number of turns and it was a lovely walk, one I treasured. On a warm summer day, with a sprinkling of sunlight on my shoulders as I strode down the drive, I knew I’d made the right decision to thin out and create an opening in the canopy to let the sun shine in. The bonus was it didn’t take long for the driveway to dry out and rarely did I come home with mud caked footwear.
Until next time, keep the dream alive! We wish you a great day!
Ron and Johanna
If you found our site and this post of value, would you please click the “Top Prepper Sites” link in the right hand column to vote for us? Thank you so much!
Please subscribe to our blog if you would like email notification of new posts.
Forest Road Construction: A Step by Step Process
Forest Road Construction: A Step by Step Process
Forest Road Construction is an essential part of managing timberlands. It’s also essential to the longterm profitability of a timberland asset – Access is Key. In most cases, over the course of one to two lifetime’s, a property will change hands. That means that you or your children will likely be a part of the transfer, the passage of that bundle of sticks from seller to buyer. Beforehand, a focus on accessibility is a worthwhile endeavor. The benefits to owning a property with a network of sound woods-roads and firebreaks are many. As we meander through the inner-workings of constructing a forest road we’ll highlight the pros and cons associated with it.
Step 1: Boots on the Ground
This part of the process allows one to take note of any existing thoroughfares on a given property. A lot of times, an old-road can be opened back up to serve as all or a portion of what we call the main forest road. Situations like this certainly make things easier for all involved. Almost always, though, there will be segments that entail starting from scratch. This is a good opportunity to get to know your landowner and get a better feel for the land you’re working on.
Step 2: Aerial & Topographic Map Assessment
Once an inventory of any existing roads has been taken, both aerial photos and topographic maps must be studied, any planned path measured up against them. Often times, Steps One & Two happen in conjunction with each other, newer Apps like HuntStand or OnX Hunt greatly improving our in-the-field workflow by reducing the need for paper maps.
Step 3: Assessing Individual Watersheds for Stream Crossings
This step involves studying contour maps to estimate the number of acres that flow into an area proposed for a stream crossing. You can find Contour Maps on your county’s GIS Website. You’ll then use the Polygon Measuring tool to estimate the acreage flowing into your proposed stream crossing. We recommend completing this process a minimum of 3 times for each stream crossing site and then taking the average. You can then use this portion of the North Carolina Forestry BMP Manual to calculate the size and number of pipe you’ll need to accommodate a specific watershed: Part 3 – Stream Crossings
See the links at the end of this publication for more information on assessing watersheds
Step 4: Flagging the Proposed Path
Simple enough, this step involves using high-visibility flagging spaced 15-30 feet apart in most cases. The objective is to keep all equipment operators on the right track! Timber-stand density will effect the distance between flagging.
As a timberland manager or landowner, you want to cash in on any aesthetically pleasing aspects of your property, making a forest road meander through and/or adjacent such areas – this can be a significant boost to the realty value of a property while also serving to impact your own pride in ownership or enjoyment. At the same time, you also have to pay close attention to topography and conditions on the ground that can save you thousands of dollars in earth moving costs or those associated with future problems that stem from putting a road in the wrong spot.
Step 5: In comes the Feller Buncher & Skidder
In the best possible case, having a logger ready to go once a final path is settled upon will allow for a more complete merchandising of any wood products found within the proposed path. The buncher operator would cut and set aside the merchantable stems that can then be moved out of the desired path by the skidder operator. Unfortunately, this isn’t always possible. Loggers are rarely available to jump right into a project.
Step 6: Dozer & Excavator
For our most recent project, Step 5 had to follow step 6 at first. Unique circumstances will call for a rearrangement of the order of things on certain jobs. During this process, due care must be taken to fully mitigate stump holes and remove ALL top soil from the proposed roadway. A failure to do so will result in your road doing to rock what the cookie monster does to cookies. Topsoil can be re-spread over logging deck sites or other areas like those used for the creation of edge habitat or wildlife food plots.
But, what about the wood that has to be pushed over and out of the way? Will it all go to waste? Any wood pushed over in the process, even some that could be classified as merchantable, can be very valuable on the down-side of slopes by creating a barrier to further minimize erosion. In addition to adequate crowning and ditching of the roadway, water bars can be installed to divert the flow of water away from the center of your road and into a turn-out – Here’s a good PowerPoint I found online regarding water bars and turnouts – WaterBars & Turnouts (Downloads to your Mac or PC).
Step 7: Ordering Pipes for Stream Crossings & Other Supplies
Early in the process, while the dozer and excavator are at work, it’s wise to order any pipes or stabilization supplies like Erosion Control Mats, Straw Wattles, Ground Stakes, Seed, Fertilizer, Lime, & more. Planning ahead and ordering supplies early will ensure that equipment operators aren’t waiting on you to secure any necessary materials. It will also ensure that you are ready to perform Step 8 on a moments notice – something often necessary to beat rain and keep erosion to a minimum. Because we appreciate small-business and fully embrace keeping business local if humanly possible, we recommend Carthage Farm Supply/Southern States for most of the roadwork supplies you may need in and around Moore County, NC.
Step 8: Stabilization of Stream Crossings & new Roadway
This is the most labor intensive part of Forest Road Construction for the timberland manager or landowner. Newly moved dirt requires stabilization as soon as possible. As such, we often have to make things happen quickly. This can include choreographing the delivery and application of rock to serve as a base for the portion of the road that will see vehicular traffic.
For the sides of the roadway and ditched areas you’ll need to lay down some lime, seed, and fertilizer. Also, along the run of your ditches, you’ll need to use rock or Straw Wattles that will serve to slow the flow of water downhill, which will help to reduce erosion along your roadway. The distance between wattles is directly related to the slope of the land you’re working on. For Stream Crossings, we put down a layer of Erosion Control Matting and then apply our Lime, Seed, and Fertilizer. The Matting is PIVOTAL on steep areas as it holds the seed and soil in place when it would otherwise wash down to the bottom of the slope with the first hint of rain. We’ll also utilize bales of wheat straw to help cover areas where matting isn’t as practical. Additionally, it is UBER important to solidify the sides of all pipes with rock, a rip-rap or similar-sized material working best.
Step 9: Keep a Regular Check on any newly created Roadway
We highly recommend keeping a regular check on any newly created forest road or firebreak, especially at first. There’s no set time and we fully understand that there will be periods of weeks or even months where a low-impact woods-road may see little or no human interaction. At first, though, regular check-ups can be a life road saver, literally. Any problems can be addressed swiftly saving you money in the long-run.
The Pros:
Accessible Land is MORE Valuable – In more ways than One
Improved Forest Aesthetics Pride in Ownership
Improved Recreational Enjoyment White-Tailed Deer Hunting Wild Turkey Hunting Fishing Wildlife Viewing & Photographing Trail Riding Walking/Running Biking
A solid, Main Forest Road, especially one with “All-Weather” Designation, leads to higher valued wood products
Allows for the compartmentalization of a larger tract or parcel of land into smaller management units. This can be important for accomplishing certain wildlife management objectives or other conservation activities. It also affords the landowner an easier path to having and managing multiple timber stands for different uses or wood products. Ex. A main forest road and interconnecting firebreaks or tributaries allow for much easier and safer management of individual timber stands by serving as a divider. One side of the road or firebreak might be managed for the production of White Oak Stave Barrels while the other side is loblolly pine plantation.
Leads to a much safer execution of any Prescribed Fire Plan or series of plans. Read more about Prescribed Fire here: Rx Fire
The Cons:
Forest Road Construction can be Expensive
Requires regular maintenance
Removes some acreage from Timber Production
Concluding Remarks
Forest Road Construction and maintenance is as important to the management and appreciation of timberland over time as are the natural resources themselves – When one is lacking the other suffers and vice versa. The pros of creating and adequately maintaining a network of thoroughfares across a given landscape significantly outweigh the cons.
Although the creation of a main forest road and firebreaks certainly removes land from timber production, you’re talking minuscule amounts. For example, a 40 foot wide main forest road running 3696 Linear Feet removes only 3.4 +- acres from production. In 9 out of 10 cases, this would translate into losing no more than $10,000 over the course of a 35-year loblolly pine rotation. Is this acceptable to you? It should be!
The takeaway – no woods-road or firebreak will be 100% perfect all of the time regardless of where you put it or whether or not you’ve done everything by the book. If you own or manage timberland, you’ll find there’s always something that needs fixing or improving. But, carefully planning and carrying out the creation of a sound network of thoroughfares and keeping them maintained can literally mean money in the bank down the road. In the end, choose your path wisely – cash in on the natural draw your property has to offer and make your lands accessible. You’ll be glad you did!
Here are a couple of helpful links to aid in your road building needs:
Low-Volume Roads Engineering
How to Read a Topographic Map and Delineate a Watershed
How to read a Topographical Map
Stay tuned for more on the creation of forests roads and firebreaks!
**Disclaimer: This is in NO way, shape, or form the only means to an end. We are constantly learning more, improving on what we know, and tweaking every management objective we carry out. As such, this step by step process we follow is subject to change. Some of the links provided within take forest road construction to a whole new level. Additionally, we have learned the hard way that when you don’t know, ask – Hunt down an answer any way you can! It’s better to do something as close to right as possible the first time! For regulations regarding the creation and maintenance of forest roads in North Carolina see here: NCFA Forestry Regulations
Share this: Twitter
So you have finished reading the how to build a road in the woods topic article, if you find this article useful, please share it. Thank you very much. See more: types of forest roads, forest road construction manual, clear the road petition, forest road maintenance, corduroy road, forest path