
You are looking for information, articles, knowledge about the topic nail salons open on sunday near me how to remove shadow lightroom on Google, you do not find the information you need! Here are the best content compiled and compiled by the Chewathai27.com team, along with other related topics such as: how to remove shadow lightroom remove shadow from face lightroom app, how to remove shadows in lightroom classic, remove shadow from photo, removing background shadows in lightroom, how to remove shadows in lightroom app, how to remove shadows under eyes in lightroom, how to remove shadows in snapseed, how to remove shadows from face in lightroom
If you want to get rid of shadows in Lightroom, start by making global adjustments to your image, and using sliders is the easiest way to do it. If there are only subtle shadows in your image, you can go to the Shadows slider in the Basic Panel of the Develop Module and drag it to +100.Snapseed is an Android and iOS photo shadow remover app that is completely free for all users. It is one of the most used tools for this purpose. It is because of its simplicity and friendly user interface.First, start off by pulling down the ‘Highlights’ and ‘Whites’ of the image in order to balance the overall tone. Bring up the ‘Shadows’ and ‘Blacks’ in the photo to brighten the darker portions of the image.
- Step 1: Tune Up the Global Adjustment Sliders.
- Step 2: Balance the Other Sliders in the Panel to Enhance the Contrast.
- Step 3: Use the Adjustment Brush Tool for Specific Shadowed Areas.
- Step 4: Use the Split Toning Panel to Enhance the Contrast.
- Step 5: Adjust the Color Temperature.
- Step 1: Open and Duplicate the Background. …
- Step 2: Select the Patch Tool. …
- Step 3: Remove Shadows. …
- Step 1: Select the Shadow. …
- Step 2: Copy Shadow to New Layer. …
- Step 3: Adjust Brightness and Temperature. …
- Remove Harsh Shadows with the Clone Tool for More Control.
Contents
How do you get rid of a shadow in a photo Lightroom?
If you want to get rid of shadows in Lightroom, start by making global adjustments to your image, and using sliders is the easiest way to do it. If there are only subtle shadows in your image, you can go to the Shadows slider in the Basic Panel of the Develop Module and drag it to +100.
Can shadows be removed from pictures?
Snapseed is an Android and iOS photo shadow remover app that is completely free for all users. It is one of the most used tools for this purpose. It is because of its simplicity and friendly user interface.
How do you clear a shadow?
- Step 1: Open and Duplicate the Background. …
- Step 2: Select the Patch Tool. …
- Step 3: Remove Shadows. …
- Step 1: Select the Shadow. …
- Step 2: Copy Shadow to New Layer. …
- Step 3: Adjust Brightness and Temperature. …
- Remove Harsh Shadows with the Clone Tool for More Control.
How do you remove harsh sunlight in Lightroom?
First, start off by pulling down the ‘Highlights’ and ‘Whites’ of the image in order to balance the overall tone. Bring up the ‘Shadows’ and ‘Blacks’ in the photo to brighten the darker portions of the image.
How can I remove shadows from pictures online?
PhotoAiD developed a free-of-charge tool that will easily remove shadows from your picture in the blink of an eye! All you need to do is upload your photo that has shadows and click the “Remove shadows” button. Within just a moment, you will get your photo with the lighting adjusted and the shadows removed.
How can I remove a shadow from an image without Photoshop?
How to Remove Shadows From Photos Without Photoshop. You don’t need expensive software to remove shadows in contrasty images. You can also do it in GIMP, the free photo editing app. Just go to Colors > Shadows-Highlights and drag the Shadows slider left or right to make your changes.
How do you soften shadows in Photoshop?
Use 6-10px Gaussian Blur on the Tone layer. Select the Texture layer. Head to the Image menu, choose Apply Image. Inside the box from the “Layer” dropdown menu choose Tone, set Blending Mode as Subtract.
Can you fix shadows in Photoshop?
The Best Shadow Removal Photoshop Tools
You can use Photoshop’s retouch and repair tools to quickly remove shadows, including Clone Stamp Tool and the Patch Tool. Repair tools also allow you to get in and fine-tune details using the Healing Brush and the Spot Healing Brush.
How do I remove shadows from photos on Mac?
In the Photos app on your Mac, double-click a photo, then click Edit in the toolbar. Click Adjust in the toolbar. Do any of the following: Click the arrow next to Light, Color, or Black & White, then drag the slider until you are satisfied with the look of the photo.
How do I remove the shadow from a photo using Snapseed?
- First, start your Snapseed app.
- Second, tap on the plus icon to open your gallery.
- Next, select a photo to edit.
- Then, enter the Tools tab and select Selective.
- Now choose the place you want to brighten.
- Use two fingers to adjust the size of the highlighted area.
- Swipe left to lighten the area.
How do I edit Lowlight photos in Lightroom?
- Step 0: Do your best to get it right in camera. …
- Step 1: Evaluate your photo. …
- Step 2: Check for clipped highlights and shadows. …
- Step 3: Adjust the exposure. …
- Step 4: Increase contrast. …
- Step 5: Fix the white balance. …
- Step 6: Add Clarity and/or sharpening.
How do you soften harsh light?
Grab a tissue or thin paper napkin and hold it over the flash, point and shoot. It works best if you use a double layer tissue or fold it in two. This softens the light of your flash in your photos, even though the light is still direct. There are more expensive tools that you can buy to soften your flash.
How do I see before and after in Lightroom?
The next way to view a before and after comparison in Lightroom is the Top/Bottom view. To activate this view, select “Before/After Top/Bottom” from the Before & After tool or press [Alt + Y] on Windows or [Option + Y] on Mac. This will display your original image on top and your edited version on the bottom.
How do I use auto mask in Lightroom?
To do this process on your own, navigate to the Adjustment Brush panel, select a preset or move the sliders to your own liking, adjust the size of the brush, and then tick Auto Mask.
Where is the Adjustment Brush in Lightroom?
The Adjustment Brush icon can be found in the Develop module below the Histogram, and above the Basic panel on the far right. To use it, either use keyboard shortcut ‘K’ or simply click on the icon, and your effects options will be revealed. You can select from any of these sliders to make adjustments to your image.
How to Remove Shadows in Lightroom | ShootDotEdit
- Article author: shootdotedit.com
- Reviews from users: 18394
 Ratings
 - Top rated: 3.4
- Lowest rated: 1
- Summary of article content: Articles about How to Remove Shadows in Lightroom | ShootDotEdit
Updating … - Most searched keywords: Whether you are looking for How to Remove Shadows in Lightroom | ShootDotEdit
Updating Shadows making your images look dark & dull? Are they masking image details? Learn how to remove shadows in Lightroom in 5 easy steps! - Table of Contents:
Tutorial How to Remove Shadows in Lightroom
How to Remove Shadows in Lightroom in 5 Easy Steps
Leave a comment
How to Remove Shadow from Photo
- Article author: filme.imyfone.com
- Reviews from users: 33803 Ratings
- Top rated: 3.6
- Lowest rated: 1
- Summary of article content: Articles about How to Remove Shadow from Photo Updating …
- Most searched keywords: Whether you are looking for How to Remove Shadow from Photo Updating This article will show you online tools to remove shadow from photo easily. You can get rid of shadow from photo with the methods below easily.
- Table of Contents:
Part 1 Remove Shadows from Images with AI-Powered MarkGo Remover [1-Click]
Part 2 5 Best Apps to Get Rid of Shadow from Photo(iPhoneAndroid)
Part 3Top 3 Online Tools to Delete Shadow from Photo Online
Part 4 Tips to Avoid Shadows When Taking Pictures
Part 5 Other FAQs about Erasing Shadows from Photos
Conclusion
Related Articles
How to Remove Shadows in Photoshop (Step by Step)
- Article author: expertphotography.com
- Reviews from users: 43556 Ratings
- Top rated: 4.3
- Lowest rated: 1
- Summary of article content: Articles about How to Remove Shadows in Photoshop (Step by Step) Updating …
- Most searched keywords: Whether you are looking for How to Remove Shadows in Photoshop (Step by Step) Updating Ever ruined a shot because you accidentally captured your own shadow? Here are a few fast and easy ways to remove shadows in Photoshop.
- Table of Contents:
How to Remove Shadows with Content-Aware Fill
Reduce Harsh Shadows using Layers
Removing Harsh Shadows from Faces to Improve an Image
Conclusion
About the Authors
Related Articles
Create Photo-Magic with Simple Steps in Photoshop
Create This Photo-Magic with Simple Steps in Photoshop
How to Remove Shadows in Lightroom | ShootDotEdit
- Article author: shootdotedit.com
- Reviews from users: 31806 Ratings
- Top rated: 3.0
- Lowest rated: 1
- Summary of article content: Articles about How to Remove Shadows in Lightroom | ShootDotEdit
If you want to get r of shadows in Lightroom, start by making global adjustments to your image, and using slers is the easiest way to do it. If there are … … - Most searched keywords: Whether you are looking for How to Remove Shadows in Lightroom | ShootDotEdit
If you want to get r of shadows in Lightroom, start by making global adjustments to your image, and using slers is the easiest way to do it. If there are … Shadows making your images look dark & dull? Are they masking image details? Learn how to remove shadows in Lightroom in 5 easy steps! - Table of Contents:
Tutorial How to Remove Shadows in Lightroom
How to Remove Shadows in Lightroom in 5 Easy Steps
Leave a comment
Proven Steps on How To Remove Shadows In Lightroom
- Article author: theclippingpathservice.com
- Reviews from users: 46602 Ratings
- Top rated: 3.7
- Lowest rated: 1
- Summary of article content: Articles about Proven Steps on How To Remove Shadows In Lightroom Gueline on How To Remove Shadows In Lightroom · Step 1: Work with Global Adjustments · Step 2: Use Lightroom Brush Tool · Step 3: Improve The Image Contrast. …
- Most searched keywords: Whether you are looking for Proven Steps on How To Remove Shadows In Lightroom Gueline on How To Remove Shadows In Lightroom · Step 1: Work with Global Adjustments · Step 2: Use Lightroom Brush Tool · Step 3: Improve The Image Contrast. Vanish all the unwanted shadows from images within minutes. Follow our steps on how to remove shadows in Lightroom and get instant results.
- Table of Contents:
How to Remove Shadow From Picture in Lightroom – Click The Photo
- Article author: clickthephoto.com
- Reviews from users: 22321 Ratings
- Top rated: 5.0
- Lowest rated: 1
- Summary of article content: Articles about How to Remove Shadow From Picture in Lightroom – Click The Photo Sler. What we do is, increase the Shadows Sler to +100. If in a picture, the shadow is subtle, only then this one trick will … …
- Most searched keywords: Whether you are looking for How to Remove Shadow From Picture in Lightroom – Click The Photo Sler. What we do is, increase the Shadows Sler to +100. If in a picture, the shadow is subtle, only then this one trick will … we are going to give you a guide on how to remove shadow from picture in Lightroom. Please do keep in mind that the technique is rather simple hence
- Table of Contents:
Introduction
How to Remove Shadow From Picture in Lightroom
FAQ
Conclusion
How to remove shadows on a face on the mobile app? – Adobe Support Community – 10782687
- Article author: community.adobe.com
- Reviews from users: 9358 Ratings
- Top rated: 4.2
- Lowest rated: 1
- Summary of article content: Articles about
How to remove shadows on a face on the mobile app? – Adobe Support Community – 10782687
As you want to remove the shadow from a face, You may want to look … This is for the full desktop version of Lightroom not the mobile app. … - Most searched keywords: Whether you are looking for
How to remove shadows on a face on the mobile app? – Adobe Support Community – 10782687
As you want to remove the shadow from a face, You may want to look … This is for the full desktop version of Lightroom not the mobile app. Can someone please tell me how to remove shadows on someone’s face on the mobile app? I’ve seen multiple posts for the desktop/full Lightroom program but – 10782687 - Table of Contents:

Remove background shadows using Lightroom?: Retouching Forum: Digital Photography Review
- Article author: www.dpreview.com
- Reviews from users: 35178 Ratings
- Top rated: 4.0
- Lowest rated: 1
- Summary of article content: Articles about Remove background shadows using Lightroom?: Retouching Forum: Digital Photography Review I do that by selecting each area with a selection tool. I use the pen tool, and then fill those selections with the proper background color, and … …
- Most searched keywords: Whether you are looking for Remove background shadows using Lightroom?: Retouching Forum: Digital Photography Review I do that by selecting each area with a selection tool. I use the pen tool, and then fill those selections with the proper background color, and … Expert news, reviews and videos of the latest digital cameras, lenses, accessories, and phones. Get answers to your questions in our photography forums.
- Table of Contents:
Latest sample galleries
Latest in-depth reviews
Latest buying guides
See more articles in the same category here: Top 122 tips update new.
How to Remove Shadows in Lightroom
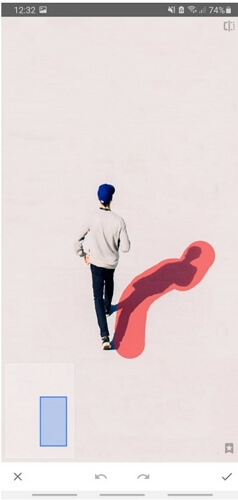
Have you ever wondered why some parts of your images look dark and shadowy even though you were shooting in bright light? This happens because light doesn’t hit all areas in your photo the same way, causing some parts to be darker than others, which then results in your images having a range of light and dark tones. However, these dark tones can be just shadows or blacks. The difference lies in the amount of brightness and details in them. Shadow areas might look dull, but there are details hidden under them, whereas in black areas, all details are lost. However, during post-production, you can retrieve any details hidden under shadows and also modify the contrast in your image. So if you want to know how to remove shadows in Lightroom and improve the quality of your pictures, this blog shows you how in 5 easy steps.
How to Remove Shadows in Lightroom in 5 Easy Steps
1. Make Global Adjustments Using Sliders
Image Courtesy of @photography_by_orlando
If you want to get rid of shadows in Lightroom, start by making global adjustments to your image, and using sliders is the easiest way to do it. If there are only subtle shadows in your image, you can go to the Shadows slider in the Basic Panel of the Develop Module and drag it to +100. You can even use this step for every photo you import into Lightroom. But if the shadows were underexposed when the image was first taken, this step might create unwanted noise. Contrary to RAW images, JPEGs will usually show noise in the shadows with a minor shadows adjustment. You can follow these steps to reduce the noise in your photos. Also, increasing the Blacks slider might help with saving shadow details.
Another thing you can do is decrease the Highlights. Drag the slider down to -50 and see if the results work for you. You can also increase the Exposure to balance out the effect of the Highlights. When you decrease the Highlights and increase the Exposure, the luminance value of the brightest parts in your image will come closer to the darker areas in it.
You can keep making the adjustments to get desired results, but these sliders have limitations. If you don’t get the results you want by using the sliders, you can go ahead and make local adjustments.
2. Remove Shadows in Lightroom With the Brush Tool
Image Courtesy of @photography_by_orlando
For local adjustments, you can use the Brush Tool to edit specific areas of your image. In the Develop Panel, you will find the Brush Tool near the top. Next, you will have to load your brush with the right settings so that you can remove shadows from your photo. Start by moving the Feather slider to +100, then turn on Auto-Mask. Next, increase the Shadows to +100 with the help of the slider. In the end, turn on the Overlay by pressing the O key on your keyboard. This will help you see the areas where you used the brush.
Now, start brushing on the darker or shadow areas of your image. Using the shadow adjustment will help ensure that you don’t go too far with your edits and that only the darker parts of your photo are affected. Once you are done brushing, you can turn off the Overlay to see how your image looks. If you are not satisfied with the result, you can increase the Exposure using the slider. But be cautious as you use this tool as it can give an unnatural look to your photo when not used in the right amount. So before you try the Exposure slider, you can duplicate the brush effect by making adjustments to Shadows.
3. Erase to Perfect Brushed Areas
Sometimes, you might forget to turn on the Auto-Mask feature and accidentally use the brush on those parts of your image that don’t require any edits. In this situation, you would need to change your brush mode to Erase. With the Auto-Mask still turned off, you will have to turn on the Overlay and then brush over the areas you don’t want to be affected by your edits.
Related Read: How To Install Brushes In Lightroom
4. Fix Color Temperature
A photograph taken in harsh lighting could have different color temperatures in its bright and shadow areas. So if you try to brighten up the dark or the shadow areas in such images, the original highlights or the areas that were already bright in that photo might end up looking much warmer compared to the shadow areas you brightened later. This can make your photo look heavily edited and unnatural. You can avoid this by selecting your brush adjustment once again and use it to increase the warmth in specific areas in your image. To do this, use the Temp slider in the White Balance section of the Basic Panel. To make your image’s highlights and shadow areas blend more naturally, move the Temp slider to the warm or yellow side.
5. Range Mask to Protect Highlights
If you think your edits could affect the bright areas or the highlights of your image, you can use the Range Mask technique on your brush adjustment. In the Develop Module, you will find the Graduated Filter tool right below the Histogram panel. When you click on the Graduated Filter option, you will see a Range Mask menu pop up. Select Luminance from the menu. The Luminance option will let you mask parts of your photo based on their brightness value. This way, you will be able to protect the highlight or bright areas of your image, especially when you decide to use the exposure slider as a part of your brush settings.
Further Read: How To Sharpen Images In Lightroom
To learn more about image editing, you can go to the Lightroom & Photoshop Tips section of our website. At ShootDotEdit, we love sharing tips and tricks that help you hone your craft. We also aim to lessen your post-production workload with our professional photo editing services. To learn more about how we can help your wedding photography business, check out our pricing plans.
How to Remove Shadow from Photo
Sometimes, it becomes hard to avoid shadows in the images. Those shadows ruin the image background and beauty. But do not worry; there are many applications, software, and online tools for this task. Removing apps including iOS and Android will be introduced in this article. Furthermore, we will introduce best way to remove shadows from photos using desktop applications if you enjoy editing everything on your laptop or PC.
Part 1: Remove Shadows from Images with AI-Powered MarkGo Remover [1-Click] We have seen many applications that you can use on your smartphone, but these are only for quick or rare usage. If you want perfection and professional precision, you should go with a desktop tool. Tips Want to use AI online website tool to remove shadow without downloading software or app? Just try it out FREE without download now! Remove Watermark Online Equipped with the state of the art AI deep learning technique, iMyFone MarkGo is a desktop tool that allows the user to edit their photos and videos. It is basically a watermark tool. You can remove watermark from video and photo. But this tool can also be used to remove shadows from pictures with ease. Features:
iMyFone MarkGo gives an advantage to the user to edit both photos and videos.
It is one of the easiest tools that you will ever find. It is easy to edit and export photos and videos.
You can remove the shadows, background, unwanted objects, or any type of watermark with just a click.
Let us see how a watermark tool can remove the shadow from a photo. Step 1: Download and install iMyFone MarkGo. Open the app and click on “Remove Image Watermark”. Step 2: Click on Add Image and import the image with shadow. Step 3: On your right side, you will see an option of “Selection tool”. Click on it and select the shadow area with this tool. Step 4: You have selected the shadow area, click on “Remove Now”, which is on the right side of your screen. The shadow in the photo will be easily removed.
Watch the video tutorial to learn more about MarkGo
Try It FreeTry It Free
Part 2: 5 Best Apps to Get Rid of Shadow from Photo(iPhone/Android)
For iOS and Android, there are different types of apps in the market. We will discuss both of them and how you can use those photo editors to remove shadows from pictures easily.
1) Snapseed
Snapseed is an Android and iOS photo shadow remover app that is completely free for all users. It is one of the most used tools for this purpose. It is because of its simplicity and friendly user interface.
Features:
With Snapseed, you can use the ” Healing ” tool to remove any type of shadow or unwanted objects from the photo. The healing tool clones the area around your selected shadow and stamps on the shadow to create a blending effect with the background.
It is a very easy editing tool that allows you to erase shadows with just a click and saves your time.
Not only this, but with Snapseed, you can edit your photos in different ways. There are multiple effects and options available.
User Review:
There are thousands of user reviews on this app, and it has a rating of 4.4 out of 5, which definitely means that people love it.
How to Remove Shadow from Photo on iPhone
Snapseed is both an Android and iOS tool, and the usage is almost similar. Let us see how it can help us to remove shadows from a picture on an iPhone.
Step 1: Go to the App Store and download Snapseed. It is a free tool and will take only a few seconds to install. Once it is installed, open it. You will see a big “Plus (+)” sign; tap on it.
Step 2: Select the photo from which you want to remove the shadow.
Step 3: Once the photo is imported, tap on “Effects” and select the “Healing” tool. Mark the shadow area with the tool.
Step 4: After marking the shadow, just remove your finger from the screen and let the healing tool do its work. Shadow will be removed, and the background will be blended with just a touch of healing tool.
2) Photoshop Fix
Photoshop Fix is an iOS photo shadow remover app that allows you to edit your photos with different tools. It is a professional tool and allows the user to remove shadow with Photoshop and perfection.
Features: It allows the user to perform layer-based editing, which is rare and complex in mobile apps. You can easily remove the shadow from a photo using the layer method.
You can add a duplicate layer and use the ” Clone ” tool to fill the shadow areas. You can also use other tools to add detailing to the photo.
The ” blemish ” tool helps to blend the background so that the photo looks original. Photoshop Fix allows the user to play with complex settings, effects, and presets.
User Review:
We know that iOS tools can be a little complex. But users have reviewed this product as very helpful, quick, and fun. With different editing modes and features, it helps the user to enhance the photo.
3) Pixelmator
Pixelmator is also an iOS photo shadow remover app, and it is a paid tool. The reason behind paid subscription to this app is that it is creative and detail-oriented. It consists of templates and presets that one can add to the photos with just a tap. It costs around $4.99.
Features:
Pixelmator allows the user to erase shadows from photos easily. It has an option of the ” Repair ” tool. With this tool, you can not only remove shadows from photos, but you can also remove any kind of unwanted object.
This tool automatically blends the background with shadow to look real. It gives the user the diversity to work outside his comfort zone. It has simple effects and color gradients with just a touch.
User Review:
This app is available for iOS and iPadOS. It is a great tool for editing, and it allows users to use layers and templates to enhance their photos. Due to these reasons, Pixelmator has a rating of 3.7 out of 5.
4) TouchRetouch
TouchRetouch is an app that is available on both Android and iOS. It is a paid tool and allows the user to edit their photos with it. This app was initially developed to remove objects from the photos. We can also use this app to remove shadows from photos easily.
Features:
TouchRetouch has a ” clone ” tool that allows the user to remove shadows from photos. You just need to select this tool and mark the area of shadow. Leave the rest to this app. It will remove the shadow with perfection.
It is a simple and easy-to-use tool with a user-friendly interface.
It allows the user to enhance the photo with the use of different filters.
User Review:
TouchRetouch is a paid tool on both iOS and Android. It costs around $2.00. Thousands of users have reviewed this app because of the variety of editing options, and it has a rating of 4.6 out of 5.
5) Picsart
Picsart is an Android application that is partially free. It means that you have to pay for in-app purchases. The whole app is not free; only a few features are free. Luckily, you can remove shadows from photos with Picsart without any cost.
Features:
To remove any kind of shadow or object from the photo, you can select the ” Clone ” tool. Tap on any area of the photo to select a clone source. Then move your finger on the shadow to apply the clone effect to it. It will remove the shadow like a charm.
Editing becomes very easy with Picsart due to its one-touch tools.
It also has stickers and different cutouts that allow the user to go out of the box while editing a photo.
User Review:
Some options of Picsart are limited, and users need to buy it to use the tools. But overall, it is a good tool for editing, and people love it just because of its simple and user-friendly interface.
Part 3.Top 3 Online Tools to Delete Shadow from Photo Online
First of all, let’s discuss some online tools. Online tools are very helpful for beginners and quick tasks. You do not need to download and install the application. You only need to go to the site and perform your task online.
Here are the three best online object-removing tools that can efficiently remove background shadows from images online free.
1) LunaPic
LunaPic is an online tool for editing images. It has vast applications for adding filters, effects, borders, and drawings over images. It is also well-known for removing objects and watermarks from pictures, and anyone can easily remove shadows using this online tool without paying anything.
Steps on How to Remove Shadow from Photos Using Lunapic Online:
Step 1: First of all, go to the website. On the website’s main page, you will see a large blue button for Upload. Click on it.
Step 2: Now, the tool will allow you to choose images from your device. Choose an image and click on Open. LunaPic will take a few seconds to upload your selected photo.
Step 3: Once your photo is opened with the tool, click on the Cut Out Tool and draw a loop around the shadow.
Step 4: After drawing the loop around the shadow, click on Remove & Inpaint. After a few seconds, the shadow will be removed and replaced with a similar background.
2) removal.ai
Removal.ai is an online background remover for enhancing the presentation and graphics of images. This is a free tool that can also be used for the removal of background and shadows from images. Let’s have a look at the simple steps on how a person can remove shadows from faces online.
Steps on How to Remove Shadow from Photos:
Step 1: First of all, go to the website. On the main page, you will see an option of CHOOSE A PHOTO. Click on it and select the image from your device.
Step 2: On the top of the opened image, you will see two options: one will be Original, and the other will be Removed background. Click on Removed background > Erase & Restore > Preview image.
Step 3: There will be three options on the top of the next window. Firstly, click on Restore. Increase brush size and select all parts of the image. Then click on Erase and select the shadow from your image.
Step 4: Select the area precisely to get good results. Click on Download. If you want to fill the removed parts with a similar background, then cut the background from the image and paste it over the removed area. It is because this does not replace the cut portion of the image with a similar background.
3) Cutout.pro
Cutout.pro is a free and fast online background remover and photo editor. This tool is not only used for removing things and backgrounds from photos, but it can also create cartoon selfies with 3D effects. You can use it to remove the unwanted parts from images, and the removed part will be automatically replaced with the background to make the image natural and real.
Steps on How to Remove Shadow from Photos Online:
Step 1: Go to the website.
Step 2: Now, go to the Products from the top menu bar options and click on the Photo Retouch option. Now, click on the Upload Image button and upload the photo from your device.
Step 3: Select the Smear Repair option and select the shadow by drawing over the image.
Step 4: After drawing, just leave the right click of your mouse, and the selected area will be automatically removed and replaced. Download the image by clicking on the Download button at the top of the screen.
Part 4. Tips to Avoid Shadows When Taking Pictures
Perfect Time
Professional photographers will tell you that there is always a time to capture photos when it is a nature shoot. It is not advisable to take photos when the sun is high because the shadow will be very dark and visible. Thus, it is better to pick a suitable time. Sunset is a recommended time because the sun is not high. If you do not want to shoot in the sunset, you can shoot 1-2 hours before that.
Flash and Viewing Angle
If you want to avoid shadows when taking pictures, the best tip is to use flash. It will help you if you are shooting indoors. But if you are outside and capturing nature, then you need to find the best possible viewing angle to avoid the shadow. It is not easy to find the best angle, and you can hit and try. You can click a few images to arrive at a conclusion.
Adequate Lighting
You can make sure that there is adequate lighting in your studio. If you see any shadow in images, you might need to adjust the position of the lights. If everything is perfect, there won’t be shadows in the image or video.
Part 5. Other FAQs about Erasing Shadows from Photos
1) Is there an app to remove shadows from pictures?
Yes, there are many applications and software to remove shadows from images as well as from videos. We have discussed the best online tools along with the most suitable software, MarkGo, to solve the problem of shadow removal from images. You can also use TouchRetouch and Snapseed on your mobile.
2) How can I remove a shadow from an image without Photoshop?
Photoshop is a famous photo editing software, but it is tricky for new users. So there are many other options that can perform the function similar to Photoshop with easy steps and a simple interface. We have discussed MarkGo, which is a good alternative to Photoshop. Moreover, we have also mentioned three easy and simple online tools to remove shadows from images.
3) How do I remove a shadow from a picture in Picsart?
Picsart is excellent for shadow removal. First of all, always try to use the updated version of the app. After installing the latest version, just open the image with Picsart and tap on Tool > Remove. A brush will appear to select the object to be removed. Now, select the object with the brush and save changes. That’s it!
Conclusion
In this article, we have also mentioned the best online tools with their complete steps to use. But it is better to use a desktop tool for perfection. We recommend MarkGo as it can easily remove unwanted shadows from images as well as from videos. You can remove shadows, objects, and watermarks with one click.
It is possible to get rid of watermarks and shadows from images using mobile applications. We have shared some of the best tools for Android and iOS, so you can use any of them to remove shadows from your images. If you are looking for perfection and precise results, you need to choose a desktop tool, such as MarkGo. It will help you remove background and shadows with perfection and maintain the image quality.
Try It FreeTry It Free
How to Remove Shadows in Photoshop (Step by Step)
Your privacy is safe. I will never share your information.
You can also select your interests for free access to our premium training:
Related course: Fantastic Photo Adventures
Shadows can be beautiful additions to your images. They add depth and interest. But they can also be distracting or too harsh. In this article, I’m going to show you how to remove shadows in Photoshop.
First, I’ll show you how to remove shadows in Photoshop using the content-aware fill tools. Then, I’ll show you how to reduce the harshness of shadows using layers. Finally, we’ll remove and reduce shadows on someone’s face.
How to Remove Shadows with Content-Aware Fill
Photoshop has a range of tools available to help you remove shadows. For removing simple shadows, I like to use content-aware fill tools like Patch tool. This method works best when the shadow you’re removing has clear lines and is being cast on a well-defined background.
I’m going to remove the extra shadows in this image on the edges of the frame. There is an ugly dark spot in the bottom right-hand corner. There are also odd extra shadows coming in from the right side of the frame.
Step 1: Open and Duplicate the Background
Open the photo and right-click on the background layer. Select Duplicate Layer… (Ctrl or ⌘J). This will allow you to edit your photos without destroying the original image.
Step 2: Select the Patch Tool
Select the Patch tool from the toolbar on the left.
Make sure to select ‘Content-Aware‘ in the Patch dropdown menu. By doing this, Photoshop will help you by creating new pixels. This will make transitions as smooth as possible.
Step 3: Remove Shadows
Make a selection of the shadow you want to remove. I’m going to start by removing the odd-shaped shadow in the bottom right-hand corner of the frame.
Drag the selection to an area that looks similar. In my case, I select an area of pavement. While dragging, you can see the selected area change.
Let go when you’re satisfied with the area you’ve chosen, and Photoshop will smoothen it out.
If you’re not getting the look you want, change the Structure and Color options in the Patch toolbar. With Structure, you define how closely Photoshop should match the shapes. With Color, you define how much colour blending you want.
You may need to clean up the patch. Especially look for repeating patterns. These will draw the eye and call attention to your replacement. Use the Clone Stamp tool or the Healing Brush for detailed work.
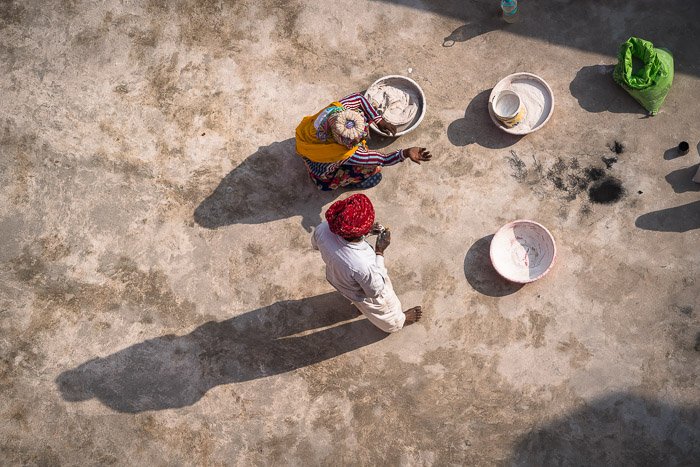
Reduce Harsh Shadows using Layers
Sometimes the shadows are fine, but they are just too harsh. A softer shadow would be more pleasing.
I’m going to reduce the shadow in this image of this man reading a newspaper on an Indian train platform. The shadow makes sense in the image, I just want it to be less noticeable. I’ve also removed a little shadow in the foreground.
Step 1: Select the Shadow
Start by selecting the shadow. You can do this by using the Object Selection Tool (keyboard shortcut W), the Lasso, or Quick Selection – whichever allows you to isolate the shadow best.
Step 2: Copy Shadow to New Layer
Copy the shadow to a new layer. To do this, go to Edit>Copy (Ctrl or ⌘C). Then, paste by selecting Layer>New>Layer via Copy (Ctrl or ⌘J).
Step 3: Adjust Brightness and Temperature
The easiest way to reduce harsh shadows is to lighten them. But shadows are cooler than the surrounding light, so you’ll also have to warm up the temperature to blend the shadow with the surrounding area.
You can do change both settings in Photoshop using the Brightness and Color Balance adjustments. But the adjustments might be easier if you use Adobe Camera Raw (ACR). Go to Filter>Camera Raw Filter (Shift + Ctrl or ⌘A). This will open a new workspace. You’ll have sliders similar to Lightroom.
Increase the shadow slider and warm up the temperature. Do this a little bit at a time. Click OK to check the blend.
If the shadows are really harsh, try decreasing the Clarity and Dehaze.
Removing Harsh Shadows from Faces to Improve an Image
In a studio, you can control where the light falls. But in street and travel photography sometimes the light falls awkwardly across someone’s face or body.
When removing or reducing shadows across a face, you’ll need a detailed tool and a lot of patience.
The Clone Stamp tool in Photoshop is perfect when you want more control over what you do when removing shadows from photos. If I’m looking just to reduce the shadow, I use the Dodge Tool. I’ll show you both techniques for removing harsh shadows from faces in Photoshop.
Remove Harsh Shadows with the Clone Tool for More Control
With the Clone Stamp tool, I’m going to remove shadows with a similar, but not shaded, section of the face. This image is a bit tricky because the woman is wearing a Venetian mask with texture and detail. I’m going to have to search the mask to find details that match the shaded section. Most faces will be simpler to clone.
Step 1: Open and Duplicate the Background
Open the photo and right-click on the background layer. Select Duplicate Layer… (Ctrl or ⌘J).
Step 2: Select the Clone Stamp Tool
Click on the Clone Stamp in the toolbar on the left. It looks like a rubber stamp.
Pick a soft medium-sized brush. A soft brush will get you the best result because of the smooth edges. You can easily change the brush size by using the bracket keys. “[” will decrease your brush size. “]” will increase your brush size.
If I’m only trying to reduce, rather than remove shadows, I decrease the Opacity of the Clone tool to around 50%.
Step 3: Select the Clone Source
Select a non-shaded area of the face. Press the Alt or Option key and click to confirm the source pixels. The cursor will change into crosshairs.
The moment you click, the cursor will change and show the pixels you’ve selected.
Step 4: Remove Shadows from the Photo
Zoom in and start painting over the shadow you want to remove. You may have to repeat Steps 3 and 4 repeatedly. Select pixels that are closest in content and colour to those you are replacing. If you don’t like the result, undo by going to Edit>Undo Clone Stamp (Ctrl or ⌘Z).
For the best result, use different clone sources to cover the shadow. If it doesn’t look natural, go back and take pixels from another part of the photo and paint again. I also use the Healing brush when I can.
It’s important to avoid repeating patterns. These patterns are a sign of cloning and removing an object or shadow from a photo.
I’m aiming for a natural look, so I often don’t remove all shadows on the face. Think about where the light may have naturally have fallen.
Reducing Harsh Shadows on Faces Using the Dodge Tool
It might not be possible to remove a shadow on someone’s face completely, but you can reduce it using the Dodge tool.
Step 1: Open and Duplicate the Background
Open the photo and right-click on the background layer. Select ‘Duplicate Layer…’ (Ctrl or ⌘J).
Step 2: Select the Dodge Tool
Click on the Dodge tool in the toolbar on the left. It looks like a lollipop. In the Dodge menu, select Shadows under Range and enter between 10 and 50%. I find a little goes a long way. I can always build up the dodge effect by going over the area again.
Step 3: Paint over the Shadow
Zoom in and start painting over the shadow you want to reduce. If you don’t see a lot of change, increase opacity or switch the Range to Midtones.
If you make a mistake, go to Edit>Undo Dodge Tool (Ctrl or ⌘Z). You can also switch to the Burn tool, which looks like a clenched hand and darken the area again.
Conclusion
In this article, I showed you how to remove shadows in Photoshop. Photoshop has many tools to help you replace or reduce shadows in your photos. You can remove shadows from a background or across someone’s face.
Always try out different techniques to find out which one works best for you. Make sure to avoid patterns to get a natural result.
Delve into the world of editing with our Effortless Editing in Lightroom course!
So you have finished reading the how to remove shadow lightroom topic article, if you find this article useful, please share it. Thank you very much. See more: remove shadow from face lightroom app, how to remove shadows in lightroom classic, remove shadow from photo, removing background shadows in lightroom, how to remove shadows in lightroom app, how to remove shadows under eyes in lightroom, how to remove shadows in snapseed, how to remove shadows from face in lightroom