
당신은 주제를 찾고 있습니까 “labelme to coco – How to make coco dataset from scratch | how to prepare coco custom data | How to make a yolo format“? 다음 카테고리의 웹사이트 https://chewathai27.com/you 에서 귀하의 모든 질문에 답변해 드립니다: https://chewathai27.com/you/blog. 바로 아래에서 답을 찾을 수 있습니다. 작성자 Ai blogs MS Rajput 이(가) 작성한 기사에는 조회수 2,161회 및 좋아요 39개 개의 좋아요가 있습니다.
labelme is a widely used is a graphical image annotation tool that supports classification, segmentation, instance segmentation and object detection formats. However, widely used frameworks/models such as Yolact/Solo, Detectron, MMDetection etc.Loading a COCO dataset into Python
In order to load your COCO formatted dataset, you could write a parser for the JSON labels file, but really you should just use one of the various tools out there that will load it for you. Two of the best tools for this are the official COCO APIs and FiftyOne.
- Step 1: Create a Free Roboflow Public Workspace. Roboflow is the universal conversion tool for computer vision annotation formats. …
- Step 2: Upload your data into Roboflow. …
- Step 3: Generate Dataset Version. …
- Step 4: Export Dataset Version.
- Step 1: Dataset Preparation. Split your data. …
- Step 2: Class Name Preparation. Type all the Class Names (Labels) to be annotated in the “Labels.txt” file. …
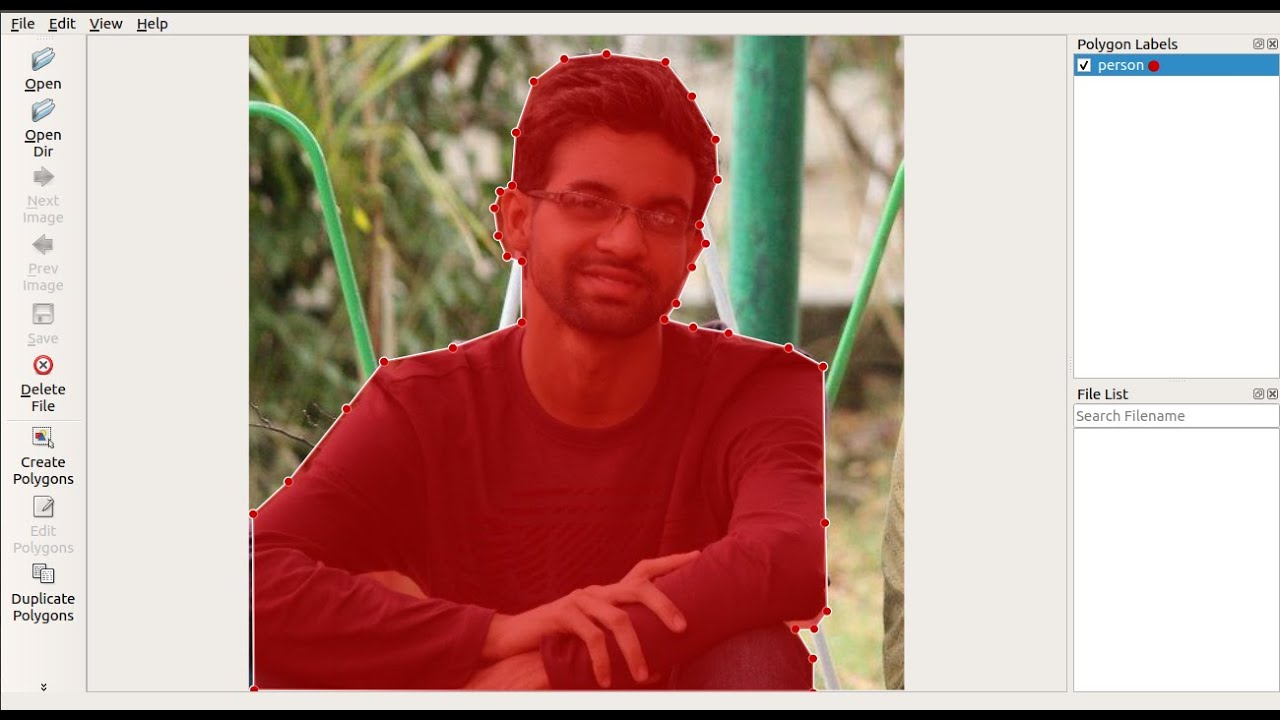
- Step 3: Do Annotation. Press “Create Polygons” button then start drawing.
- Step 4: Name the Polygon. …
- Step 5: Edit Polygon. …
- Step 6: Save.
Table of Contents
labelme to coco 주제에 대한 동영상 보기
여기에서 이 주제에 대한 비디오를 시청하십시오. 주의 깊게 살펴보고 읽고 있는 내용에 대한 피드백을 제공하세요!
d여기에서 How to make coco dataset from scratch | how to prepare coco custom data | How to make a yolo format – labelme to coco 주제에 대한 세부정보를 참조하세요
How to make coco dataset | how to prepare coco custom dataset for model training | how to make a yolo format dataset | how to annotated dataset using labelem
| coco format dataset skratch | yolo format dataset | how to convert coco format to yolo format
Ai blogs ms rajput :-
https://manishsinghrajput96.blogspot.com/
Ai blogs ms rajput youtube channel :-
https://www.youtube.com/channel/UC_G6-RnDF1IaEjz4ljzF-hw/featured
Github link of labelme and scripts :-
https://github.com/Manishsinghrajput98/labelme.git
labelme to coco 주제에 대한 자세한 내용은 여기를 참조하세요.
labelme2coco – PyPI
Convert LabelMe annotations to COCO format in one step. labelme is a wely used is a graphical image annotation tool that supports ification, segmentation …
Source: pypi.org
Date Published: 10/11/2022
View: 9830
Convert coco to labelme format – annotations – Stack Overflow
My mates and I have created a python package called PyLabel to help others with this kind of task and other labelling tasks.
Source: stackoverflow.com
Date Published: 2/1/2022
View: 7395
Convert Labelme label file to coco data set format (polygon …
Use the labelme tool to annotate pictures. After making the data set, you need to convert the data set to the coco data set format and send it to the …
Source: blog.actorsfit.com
Date Published: 11/24/2022
View: 5234
labelme2coco: Docs, Tutorials, Reviews – Openbase
Make your own dataset for object detection/instance segmentation using labelme and transform the format to coco json format.
Source: openbase.com
Date Published: 6/16/2022
View: 6171
labelme vs labelme2coco – compare differences and reviews?
Just type “labelme” in the shell after pip installing and you will see the GUI. There are tools to convert to coco format (like …
Source: www.libhunt.com
Date Published: 9/27/2021
View: 4449
Detectron2 Train a Instance Segmentation Model
Custom method (Labelme format). If your data-set isn’t in COCO format, you have to write a method that returns a list of dictionaries with the needed …
Source: gilberttanner.com
Date Published: 4/23/2021
View: 6121
주제와 관련된 이미지 labelme to coco
주제와 관련된 더 많은 사진을 참조하십시오 How to make coco dataset from scratch | how to prepare coco custom data | How to make a yolo format. 댓글에서 더 많은 관련 이미지를 보거나 필요한 경우 더 많은 관련 기사를 볼 수 있습니다.
주제에 대한 기사 평가 labelme to coco
- Author: Ai blogs MS Rajput
- Views: 조회수 2,161회
- Likes: 좋아요 39개
- Date Published: 2021. 9. 15.
- Video Url link: https://www.youtube.com/watch?v=MrXlCD3UfZY
How do I convert LabelMe JSON to Coco JSON?
- Step 1: Create a Free Roboflow Public Workspace. Roboflow is the universal conversion tool for computer vision annotation formats. …
- Step 2: Upload your data into Roboflow. …
- Step 3: Generate Dataset Version. …
- Step 4: Export Dataset Version.
How do I open LabelMe?
- Step 1: Dataset Preparation. Split your data. …
- Step 2: Class Name Preparation. Type all the Class Names (Labels) to be annotated in the “Labels.txt” file. …
- Step 3: Do Annotation. Press “Create Polygons” button then start drawing.
- Step 4: Name the Polygon. …
- Step 5: Edit Polygon. …
- Step 6: Save.
How do I load Coco dataset?
Loading a COCO dataset into Python
In order to load your COCO formatted dataset, you could write a parser for the JSON labels file, but really you should just use one of the various tools out there that will load it for you. Two of the best tools for this are the official COCO APIs and FiftyOne.
How do you use LabelMe?
- Sign Up and Login to LabelMe.
- Upload Images to LabelMe.
- Make Annotations in LabelMe.
- Adhere to Common Labeling Practices in LabelMe.
- Download Data From LabelMe.
- Covert LabelMe to Any Destination.
- Train A Model from LabelMe Data.
What is PixelLib?
PixelLib is a library created for performing image and video segmentation using few lines of code. It is a flexible library created to allow easy integration of image and video segmentation into software solutions. PixelLib requires python’s version 3.5-3.7, Download python.
What is LabelMe format?
LabelMe is an actively developed open source graphical image annotation tool inspired by the app of the same name released in 2012 by MIT CSAIL. It is capable of annotating images for object detection, segmentation, and classification (along with polygon, circle, line, and point annotations).
What is LabelMe tool?
Welcome to LabelMe, the open annotation tool.
The goal of LabelMe is to provide an online annotation tool to build image databases for computer vision research. You can contribute to the database by visiting the annotation tool. Label objects in the images. Edit your annotations.
How do I download LabelMe dataset?
Before downloading the dataset, we only ask you to label some images using the annotation tool online. Any new labels that you will add, will be inmediately ready for download. Step 1: Download the LabelMe Matlab toolbox and add the toolbox to the Matlab path. Step 2: The function LMinstall will download the database.
Is COCO dataset free?
There are different dataset splits available to download for free. Each year’s images are associated with different tasks such as Object Detection, Keypoint Tracking, Image Captioning, and more. To download them and see the most recent Microsoft COCO 2020 challenges, visit the official MS COCO website.
What is Coco JSON format?
COCO is a format for specifying large-scale object detection, segmentation, and captioning datasets. This Python example shows you how to transform a COCO object detection format dataset into an Amazon Rekognition Custom Labels bounding box format manifest file.
How big is the COCO dataset?
The features of the COCO dataset are – object segmentation, context recognition, stuff segmentation, three hundred thirty thousand images, 1.5 million instances of the object, eighty categories of object, ninety-one categories of staff, five per image captions, 250,000 keynotes people. The size of the dataset is 25 GB.
How do I open Labelme GUI files?
Labelme GUI displayed
In the GUI interface click on Open Dir, the second-left corner icon to open directory of the images you intend to annotate. When you click on open Dir you can choose the folder containing the images. It will show the first image in the folder you selected.
How do I run Labelme in Ubuntu?
- sudo apt-get update. Copy. After updating apt database, We can install labelme using apt-get by running the following command: …
- sudo apt update. Copy. …
- sudo aptitude update. Copy. …
- sudo apt-get -y purge labelme. Copy.
How do I open LabelImg in Windows?
LabelImg Download
Simply run the following in your command line: `pip3 install labelImg . Then, launch LabelImg by typing labelImg in your command line prompt.
How do you edit labels in Labelme?
Here’s how to change a single image annotation in Labelme. Right-click on the polygon labels list and then choose “Edit Label”, continue by typing a new name for the annotation.
fcakyon/labelme2coco: A lightweight package for converting your labelme annotations into COCO object detection format.
Convert LabelMe annotations to COCO format in one step
labelme is a widely used is a graphical image annotation tool that supports classification, segmentation, instance segmentation and object detection formats. However, widely used frameworks/models such as Yolact/Solo, Detectron, MMDetection etc. requires COCO formatted annotations.
You can use this package to convert labelme annotations to COCO format.
Getting started
Installation
pip install -U labelme2coco
Basic Usage
labelme2coco path / to / labelme / dir
labelme2coco path / to / labelme / dir – – train_split_rate 0.85
Advanced Usage
# import package import labelme2coco # set directory that contains labelme annotations and image files labelme_folder = “tests/data/labelme_annot” # set export dir export_dir = “tests/data/” # set train split rate train_split_rate = 0.85 # convert labelme annotations to coco labelme2coco . convert ( labelme_folder , export_dir , train_split_rate )
labelme2coco
labelme2coco Python Package for Linux/MacOS/Windows
Make your own dataset for object detection/instance segmentation using labelme and transform the format to coco json format.
Convert LabelMe annotations to COCO format in one step
labelme is a widely used is a graphical image annotation tool that supports classification, segmentation, instance segmentation and object detection formats. However, widely used frameworks/models such as Yolact/Solo, Detectron, MMDetection etc. requires COCO formatted annotations.
You can use this package to convert labelme annotations to COCO format.
Getting started
Installation
pip install -U labelme2coco
Basic Usage
labelme2coco path / to / labelme / dir
labelme2coco path / to / labelme / dir — train_split_rate 0.85
Advanced Usage
# import package import labelme2coco # set directory that contains labelme annotations and image files labelme_folder = “tests/data/labelme_annot” # set export dir export_dir = “tests/data/” # set train split rate train_split_rate = 0.85 # convert labelme annotations to coco labelme2coco . convert ( labelme_folder , export_dir , train_split_rate )
How To Convert LabelMe JSON to COCO JSON
COCO is a common JSON format used for machine learning because the dataset it was introduced with has become a common benchmark.
The native format of LabelMe, an open source graphical image annotation tool written in Python and available for Windows, Mac, and Linux.
How To Convert LabelMe JSON to COCO JSON
If your labeling tool exported annotations in the
format, but you’re trying to use a
model that needs
annotations, we’ve got you covered. You can convert those in 3 clicks with Roboflow.
Step 1: Create a Free Roboflow Public Workspace
Roboflow is the universal conversion tool for computer vision annotation formats. The Public plan is the best way for those exploring personal projects, class assignments, and other experiments to try Roboflow. To convert your dataset, start by creating a workspace on the Public plan.
Step 2: Upload your data into Roboflow
Once your account has been created, click Create Dataset. Upload your data to Roboflow by dragging and dropping your LabelMe JSON images and annotations into the upload space. To learn more about LabelMe, check out our LabelMe Tutorial which goes through the process of annotating an object detection dataset along with tips, tricks, and best practices.
Step 3: Generate Dataset Version
Next, you can choose Preprocessing and Augmentation options for your dataset version and then click Generate.
Step 4: Export Dataset Version
After generating, you will be prompted to Export your dataset. You can choose to receive your dataset as a .zip file or a curl download link. You can also choose which format you would like to export. Choose COCO JSON .
Congratulations, you have successfully converted your dataset from LabelMe JSON format to COCO JSON format!
Next Steps
How To Convert LabelMe JSON to COCO JSON
COCO is a common JSON format used for machine learning because the dataset it was introduced with has become a common benchmark.
The native format of LabelMe, an open source graphical image annotation tool written in Python and available for Windows, Mac, and Linux.
How To Convert LabelMe JSON to COCO JSON
If your labeling tool exported annotations in the
format, but you’re trying to use a
model that needs
annotations, we’ve got you covered. You can convert those in 3 clicks with Roboflow.
Step 1: Create a Free Roboflow Public Workspace
Roboflow is the universal conversion tool for computer vision annotation formats. The Public plan is the best way for those exploring personal projects, class assignments, and other experiments to try Roboflow. To convert your dataset, start by creating a workspace on the Public plan.
Step 2: Upload your data into Roboflow
Once your account has been created, click Create Dataset. Upload your data to Roboflow by dragging and dropping your LabelMe JSON images and annotations into the upload space. To learn more about LabelMe, check out our LabelMe Tutorial which goes through the process of annotating an object detection dataset along with tips, tricks, and best practices.
Step 3: Generate Dataset Version
Next, you can choose Preprocessing and Augmentation options for your dataset version and then click Generate.
Step 4: Export Dataset Version
After generating, you will be prompted to Export your dataset. You can choose to receive your dataset as a .zip file or a curl download link. You can also choose which format you would like to export. Choose COCO JSON .
Congratulations, you have successfully converted your dataset from LabelMe JSON format to COCO JSON format!
Next Steps
Convert coco to labelme format
My classmates and I have created a python package called PyLabel to help others with this kind of task and other labelling tasks. You can see an example in this notebook: https://github.com/pylabel-project/samples/blob/main/coco2voc.ipynb
While this may not directly go to the labelme format, you should be able to use the package’s importer tool to import your data to a dataframe that you can then use to convert it to your desired format.
If you’re interested in converting between other formats, you can find the code for the package here: https://github.com/pylabel-project/
Convert Labelme label file to coco data set format (polygon labeling method)
Use the labelme tool to annotate pictures. After making the data set, you need to convert the data set to the coco data set format and send it to the network for training. I found that many blogs on the Internet use the following code for conversion, but there are certain errors in it. Therefore, write a blog to record the process of fear of pitting.
code show as below:
# -*- coding:utf-8 -*- # !/usr/bin/env python import argparse import json import matplotlib.pyplot as plt import skimage.io as io import cv2 from labelme import utils import numpy as np import glob import PIL.Image class MyEncoder(json.JSONEncoder): def default(self, obj): if isinstance(obj, np.integer): return int(obj) elif isinstance(obj, np.floating): return float(obj) elif isinstance(obj, np.ndarray): return obj.tolist() else: return super(MyEncoder, self).default(obj) class labelme2coco(object): def __init__(self, labelme_json=[], save_json_path=’./tran.json’): ”’ :param labelme_json: a list of all labelme json file paths :param save_json_path: json save location ”’ self.labelme_json = labelme_json self.save_json_path = save_json_path self.images = [] self.categories = [] self.annotations = [] # self.data_coco = {} self.label = [] self.annID = 1 self.height = 0 self.width = 0 self.save_json() def data_transfer(self): for num, json_file in enumerate(self.labelme_json): with open(json_file,’r’) as fp: data = json.load(fp) # Load json file self.images.append(self.image(data, num)) for shapes in data[‘shapes’]: label = shapes[‘label’] if label not in self.label: self.categories.append(self.categorie(label)) self.label.append(label) points = shapes[‘points’]#The point here is marked with a rectangle, there are only two points, which need to be converted into four points points.append([points[0][0],points[1][1]]) points.append([points[1][0],points[0][1]]) self.annotations.append(self.annotation(points, label, num)) self.annID += 1 def image(self, data, num): image = {} img = utils.img_b64_to_arr(data[‘imageData’]) # parse the original image data # img=io.imread(data[‘imagePath’]) # Open the image through the image path # img = cv2.imread(data[‘imagePath’], 0) height, width = img.shape[:2] img = None image[‘height’] = height image[‘width’] = width image[‘id’] = num + 1 image[‘file_name’] = data[‘imagePath’].split(‘/’)[-1] self.height = height self.width = width return image def categorie(self, label): categorie = {} categorie[‘supercategory’] =’Cancer’ categorie[‘id’] = len(self.label) + 1 # 0 defaults to background categorie[‘name’] = label return categorie def annotation(self, points, label, num): annotation = {} annotation[‘segmentation’] = [list(np.asarray(points).flatten())] annotation[‘iscrowd’] = 0 annotation[‘image_id’] = num + 1 # annotation[‘bbox’] = str(self.getbbox(points)) # Error when saving json file using list (don’t know why) # list(map(int,a[1:-1].split(‘,’))) a=annotation[‘bbox’] Use this method to convert to list annotation[‘bbox’] = list(map(float, self.getbbox(points))) annotation[‘area’] = annotation[‘bbox’][2] * annotation[‘bbox’][3] # annotation[‘category_id’] = self.getcatid(label) annotation[‘category_id’] = self.getcatid(label) annotation[‘id’] = self.annID return annotation def getcatid(self, label): for categorie in self.categories: if label == categorie[‘name’]: return categorie[‘id’] return 1 def getbbox(self, points): # img = np.zeros([self.height,self.width],np.uint8) # cv2.polylines(img, [np.asarray(points)], True, 1, lineType=cv2.LINE_AA) # draw boundary lines # cv2.fillPoly(img, [np.asarray(points)], 1) # Draw the inner pixel value of the polygon 1 polygons = points mask = self.polygons_to_mask([self.height, self.width], polygons) return self.mask2box(mask) def mask2box(self, mask): ”’Inversely calculate its border from the mask mask: [h,w] a picture composed of 0 and 1 1 corresponds to the object, just calculate the row and column number corresponding to 1 (the row and column number in the upper left corner, the row and column number in the lower right corner, you can calculate its border) ”’ # np.where(mask==1) index = np.argwhere(mask == 1) rows = index[:, 0] clos = index[:, 1] # Parse the row and column number in the upper left corner left_top_r = np.min(rows) # y left_top_c = np.min(clos) # x # Parse the row and column number in the lower right corner right_bottom_r = np.max(rows) right_bottom_c = np.max(clos) # return [(left_top_r,left_top_c),(right_bottom_r,right_bottom_c)] # return [(left_top_c, left_top_r), (right_bottom_c, right_bottom_r)] # return [left_top_c, left_top_r, right_bottom_c, right_bottom_r] # [x1,y1,x2,y2] return [left_top_c, left_top_r, right_bottom_c-left_top_c, right_bottom_r-left_top_r] # [x1,y1,w,h] corresponds to COCO’s bbox format def polygons_to_mask(self, img_shape, polygons): mask = np.zeros(img_shape, dtype=np.uint8) mask = PIL.Image.fromarray(mask) xy = list(map(tuple, polygons)) PIL.ImageDraw.Draw(mask).polygon(xy=xy, outline=1, fill=1) mask = np.array(mask, dtype=bool) return mask def data2coco(self): data_coco = {} data_coco[‘images’] = self.images data_coco[‘categories’] = self.categories data_coco[‘annotations’] = self.annotations return data_coco def save_json(self): self.data_transfer() self.data_coco = self.data2coco() # Save the json file json.dump(self.data_coco, open(self.save_json_path,’w’), indent=4, cls=MyEncoder) labelme_json = glob.glob(‘./Annotations/*.json’) # labelme_json=[‘./Annotations/*.json’] labelme2coco(labelme_json,’./json/test.json’)
If the annotated image is annotated with the rectangle method, the above code is no problem, but the polygon method is used, the above code has some defects. As follows:
points = shapes[‘points’]#The point here is marked with a rectangle, there are only two points, which need to be converted into four points points.append([points[0][0],points[1][1]]) points.append([points[1][0],points[0][1]])
This paragraph is for retangle, it is not applicable to the polygon labeling method, and the related [‘area’] parameter calculation method also has errors.
After many investigations, it is found that labelme’s github blog has already given relevant solutions. The link is as follows: https://github.com/wkentaro/labelme/blob/master/examples/instance_segmentation/labelme2coco.py
code show as below:
#!/usr/bin/env python import argparse import collections import datetime import glob import json import os import os.path as osp import sys import numpy as np import PIL.Image import labelme try: import pycocotools.mask except ImportError: print(‘Please install pycocotools:
pip install pycocotools
‘) sys.exit(1) def main(): parser = argparse.ArgumentParser( formatter_class=argparse.ArgumentDefaultsHelpFormatter ) parser.add_argument(‘input_dir’, help=’input annotated directory’) parser.add_argument(‘output_dir’, help=’output dataset directory’) parser.add_argument(‘–labels’, help=’labels file’, required=True) args = parser.parse_args() if osp.exists(args.output_dir): print(‘Output directory already exists:’, args.output_dir) sys.exit(1) os.makedirs(args.output_dir) os.makedirs(osp.join(args.output_dir, ‘JPEGImages’)) print(‘Creating dataset:’, args.output_dir) now = datetime.datetime.now() data = dict( info=dict( description=None, url=None, version=None, year=now.year, contributor=None, date_created=now.strftime(‘%Y-%m-%d %H:%M:%S.%f’), ), licenses=[dict( url=None, id=0, name=None, )], images=[ # license, url, file_name, height, width, date_captured, id ], type=’instances’, annotations=[ # segmentation, area, iscrowd, image_id, bbox, category_id, id ], categories=[ # supercategory, id, name ], ) class_name_to_id = {} for i, line in enumerate(open(args.labels).readlines()): class_id = i – 1 # starts with -1 class_name = line.strip() if class_id == -1: assert class_name == ‘__ignore__’ continue class_name_to_id[class_name] = class_id data[‘categories’].append(dict( supercategory=None, id=class_id, name=class_name, )) out_ann_file = osp.join(args.output_dir, ‘annotations.json’) label_files = glob.glob(osp.join(args.input_dir, ‘*.json’)) for image_id, label_file in enumerate(label_files): print(‘Generating dataset from:’, label_file) with open(label_file) as f: label_data = json.load(f) base = osp.splitext(osp.basename(label_file))[0] out_img_file = osp.join( args.output_dir, ‘JPEGImages’, base + ‘.jpg’ ) img_file = osp.join( osp.dirname(label_file), label_data[‘imagePath’] ) img = np.asarray(PIL.Image.open(img_file)) PIL.Image.fromarray(img).save(out_img_file) data[‘images’].append(dict( license=0, url=None, file_name=osp.relpath(out_img_file, osp.dirname(out_ann_file)), height=img.shape[0], width=img.shape[1], date_captured=None, id=image_id, )) masks = {} # for area segmentations = collections.defaultdict(list) # for segmentation for shape in label_data[‘shapes’]: points = shape[‘points’] label = shape[‘label’] shape_type = shape.get(‘shape_type’, None) mask = labelme.utils.shape_to_mask( img.shape[:2], points, shape_type ) if label in masks: masks[label] = masks[label] | mask else: masks[label] = mask points = np.asarray(points).flatten().tolist() segmentations[label].append(points) for label, mask in masks.items(): cls_name = label.split(‘-‘)[0] if cls_name not in class_name_to_id: continue cls_id = class_name_to_id[cls_name] mask = np.asfortranarray(mask.astype(np.uint8)) mask = pycocotools.mask.encode(mask) area = float(pycocotools.mask.area(mask)) bbox = pycocotools.mask.toBbox(mask).flatten().tolist() data[‘annotations’].append(dict( id=len(data[‘annotations’]), image_id=image_id, category_id=cls_id, segmentation=segmentations[label], area=area, bbox=bbox, iscrowd=0, )) with open(out_ann_file, ‘w’) as f: json.dump(data, f) if __name__ == ‘__main__’: main()
The detailed usage method will not be repeated here. If you are interested, you can check it on the github official website! !
labelme2coco: Docs, Tutorials, Reviews
labelme2coco Python Package for Linux/MacOS/Windows
Make your own dataset for object detection/instance segmentation using labelme and transform the format to coco json format.
Convert LabelMe annotations to COCO format in one step
labelme is a widely used is a graphical image annotation tool that supports classification, segmentation, instance segmentation and object detection formats. However, widely used frameworks/models such as Yolact/Solo, Detectron, MMDetection etc. requires COCO formatted annotations.
You can use this package to convert labelme annotations to COCO format.
Getting started
Installation
pip install -U labelme2coco
Basic Usage
labelme2coco path/to/labelme/ dir
labelme2coco path/to/labelme/ dir –train_split_rate 0.85
Advanced Usage
import labelme2coco labelme_folder = “tests/data/labelme_annot” export_dir = “tests/data/” train_split_rate = 0.85 labelme2coco.convert(labelme_folder, export_dir, train_split_rate)
labelme vs labelme2coco – compare differences and reviews?
What are some alternatives?
When comparing labelme and labelme2coco you can also consider the following projects:
albumentations – Fast image augmentation library and an easy-to-use wrapper around other libraries. Documentation: https://albumentations.ai/docs/ Paper about the library: https://www.mdpi.com/2078-2489/11/2/125
Swin-Transformer-Semantic-Segmentation – This is an official implementation for “Swin Transformer: Hierarchical Vision Transformer using Shifted Windows” on Semantic Segmentation.
Mask-RCNN-Implementation – Mask RCNN Implementation on Custom Data(Labelme)
Pytorch – Tensors and Dynamic neural networks in Python with strong GPU acceleration
autogluon – AutoGluon: AutoML for Image, Text, and Tabular Data
bpycv – Computer vision utils for Blender (generate instance annoatation, depth and 6D pose by one line code)
Mask_RCNN – Mask R-CNN for object detection and instance segmentation on Keras and TensorFlow
mask-rcnn – Mask-RCNN training and prediction in MATLAB for Instance Segmentation
mmsegmentation – OpenMMLab Semantic Segmentation Toolbox and Benchmark.
HugsVision – HugsVision is a easy to use huggingface wrapper for state-of-the-art computer vision
sentinel2-cloud-detector – Sentinel Hub Cloud Detector for Sentinel-2 images in Python
Detectron2 Train a Instance Segmentation Model
In this article, you’ll learn how to create your own instance segmentation data-set and how to train a Detectron2 model on it. If you haven’t already, I highly recommend you read my first article on Detectron2, which will give you a basic understanding of how Detectron2 works. As always, all the code covered in this article can be found on my Github.
Gathering data
Gathering image data is simple. You can either take pictures yourself using a camera or download images from the internet.
To build a robust model, you need pictures with different backgrounds, varying lighting conditions, and random objects in the background.
For my microcontroller data-set, I have four different objects (Arduino Nano, ESP8266, Raspberry Pi 3, Heltect ESP32 Lora). I took about 25 pictures of each microcontroller and 25 containing multiple microcontrollers using my smartphone. After taking the pictures, make sure to transform them to a resolution suitable for training (I used 800×600).
Figure 1: Examples of collected images
Labeling data
After gathering enough images, it’s time to label them so your model knows what to learn. To label the data, you will need to use a labeling software.
For object detection, we used LabelImg, an excellent image annotation tool supporting both PascalVOC and Yolo format. For Image Segmentation / Instance Segmentation, there are multiple great annotation tools available, including VGG Image Annotation Tool, labelme, and PixelAnnotationTool. I chose labelme because of its simplicity to both install and use.
Figure 2: Labelme
Labelme can be installed using pip:
pip install labelme
After installing Labelme, you can start it by typing labelme inside the command line. Now you can click on “Open Dir”, select the folder with the images inside, and start labeling your images.
Figure 3: Labeling images
After you’re done labeling the images, I’d recommend splitting the data into two folders – a training and a testing folder. Doing this will allow you to get a reasonable estimate of how good your model really is later on.
Now that you have the labels, you could get started coding, but I decided to also show you how to convert your data-set to COCO format, which makes your life a lot easier.
Convert your data-set to COCO-format
COCO has five annotation types: object detection, keypoint detection, stuff segmentation, panoptic segmentation, and image captioning.
Instance segmentation falls under type three – stuff segmentation. The stuff segmentation format is identical and fully compatible with the object detection format.
annotation{ “id”: int, “image_id”: int, “category_id”: int, “segmentation”: RLE or [polygon], “area”: float, “bbox”: [x,y,width,height], “iscrowd”: 0 or 1, } categories[{ “id”: int, “name”: str, “supercategory”: str, }]
We can convert the JSON files created by labelme to COCO using the labelme2coco.py file created by Tony607.
python labelme2coco.py train train.json python labelme2coco.py test test.json
Registering the data-set
If you want to use a custom data-set with one of detectron2’s prebuilt data loaders, you will need to register your data-set, so Detectron2 knows how to obtain the data-set.
As described in the last article, you have two options here. Which one you use will depend on what data you have. In the end, both will give you the same results.
Custom method (Labelme format)
If your data-set isn’t in COCO format, you have to write a method that returns a list of dictionaries with the needed information for Detectron2 to obtain the data.
For my microcontroller segmentation data-set, this method looks as follows:
import os import numpy as np import json from detectron2.structures import BoxMode def get_microcontroller_dicts(directory): classes = [‘Raspberry_Pi_3’, ‘Arduino_Nano’, ‘ESP8266’, ‘Heltec_ESP32_Lora’] dataset_dicts = [] for filename in [file for file in os.listdir(directory) if file.endswith(‘.json’)]: json_file = os.path.join(directory, filename) with open(json_file) as f: img_anns = json.load(f) record = {} filename = os.path.join(directory, img_anns[“imagePath”]) record[“file_name”] = filename record[“height”] = 600 record[“width”] = 800 annos = img_anns[“shapes”] objs = [] for anno in annos: px = [a[0] for a in anno[‘points’]] py = [a[1] for a in anno[‘points’]] poly = [(x, y) for x, y in zip(px, py)] poly = [p for x in poly for p in x] obj = { “bbox”: [np.min(px), np.min(py), np.max(px), np.max(py)], “bbox_mode”: BoxMode.XYXY_ABS, “segmentation”: [poly], “category_id”: classes.index(anno[‘label’]), “iscrowd”: 0 } objs.append(obj) record[“annotations”] = objs dataset_dicts.append(record) return dataset_dicts from detectron2.data import DatasetCatalog, MetadataCatalog for d in [“train”, “test”]: DatasetCatalog.register(“microcontroller_” + d, lambda d=d: get_microcontroller_dicts(‘Microcontroller Segmentation/’ + d)) MetadataCatalog.get(“microcontroller_” + d).set(thing_classes=[‘Raspberry_Pi_3’, ‘Arduino_Nano’, ‘ESP8266’, ‘Heltec_ESP32_Lora’]) microcontroller_metadata = MetadataCatalog.get(“microcontroller_train”)
COCO format
If your data-set is in COCO format, the whole process gets a lot simpler. Instead of needing to write a custom method, you only need to call the register_coco_instances method and pass it the data-set name, the path to the JSON file, and the image directory path.
from detectron2.data.datasets import register_coco_instances for d in [“train”, “test”]: register_coco_instances(f”microcontroller_{d}”, {}, f”Microcontroller Segmentation/{d}.json”, f”Microcontroller Segmentation/{d}”)
Training the model
Training the model works just the same as training an object detection model. The only difference is that you’ll need to use an instance segmentation model instead of an object detection model.
from detectron2.engine import DefaultTrainer from detectron2.config import get_cfg cfg = get_cfg() cfg.merge_from_file(model_zoo.get_config_file(“COCO-InstanceSegmentation/mask_rcnn_R_50_FPN_3x.yaml”)) cfg.DATASETS.TRAIN = (“microcontroller_train”,) cfg.DATASETS.TEST = () cfg.DATALOADER.NUM_WORKERS = 2 cfg.MODEL.WEIGHTS = model_zoo.get_checkpoint_url(“COCO-InstanceSegmentation/mask_rcnn_R_50_FPN_3x.yaml”) cfg.SOLVER.IMS_PER_BATCH = 2 cfg.SOLVER.BASE_LR = 0.00025 cfg.SOLVER.MAX_ITER = 1000 cfg.MODEL.ROI_HEADS.NUM_CLASSES = 4 os.makedirs(cfg.OUTPUT_DIR, exist_ok=True) trainer = DefaultTrainer(cfg) trainer.resume_or_load(resume=False) trainer.train()
Figure 4: Training
Using the model for inference
After training, the model automatically gets saved into a pth file. This file can then be used to load the model and make predictions.
For inference, the DefaultPredictor class will be used instead of the DefaultTrainer .
from detectron2.utils.visualizer import ColorMode cfg.MODEL.WEIGHTS = os.path.join(cfg.OUTPUT_DIR, “model_final.pth”) cfg.MODEL.ROI_HEADS.SCORE_THRESH_TEST = 0.5 cfg.DATASETS.TEST = (“microcontroller_test”, ) predictor = DefaultPredictor(cfg) dataset_dicts = get_microcontroller_dicts(‘Microcontroller Segmentation/test’) for d in random.sample(dataset_dicts, 3): im = cv2.imread(d[“file_name”]) outputs = predictor(im) v = Visualizer(im[:, :, ::-1], metadata=microcontroller_metadata, scale=0.8, instance_mode=ColorMode.IMAGE_BW # remove the colors of unsegmented pixels ) v = v.draw_instance_predictions(outputs[“instances”].to(“cpu”)) plt.figure(figsize = (14, 10)) plt.imshow(cv2.cvtColor(v.get_image()[:, :, ::-1], cv2.COLOR_BGR2RGB)) plt.show()
Figure 5: Prediction example
Conclusion
That’s all from this article. If you have any questions or want to chat with me, feel free to contact me via EMAIL or social media.
키워드에 대한 정보 labelme to coco
다음은 Bing에서 labelme to coco 주제에 대한 검색 결과입니다. 필요한 경우 더 읽을 수 있습니다.
이 기사는 인터넷의 다양한 출처에서 편집되었습니다. 이 기사가 유용했기를 바랍니다. 이 기사가 유용하다고 생각되면 공유하십시오. 매우 감사합니다!
사람들이 주제에 대해 자주 검색하는 키워드 How to make coco dataset from scratch | how to prepare coco custom data | How to make a yolo format
- Python
- Image Processing
- Machine Learning Model Training and Artificial Intelligence
- Website Designing Related Topics
How #to #make #coco #dataset #from #scratch #| #how #to #prepare #coco #custom #data #| #How #to #make #a #yolo #format
YouTube에서 labelme to coco 주제의 다른 동영상 보기
주제에 대한 기사를 시청해 주셔서 감사합니다 How to make coco dataset from scratch | how to prepare coco custom data | How to make a yolo format | labelme to coco, 이 기사가 유용하다고 생각되면 공유하십시오, 매우 감사합니다.