
당신은 주제를 찾고 있습니까 “srdf query commands – Dell EMC PowerMax SRDF MetroDR Demonstration“? 다음 카테고리의 웹사이트 https://chewathai27.com/you 에서 귀하의 모든 질문에 답변해 드립니다: https://chewathai27.com/you/blog. 바로 아래에서 답을 찾을 수 있습니다. 작성자 Tech Field Day 이(가) 작성한 기사에는 조회수 1,572회 및 좋아요 10개 개의 좋아요가 있습니다.
Table of Contents
srdf query commands 주제에 대한 동영상 보기
여기에서 이 주제에 대한 비디오를 시청하십시오. 주의 깊게 살펴보고 읽고 있는 내용에 대한 피드백을 제공하세요!
d여기에서 Dell EMC PowerMax SRDF MetroDR Demonstration – srdf query commands 주제에 대한 세부정보를 참조하세요
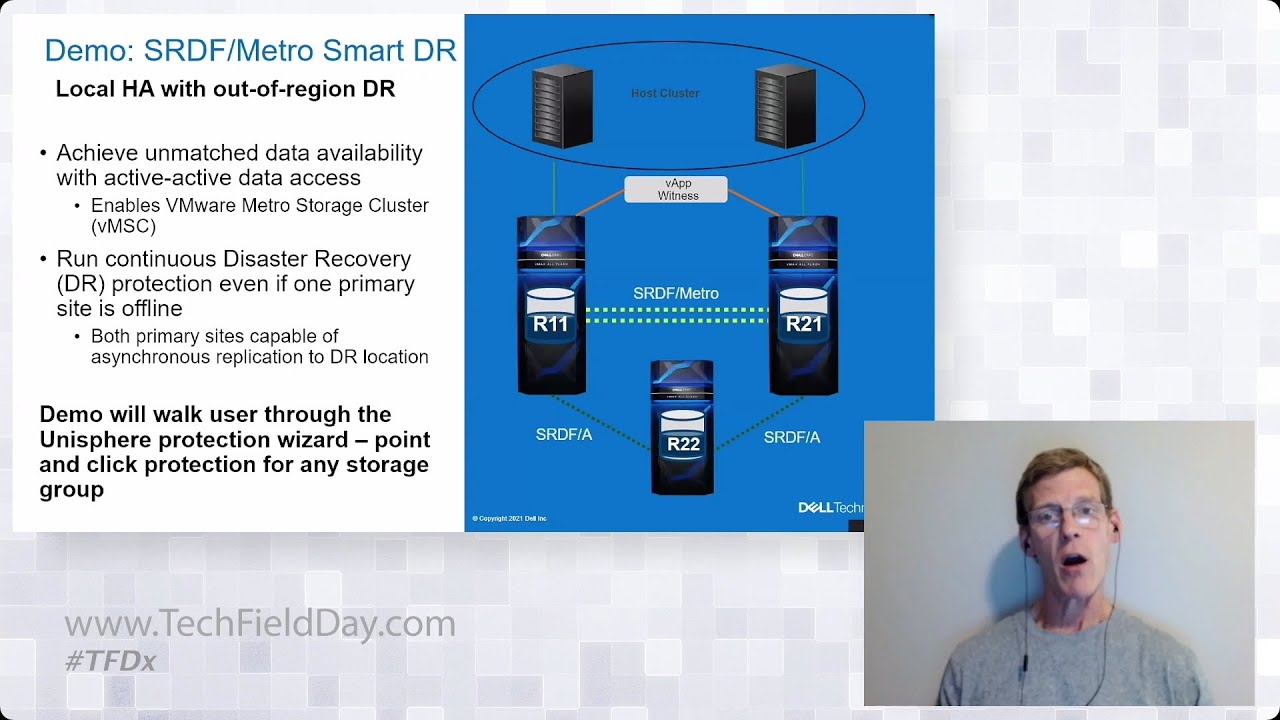
SRDF/MetroDR is a two-region high available (HA) disaster recovery (DR) solution that integrates SRDF/Metro and SRDF/A. The demo will show how with a few clicks the user can protect a storage group. Presented by Drew Tonnesen, Technical Staff, Dell Technologies.
Recorded on August 2, 2021 as part of Tech Field Day Presents Dell Technologies HCI \u0026 Storage: Cutting Edge Infrastructure to Drive Your Business. Watch the entire presentation at https://techfieldday.com/appearance/dell-emc-powermax-mission-critical-storage/ or visit https://techfieldday.com/event/tfdxdell21/ or https://DellTechnologies.com/PowerStore for more information.
srdf query commands 주제에 대한 자세한 내용은 여기를 참조하세요.
Dell EMC Solutions Enabler SRDF Family CLI User Guide
Commands to display, query and verify SRDF configurations…….. 37 symrdf list command options. … SRDF/Metro changes to SYMCLI operations commands.
Source: www.delltechnologies.com
Date Published: 11/23/2022
View: 5357
How to determine the current replicated state for EMC SRDF …
To determine the current SRDF replicated state, use either SYMCLI commands “symrdf -s list pd” or “symrdf -g
Source: www.veritas.com
Date Published: 4/26/2021
View: 2072
EMC – SRDF – Operational Commands – SANSPIRE
Run symrdf query to get the status against each array from respective management host. Error while creating SRDF Pair. ====> # symrdf -s 1234 …
Source: www.sanspire.com
Date Published: 7/2/2021
View: 8389
How to check SRDF? – Wazeesupperclub.com
To determine the current SRDF replicated state, use either SYMCLI commands “symrdf -s list pd” or “symrdf -g query”. Note: Both outputs confirm that the …
Source: www.wazeesupperclub.com
Date Published: 4/30/2021
View: 5587
Administering EMC Symmetrix Remote Data Facility …
How to Configure DID Devices for Replication Using EMC SRDF … From the primary room, use the symrdf command to query the replication status of the RDF …
Source: docs.oracle.com
Date Published: 6/13/2022
View: 8187
EMC SRDF Commands – NIXDRAFTS By RSY Digital World
Please refer to below example. # symrdf -g FS_SYBDUMPS query Device Group (DG) Name : FS_SYBDUMPS DG’s Type : RDF1 DG’s Symmetrix ID …
Source: rsydigitalworld.com
Date Published: 8/6/2022
View: 9657
주제와 관련된 이미지 srdf query commands
주제와 관련된 더 많은 사진을 참조하십시오 Dell EMC PowerMax SRDF MetroDR Demonstration. 댓글에서 더 많은 관련 이미지를 보거나 필요한 경우 더 많은 관련 기사를 볼 수 있습니다.
주제에 대한 기사 평가 srdf query commands
- Author: Tech Field Day
- Views: 조회수 1,572회
- Likes: 좋아요 10개
- Date Published: 2021. 8. 4.
- Video Url link: https://www.youtube.com/watch?v=IcyYmlOB0xg
How to check SRDF?
To determine the current SRDF replicated state, use either SYMCLI commands “symrdf -sid <sid> list pd” or “symrdf -g <DeviceGroup> query”. Note: Both outputs confirm that the SRDF devices are “synchronized” in this instance.
What is Symcfg command?
The symcfg commands discovers or displays Symmetrix configuration information.
How do I list the RDF groups?
- Sample output. Local EMC Symmetrix ID (SID) “822”:
- Dopey # symcfg -sid 822 list -rdfg all.
- Repeat the command for the “remote” EMC enclosure using the “symcfg -sid <sid> list -rdfg all” command. …
- Bashful # symcfg -sid 414 list -rdfg all.
How does SRDF Metro work?
SRDF/Metro significantly changes the traditional behavior of SRDF to better support your critical applications in high availability environments. With SRDF/Metro, the SRDF secondary device is read/write accessible to the host and takes on the external identity of the primary device (geometry, device WWN, and so on).
What is Unix Srdf?
SRDF is basically a short form of Symmetrix Remote Data Facility. This is an intelligent software system for data replication from one Symmetrix Storage Array to another geographically distant location through a SAN or over an IP network.
What is Srdf link?
What is SRDF? The Symmetrix Remote Data Facility( SRDF ) is a family of remote mirroring software from Dell EMC offers various levels of business continuity and disaster recovery solutions. This solution can be used to maintain multiple host independent mirrored copy of data.
How do I access Symcli?
…
- At the command line, change to the directory where Solutions Enabler is installed.
- Enter the following at the command line: symcfg list. A list of all connected Symmetrix arrays displays. …
- Determine the microcode version, which is 5266 in this example.
What is EMC solution enabler?
Description: Dell EMC Solutions Enabler provides shared libraries utilized by the Symmetrix Command Line Interface (SYMCLI) for use by storage administrators and systems engineers.
How do you screenshot on Vmax?
- Find out the savepools already created on the array. …
- List save devices which might already exist in DEFAULT_POOL. …
- Disable save devices 1234:5678 from DEFAULT_POOL, add them into snapshot_pool, and enable them. …
- Check whether vdevs are already created on the array.
What is masking view in Vmax?
EMC masking views (also known as LUN masking) enable one set of storage ports (taps) to present different strings of disks to different sets of initiators (channels). Most customers will not need to use this capability.
How does SRDF replication work?
SRDF software replicates data between two, three, or four arrays located in the same room, on the same campus, or thousands of kilometers apart. SRDF replication modes include: SRDF synchronous (SRDF/S)―SRDF/S replication maintains a real-time copy at arrays that are located within 200 kilometers.
How does Smart Dr enhance Srdf metro capabilities?
- Disaster Recovery (DR) Solutions protect against failures of the local storage or database by keeping a remote, up-to-date copy of the data. …
- SRDF/Metro provides higher database resiliency at short distances (up to approximately 100km), based on synchronous replication.
How do I make a group in Srdf?
- SRDF/Metro HA Setup.
- Step 1: Prerequisites.
- Step 2: Create an SRDF connection between the storage systems.
- Step 3: Set up Witness and establish the connection to vWitness.
- Step 4: Determine which storage groups to protect.
- Step 5: Create empty SRDF groups with labels.
How do you write RDF?
- Add The RDF Document Root Tag. First, add the RDF root node: …
- Add A Statement. An RDF document can contain more than one statement. …
- Add Predicates. There’s no point in saying you’re going to describe something, give it a unique ID but then not describe anything about it. …
- XML Namespace URIs.
What is RDF collection?
RDF collections are used to describe groups that contains ONLY the specified members.
What is an RDF document?
The Resource Description Framework (RDF) is a general framework for representing interconnected data on the web. RDF statements are used for describing and exchanging metadata, which enables standardized exchange of data based on relationships. RDF is used to integrate data from multiple sources.
How to determine the current replicated state for EMC SRDF devices
Description
This document attempts to explain the steps required to determine the current state for EMC SRDF devices.
In this instance, the configuration consists of “4” EMC SRDF “R1” devices presented to production server “Dopey” from EMC Symmetrix id (SID) “822”. An additional “4” EMC SRDF “R2” devices have been presented to DR server “Bashful” from EMC Symmetrix ID (SID) “414”.
Figure 1.0
Note: The R1 (source) devices from server Dopey are replicated to the R2 (target) devices presented to server Bashful.
In this instance, the EMC DeviceGroup name is “DopeyDg” as confirmed by “symdg list” shown below:
Dopey # symdg list
D E V I C E G R O U P S
Number of
Name Type Valid Symmetrix ID Devs GKs BCVs VDEVs TGTs
DopeyDg RDF1 Yes 000290300822 4 0 0 0 0
To determine the current SRDF replicated state, use either SYMCLI commands “symrdf -sid
list pd” or “symrdf -g query”. Note: Both outputs confirm that the SRDF devices are “synchronized” in this instance.
Dopey # symrdf -g DopeyDg query
Device Group (DG) Name : DopeyDg
DG’s Type : RDF1
DG’s Symmetrix ID : 000290300822 (Microcode Version: 5773)
Remote Symmetrix ID : 000290301414 (Microcode Version: 5773)
RDF (RA) Group Number : 11 (0A)
Source (R1) View Target (R2) View MODES
——————————– ———————— —– ————
ST LI ST
Standard A N A
Logical T R1 Inv R2 Inv K T R1 Inv R2 Inv RDF Pair
Device Dev E Tracks Tracks S Dev E Tracks Tracks MDA STATE
——————————– — ———————— —– ————
DEV08C 008C RW 0 0 RW 0072 WD 0 0 S.. Synchronized
DEV08D 008D RW 0 0 RW 0073 WD 0 0 S.. Synchronized
DEV08E 008E RW 0 0 RW 0074 WD 0 0 S.. Synchronized
DEV08F 008F RW 0 0 RW 0075 WD 0 0 S.. Synchronized
Total ——– ——– ——– ——–
Track(s) 0 0 0 0
MB(s) 0.0 0.0 0.0 0.0
Legend for MODES:
M(ode of Operation): A = Async, S = Sync, E = Semi-sync, C = Adaptive Copy
D(omino) : X = Enabled, . = Disabled
A(daptive Copy) : D = Disk Mode, W = WP Mode, . = ACp off
or
Dopey # symrdf -sid 822 list pd
Symmetrix ID: 000290300822
Local Device View
—————————————————————————-
STATUS MODES RDF S T A T E S
Sym RDF ——— —– R1 Inv R2 Inv ———————-
Dev RDev Typ:G SA RA LNK MDAT Tracks Tracks Dev RDev Pair
—- —- ——– ——— —– ——- ——- — —- ————-
008C 0072 R1:11 RW RW RW S..1 0 0 RW WD Synchronized
008D 0073 R1:11 RW RW RW S..1 0 0 RW WD Synchronized
008E 0074 R1:11 RW RW RW S..1 0 0 RW WD Synchronized
008F 0075 R1:11 RW RW RW S..1 0 0 RW WD Synchronized
Total ——– ——–
Track(s) 0 0
MB(s) 0.0 0.0
Legend for MODES:
M(ode of Operation): A = Async, S = Sync, E = Semi-sync, C = Adaptive Copy
D(omino) : X = Enabled, . = Disabled
A(daptive Copy) : D = Disk Mode, W = WP Mode, . = ACp off
(Mirror) T(ype) : 1 = R1, 2 = R2
Dell EMC Storage – RAJESHVU.COM
The symcfg commands discovers or displays Symmetrix configuration information.
Below list contains some of the most useful symcfg command examples.
Search results for
Check the configuartion and SYMAPI database status of all arrays.
Check the configuartion and SYMAPI database status of all arrays.
List the SLOs available in VMAX3 array 1234 along with the allocated and used storage capacity from the SRP.
List the SLOs available in VMAX3 array 1234 along with the allocated and used storage capacity from the SRP.
A brief description of the all connected Symmetrix boxes.
A brief description of the all connected Symmetrix boxes.
Shows the specific SRDF/A information about the rdf group 10.
Shows the specific SRDF/A information about the rdf group 10.
Check whether the SYMAPI database is in sync with the current configuration of array 1234.
Check whether the SYMAPI database is in sync with the current configuration of array 1234.
List all the datadevices in thinpool My_Pool on array 1234.The ‘-detail’ option also displays the configurable options like , Max. subscription Percentage etc.
List all the datadevices in thinpool My_Pool on array 1234.The ‘-detail’ option also displays the configurable options like , Max. subscription Percentage etc.
List all the datadevices in thinpool My_Pool on array 1234.
List all the datadevices in thinpool My_Pool on array 1234.
Show the efficiency gained through Virtual Provisioning, Snap Shots and Compression for SRP_1 in 1234 array
Show the efficiency gained through Virtual Provisioning, Snap Shots and Compression for SRP_1 in 1234 array
Show the array efficiency gained through Virtual Provisioning, Snap Shots and Compression for 1234 array
Show the array efficiency gained through Virtual Provisioning, Snap Shots and Compression for 1234 array
Remove the array 1234 from symcfg list.
Remove the array 1234 from symcfg list.
Displays detailed information about the Symmetrix Array 1234. This included capacity and microcode/Enginuity version etc
Displays detailed information about the Symmetrix Array 1234. This included capacity and microcode/Enginuity version etc
List all the thinpools in array 1234 along with Subscription percentage for each thin pool. subscription percentage=Total Bounded TDEV capacity/Total Thin Pool Capacity*100.
List all the thinpools in array 1234 along with Subscription percentage for each thin pool. subscription percentage=Total Bounded TDEV capacity/Total Thin Pool Capacity*100.
List all the thinpools in array 1234.
List all the thinpools in array 1234.
List all the thin devices in array 1234 which are not bounded to any thin pools.
List all the thin devices in array 1234 which are not bounded to any thin pools.
List all the TDEVs in Storage Group MySg with the bounded poolname and other useful details.This also displays actual bounded pool and also the pool which currently moved due to “rebind” or FAST Policy.
List all the TDEVs in Storage Group MySg with the bounded poolname and other useful details.This also displays actual bounded pool and also the pool which currently moved due to “rebind” or FAST Policy.
List all the TDEVs in Storage Group MySg with the bounded poolname and other useful details.
List all the TDEVs in Storage Group MySg with the bounded poolname and other useful details.
List thin devices starting from AAA to ABB and the pools which are bounded with.
List thin devices starting from AAA to ABB and the pools which are bounded with.
With “detail” option ,this commands will displays the multiple thin pools that each TEVS binded with.
With “detail” option ,this commands will displays the multiple thin pools that each TEVS binded with.
List all the thin devices in array 1234.And also shows the thinpools associated to each device with the binding status.
List all the thin devices in array 1234.And also shows the thinpools associated to each device with the binding status.
List all the thin devices in array 1234 which are bounded to a thin pool.
List all the thin devices in array 1234 which are bounded to a thin pool.
List all the thin devices assoicated with thinpool My_Pool
List all the thin devices assoicated with thinpool My_Pool
List all the Storage Resource Pools(SRP) in the VMAX3 in verbose format, with underlying Disk Groups and available Service Level Objectives.
List all the Storage Resource Pools(SRP) in the VMAX3 in verbose format, with underlying Disk Groups and available Service Level Objectives.
List all the SRPs in the VMAX3 array 1234 along with usable, allocated and free storage capacity.
List all the SRPs in the VMAX3 array 1234 along with usable, allocated and free storage capacity.
List all the Storage Resource Pools(SRP) in the Vmax3 array 1234.
List all the Storage Resource Pools(SRP) in the Vmax3 array 1234.
List the SLOs and the workloads that can be associated with storage groups in VMAX3 array 1234, along with the approximate response time for each.
List the SLOs and the workloads that can be associated with storage groups in VMAX3 array 1234, along with the approximate response time for each.
List all the available Service Level Objectives( SLO ) in Vmax3 1234.
List all the available Service Level Objectives( SLO ) in Vmax3 1234.
List all Storage Groups in AllFalsh Vmax 1234 along with the compression ratio in descending order
List all Storage Groups in AllFalsh Vmax 1234 along with the compression ratio in descending order
List all Storage Groups in AllFalsh Vmax 1234 along with the compression ratio
List all Storage Groups in AllFalsh Vmax 1234 along with the compression ratio
Displays the online status of all Front-end directors.
Displays the online status of all Front-end directors.
List details about all the static rdf groups in array .
List details about all the static rdf groups in array .
List details about all the dynamic rdf groups in array .
List details about all the dynamic rdf groups in array .
List details about all the rdf groups in array.
List details about all the rdf groups in array.
List all the RA ports in array 1234 and the RDF groups where each RA port is a member of.
List all the RA ports in array 1234 and the RDF groups where each RA port is a member of.
List all the RDF groups where RA port 3f is a member of.
List all the RDF groups where RA port 3f is a member of.
list all the free ports in director slot 1 not associated with any emulation
list all the free ports in director slot 1 not associated with any emulation
List all the free ports not associated with any emulations
List all the free ports not associated with any emulations
shows the amount and details of memory configure in the array .
shows the amount and details of memory configure in the array .
List all the external locks held in Symmetrix array 1234.
List all the external locks held in Symmetrix array 1234.
Displays online and connection status of all front-end director ports.
Displays online and connection status of all front-end director ports.
Displays wwn of all front-end director ports.
Displays wwn of all front-end director ports.
Displays the detailed information and status of arrays each physical components like power supply units Fans etc.
Displays the detailed information and status of arrays each physical components like power supply units Fans etc.
Display all the failed physical components in symmetrix array 1234.
Display all the failed physical components in symmetrix array 1234.
Dispalys the information and status of arrays physical components like powersupply units Fans etc.
Dispalys the information and status of arrays physical components like powersupply units Fans etc.
Display the SRP wise array efficiency gained through Virtual Provisioning, Snap Shots and Compression for 1234 array
Display the SRP wise array efficiency gained through Virtual Provisioning, Snap Shots and Compression for 1234 array
Display the array efficiency gained through Virtual Provisioning, Snap Shots and Compression for 1234 array
Display the array efficiency gained through Virtual Provisioning, Snap Shots and Compression for 1234 array
Displays the online status of all directors ( Frontend+Backend).
Displays the online status of all directors ( Frontend+Backend).
Displays the datadevices in array 1234 along with the pool information of each device is associated with.
Displays the datadevices in array 1234 along with the pool information of each device is associated with.
Displays the online status of all Back-end directors.
Displays the online status of all Back-end directors.
List all the hosts wlong with the OS version, connected to array 1234. This also give the information about the Service Processor of 1234.
List all the hosts wlong with the OS version, connected to array 1234. This also give the information about the Service Processor of 1234.
Make the front-end port 6h:1 to offline.
Make the front-end port 6h:1 to offline.
Make the front-end port 6h:1 to online.
Make the front-end port 6h:1 to online.
Release the lock 15 held on array 1234 .
Release the lock 15 held on array 1234 .
List the LUN information / availability of lun ids on port 4a0 in array 1234 .
List the LUN information / availability of lun ids on port 4a0 in array 1234 .
Shows the configuration information about the current symapi database.
Shows the configuration information about the current symapi database.
symcfg -db Shows the configuration information about the current symapi database. Copied
symcfg -sid 1234 -dir 4a -p list -addr -avail List the LUN information / availability of lun ids on port 4a0 in array 1234 . Copied
symcfg -sid 1234 -lockn 15 release -force Release the lock 15 held on array 1234 . Copied
symcfg -sid 1234 -SA 6h -P 1 online Make the front-end port 6h:1 to online. Copied
symcfg -sid 1234 -SA 6h -P 1offline Make the front-end port 6h:1 to offline. Copied
symcfg -sid 1234 list -connections List all the hosts wlong with the OS version, connected to array 1234. This also give the information about the Service Processor of 1234. Copied
symcfg -sid 1234 list -da all Displays the online status of all Back-end directors. Copied
symcfg -sid 1234 list -datadev -GB Displays the datadevices in array 1234 along with the pool information of each device is associated with. Copied
symcfg -sid 1234 list -dir all Displays the online status of all directors ( Frontend+Backend). Copied
symcfg -sid 1234 list -efficiency -detail Display the array efficiency gained through Virtual Provisioning, Snap Shots and Compression for 1234 array Copied
symcfg -sid 1234 list -efficiency -detail -srp Display the SRP wise array efficiency gained through Virtual Provisioning, Snap Shots and Compression for 1234 array Copied
symcfg -sid 1234 list -env_data Dispalys the information and status of arrays physical components like powersupply units Fans etc. Copied
symcfg -sid 1234 list -env_data -service_state failed Display all the failed physical components in symmetrix array 1234. Copied
symcfg -sid 1234 list -env_data -v Displays the detailed information and status of arrays each physical components like power supply units Fans etc. Copied
symcfg -sid 1234 list -fa all Displays wwn of all front-end director ports. Copied
symcfg -sid 1234 list -fa all -port Displays online and connection status of all front-end director ports. Copied
symcfg -sid 1234 list -lockn all List all the external locks held in Symmetrix array 1234. Copied
symcfg -sid 1234 list -memory shows the amount and details of memory configure in the array . Copied
symcfg -sid 1234 list -port -free List all the free ports not associated with any emulations Copied
symcfg -sid 1234 list -port -free -slot 1 list all the free ports in director slot 1 not associated with any emulation Copied
symcfg -sid 1234 list -RA 3f List all the RDF groups where RA port 3f is a member of. Copied
symcfg -sid 1234 list -RA ALL List all the RA ports in array 1234 and the RDF groups where each RA port is a member of. Copied
symcfg -sid 1234 list -rdfg 3 List details about rdf group 3 . Copied
symcfg -sid 1234 list -rdfg all List details about all the rdf groups in array. Copied
symcfg -sid 1234 list -rdfg all -dynamic List details about all the dynamic rdf groups in array . Copied
symcfg -sid 1234 list -rdfg all -static List details about all the static rdf groups in array . Copied
symcfg -sid 1234 list -sa all Displays the online status of all Front-end directors. Copied
symcfg -sid 1234 list -sg_compression -all List all Storage Groups in AllFalsh Vmax 1234 along with the compression ratio Copied
symcfg -sid 1234 list -sg_compression -by_compressibility -all List all Storage Groups in AllFalsh Vmax 1234 along with the compression ratio in descending order Copied
symcfg -sid 1234 list -slo List all the available Service Level Objectives( SLO ) in Vmax3 1234. Copied
symcfg -sid 1234 list -slo -detail -by_resptime -all List the SLOs and the workloads that can be associated with storage groups in VMAX3 array 1234, along with the approximate response time for each. Copied
symcfg -sid 1234 list -srp List all the Storage Resource Pools(SRP) in the Vmax3 array 1234. Copied
symcfg -sid 1234 list -srp -detail List all the SRPs in the VMAX3 array 1234 along with usable, allocated and free storage capacity. Copied
symcfg -sid 1234 list -srp -v List all the Storage Resource Pools(SRP) in the VMAX3 in verbose format, with underlying Disk Groups and available Service Level Objectives. Copied
symcfg -sid 1234 list -tdev -gb -thin -pool My_Pool List all the thin devices assoicated with thinpool My_Pool Copied
symcfg -sid 1234 list -tdev -bound -GB List all the thin devices in array 1234 which are bounded to a thin pool. Copied
symcfg -sid 1234 list -tdev -GB List all the thin devices in array 1234.And also shows the thinpools associated to each device with the binding status. Copied
symcfg -sid 1234 list -tdev -GB -detail With “detail” option ,this commands will displays the multiple thin pools that each TEVS binded with. Copied
symcfg -sid 1234 list -tdev -range AAA:AAB -GB List thin devices starting from AAA to ABB and the pools which are bounded with. Copied
symcfg -sid 1234 list -tdev -sg MySg List all the TDEVs in Storage Group MySg with the bounded poolname and other useful details. Copied
symcfg -sid 1234 list -tdev -sg MySg -detail List all the TDEVs in Storage Group MySg with the bounded poolname and other useful details.This also displays actual bounded pool and also the pool which currently moved due to “rebind” or FAST Policy. Copied
symcfg -sid 1234 list -tdev -unbound -GB List all the thin devices in array 1234 which are not bounded to any thin pools. Copied
symcfg -sid 1234 list -thin -pool -GB List all the thinpools in array 1234. Copied
symcfg -sid 1234 list -thin -pool -GB -detail List all the thinpools in array 1234 along with Subscription percentage for each thin pool. subscription percentage=Total Bounded TDEV capacity/Total Thin Pool Capacity*100. Copied
symcfg -sid 1234 list -v Displays detailed information about the Symmetrix Array 1234. This included capacity and microcode/Enginuity version etc Copied
symcfg -sid 1234 remove Remove the array 1234 from symcfg list. Copied
symcfg -sid 1234 show -efficiency -detail Show the array efficiency gained through Virtual Provisioning, Snap Shots and Compression for 1234 array Copied
symcfg -sid 1234 show -efficiency -srp SRP_1 Show the efficiency gained through Virtual Provisioning, Snap Shots and Compression for SRP_1 in 1234 array Copied
symcfg -sid 1234 show -pool My_Pool -thin -GB List all the datadevices in thinpool My_Pool on array 1234. Copied
symcfg -sid 1234 show -pool My_Pool -thin -GB -detail List all the datadevices in thinpool My_Pool on array 1234.The ‘-detail’ option also displays the configurable options like , Max. subscription Percentage etc. Copied
symcfg -sid 1234 verify Check whether the SYMAPI database is in sync with the current configuration of array 1234. Copied
symcfg -sid 198 list -rdfg 10 -rdfa Shows the specific SRDF/A information about the rdf group 10. Copied
symcfg list A brief description of the all connected Symmetrix boxes. Copied
symcfg list -srp -demand -type slo List the SLOs available in VMAX3 array 1234 along with the allocated and used storage capacity from the SRP. Copied
How to list the EMC SRDF “RDF” defined groups for an EMC Symmetrix (DMX) array
Description
This document attempts to explain how to list the EMC SRDF “RDF” defined groups for an EMC Symmetrix (DMX) array.
Prior to creating a new EMC SRDF “RDF” group, a RDF group number (GrpNum) and corresponding RDF director port details is required for both the local and remote EMC enclosures.
Sample configuration
Figure 1.0
The EMC SYMCLI command “symcfg -sid
list -rdfg all” can be used to list the defined SRDF “RDF” groups for a given EMC Symmetrix (DMX) array. Sample output
Local EMC Symmetrix ID (SID) “822”:
Dopey # symcfg -sid 822 list -rdfg all
Symmetrix ID : 000290300822
S Y M M E T R I X R D F G R O U P S
Local Remote Group RDFA Info
————– ——————— ———————– —————–
LL Flags Dir Flags Cycle
RA-Grp (sec) RA-Grp SymmID T Name LPDS Cfg CSRM time Pri
————– ——————— ———————– —– —– —
1 ( 0) 10 1 ( 0) 000290301414 S SETUP_GRP .X.. F-S -IS- 30 33
2 ( 1) 10 2 ( 1) 000290301414 D Sol-01 .XX. F-S -IS- 30 33
3 ( 2) 10 3 ( 2) 000290301414 D Sol-02 .XX. F-S -IS- 30 33
4 ( 3) 10 4 ( 3) 000290301414 D Sol-03 XX.. F-S -IS- 30 33
5 ( 4) 10 5 ( 4) 000290301414 D Sol-04 XX.. F-S -IS- 30 33
6 ( 5) 10 6 ( 5) 000290301414 D Sol-05 XX.. F-S -IS- 30 33
7 ( 6) 10 7 ( 6) 000290301414 D aix-01 XX.. F-S -IS- 30 33
8 ( 7) 10 8 ( 7) 000290301414 D ESX-01 XX.. F-S -IS- 30 33
9 ( 8) 10 9 ( 8) 000290301414 D v20z-03-04 XX.. F-S -IS- 30 33
10 ( 9) 10 10 ( 9) 000290301414 D 710_03-06 XX.. F-S -IS- 30 33
Legend:
? : Unknown
Group (T)ype : S = Static, D = Dynamic
Director (C)onfig : F-S = Fibre-Switched, F-H = Fibre-Hub
G = GIGE, E = ESCON, T = T3, – = N/A
Group Flags :
Prevent Auto (L)ink Recovery : X = Enabled, . = Disabled
Prevent RAs Online Upon (P)ower On: X = Enabled, . = Disabled
Link (D)omino : X = Enabled, . = Disabled
(S)TAR mode : N = Normal, R = Recovery, . = OFF
RDFA Flags :
(C)onsistency : X = Enabled, . = Disabled, – = N/A
(S)tatus : A = Active, I = Inactive, – = N/A
(R)DFA Mode : S = Single-session, M = MSC, – = N/A
(M)sc Cleanup : C = MSC Cleanup required, – = N/A
Note: In this instance, “11” is the next available “GrpNum” number.
Repeat the command for the “remote” EMC enclosure using the “symcfg -sid
list -rdfg all” command. Remote EMC Symmetrix ID (SID) “414”:
Bashful # symcfg -sid 414 list -rdfg all
Symmetrix ID : 000290301414
S Y M M E T R I X R D F G R O U P S
Local Remote Group RDFA Info
————– ——————— ———————– —————–
LL Flags Dir Flags Cycle
RA-Grp (sec) RA-Grp SymmID T Name LPDS Cfg CSRM time Pri
————– ——————— ———————– —– —– —
1 ( 0) 10 1 ( 0) 000290300822 S SETUP_GRP .X.. F-S -IS- 30 33
2 ( 1) 10 2 ( 1) 000290300822 D Sol-01 .XX. F-S -IS- 30 33
3 ( 2) 10 3 ( 2) 000290300822 D Sol-02 .XX. F-S -IS- 30 33
4 ( 3) 10 4 ( 3) 000290300822 D Sol-03 XX.. F-S -IS- 30 33
5 ( 4) 10 5 ( 4) 000290300822 D Sol-04 XX.. F-S -IS- 30 33
6 ( 5) 10 6 ( 5) 000290300822 D Sol-05 XX.. F-S -IS- 30 33
7 ( 6) 10 7 ( 6) 000290300822 D aix-01 XX.. F-S -IS- 30 33
8 ( 7) 10 8 ( 7) 000290300822 D ESX-01 XX.. F-S -IS- 30 33
9 ( 8) 10 9 ( 8) 000290300822 D v20z-03-04 XX.. F-S -IS- 30 33
10 ( 9) 10 10 ( 9) 000290300822 D 710_03-06 XX.. F-S -IS- 30 33
Legend:
? : Unknown
Group (T)ype : S = Static, D = Dynamic
Director (C)onfig : F-S = Fibre-Switched, F-H = Fibre-Hub
G = GIGE, E = ESCON, T = T3, – = N/A
Group Flags :
Prevent Auto (L)ink Recovery : X = Enabled, . = Disabled
Prevent RAs Online Upon (P)ower On: X = Enabled, . = Disabled
Link (D)omino : X = Enabled, . = Disabled
(S)TAR mode : N = Normal, R = Recovery, . = OFF
RDFA Flags :
(C)onsistency : X = Enabled, . = Disabled, – = N/A
(S)tatus : A = Active, I = Inactive, – = N/A
(R)DFA Mode : S = Single-session, M = MSC, – = N/A
(M)sc Cleanup : C = MSC Cleanup required, – = N/A
Note: In this instance, “11” is the next available “GrpNum” number.
How to determine the current replicated state for EMC SRDF devices
Description
This document attempts to explain the steps required to determine the current state for EMC SRDF devices.
In this instance, the configuration consists of “4” EMC SRDF “R1” devices presented to production server “Dopey” from EMC Symmetrix id (SID) “822”. An additional “4” EMC SRDF “R2” devices have been presented to DR server “Bashful” from EMC Symmetrix ID (SID) “414”.
Figure 1.0
Note: The R1 (source) devices from server Dopey are replicated to the R2 (target) devices presented to server Bashful.
In this instance, the EMC DeviceGroup name is “DopeyDg” as confirmed by “symdg list” shown below:
Dopey # symdg list
D E V I C E G R O U P S
Number of
Name Type Valid Symmetrix ID Devs GKs BCVs VDEVs TGTs
DopeyDg RDF1 Yes 000290300822 4 0 0 0 0
To determine the current SRDF replicated state, use either SYMCLI commands “symrdf -sid
list pd” or “symrdf -g query”. Note: Both outputs confirm that the SRDF devices are “synchronized” in this instance.
Dopey # symrdf -g DopeyDg query
Device Group (DG) Name : DopeyDg
DG’s Type : RDF1
DG’s Symmetrix ID : 000290300822 (Microcode Version: 5773)
Remote Symmetrix ID : 000290301414 (Microcode Version: 5773)
RDF (RA) Group Number : 11 (0A)
Source (R1) View Target (R2) View MODES
——————————– ———————— —– ————
ST LI ST
Standard A N A
Logical T R1 Inv R2 Inv K T R1 Inv R2 Inv RDF Pair
Device Dev E Tracks Tracks S Dev E Tracks Tracks MDA STATE
——————————– — ———————— —– ————
DEV08C 008C RW 0 0 RW 0072 WD 0 0 S.. Synchronized
DEV08D 008D RW 0 0 RW 0073 WD 0 0 S.. Synchronized
DEV08E 008E RW 0 0 RW 0074 WD 0 0 S.. Synchronized
DEV08F 008F RW 0 0 RW 0075 WD 0 0 S.. Synchronized
Total ——– ——– ——– ——–
Track(s) 0 0 0 0
MB(s) 0.0 0.0 0.0 0.0
Legend for MODES:
M(ode of Operation): A = Async, S = Sync, E = Semi-sync, C = Adaptive Copy
D(omino) : X = Enabled, . = Disabled
A(daptive Copy) : D = Disk Mode, W = WP Mode, . = ACp off
or
Dopey # symrdf -sid 822 list pd
Symmetrix ID: 000290300822
Local Device View
—————————————————————————-
STATUS MODES RDF S T A T E S
Sym RDF ——— —– R1 Inv R2 Inv ———————-
Dev RDev Typ:G SA RA LNK MDAT Tracks Tracks Dev RDev Pair
—- —- ——– ——— —– ——- ——- — —- ————-
008C 0072 R1:11 RW RW RW S..1 0 0 RW WD Synchronized
008D 0073 R1:11 RW RW RW S..1 0 0 RW WD Synchronized
008E 0074 R1:11 RW RW RW S..1 0 0 RW WD Synchronized
008F 0075 R1:11 RW RW RW S..1 0 0 RW WD Synchronized
Total ——– ——–
Track(s) 0 0
MB(s) 0.0 0.0
Legend for MODES:
M(ode of Operation): A = Async, S = Sync, E = Semi-sync, C = Adaptive Copy
D(omino) : X = Enabled, . = Disabled
A(daptive Copy) : D = Disk Mode, W = WP Mode, . = ACp off
(Mirror) T(ype) : 1 = R1, 2 = R2
EMC – SRDF – Operational Commands
SRDF related operational commands:
How to list RA ports between 2 EMCs
# symcfg -sid 1234 list -RA all [–switched] Symmetrix ID: 000292601234 S Y M M E T R I X R D F D I R E C T O R S Remote Local Remote Ident Symb Num Slot Type Attr SymmID RA Grp RA Grp Status RF-5H 05H 117 5 RDF-BI-DIR – 000292605678 2 (01) 2 (01) Online RF-6H 06H 118 6 RDF-BI-DIR – 000292605678 2 (01) 2 (01) Online RF-7H 07H 119 7 RDF-BI-DIR – 000292605678 2 (01) 2 (01) Online RF-8H 08H 120 8 RDF-BI-DIR – 000292605678 2 (01) 2 (01) Online RF-9H 09H 121 9 RDF-BI-DIR – 000292605678 2 (01) 2 (01) Online RF-10H 10H 122 10 RDF-BI-DIR – 000292605678 2 (01) 2 (01) Online RF-11H 11H 123 11 RDF-BI-DIR – 000292605678 2 (01) 2 (01) Online RF-12H 12H 124 12 RDF-BI-DIR – 000292605678 2 (01) 2 (01) Online
How to delete a RDF pair and bring the devs into standard mode
# symrdf -sid 1234 -rdfg 2 -f srdf_devs deletepair -force
How to create a SRDF Device pair/group
First select the devices you want to be paired and create a file containing those devices (First column should list the devices which are from the sid against which you will be running the command)
# cat srdf_devs
A001 B001
A002 B002
A003 B003
Find out rdfg group id between arrays
# symcfg -sid 1234 -ra all list
Set up the replication pair between local and remote devices
# symrdf -sid 1234 -rdfg 2 –f srdf_devs createpair -invalidate R2 -type R1 –nop
# symrdf -sid 1234 -rdfg 2 –f srdf_devs createpair -invalidate R2 -type R1 –g testdg (if you want to create the dg at the same time)
How to find out which devices are SRDFed (are either R1 or R2)
# symrdf -sid 1234 list
How to find out diskgroups on a given management server
# symdg list
How to add the device to dg
# symld -sid 1234 -g testdg add dev A001
How to check status of SRDF link establishment
# symrdf verify -synchronized -g testdg DEV001
How to check the status of SRDF Status group
# symrdf -g testdg query -i 5 (will check the status every 5 seconds and will give an estimate time left for sync as well as transfer speed)
How to set a device group to asynchronous mode
# symrdf -g testdg set mode acp_disk
How to set a device to asynchronous mode
# symrdf -g testdg set mode acp_disk DEV003
How to set up acp mode for individual disks not added to dg yet
# symrdf -sid 1234 -f srdf_devs -rdfg 2 set mode acp_disk
How to establish replication between local and remote devices not added to dg yet
# symrdf -sid 1234 -f srdf_devs -rdfg 2 establish -full
How to establish SRDF connection for a single device in a device group
# symrdf –g testdg establish -full DEV001 –nop
How to create SRDF device group
# symdg create -type R1 testdg
How to rename a srdf device group
# symdg rename testdg new_testdg
How to move device from one srdf device group to another and rename
# symld -g testdg move DEV003 new_testdg -rename (will move device DEV003 from testdg to new_testdg and rename it to next available device name)
# symld -g testdg moveall -range A001:A004 new_testdg -rename (will move range of devices from testdg to new_testdg and rename them)
How to change the replication mode (asynchronous)
# symrdf -g group set mode sync # symrdf -g group set domino on # symrdf -g group set acp_disk skew 1000
-format option in symrdf while creating a new pair
Prior to 5876 and SE7.4, the createpair command will start full synch of data – by moving
tracks from R1 to R2 or the other way around. With 5867/SE7.4, there is a new option “-format”.
It causes all tracks on R1-R2 pair to be cleared – this obviating the need for full sync. Both
the devices on the source and target must be unmapped from all FE ports or made NR in order to
use -format.
# symrdf -sid 1234 -rdfg 2 -f pair_r1_r2 -type r1 -format -establish
How to resume SRDF between arrays?
When one of the arrays is shutdown, replication between the pair gets suspended and has to be
resumed manually using the command
# symrdf resume
How to unmap a R2 device which is part of a device group
If you want to unmap R2 devices from FA port, you will have to first disable the devices and then unmap each device on each FA port one at a time. You can’t unmap the range of devices all at once using the range. So say you have 1 device mapped to 2 FA ports which you want to write disable. Steps will be as below:
Find out DEV00X device name
# symdg -g testdg list (if srdf device group doesn’t exist, create a temporary one using symdg create -type R1 testdg and use symrdf -g DGNAME query)
Write Disable the device on required FA ports
# symld -sid 1234 -g testdg -sa 09C -p 0 write_disable DEV00X
# symld -sid 1234 -g testdg -sa all write_disable DEV00X (or no device name at all will write disable all devices from the device group from all FAs)
Prepare text file containing unmap command
# cat unmap
unmap dev A001 from dir 09C:0;
Unmap using symconfigure prepapre and commit
How to turn R1 into R2 and vice-versa (swap the personality)
# symrdf -g Testdg query # symrdf -g Testdg failover # symrdf -g Testdg swap # symrdf -g Testdg resume
How to create a RA group between the two arrays
# symrdf addgrp -sid 1234 -rdfg 52 -label rdfg52 -dir 7c,8c,9c,10c -remote_sid 5678 -remote_rdfg 52 -remote_dir 8a,9a,8b,9b
How to remove a RA group between the two arrays
# symrdf removegrp -sid 1234 -label rdfg52
How to change the mode from async to sync
# symrdf -g testdg query | grep SyncInProg | wc -l 10 # symdg show testdg | grep -i tracks RDF Adaptive Copy Skew (Tracks) : 65535 Number of R1 Invalid Tracks : 0 Number of R2 Invalid Tracks : 386 Tracks not Committed to the R2 Side: 0 R1 Side DSE Used Tracks : 0 R2 Side DSE Used Tracks : 0 # symrdf -g testdg set mode sync Execute an RDF Set ‘Synchronous Mode’ operation for device group ‘testdg’ (y/2) ? y An RDF Set ‘Synchronous Mode’ operation execution is in progress for device group ‘testdg’. Please wait… The RDF Set ‘Synchronous Mode’ operation successfully executed for device group ‘testdg’. # symrdf -g testdg query | grep SyncInProg | wc -l 7 # symrdf -g testdg query | grep SyncInProg | wc -l 0 # symdg show testdg | grep -i tracks RDF Adaptive Copy Skew (Tracks) : 65535 Number of R1 Invalid Tracks : 0 Number of R2 Invalid Tracks : 0 Tracks not Committed to the R2 Side: 0 R1 Side DSE Used Tracks : 0 R2 Side DSE Used Tracks : 0
SRDF commands related errors:
Error received while deleting a RDF pair and bringing the devs into standard mode
===>
# symrdf -sid 1234 -rdfg 2 -file srdf_devs deletepair -force -nop An RDF ‘Delete Pair’ operation execution is in progress for device file ‘srdf_devs’. Please wait… The device is not in a valid RDF state for this operation
# symrdf -sid 1234 -rdfg 2 -file srdf_devs split # symrdf -sid 1234 -rdfg 2 -file srdf_devs deletepair -force -nop
Error while creating SRDF pair
===>It means it first needs to be split or suspended and then deleted.
=====>
# symrdf -sid 1234 -rdfg 2 -invalidate R2 createpair -f srdf_devs -type R1 -nop An RDF ‘Create Pair’ operation execution is in progress for device file ‘srdf_devs’. Please wait… A configuration mismatch was detected between your local and remote device(s)
=====>
This is because the local database for each array on respective MA is not up to date. In this case, run symcfg discover on each MA and then try creating the pair.
OR
some/all of the devices are already in SRDF paired status, or they are paired differently than mentioned in the diskgroup or the device file. In this case create 2 text files – each containing list of devices from each array in the first column and “1” (number 1) in the second column. Run symrdf query to get the status against each array from respective management host.
Error while creating SRDF Pair
====>
# symrdf -sid 1234 -rdfg 2 -invalidate R2 createpair -f srdf_devs -type R1 -nop An RDF ‘Create Pair’ operation execution is in progress for device file ‘srdf_devs’. Please wait… The specified RA group is not valid
Error while creating SRDF Pair
====>This is a misleading message. Run symcfg -sid 1234 list -RA all to verify the rdfg group. It is indeed the value you used while creating the pair. The problem is not with the rdfg value. The problem is with the status of devices. Either some or all the devices are in SRDF pairing relationship already. Run symrdf -sid 1234 list to find out the devices that are in srdf relationship.
====>
# symrdf -sid 1234 -rdfg 2 -f srdf_devs createpair -type r1 -invalidate r2 -nop An RDF ‘Create Pair’ operation execution is in progress for device file ‘srdf_devs’. Please wait… The devices being acted on are a mixture of dynamic and Non dynamic DRDF devices
Error while creating SRDF Pair
====>This message means that either one or more devices listed in srdf_devs file doesn’t have dyn_rdf attribute set. So, set the attribute=dyn_rdf using symconfigure on listed devices and run createpair again.
====>
# symrdf -sid 1234 -rdfg 2 -f srdf_devs createpair -type r1 -invalidate r2 -nop An RDF ‘Create Pair’ operation execution is in progress for device file ‘srdf_devs’. Please wait… The device configuration is not valid for the dynamic RDF operation to be performed
Error while creating SRDF Pair
====>This message means that some or all of the devices are already paired up. Run query to check their status.
====>
# symrdf -sid 1234 -rdfg 2 -f srdf_devs createpair -type r1 -invalidate r2 -nop An RDF ‘Create Pair’ operation execution is in progress for device file ‘srdf_devs’. Please wait… The other pair of the R21 is not in a valid RDF mode for this operation. Operation can not be performed
Error while running SRDF query
====>It means the target devices are already in another rdf relationship. Devices should be standardto begin with.
====>
# symrdf -sid 1234 -rdfg 2 -f srdf_devs query The device name specified could not be found
Error while setting devices to sync mode
====>Try running the command from management host for partner array.
====>
# symrdf -sid 1234 -rdfg 2 -f srdf_devs set mode sync -nop RDF Set Operation will not be executed.
Error while suspending async replication
====>It means some of the devices are already in sync mode
====>
# symrdf -g srdf_devs suspend -force -nop Unable to acquire the Symmetrix device lock
symcfg list -lockn all -sid
symdev -sid 1234 list -lock
symdev -sid 1234 -lock 9 release -nop
Some devices end up in Invalid state in async replication
====>on both the arrays shows no lock. But because these lock 9 on devices, you can see them with, and release them with. Yourun symcfg discover after releasing the lock. Following that, you should be able to suspend the replication and establish again.
====>
This might happen when meta devices are being replicated, and some of the member devices end up being in a state different than the meta head. In such situation, suspend the replication, and then re-establish.
How to check SRDF? – Wazeesupperclub.com
How to check SRDF?
To determine the current SRDF replicated state, use either SYMCLI commands “symrdf -sid list pd” or “symrdf -g query”. Note: Both outputs confirm that the SRDF devices are “synchronized” in this instance.
Which SRDF command will cause the RDF links to become not ready and invalid tracks to accumulate on writes only at the source side?
To invoke a failback, the SRDF pair(s) must already be in Failed over/Suspended and Write Disabled at the source/Suspended and Not Ready at the source/R1 Updated/R1 UpdInProg. Update – Initiates copying of invalid tracks before disabling any disks.
How do I list the RDF groups?
The EMC SYMCLI command “symcfg -sid list -rdfg all” can be used to list the defined SRDF “RDF” groups for a given EMC Symmetrix (DMX) array.
How do I set up SRDF?
How to Configure an EMC SRDF Replication Group
Verify that the primary and secondary replicas are synchronized. Determine which node contains the primary replica and which node contains the secondary replica by using the symdg show command. Enable the secondary replica. Swap the RDF1 and RDF2 devices.
What is Unix SRDF?
SRDF is basically a short form of Symmetrix Remote Data Facility. This is an intelligent software system for data replication from one Symmetrix Storage Array to another geographically distant location through a SAN or over an IP network.
What is Dell EMC SRDF?
This Ready Solution uses Dell EMC Symmetrix Remote Data Facility (SRDF) software for disaster recovery and data mobility. Data at the remote array is typically only seconds behind the primary site.
What is RDF group?
RDF Group, specialises in commercial office strip out & fit outs, refurbishment, construction & maintenance and special projects for clients in the UK.
What is EMC RDF?
EMC SRDF/Metro SmartDR configuration PowerHA SystemMirror uses Symmetrix command-line interface (SYMCLI) to discover and integrate the replicated storage from an EMC storage device into the High Availability and Disaster Recovery (HADR) framework.
What is SRDF replication?
How does SRDF replication work?
SRDF software replicates data between two, three, or four arrays located in the same room, on the same campus, or thousands of kilometers apart. SRDF replication modes include: SRDF synchronous (SRDF/S)―SRDF/S replication maintains a real-time copy at arrays that are located within 200 kilometers.
What is Adaptive Copy Disk Mode?
Adaptive Copy Disk Mode Source array acknowleges all the writes to hosts, and saves them in cache of local array. These writes are de-staged from cache to source volume (R1s) and these IOs are tracked as invalid tracks. The data is subsequently transferred to remote volume (R2s).
Administering EMC Symmetrix Remote Data Facility Replicated Devices
Administering EMC Symmetrix Remote Data Facility Replicated Devices
The following table lists the tasks you must perform to set up and manage an EMC Symmetrix Remote Data Facility (SRDF) storage-based replicated device.
How to Configure an EMC SRDF Replication Group
Before You Begin
EMC Solutions Enabler software must be installed on all cluster nodes before you configure an EMC Symmetrix Remote Data Facility (SRDF) replication group. First, configure the EMC SRDF device groups on shared disks in the cluster. For more information about how to configure the EMC SRDF device groups, see your EMC SRDF product documentation.
When using EMC SRDF, use dynamic devices instead of static devices. Static devices require several minutes to change the replication primary and can impact failover time.
Caution – The name of the Oracle Solaris Cluster device group that you create (Solaris Volume Manager or raw-disk) must be the same as the name of the replicated device group.
Assume a role that provides solaris.cluster.modify RBAC authorization on all nodes connected to the storage array. For a three-site or three-data-center implementation using concurrent SRDF or cascaded devices, set the SYMAPI_2SITE_CLUSTER_DG parameter. Add the following entry to the Solutions Enabler options file on all participating cluster nodes: SYMAPI_2SITE_CLUSTER_DG=: rdf-group-number device-group Specifies the name of the device group. rdf-group-number Specifies the RDF group that connects the host’s local symmetrix to the second site’s symmetrix. This entry enables the cluster software to automate the movement of the application between the two SRDF synchronous sites. For more information about three-data-center configurations, see Three-Data-Center (3DC) Topologies in Oracle Solaris Cluster Geographic Edition Overview . On each node configured with the replicated data, discover the symmetrix device configuration. This might take a few minutes. # /usr/symcli/bin/symcfg discover If you have not already created the replica pairs, create them now. Use the symrdf command to create your replica pairs. For instructions on creating the replica pairs, refer to your SRDF documentation. Note – If using concurrent RDF devices for a three-site or three-data-center implementation, add the following parameter to all symrdf commands: -rdfg rdf-group-number If using concurrent RDF devices for a three-site or three-data-center implementation, add the following parameter to allcommands: Specifying the RDF group number to the symrdf command ensures that the symrdf operation is directed to the correct RDF group. On each node configured with replicated devices, verify that data replication is set up correctly. # /usr/symcli/bin/symdg show group-name Perform a swap of the device group. Verify that the primary and secondary replicas are synchronized. # /usr/symcli/bin/symrdf -g group-name verify -synchronized Determine which node contains the primary replica and which node contains the secondary replica by using the symdg show command. # /usr/symcli/bin/symdg show group-name The node with the RDF1 device contains the primary replica and the node with the RDF2 device state contains the secondary replica. Enable the secondary replica. # /usr/symcli/bin/symrdf -g group-name failover Swap the RDF1 and RDF2 devices. # /usr/symcli/bin/symrdf -g group-name swap -refresh R1 Enable the replica pair. # /usr/symcli/bin/symrdf -g group-name establish Verify that the primary node and secondary replicas are synchronized. # /usr/symcli/bin/symrdf -g group-name verify -synchronized Repeat all of step 5 on the node which originally had the primary replica.
Next Steps
After you have configured a device group for your EMC SRDF replicated device, you must configure the device identifier (DID) driver that the replicated device uses.
How to Configure DID Devices for Replication Using EMC SRDF
This procedure configures the device identifier (DID) driver that the replicated device uses. Ensure that the specified DID device instances are replicas of each other and that they belong to the specified replication group.
Before You Begin
The phys-schost# prompt reflects a global-cluster prompt. Perform this procedure on a global cluster.
This procedure provides the long forms of the Oracle Solaris Cluster commands. Most commands also have short forms. Except for the long and short forms of the command names, the commands are identical.
Assume a role that provides solaris.cluster.modify RBAC authorization on any node of the cluster. Determine which DID devices correspond to the configured RDF1 and RDF2 devices. # /usr/symcli/bin/symdg show group-name Note – If your system does not display the entire Oracle Solaris device patch, set the environment variable SYMCLI_FULL_PDEVNAME to 1 and retype the symdg -show command. Determine which DID devices correspond to the Oracle Solaris devices. # cldevice list -v For each pair of matched DID devices, combine the instances into a single replicated DID device. Run the following command from the RDF2/secondary side. # cldevice combine -t srdf -g replication-device-group \ -d destination-instance source-instance Note – The –T option is not supported for SRDF data replication devices. -t replication-type Specifies the replication type. For EMC SRDF, type SRDF . -g replication-device-group Specifies the name of the device group as shown in the symdg show command. -d destination-instance Specifies the DID instance that corresponds to the RDF1 device. source-instance Specifies the DID instance that corresponds to the RDF2 device. Note – If you combine the wrong DID device, use the –b option for the scdidadm command to undo the combining of two DID devices. # scdidadm -b device –b device The DID instance that corresponded to the destination_device when the instances were combined. If you combine the wrong DID device, use theoption for thecommand to undo the combining of two DID devices. If the name of a replication device group changes, additional steps are required for SRDF. After you complete steps 1 through 4, perform the appropriate additional step. Item Description SRDF If the name of the replication device group (and the corresponding global device group) changes, you must update the replicated device information by first using the scdidadm –b command to remove the existing information. The last step is to use the cldevice combine command to create a new, updated device. Verify that the DID instances have been combined. # cldevice list -v device Verify that the SRDF replication is set. # cldevice show device On all nodes, verify that the DID devices for all combined DID instances are accessible. # cldevice list -v
Next Steps
After you have configured the device identifier (DID) driver that the replicated device uses, you must verify the EMC SRDF replicated global device group configuration.
How to Verify EMC SRDF Replicated Global Device Group Configuration
Before You Begin
Before you verify the global device group, you must first create it. You can use device groups from Solaris Volume Manager ZFS, or raw-disk. For more information, consult the following:
Caution – The name of the Oracle Solaris Cluster device group that you created (Solaris Volume Manager or raw-disk) must be the same as the name of the replicated device group.
The phys-schost# prompt reflects a global-cluster prompt. Perform this procedure on a global cluster.
This procedure provides the long forms of the Oracle Solaris Cluster commands. Most commands also have short forms. Except for the long and short forms of the command names, the commands are identical.
Verify that the primary device group corresponds to the same node as the node that contains the primary replica. # symdg -show group-name # cldevicegroup status -n nodename group-name Perform a trial switchover to ensure that the device groups are configured correctly and the replicas can move between nodes. If the device group is offline, bring it online. # cldevicegroup switch -n nodename group-name -n nodename The node to which the device group is switched. This node becomes the new primary. Verify that the switchover was successful by comparing the output of the following commands. # symdg -show group-name # cldevicegroup status -n nodename group-name
Example: Configuring an SRDF Replication Group for Oracle Solaris Cluster
This example completes the Oracle Solaris Cluster specific steps necessary to set up SRDF replication in your cluster. The example assumes that you have already performed the following tasks:
Completed pairing LUNS for replication between arrays.
Installed the SRDF software on your storage device and cluster nodes.
This example involves a four-node cluster where two nodes are connected to one symmetrix and the other two nodes are connected to the second symmetrix. The SRDF device group is called dg1 .
Creating Replica Pairs
Run the following command on all nodes.
# symcfg discover ! This operation might take up to a few minutes. # symdev list pd Symmetrix ID: 000187990182 Device Name Directors Device ————————— ———— ————————————– Cap Sym Physical SA 😛 DA :IT Config Attribute Sts (MB) ————————— ————- ————————————- 0067 c5t600604800001879901* 16D:0 02A:C1 RDF2+Mir N/Grp’d RW 4315 0068 c5t600604800001879901* 16D:0 16B:C0 RDF1+Mir N/Grp’d RW 4315 0069 c5t600604800001879901* 16D:0 01A:C0 RDF1+Mir N/Grp’d RW 4315 …
On all nodes on the RDF1 side, type:
# symdg -type RDF1 create dg1 # symld -g dg1 add dev 0067
On all nodes on the RDF2 side, type:
# symdg -type RDF2 create dg1 # symld -g dg1 add dev 0067
Verifying Data Replication Setup
From one node in the cluster, type:
# symdg show dg1 Group Name: dg1 Group Type : RDF1 (RDFA) Device Group in GNS : No Valid : Yes Symmetrix ID : 000187900023 Group Creation Time : Thu Sep 13 13:21:15 2007 Vendor ID : EMC Corp Application ID : SYMCLI Number of STD Devices in Group : 1 Number of Associated GK’s : 0 Number of Locally-associated BCV’s : 0 Number of Locally-associated VDEV’s : 0 Number of Remotely-associated BCV’s (STD RDF): 0 Number of Remotely-associated BCV’s (BCV RDF): 0 Number of Remotely-assoc’d RBCV’s (RBCV RDF) : 0 Standard (STD) Devices (1): { ——————————————————————– Sym Cap LdevName PdevName Dev Att. Sts (MB) ——————————————————————– DEV001 /dev/rdsk/c5t6006048000018790002353594D303637d0s2 0067 RW 4315 } Device Group RDF Information … # symrdf -g dg1 establish Execute an RDF ‘Incremental Establish’ operation for device group ‘dg1’ (y/[n]) ? y An RDF ‘Incremental Establish’ operation execution is in progress for device group ‘dg1’. Please wait… Write Disable device(s) on RA at target (R2)…………..Done. Suspend RDF link(s)…………………………………Done. Mark target (R2) devices to refresh from source (R1)……Started. Device: 0067 …………………………………….. Marked. Mark target (R2) devices to refresh from source (R1)……Done. Merge device track tables between source and target…….Started. Device: 0067 …………………………………….. Merged. Merge device track tables between source and target…….Done. Resume RDF link(s)………………………………….Started. Resume RDF link(s)………………………………….Done. The RDF ‘Incremental Establish’ operation successfully initiated for device group ‘dg1’. # # symrdf -g dg1 query Device Group (DG) Name : dg1 DG’s Type : RDF2 DG’s Symmetrix ID : 000187990182 Target (R2) View Source (R1) View MODES ——————————– ———————— —– ———— ST LI ST Standard A N A Logical T R1 Inv R2 Inv K T R1 Inv R2 Inv RDF Pair Device Dev E Tracks Tracks S Dev E Tracks Tracks MDA STATE ——————————– — ———————— —– ———— DEV001 0067 WD 0 0 RW 0067 RW 0 0 S.. Synchronized Total ——– ——– ——– ——– MB(s) 0.0 0.0 0.0 0.0 Legend for MODES: M(ode of Operation): A = Async, S = Sync, E = Semi-sync, C = Adaptive Copy D(omino) : X = Enabled, . = Disabled A(daptive Copy) : D = Disk Mode, W = WP Mode, . = ACp off #
Displaying DIDs Corresponding to the Disks Used
The same procedure applies to the RDF1 and RDF2 sides.
You can look under the PdevName field of output of the dymdg show dg command.
On the RDF1 side, type:
# symdg show dg1 Group Name: dg1 Group Type : RDF1 (RDFA) … Standard (STD) Devices (1): { ——————————————————————– Sym Cap LdevName PdevName Dev Att. Sts (MB) ——————————————————————– DEV001 /dev/rdsk/c5t6006048000018790002353594D303637d0s2 0067 RW 4315 } Device Group RDF Information …
To obtain the corresponding DID, type:
# scdidadm -L | grep c5t6006048000018790002353594D303637d0 217 pmoney1:/dev/rdsk/c5t6006048000018790002353594D303637d0 /dev/did/rdsk/d217 217 pmoney2:/dev/rdsk/c5t6006048000018790002353594D303637d0 /dev/did/rdsk/d217 #
To list the corresponding DID, type:
# cldevice show d217 === DID Device Instances === DID Device Name: /dev/did/rdsk/d217 Full Device Path: pmoney2:/dev/rdsk/c5t6006048000018790002353594D303637d0 Full Device Path: pmoney1:/dev/rdsk/c5t6006048000018790002353594D303637d0 Replication: none default_fencing: global #
On the RDF2 side, type:
You can look under the PdevName field of output of dymdg show dg command.
# symdg show dg1 Group Name: dg1 Group Type : RDF2 (RDFA) … Standard (STD) Devices (1): { ——————————————————————– Sym Cap LdevName PdevName Dev Att. Sts (MB) ——————————————————————– DEV001 /dev/rdsk/c5t6006048000018799018253594D303637d0s2 0067 WD 4315 } Device Group RDF Information …
To obtain the corresponding DID, type:
# scdidadm -L | grep c5t6006048000018799018253594D303637d0 108 pmoney4:/dev/rdsk/c5t6006048000018799018253594D303637d0 /dev/did/rdsk/d108 108 pmoney3:/dev/rdsk/c5t6006048000018799018253594D303637d0 /dev/did/rdsk/d108 #
To list the corresponding DID, type:
# cldevice show d108 === DID Device Instances === DID Device Name: /dev/did/rdsk/d108 Full Device Path: pmoney3:/dev/rdsk/c5t6006048000018799018253594D303637d0 Full Device Path: pmoney4:/dev/rdsk/c5t6006048000018799018253594D303637d0 Replication: none default_fencing: global #
Combining DID instances
From the RDF2 side, type:
# cldevice combine -t srdf -g dg1 -d d217 d108 #
Displaying the Combined DIDs
From any node in the cluster, type:
# cldevice show d217 d108 cldevice: (C727402) Could not locate instance “108”. === DID Device Instances === DID Device Name: /dev/did/rdsk/d217 Full Device Path: pmoney1:/dev/rdsk/c5t6006048000018790002353594D303637d0 Full Device Path: pmoney2:/dev/rdsk/c5t6006048000018790002353594D303637d0 Full Device Path: pmoney4:/dev/rdsk/c5t6006048000018799018253594D303637d0 Full Device Path: pmoney3:/dev/rdsk/c5t6006048000018799018253594D303637d0 Replication: srdf default_fencing: global #
How to Recover EMC SRDF Data after a Primary Room’s Complete Failure
This procedure performs data recovery when a campus cluster’s primary room fails completely, the primary room fails over to a secondary room, and then the primary room comes back online. The campus cluster’s primary room is the primary node and storage site. The complete failure of a room includes the failure of both the host and the storage in that room. If the primary room fails, Oracle Solaris Cluster automatically fails over to the secondary room, makes the secondary room’s storage device readable and writable, and enables the failover of the corresponding device groups and resource groups.
When the primary room returns online, you can manually recover the data from the SRDF device group that was written to the secondary room and resynchronize the data. This procedure recovers the SRDF device group by synchronizing the data from the original secondary room (this procedure uses phys-campus-2 for the secondary room) to the original primary room ( phys-campus-1 ). The procedure also changes the SRDF device group type to RDF1 on phys-campus-2 and to RDF2 on phys-campus-1 .
Before You Begin
You must configure the EMC replication group and DID devices, as well as register the EMC replication group before you can perform a manual failover. For information about creating a Solaris Volume Manager device group, see How to Add and Register a Device Group (Solaris Volume Manager).
Note – These instructions demonstrate one method you can use to manually recover SRDF data after the primary room fails over completely and then comes back online. Check the EMC documentation for additional methods.
Log into the campus cluster’s primary room to perform these steps. In the procedure below, dg1 is the SRDF device group name. At the time of the failure, the primary room in this procedure is phys-campus-1 and the secondary room is phys-campus-2 .
Log into the campus cluster’s primary room and assume a role that provides solaris.cluster.modify RBAC authorization. From the primary room, use the symrdf command to query the replication status of the RDF devices and view information about those devices. phys-campus-1# symrdf -g dg1 query Tip – A device group that is in the split state is not synchronized. If the RDF pair state is split and the device group type is RDF1, then force a failover of the SRDF device group. phys-campus-1# symrdf -g dg1 -force failover View the status of the RDF devices. phys-campus-1# symrdf -g dg1 query After the failover, you can swap the data on the RDF devices that failed over. phys-campus-1# symrdf -g dg1 swap Verify the status and other information about the RDF devices. phys-campus-1# symrdf -g dg1 query Establish the SRDF device group in the primary room. phys-campus-1# symrdf -g dg1 establish Confirm that the device group is in a synchronized state and that the device group type is RDF2. phys-campus-1# symrdf -g dg1 query
Manually Recovering EMC SRDF Data after a Primary Site Failover
This example provides the Oracle Solaris Cluster-specific steps necessary to manually recover EMC SRDF data after a campus cluster’s primary room fails over, a secondary room takes over and records data, and then the primary room comes back online. In the example, the SRDF device group is called dg1 and the standard logical device is DEV001. The primary room is phys-campus-1 at the time of the failure, and the secondary room is phys-campus-2 . Perform the steps from the campus cluster’s primary room, phys-campus-1 .
EMC SRDF Commands NIXDRAFTS By RSY Digital World
Facebook Twitter LinkedIn Pinterest Messenger Print WhatsApp Tumblr Email Reddit Viber
Introduction
In this article, we are going to discuss all the important emc srdf commands you must need to know when you are working on EMC Storage Replication Technology. All these emc srdf commands are really handy when you have to perform various operations on this storage. We will try to show all emc srdf commands with examples wherever it is possible to show more visibility. We will try to create a cheat sheet and will attach it to this article so that it can be an effective doc for your convenience and reference point.
These are very highly critical operations for an organization Disaster Recovery Plans and performing these tasks efficiently must be a crucial task to avoid any loss of organization data which may result in monitory loss to organizations.
All this can be avoided by knowing what each emc srdf commands does exactly and what will be the impact of each command while performing individual tasks.
What is SRDF?
SRDF is nothing but a short form of Symmetrix Remote Data Facility used by EMC Storage System. An intelligent system for data replication from one Symmetrix Storage Array to another geographically distant location through a SAN or over an IP network. You can refer to know more about what is SRDF? In our previous article.
We can perform the below operations on EMC storage. We will start sequentially starting from validating before making any changes or performing any intensive operations.
Just for better understanding like LVM (Logical Volume Manager) or VxVM (Veritas Volume Manager), we create Volume Group simply known as VG or in VxVM called Disk Group known as DG, we also groups individual disks into groups for efficient management purpose only. In the EMC world, it is known as Symmetrix Disk Group or SYMM DG.
Now we are ready to discuss emc srdf commands. So let’s explore all of them one by one.
EMC SRDF Commands
Let’s explore emc srdf commands one by one as mentioned starting to find out and identify SYMM DG.
1. How to Identify an SRDF/A Group
Just to know about the SYMDG available to the system you can use the below command to display the SYMDG name to the system. This is most important to know as it is required for any operations.
# symdg list D E V I C E G R O U P S Number of Name Type Valid Symmetrix ID Devs GKs BCVs VDEVs TGTs FS_SYBDUMPS RDF1 Yes 000190104472 1 0 0 0 0
2. How to Validate an SRDF/A Group Status
This is the most important and very frequently used emc srdf commands which gives the status of SYMDG before performing any activity or verifying the status after performing any activity.
# symrdf -g FS_SYBDUMPS query Device Group (DG) Name : FS_SYBDUMPS DG’s Type : RDF1 DG’s Symmetrix ID : 000190104472 Source (R1) View Target (R2) View MODES ——————————– ———————— —– ———— ST LI ST Standard A N A Logical T R1 Inv R2 Inv K T R1 Inv R2 Inv RDF Pair Device Dev E Tracks Tracks S Dev E Tracks Tracks MDA STATE ——————————– — ———————— —– ———— DEV001 15DB RW 0 0 RW 15DB WD 0 0 A.. Consistent Total ——– ——– ——– ——– Track(s) 0 0 0 0 MB(s) 0.0 0.0 0.0 0.0
3. How to verify the state, cycle time, and consistency of the SRDF/A group
As the name suggests it shows all the details about the SYMDG including Group Type, Symmetrix ID, Creation Type, and much more. You can easily see in below example.
# symdg show FS_SYBDUMPS Group Name: FS_SYBDUMPS Group Type : RDF1 (RDFA) Device Group in GNS : No Valid : Yes Symmetrix ID : 000190104472 Group Creation Time : Sat Dec 6 20:25:25 2008 Vendor ID : EMC Corp Application ID : SYMCLI Number of STD Devices in Group : 1 Number of Associated GK’s : 0 ——————————————————————————— Standard (STD) Devices (1): { —————————————————————————– Sym Cap LdevName PdevName Dev Att. Sts (MB) —————————————————————————– DEV001 rdmp/emcpower12s2 15DB (M) RW 34856 } Device Group RDF Information { RDF Type : R1 RDF (RA) Group Number : 20 (13)
Remote Symmetrix ID : 000190103503
—————————————————————————– RDF Mode : Asynchronous RDF Adaptive Copy : Disabled RDF Adaptive Copy Write Pending State: N/A RDF Adaptive Copy Skew (Tracks) : 65535 —————————————————————————– RDF Pair State (R1 <===> R2) : Consistent Number of R1 Invalid Tracks : 0 Number of R2 Invalid Tracks : 0 Cycle Number : 29570 Number of Devices in the Session : 1 Session Status : Active
Session Consistency State : Enabled Minimum Cycle Time : 00:00:05 Average Cycle Time : 00:00:05 Duration of Last cycle : 00:00:05
Session Priority : 33 Tracks not committed to the R2 Side: 42 Time that R2 is behind R1 : 00:00:09 R1 Side Percent Cache In Use : 0 R2 Side Percent Cache In Use : 0
4. How to Suspend SRDF/A Group
If you want to suspend replication of devices for such requirements you can use the below set of emc srdf commands to get it done.
# symrdf -g [SYMDG Name] disable -noprompt # symrdf -g [SYMDG Name] suspend –noprompt
5. How to Resume SRDF/A Group
If you want to resume replication which was suspended for any requirement you can use the below set of command syntax to get this done.
#symrdf -g [SYMDG Name] enable –noprompt #symrdf -g [SYMDG Name] resume –noprompt
6. How to Split SRDF/A group
Split activity needed in scenarios like DR Test. You simply spilt the replication and let both R1 and R2 behave like independent devices in simple words broking the replication status. Mount the replicated file systems on the DR site and conduct the DR Test once completed please resume the replication. Please do remember in this scenario test data will not be available anymore once replication is established. Please use the below syntax to split the replication.
# symrdf -g
split –force -nop 7. How to Failover SRDF/A Group
Before we failover SYMM DG we must (mandatory) need to perform the below action on the current R1 (Production) side.
The application must be in a shutdown state. The database must be in a shutdown state. Unmount all the replicated File Systems and Deport Veritas Volume Group or VG.
The SYMM DG failover to R2 can be accomplished by following in sequence. Before Failover SYMDG must be in a consistent state.
Verify SYMDG State #symrdf –g
query Force Failover #symrdf –g < SYMDG Name > failover –force –nop Disable SYMDG #symrdf –g < SYMDG Name > disable Swap SYMDG #symrdf –g < SYMDG Name > swap Enable SYMDG #symrdf –g < SYMDG Name > enable Verify Consistency #symrdf –g < SYMDG Name > query Validate Session State #symdg show < SYMDG Name > It must show “Enabled”.This concludes Failover Steps.
8. How to Failover during Real Disaster in Production Environment
During a complete real disaster in the production environment where the production site is down the SYMM DG’s RDF pair state will be “TransIdle” state.
We can verify status of SYMM DG using query. Please refer to below example.
# symrdf -g FS_SYBDUMPS query Device Group (DG) Name : FS_SYBDUMPS DG’s Type : RDF1 DG’s Symmetrix ID : 000190104472 Source (R1) View Target (R2) View MODES ——————————– ———————— —– ———— ST LI ST Standard A N A Logical T R1 Inv R2 Inv K T R1 Inv R2 Inv RDF Pair Device Dev E Tracks Tracks S Dev E Tracks Tracks MDA STATE ——————————– — ———————— —– ———— DEV001 15DB RW 0 0 RW 15DB WD 0 NA A.. TransIdle Total ——– ——– ——– ——– Track(s) 0 0 0 0 MB(s) 0.0 0.0 0.0 0.0
Note: In this state to bring the R2 side operational we can use the “failover immediate” option. This will bring the R2 side to an R/W mode. This should only be used in a true Disaster Scenario.
# symrdf –g
failover –immediate 9. How to Switch Between Sync and Async
Let us understand when this might be helpful while it consumes a lot of bandwidth but sometimes it is handy to replicate data faster.
For example, you are failing over a huge system that contains too much amount of data to be replicated and stayed on the other side for a few hours and the system gets data updated fast. If for some region you need to sync the date it might take longer.
ASYNC TO SYNC
If you have to switch from async to sync we can follow the below process.It must be in the async state before performing the activity.
Validate SYNC Mode # symrdf -g FS_SYBDUMPS query Disable SYMDG # symrdf -g FS_SYBDUMPS disable Set Mode SYNC # symrdf -g FS_SYBDUMPS set mode sync Validate State # symrdf -g FS_SYBDUMPS query
SYNC TO ASYNC
If you have to switch from sync to async we can follow the below process.
Validate SYNC Mode # symrdf -g FS_SYBDUMPS query Set Mode ASYNC # symrdf -g FS_SYBDUMPS set mode async Enable SYMDG # symrdf -g FS_SYBDUMPS enable Verify SYMDG # symrdf -g FS_SYBDUMPS query
10. EMC SRDF Command For Enabling SYMDG
If you want to enable any SYMDG which is in a disabled state for any reason we can use the below command syntax. –noprompt option will help to ignore if any confirmation is required.
# symrdf -g [SYMDG Name] enable -noprompt
11. EMC SRDF Command For Swap Personalities
#symrdf -g [SYMDG Name] swap –noprompt #symrdf -g [SYMDG Name] enable –noprompt
12. EMC SRDF Command For Failback
# symrdf -g [SYMDG Name] failback -noprompt # symrdf -g [SYMDG Name] enable –noprompt
13. EMC SRDF Failover Command
# symrdf -g [SYMDG Name] failover -force -noprompt # symrdf -g [SYMDG Name] disable
14. EMC SRDF Command For Establishing Replication
# symrdf -g [SYMDG Name] establish –noprompt
Conclusion
As mentioned earlier this article is about emc srdf commands . We have tried to summarize all the emc srdf commands mostly used while working on SRDF storage. We hope you must have liked it and as committed we will upload a cheat sheet which you can download as reference material.
You can use it to apply your better understanding as this is shared to help for better understanding. You need to have a better understanding of SRDF technology.
Thanks for downloading and going through this article. Hope it will help for better control of SRDF activities as part of your responsibilities.
EMC SRDF COMMANDS PDF DOWNLOAD
키워드에 대한 정보 srdf query commands
다음은 Bing에서 srdf query commands 주제에 대한 검색 결과입니다. 필요한 경우 더 읽을 수 있습니다.
이 기사는 인터넷의 다양한 출처에서 편집되었습니다. 이 기사가 유용했기를 바랍니다. 이 기사가 유용하다고 생각되면 공유하십시오. 매우 감사합니다!
사람들이 주제에 대해 자주 검색하는 키워드 Dell EMC PowerMax SRDF MetroDR Demonstration
- Tech Field Day
- Gestalt IT
Dell #EMC #PowerMax #SRDF #MetroDR #Demonstration
YouTube에서 srdf query commands 주제의 다른 동영상 보기
주제에 대한 기사를 시청해 주셔서 감사합니다 Dell EMC PowerMax SRDF MetroDR Demonstration | srdf query commands, 이 기사가 유용하다고 생각되면 공유하십시오, 매우 감사합니다.