
You are looking for information, articles, knowledge about the topic nail salons open on sunday near me convert shower drain to toilet on Google, you do not find the information you need! Here are the best content compiled and compiled by the Chewathai27.com team, along with other related topics such as: convert shower drain to toilet is it easier to move a toilet or a shower, convert floor drain to toilet, how to add a shower drain to a toilet drain, how hard is it to move a toilet, is shower drain and toilet drain the same, convert toilet to shower, convert toilet drain to sink drain, how much does it cost to move a toilet
The easiest way to run a water supply is to attach a PEX pipe to the existing cold water line that was running to the shower and run it to the wall where the toilet will be placed. Run the pipe through the wall and finish it off with a turn valve at the wall.
Contents
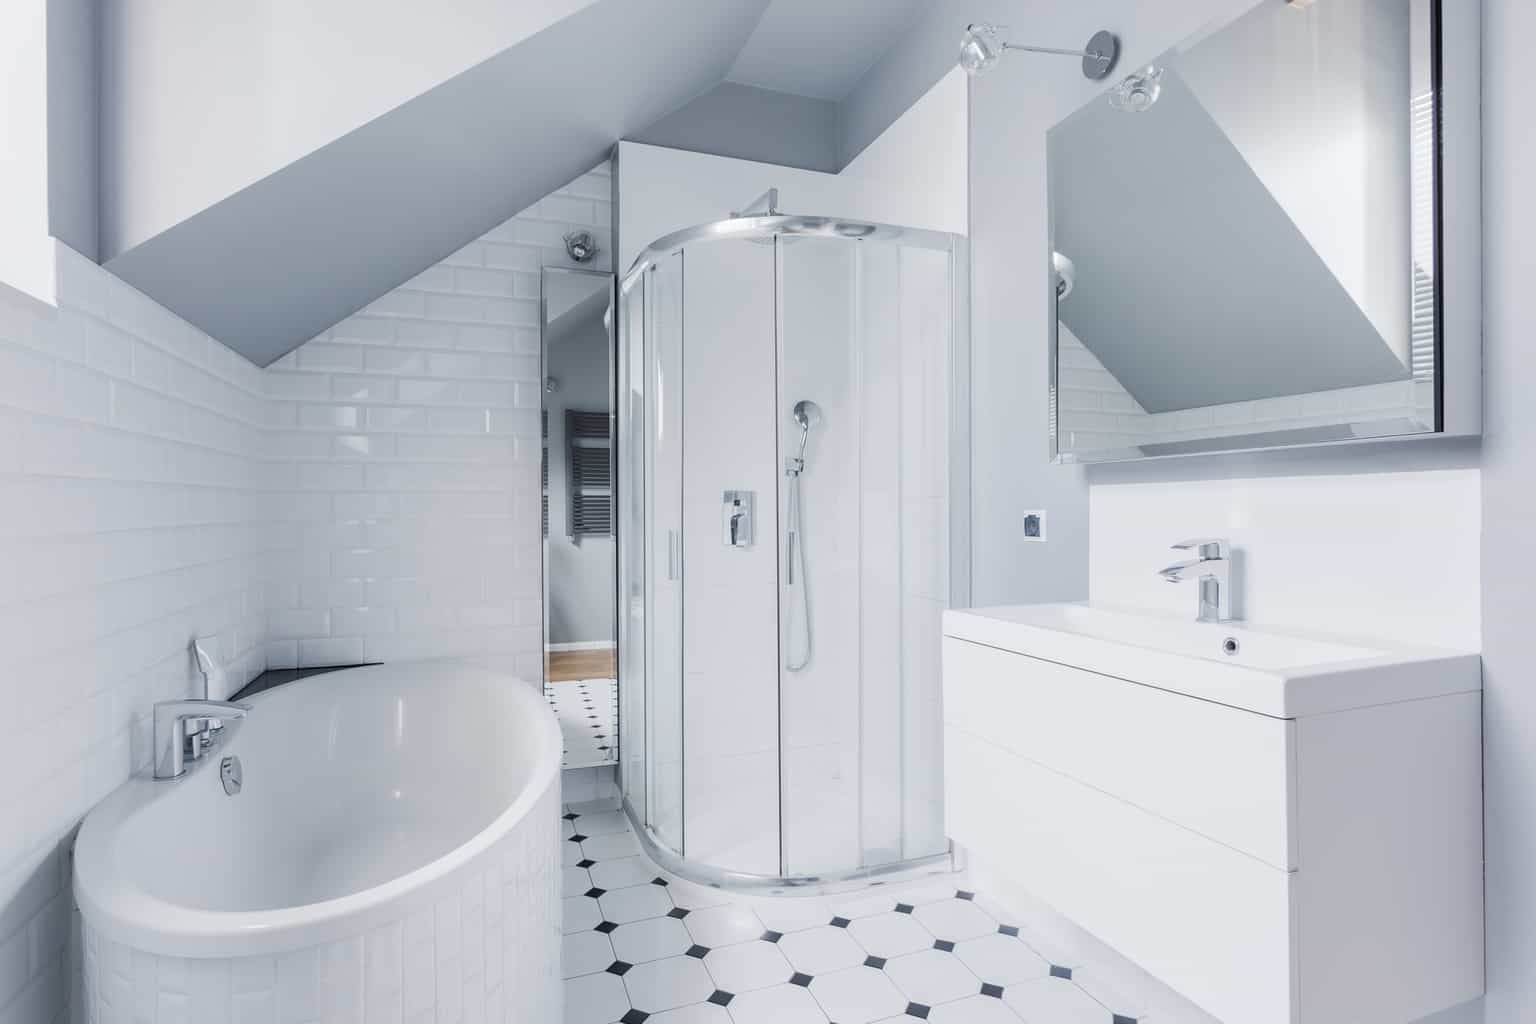
Yes, You Can Put a Toilet Where a Shower Was. This is How
- Article author: www.interiorsplace.com
- Reviews from users: 5392
 Ratings
 - Top rated: 3.0
- Lowest rated: 1
- Summary of article content: Articles about Yes, You Can Put a Toilet Where a Shower Was. This is How Updating …
- Most searched keywords: Whether you are looking for Yes, You Can Put a Toilet Where a Shower Was. This is How Updating The simple answer is yes, you can put a toilet where a shower was, but the move doesn’t come without its issues. This isn’t a simple DIY job.
- Table of Contents:
How to Convert a Shower to a Toilet | Home Guides | SF Gate
- Article author: homeguides.sfgate.com
- Reviews from users: 30255 Ratings
- Top rated: 4.5
- Lowest rated: 1
- Summary of article content: Articles about How to Convert a Shower to a Toilet | Home Guides | SF Gate You can use the existing cold water line that was running to the shower beforehand and plumb your way over from that pipe to wherever you need the toilet … …
- Most searched keywords: Whether you are looking for How to Convert a Shower to a Toilet | Home Guides | SF Gate You can use the existing cold water line that was running to the shower beforehand and plumb your way over from that pipe to wherever you need the toilet … How to Convert a Shower to a Toilet. Showers and toilets have one thing in common: plumbing. And while you can’t always interchange things in a home when working on a remodel project, you can convert your shower into an area for a toilet simply by doing some demolition and remodel work, along with replacing the …
- Table of Contents:
Demolition
Capping Plumbing
Plumbing the Toilet
Reinstall Walls and Floors
Setting the Toilet
Is The Dyson V8 Worth The Cost
How to Convert a Tub-Shower Enclosure to a Freestanding Shower
How to Replace Shower Pans in Fiberglass Showers
How to Move the Shower Stall to the Opposite Side of the Wall
How to Convert a Dual Valve to a Single Mixer Shower Fixture
Help With Building a Small Bathroom
How to Cut a Subfloor for a Toilet
How to Remove Toilet Plumbing
How to Change a Toilet Drain to a Shower Drain
How to Remove & Replace a PVC Closet Flange
How to Replace a Bathtub With a Walk-in Shower
How to Install an Upflush Toilet in a Basement
How can a shower drain pipe be converted to a toilet drain? | Hometalk
- Article author: www.hometalk.com
- Reviews from users: 33995 Ratings
- Top rated: 4.4
- Lowest rated: 1
- Summary of article content: Articles about How can a shower drain pipe be converted to a toilet drain? | Hometalk One is grey water (shower) the other black ( toilet) it’s not something that can just be moved across . You will need to get a licensed plumber in as pipe work … …
- Most searched keywords: Whether you are looking for How can a shower drain pipe be converted to a toilet drain? | Hometalk One is grey water (shower) the other black ( toilet) it’s not something that can just be moved across . You will need to get a licensed plumber in as pipe work … For handicapped accessibility I need to replace my tub with a walk in shower, move a toilet to where the shower currently is located, and add a stand-alone whee…
- Table of Contents:
Error 403 (Forbidden)
- Article author: www.quora.com
- Reviews from users: 14962 Ratings
- Top rated: 3.2
- Lowest rated: 1
- Summary of article content: Articles about Error 403 (Forbidden) Warm water with good pressure. Good body wash or soap. Open shower drain. Uninterrupted time. And, on occasion, the right shower partner. …
- Most searched keywords: Whether you are looking for Error 403 (Forbidden) Warm water with good pressure. Good body wash or soap. Open shower drain. Uninterrupted time. And, on occasion, the right shower partner.
- Table of Contents:
Can You Turn A Toilet Drain Into A Shower Drain? – Toilet Reviewer
- Article author: toiletreviewer.com
- Reviews from users: 43907 Ratings
- Top rated: 4.7
- Lowest rated: 1
- Summary of article content: Articles about Can You Turn A Toilet Drain Into A Shower Drain? – Toilet Reviewer Yes. You can turn a toilet drain into a shower drain. All you will need to do to turn a toilet drain into a shower drain is to reduce the … …
- Most searched keywords: Whether you are looking for Can You Turn A Toilet Drain Into A Shower Drain? – Toilet Reviewer Yes. You can turn a toilet drain into a shower drain. All you will need to do to turn a toilet drain into a shower drain is to reduce the …
- Table of Contents:
How To Turn A Toilet Drain Into A Shower Drain
Frequently Asked Questions
Post Navigation
Put a toilet where a shower is now? – DoItYourself.com Community Forums
- Article author: www.doityourself.com
- Reviews from users: 22732 Ratings
- Top rated: 4.3
- Lowest rated: 1
- Summary of article content: Articles about Put a toilet where a shower is now? – DoItYourself.com Community Forums The shower drain will have to either be wye-branched off of the 3″ that comes across for the toilet, but only if the toilet is vented FIRST. The … …
- Most searched keywords: Whether you are looking for Put a toilet where a shower is now? – DoItYourself.com Community Forums The shower drain will have to either be wye-branched off of the 3″ that comes across for the toilet, but only if the toilet is vented FIRST. The … Put a toilet where a shower is now?, Toilets, Sinks, Showers, Dishwashers, Tubs and Garbage Disposals – Put a toilet where a shower is now? – Hi guys, In a bathroom in a house I just bought, there is a toilet and a shower. I am removing the shower. I want to put the toilet where the shower is right now. This may sound dumb, but since I know NOTHING about
- Table of Contents:
See more articles in the same category here: Top 975 tips update new.
Yes, You Can Put a Toilet Where a Shower Was. This is How
If you’ve recently decided that you needed more space in your bathroom one possible move to create the additional space would be to take out the tub, move the shower, and put the toiler where the shower was. But is this move possible? Will the building codes or the plumbing itself allow for a toilet to be placed where a shower used to be, or s hould you find another solution?
Can you put a toilet where a shower was? The simple answer is yes, you can put a toilet where a shower was, but the move doesn’t come without its issues. This isn’t a simple DIY job. You are going to have to remove at least one wall and, hopefully, only a small portion of the floor. Depending on the building codes of your area, though, you may have to pull up the whole floor and re-pipe the room’s plumbing. There are some places that may require the drainpipe for the toilet to be separate, which will mean extensive piping.
If you are a professional or handy and adventurous, the directions for putting a toilet where a shower was are pretty straight forward even if the labor is intense. Knowledge of basic plumbing will go a long way with completing this project. Here’s how to move your toilet to another location in your bathroom.
Needed Supplies
Here is a list of some of the things you will need to complete the job…
Tools
Hammer or sledgehammer : you are going to have to open some walls. The bigger the hammer, the quicker you can get the job done.
: you are going to have to open some walls. The bigger the hammer, the quicker you can get the job done. Pry bar : this will help with the demolition.
: this will help with the demolition. Goggles : you are going to be causing debris to fly around your bathroom, either knocking down walls, cutting pipe, or pulling apart floors. You need to protect your eyes.
: you are going to be causing debris to fly around your bathroom, either knocking down walls, cutting pipe, or pulling apart floors. You need to protect your eyes. A wrench and a screwdriver : you will need the wrench to take apart piping. You will need the screwdriver to take apart fixtures and the closet flange.
: you will need the wrench to take apart piping. You will need the screwdriver to take apart fixtures and the closet flange. Circular saw : you will need this to cut into your floor.
: you will need this to cut into your floor. Reciprocating saw : you will need this to cut piping.
: you will need this to cut piping. Drill : this is for installing a closet flange and drywall.
: this is for installing a closet flange and drywall. Drill bits: obviously if you are drilling you are going to need bits, but if you are installing into concrete or a tile floor, you are going to need carbide or diamond-tipped bits
Materials
3” drainpipe This is the standard size for toilets. Showers are 2”, so you are going to have to replace it. ½” pex pipe and fittings this is used to connect a water supply to the toilet. Toilet closet flange this connects the toilet to the drainpipe. Closet flange spacer if your flange is not flush with your finished floor, you will need a spacer to raise it up, so the wax ring seals properly with the toilet. Toilet wax ring this is essential to seal the toilet to the flange, making it leak proof. 3” long sweep 90-degree bend this allows you to keep the drainpipe at the right pitch and connect to the waste stack. 3” 90-degree bend this will allow you to run straight pipe at the right pitch from the toilet. 3” wye fitting the wye fitting is needed so you can attach the new drainpipe to the stack. Pipe caps you will need to cap pipes that will no longer be in use. Pipe cement to hold the caps in place. Abs glue and primer needed to seal and connect new piping and fixtures. Cooling oil if you are drilling into concrete or tile, this will help prevent your drill from overheating. Silicone caulk this is only used with the toilet flange spacer. You will need it to seal the spacer to the flange. Hardware you are going to need hardware to attach straps to new piping and the flange to the floor.
Demolition
The first thing that you are going to need to do is to dismantle the shower. To do this, you are going to have to take out the drywall surrounding the shower. You will need to demolish the wall with the showerhead and faucets because you are going to need to expose the plumbing in order to re-pipe.
You will also need to remove the bottom half of the other two shower walls. The shower pan has to come out in order to expose the drain, and all pans are buried behind the finished walls.
The easiest way to do this is to start with the plumbing wall, since you know the whole thing has to come out, then move to the other two walls as you remove the pan. You can replace each portion of the drywall on the non-plumbing walls after you have taken the pan out.
Use your hammer and pry bar to take the drywall down. Be sure to wear safety equipment such as goggles, since debris will be flying around the room. You should also be careful of any electrical wiring that may be on the walls.
Dealing With the Shower Fixtures and Plumbing
Once you have removed the shower pan and drywall, it’s time to deal with the shower plumbing. You will have to shut off the water to either the house or the bathroom if you have the capability. Once there is no water coming into the room, remove the showerhead and faucets using your wrench or screwdriver depending on the hardware that was used to mount them.
Once you have removed the fixtures, you will have to cap the stub-out pipes. Depending on the type of shower you had, there should be two stub-outs to cap: one for the showerhead and one for the faucet. Put a cap on each of the stub-out pipes and set them in place with the pipe cement.
Make sure to measure the pipe with the cap on before you cement it in place. You don’t want the cap head to stick any further out than the face of the wall studs. If they stick out any further, they will push out the drywall when you reinstall it.
Running A Water Supply
Toilets need a water supply and, fortunately, you are putting your toilet right next to a water supply. You will still need to do a little plumbing but nothing major.
The easiest way to run a water supply is to attach a PEX pipe to the existing cold water line that was running to the shower and run it to the wall where the toilet will be placed. Run the pipe through the wall and finish it off with a turn valve at the wall.
If there is some issue with using the shower’s cold water line, you could also run the PEX from the pipe that used to supply water to the toilet at its old location. You will obviously need to run a longer pipe, so make sure you run it through the joists and support it where necessary.
If neither of these fixes works for you, there is a third option. You could add a new pipe. Instead of running the PEX directly from the old water source, you need to use the reciprocating saw to cut out a section of the existing pipe. Once you have removed the section of the pipe, add a t-connector and attach a vertical pipe, which has a cap and a connector for the toilet supply line. This should run to the wall where the toilet will sit. Attach the PEX and valve to this pipe.
Putting In A New Toilet Drain
Most shower drains are 2”, while the minimum for a toilet drain is 3”. This means that you are going to have to replace the shower drainpipe, so it is big enough to fit the toilet. If, for some reason, the previous plumbers put a 3” drainpipe in the shower, then you can skip this step; otherwise, you have some work to do.
Remove the 2” drainpipe: to do this, you will have to use the reciprocating saw to cut the pipe at the main waste stack. Once removed, you can use the old 2” pipe as a guide for how much length you will need for your 3” pipe. Put new wye fixture in a stack: you may have to cut the pipe to put the new wye in. Use a long sweep 90-degree bend: after you put the new wye in place, connect a 3” long sweep 90-degree bend to the wye. Run the new drainpipe: run your new 3” drainpipe from the new toilet location to the waste stack and into the long sweep 90-degree bend. The drainpipe needs to slope ¼” per horizontal foot toward the stack, but if you follow the old drain line, this shouldn’t be an issue. Finish the drainpipe: attach a 90-degree bend at the top of the drainpipe. Then, attach a 6-inch length of abs pipe from the bend to the top of the floor.
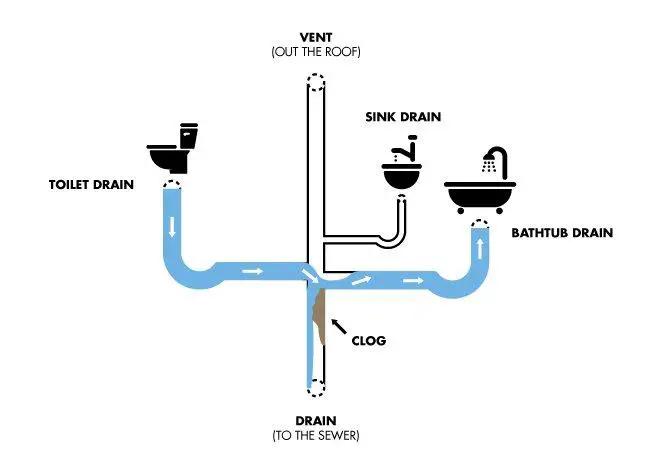
If you follow these steps, the only thing you have to be careful of is where your new toilet drain line connects to the main stack. In some areas, to be in code, you cannot connect shower or sink drains to the toilet trap arm. This means they have to be downstream of where the toilet connects to the main stack. When you run your new line, make sure it is above the other drain lines.
Separate Dain Systems
In some areas, it is against code to run a toilet drainpipe with other systems. In these areas, you cannot connect the toilet drain line with the other systems until the pipes are outside the walls of the building. If this is the case where you live, you will not be able to use the old shower drain path. Instead, you will have to find a way to connect the new toilet position to the old drain line.
You can follow the same steps as above, but you will have to run the drainpipe from the new toilet location to the old toilet location. Make sure you run the pipe through the joists and support the pipe with straps where needed. Most important, you have to make sure the drainpipe slopes ¼” per horizontal foot toward the old line or the water will not drain, and the toilet will not flush.
Putting The Dry Wall Back
Once all your plumbing is done, you can install new drywall over the plumbing wall. Use your drill to fasten the drywall to the wall studs with drywall screws. Finish the walls as you see fit before putting the toilet in. The toilet may make finishing the wall harder than it needs to be.
This is also a good time to address any flooring issues. If the existing floor isn’t water-damaged from years of being under a shower, then you don’t have to do anything. If it is water-damaged, or you want to install a new floor, now is the time to put the new flooring in.
Installing A Closet Flange
Once you have your finished floor in place, you need to install a closet flange to connect your toilet to the new drainpipe. To install a flange, you:
Brush primer and glue on the surfaces of both the flange and the new drainpipe. Drop the flange into the pipe until the flange sits on either the sub-floor or the finished surface. If the flange is resting on the sub-floor, you may have to put in a spacer, so the flange is flush with your finished floor. Cover the undersurface of the spacer with silicone caulk and place the spacer over the flange, lining up any screw holes. If you are installing into a wood floor, screw the flange and/or flange spacer into the floor. If you are installing into concrete and there are no holes already there for you to secure the flange with, use a hammer drill and carbide or diamond-tipped bit to drill the needed holes to secure the flange to the floor. Be careful not to angle towards the pipe; any damage to the pipe will cost you time and significant money. If you are installing into a tile floor, use a normal drill setting with a carbide or diamond-tipped bit that has been dipped in cooling oil. Twist the drill back and forth a few times to prevent slipping. Start drilling on the lowest speed setting your drill has until the bit bites into the subfloor, then speed up until you reach the desired depth. Once all of your holes have been drilled, change out your bit for a screwdriver attachment or use a screwdriver to drive Tapcon screws, or whatever type of fastener you are using, into the floor. Once the toilet flange has been secured to the floor, put on bolts so the toilet can be attached to the flange.
Remember, never set your flange under the level of the finished floor. There are products on the market that can help you raise the height of the flange. Also, you need to make sure that it doesn’t stick out any more than ⅛” above the finished floor. Cut any excess length off the new drainpipe if the flange is either too low or too high. The was seal will not compress right, and your toilet will leak, causing damage to your floor and releasing swage smells.
Putting The New Toilet In Place
The last thing you should do is set your new toilet into place. Whether you are buying a brand new toilet or using the one from the former location, you are going to have to use a new wax ring.
A toilet wax ring is exactly what the name suggests, a large ring of wax. Wax as a substance is impermeable, making it great as a sealant. Wax is also soft and malleable, which makes it perfect for shaping itself snugly into pipes and toilet outlets. The wax ring is held by the closet flange, and the toilet is placed on it. The weight of the toilet compresses the soft wax into a perfect seal between flange and toilet.
Types Of Toilet Wax Rings
There are a few different types of wax rings that you can buy. The main differences tend to just make the seal the ring makes stronger. Here are some examples…
Basic wax ring : this is just a ring of wax. The standard ring is 1” high and fits with most flanges.
: this is just a ring of wax. The standard ring is 1” high and fits with most flanges. Extra-thick wax ring : these rings use 40% more wax and can fill larger flanges.
: these rings use 40% more wax and can fill larger flanges. Wax ring with sleeve : rings with sleeves have another material on the inside of the ring. It is usually a material like urethane that makes the ring much more durable. It also helps create a tighter seal and extends the size of the ring so it will work with wider flanges.
: rings with sleeves have another material on the inside of the ring. It is usually a material like urethane that makes the ring much more durable. It also helps create a tighter seal and extends the size of the ring so it will work with wider flanges. Wax ring with plastic extensions : the plastic extensions are sometimes called horns. They extend slightly into the flange and helps direct the flush more directly down the drain. The only problem with these rings is that some people have said that the horns can break off and clog the drain, but this is extremely rare.
: the plastic extensions are sometimes called horns. They extend slightly into the flange and helps direct the flush more directly down the drain. The only problem with these rings is that some people have said that the horns can break off and clog the drain, but this is extremely rare. Wax free ring: these are made with rubber instead of wax.
Setting the Toilet
When the wax ring is in place, place the toilet over the flange and wax ring. Make sure that the bolt holes over on the base of the toilet are lined up with the bolts on the flange. Lower the toilet base onto the wax ring and mounting bolts, then tighten the nuts to secure the toilet to the flange and floor.
Once the toilet is secure, attach the PEX pipe to the toilet tank, turn on the water to the house or bathroom, and turn the valve, so water flows to the toilet.
How to Convert a Shower to a Toilet
Your existing floor can be used as long as it is not water-damaged (for wooden subfloor), but otherwise it will need to be replaced. Install new drywall over the wall studs, screw the pieces into place with drywall screws and finish the walls as you see fit before installation of the toilet. For both remodeled floors and existing floors, this is when you attach a toilet flange to the drain pipe that used to connect to the shower. Use a jigsaw or reciprocating saw to cut the subfloor to accommodate for the new flange and mount it to the plywood with the accompanying screw hardware sold with the flanges. Then set your new flooring material.
Can You Turn A Toilet Drain Into A Shower Drain?
If you are redoing your bathroom, you may want your new shower to lay over the old location of your toilet. If that is the case, you’re in luck. You can turn a toilet drain into a shower drain by reducing the drain size from 4-inches to 2-inches.
To learn how to turn a toilet drain into a shower drain, read on. In this guide, we cover the steps for turning a toilet drain into a shower drain and even answer frequently asked questions for your convenience. Let’s get started.
Yes. You can turn a toilet drain into a shower drain. All you will need to do to turn a toilet drain into a shower drain is to reduce the 4-inch PVC toilet drain into a 2-inch drain for the shower.
Doing so will require either access from a basement or crawlspace or for you to cut away some subflooring surrounding the drain.
How To Turn A Toilet Drain Into A Shower Drain
Turning a toilet drain into a shower drain can be difficult, and it requires several tools and steps to accomplish. If you are not experienced at working with drains, it is recommended to hire a professional so that you don’t cause costly damage to your pipes or flooring.
What You Will Need
Here’s what you’ll need to turn a toilet drain into a shower drain:
Adjustable wrench
Flat pry bar
4-inch to 2-inch PVC reducer
PVC primer and cement
1.4-inch screws
Plywood
Putty knife
Stud finder
PVC pipe
Torpedo level
Shower drain kit
Pipe strap
Chisel
Power drill with screw tip
Reciprocating saw
2-inch PVC trap
Steps
Here are the steps for turning a toilet drain into a shower drain:
Prepare Toilet
The first step to turning a toilet drain into a shower drain is preparing the toilet. Begin by turning off the water supply and removing the supply tube with an adjustable wrench. Then, flush the toilet to remove most of the water, loosen the nuts on the closet bolts, and lift the toilet off the toilet flange.
With the toilet removed, you should be looking at a toilet flange. Scrape away any of the wax ring left on the flange and loosen the mounting screws with a power drill. Remove the flange with a pry bar.
Locate Toilet Plumbing
Next, you will need to locate the toilet plumbing from beneath the floor. This step will be easier if you have access to a basement or crawlspace. Use the basement or crawlspace to locate the plumbing and then remove the subflooring around the drain.
If you do not have a basement or crawlspace, locate the closest floor joist using a stud finder. Then, cut up the subfloor to the two floor joist with a reciprocating saw. This will give you access to the toilet’s plumbing beneath the floor.
Prepare The Toilet Drain
Now that you have the toilet plumbing located, you will need to prepare the toilet drain. Cut the toilet drain back to about 12 inches from the elbow using a reciprocating saw. This will be below the location of the old flange.
Then, wipe off the burrs from the end of the remaining pipe and apply PVC primer to the end of the pipe and the inner edge of the PVC reducer. Put PVC cement around the pipe and connect the reducer to the pipe.
Measure For The Shower Drain
Now, it is time to start measuring for the shower drain. Measure the distance from the end of the reducer to the center of where you want the shower drain to be located. Then, subtract the distance from its length and add two inches to the total. Using the final number, cut a 2-inch PVC to match.
Connect The Joint To The Reducer And The Trap To The Pipe
Next, connect the joint and the reducer as well as the drain end of the trap and the end of the pipe. Begin by applying PVC cleaner to the inside of the reducer and the outside of the pipe. Then, connect half of the joint using glue, and connect the pipe to the reducer.
You will then connect the drain end of the trap to the end of the pipe using the same technique.
Angle The Pipe
In order to make sure that water flows properly, you need to make sure that the pipe is angled correctly. You will do this by draining the PVC pipe with a torpedo level. Then, attach the pipe to the floor joist at a drop rate of ¼-inch per foot. This drop rate will allow the water to drain properly.
Measure For The Flooring
You also need to account for the flooring that will be put into the shower. Measure the distance from the top of the trap to where you expect the floor to lay. Then, subtract the height of the drain kit from the length of the distance. Cut another piece of 2-inch PVC to match. Prime and install the additional PVC to the end of the trap.
Install PVC Base
Now, install the PVC base by separating the shower drain. Then, install the PVC base to the short pipe with PVC primer and cement.
Replace Subfloor
Finally, the last step for turning a toilet drain into a shower drain is replacing the subfloor. Simply chisel out the subfloor along each joist so that half of each joist can act as a nailer. Cut plywood to be the same thickness as the existing subfloor, and screw the plywood to the joists.
Install The Shower
Now that the toilet drain has been turned into a shower drain, you are free to install the shower over the drain and continue remodeling your bathroom.
Frequently Asked Questions
How can I install a toilet once the old drain has been turned into a shower drain?
Once you have turned the old toilet drain into a shower drain, you will need to install a new toilet drain for the new toilet.
Overall, it is best to consult with a licensed plumber when installing a new toilet drain. The reason for this is that toilet plumbing is extremely complex and there are certain laws about safe plumbing and toilets. You do not want to attempt to install a completely new toilet if you have no expertise in the area.
With that being said, you’ll need to install new waste and vent pipes and water supply pipes in order to completely move your toilet.
Is it easier to install a shower using a toilet drain or creating a completely new drain?
If you’re changing the location of your shower, it is easier to use the toilet drain instead of completely making a new drain for the shower.
The reason for this is that the toilet drain will already provide much of the needed plumbing. Creating a completely new drain, however, will require more plumbing and tools as well as the need for a professional. Like toilet plumbing, shower plumbing can be difficult to add if you have no expertise in the area.
So you have finished reading the convert shower drain to toilet topic article, if you find this article useful, please share it. Thank you very much. See more: is it easier to move a toilet or a shower, convert floor drain to toilet, how to add a shower drain to a toilet drain, how hard is it to move a toilet, is shower drain and toilet drain the same, convert toilet to shower, convert toilet drain to sink drain, how much does it cost to move a toilet