
You are looking for information, articles, knowledge about the topic nail salons open on sunday near me how much water to add to watercolor paint on Google, you do not find the information you need! Here are the best content compiled and compiled by the https://chewathai27.com team, along with other related topics such as: how much water to add to watercolor paint watercolour tutorial step by step, how long does it take to learn watercolor, wet on wet watercolor, is it hard to learn watercolor painting, How to mix watercolors, Watercolor tips for beginners, how to become a good watercolor artist, where to learn watercolor painting
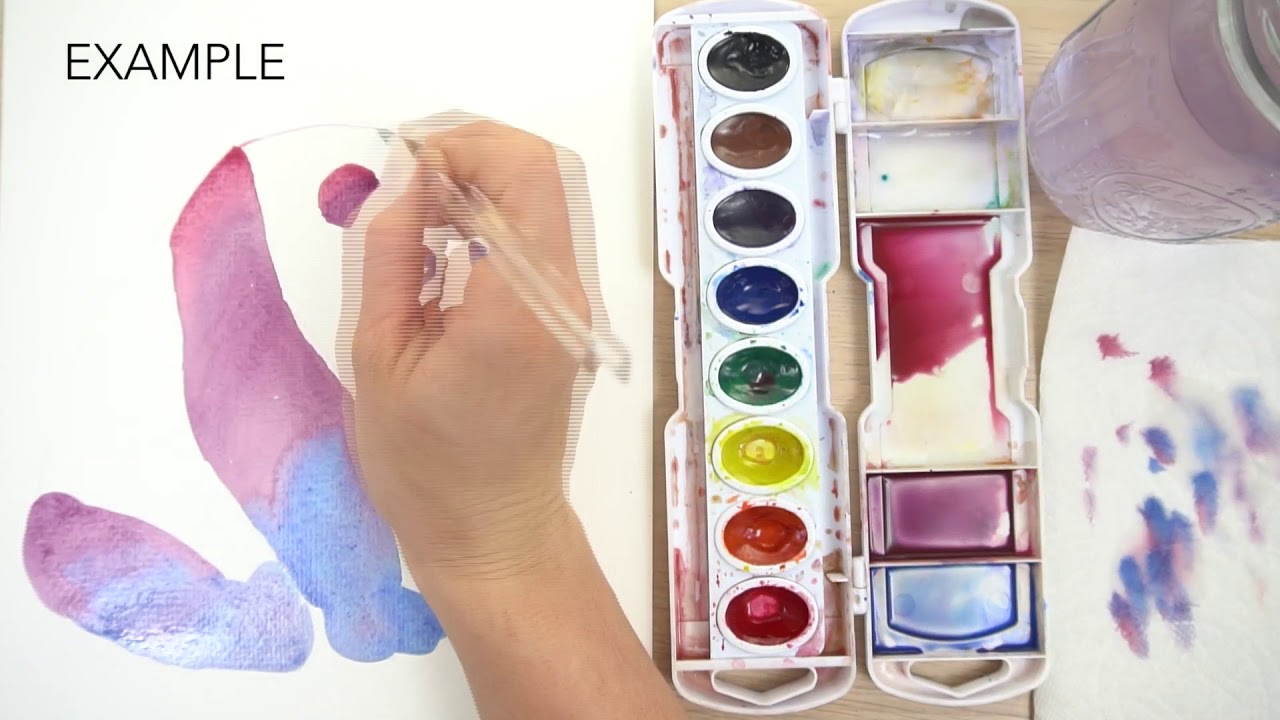
Mix two separate colors side by side. The paint should be neither too diluted nor too concentrated; aim for a 50/50 ratio of water to paint for each color. 2.Mix 1 level teaspoon of paint with water with 4 teaspoons of water, to make a 1:4 dilution (paint:water) mixture. (Or you can use the table below to mix a different paint color.) Completely dissolve the paint, then paint a single 2″ square of the color on a sheet of watercolor paper, using a #6 round brush.
Contents
How do you dilute watercolor paint?
Mix 1 level teaspoon of paint with water with 4 teaspoons of water, to make a 1:4 dilution (paint:water) mixture. (Or you can use the table below to mix a different paint color.) Completely dissolve the paint, then paint a single 2″ square of the color on a sheet of watercolor paper, using a #6 round brush.
Can you use watercolor without water?
Any pigment can be made transparent or opaque by adjusting the amount of water used when mixing. Using pigments as they come from the tube without water are opaque thick.
How do you activate watercolor paint?
To reactivate the watercolors just add some clean water to the wells before each new session. A lot of artists use a spray bottle to pre-wet their paint.
Why does my watercolor look grainy?
Why do my watercolor paintings look grainy? Some pigments are naturally granulating which means they’re coarser and have a tendency to clump together as they dry. The texture of the paper can accentuate this effect. Rough watercolor paper can have a pebbly surface that you may interpret as grainy.
How do I make my watercolor look glossy?
Watercolor mediums and additives are liquids or gels that you can add to watercolor paint to make it glossy, more transparent, textured, pearlescent and more. Their use in watercolor painting isn’t as common as other media like acrylics and oils, but they can be useful for certain techniques.
Why is my watercolor not smooth?
Usually, what will cause these rigid edges on watercolor paintings is wet paint that dries with a hard line. It lacks the smooth softness that makes watercolor so special, and can cause visual distraction. A few common culprits include: Using too much water to mix your paint.
Why do my watercolor paintings look flat?
If you’ve been using watercolors for painting for a long time, you might’ve noticed that some paintings turn dull while some still stay fresh over a long period of time. What is this? This happens due to a property of the watercolor that you’re using called lightfastness.
Do you wet the paper before watercolor?
Wet on wet: wet paint is applied to wet paper, or added to a wash of fresh paint. This creates a fluid, fun and unpredictable effect. There is less control with a wet on wet technique. To try it, lay down clean water on the paper, then add watercolor paint to the wet areas.
Should I use distilled water for watercolor painting?
Many artists believe that using distilled water for their watercolour paintings can make a tremendous difference to the quality of their artwork. Some water may be contaminated and effect the colour of the paints. Using distilled water guarantees that your paint will be of the correct tone and consistency.
What do you need to watercolor?
To get started with watercolor painting, you will need these 6 essential watercolor painting supplies: paints, paintbrushes, watercolor paper, a palette, a container of water, and soap.
5 Basic Watercolor Techniques for Beginners | Artsy
- Article author: www.artsy.net
- Reviews from users: 47343
 Ratings
 - Top rated: 4.8
- Lowest rated: 1
- Summary of article content: Articles about 5 Basic Watercolor Techniques for Beginners | Artsy Updating …
- Most searched keywords: Whether you are looking for 5 Basic Watercolor Techniques for Beginners | Artsy Updating From dabbling with the wet on wet technique to creating gradients, these basic exercises can help you excel at painting with watercolors.How to Be More Creative,Creativity tips & tools,Ana Victoria Calderón
- Table of Contents:
Wet-on-wet
Wet-on-dry
Building up color
Creating gradients
Getting Precise

How to Mix Watercolor – Beginner – YouTube
- Article author: www.youtube.com
- Reviews from users: 47641 Ratings
- Top rated: 4.3
- Lowest rated: 1
- Summary of article content: Articles about How to Mix Watercolor – Beginner – YouTube Updating …
- Most searched keywords: Whether you are looking for How to Mix Watercolor – Beginner – YouTube Updating Find my recommended watercolor supplies herewww.amazon.com/shop/mr.otterartstudioLearn how to mix watercolors in this simple short tutorial, This is great f…watercolor, watercolour, mixing, color mixing, how to mix paint, how to mix watercolors, painting, artwork, technique, beginner, easy, simple, short, complete, mr otter studio, mr otter, mccall, how to, tutorial, lesson, color, princeton
- Table of Contents:
handprint : secret of glowing color
- Article author: www.handprint.com
- Reviews from users: 18385 Ratings
- Top rated: 3.1
- Lowest rated: 1
- Summary of article content: Articles about handprint : secret of glowing color Updating …
- Most searched keywords: Whether you are looking for handprint : secret of glowing color Updating
- Table of Contents:
Smooth watercolour washes (without the stress!) – YouTube
- Article author: www.youtube.com
- Reviews from users: 27096 Ratings
- Top rated: 3.6
- Lowest rated: 1
- Summary of article content: Articles about Smooth watercolour washes (without the stress!) – YouTube Updating …
- Most searched keywords: Whether you are looking for Smooth watercolour washes (without the stress!) – YouTube Updating Here I show you my personal recipe for stress-free, smooth, watercolor washes! If you enjoy this video don’t forget to subscribe to my channel and to visit h…Watercolor Paint (Visual Art Medium), Watercolour (Composition), watercolour washes, Painting (Visual Art Form), Anna Mason Art, AnnaMasonArt, art, lessons, class, classes, watercolour tutorials, watercolor tutorial, watercolor tutorials, Tutorial (Media Genre), how to, guide, workshop, botanical, realism, artist, tip video, smooth washes, flower, petal, magnolia
- Table of Contents:

How Much Water To Use in Watercolour Painting – Emily Wassell
- Article author: www.emilywassell.co.uk
- Reviews from users: 46241 Ratings
- Top rated: 5.0
- Lowest rated: 1
- Summary of article content: Articles about How Much Water To Use in Watercolour Painting – Emily Wassell Most watercolour artists paint with two cups of water. I use one to wash off, and mix, warm colours like yellows and reds. And the other is my cool cup, washing … …
- Most searched keywords: Whether you are looking for How Much Water To Use in Watercolour Painting – Emily Wassell Most watercolour artists paint with two cups of water. I use one to wash off, and mix, warm colours like yellows and reds. And the other is my cool cup, washing … How much water should you use in watercolour painting? It’s the most common question for beginners – here’s how to work out the answer!
- Table of Contents:
Why do watercolours use water
So how much water should I use for watercolour
If you don’t have enough water
If you have too much water
Creative watery effects are not wrong!
The right amount of water to use with watercolour
What is value in watercolour
What else affects how much water to use
The importance of clean water
Download my free watercolour supply guide
Follow me!
Quick Links

Watercolor Basics: How much water should I use? | Angela Fehr Watercolour
- Article author: www.angelafehr.com
- Reviews from users: 48140 Ratings
- Top rated: 3.9
- Lowest rated: 1
- Summary of article content: Articles about Watercolor Basics: How much water should I use? | Angela Fehr Watercolour Water = movement. The more water you use, the more the paint will flow, allow colors to blend together longer and extend drying time. More water … …
- Most searched keywords: Whether you are looking for Watercolor Basics: How much water should I use? | Angela Fehr Watercolour Water = movement. The more water you use, the more the paint will flow, allow colors to blend together longer and extend drying time. More water … Want to learn how much water to use to create magical effects? Paint and
watch, and then do it again tomorrow. Familiarity makes the act of painting
feel instinctive, and while you can learn a lot from a great teacher,
actually doing will create the muscle memory that makes a skill yours. - Table of Contents:
Here are a few tips that will help you learn how much water to use when you’re painting
Trying to figure out where you are in your watercolor journey and where to go next
Get my free guide
Learn to evaluate your own work! Sign up here for my free guide ‘The Art of Self-Critique’ and receive weekly tips

How to get the right paint and water ratio — Café Watercolor
- Article author: cafewatercolor.com
- Reviews from users: 38538 Ratings
- Top rated: 3.0
- Lowest rated: 1
- Summary of article content: Articles about How to get the right paint and water ratio — Café Watercolor Of course, the size of the puddle and wet streaks will also be determent by how big is your brush. A big mop will create a much bigger water … …
- Most searched keywords: Whether you are looking for How to get the right paint and water ratio — Café Watercolor Of course, the size of the puddle and wet streaks will also be determent by how big is your brush. A big mop will create a much bigger water … Water is essential to watercolor. You loosen and dilute the paint by
adding water to it. It is also water that makes watercolor transparent. The
right paint and water ratio is directly related to the value and the
opacity. It can be a bit tricky to get it right at first, but it will
eventually become part of your instinct with enough practice and some
observation. Unfortunately I can not help you with the practice part, but I
can provide you some tips to help you along the way. Obviously, the dryer
the mixture, the more intense the color. But there are some other things
that can give you an idea how wet is your mixture… - Table of Contents:
First check – palette
Second check – paper

3 Ways to Approach Watercolor Painting As a Beginner – wikiHow
- Article author: www.wikihow.com
- Reviews from users: 37692 Ratings
- Top rated: 3.9
- Lowest rated: 1
- Summary of article content: Articles about 3 Ways to Approach Watercolor Painting As a Beginner – wikiHow Updating …
- Most searched keywords: Whether you are looking for 3 Ways to Approach Watercolor Painting As a Beginner – wikiHow Updating Painting is a great hobby that can alleviate stress and anxiety, and is a great outlet for creativity. There are a variety of different kinds of paint that all have their own characteristics, but watercolor is one of the hardest to master…
- Table of Contents:
Steps
Community Q&A
Tips
You Might Also Like
References
About This Article
Reader Success Stories
Did this article help you

Error 403 (Forbidden)
- Article author: www.quora.com
- Reviews from users: 23309 Ratings
- Top rated: 3.0
- Lowest rated: 1
- Summary of article content: Articles about Error 403 (Forbidden) If acrylic is diluted with water, it will soak into and stain the paper, much like watercolor. If you put enough layers on, and it becomes thick, … …
- Most searched keywords: Whether you are looking for Error 403 (Forbidden) If acrylic is diluted with water, it will soak into and stain the paper, much like watercolor. If you put enough layers on, and it becomes thick, …
- Table of Contents:
All About Liquid Watercolor Paints | Deep Space Sparkle
- Article author: www.deepspacesparkle.com
- Reviews from users: 11365 Ratings
- Top rated: 3.5
- Lowest rated: 1
- Summary of article content: Articles about All About Liquid Watercolor Paints | Deep Space Sparkle They can be used full strength, but I always add water. … I dn’t even use watercolor paper, but the colors are much more vibrant if you do. …
- Most searched keywords: Whether you are looking for All About Liquid Watercolor Paints | Deep Space Sparkle They can be used full strength, but I always add water. … I dn’t even use watercolor paper, but the colors are much more vibrant if you do. Creative Art Projects for Busy TeachersAll about liquid watercolor paints and how you can store, mix, find the best brands, and use with your students in the classroom or at home.
- Table of Contents:
Share
Follow Us
In stores 821
What we do
Are you sure
Are you sure
See more articles in the same category here: https://chewathai27.com/toplist.
5 Basic Watercolor Techniques for Beginners
Creativity
5 Simple Watercolor Techniques for Beginners
Ana Victoria Calderón
Sep 4, 2018 12:00PM
Mexico City-based artist Ana Victoria Calderón has taught watercolors through workshops and creative retreats, as well as through online classes via Skillshare, where she’s shared her lessons with over 30,000 students. Below, we share excerpts from her forthcoming book, Creative Watercolor: A Step-by-Step Guide for Beginners (available this December), including five basic activities to help you get started with watercolors. Watercolor can be intimidating for beginners, and even some experienced artists find it challenging. In fact, throughout my years teaching the medium, I’ve met many talented acrylic and oil painters who have a hard time switching over to watercolor because it just works so differently. With these simple warm-up activities, you’ll begin to understand how watercolor really works, get comfortable with your paints, and hopefully come up with ideas for new creations.
Wet-on-wet
Expand Expand © 2018 Quarto Publishing Group USA Inc.
There are a couple of basic ways to paint with watercolor. The wet-on-wet method is typically used for painting landscapes, simple skies, or soft watercolor washes because the effect gives us a nice flowy look that can be applied in different ways. Basically, we’re adding wet paint to a wet surface. Here’s a simple activity that can help familiarize you with this technique. 1. Start by wetting your brush with plain water and “painting” two rectangles. 2. The rectangles will be hard to see because there’s no pigment, but if you tilt your head a bit, you will be able to see where you have applied the water. 3. Pick up moistened paint from your palette and add color to your wet rectangle. In this image, I’m simply sliding my brush from side to side. 4. In your second rectangle, just add dabs of paint. This activity is great for beginning to gauge the amount of water and paint you prefer to use. 5. Next, your paint has begun to dry. See how different it looks? When painting wet-on-wet, we don’t have much control over how our paint reacts. This is a beautiful aspect of this technique; watercolor dries in mysterious ways. 6. Once the paint has completely dried, you’ll see that it’s changed even more. It’s normal for colors to appear less vibrant once they’ve dried. Interesting textures also appear, which makes wet-on-wet a great technique for adding texture to painted shapes.
Wet-on-dry
Expand Expand © 2018 Quarto Publishing Group USA Inc.
Advertisement
Wet-on-dry is used to achieve more precise and defined shapes. This is the technique I like most, and, in general, most illustration-style watercolors are achieved using wet paint over a dry area. 1. Start with dry paper. Pick up some moistened paint with a large brush and simply begin to paint. 2. The ochre paint I used here is quite watered down. The opacity of your paint will depend on how much water you mix in. 3. You can also try using drier paint. I used the minimum amount of water to get my paint going, and you can see we get a completely different texture, a sketch-like finish. 4. Now, the paint is completely dry. Again, notice how the colors tend to fade and can look quite different at this point.
Building up color
Expand Expand © 2018 Quarto Publishing Group USA Inc.
This activity will help you practice building up color from plain water to a saturated paint mix. We’ll be using just one color to achieve different values, looking to create a seamless effect, popularly known as “ombré.” 1. Start with a dry area of watercolor paper. Drop a small puddle of water into your palette and a dab of concentrated paint right next to it. I used a medium-sized brush and a bit of green tube watercolor. 2. Pick up a bit of water with your brush (no pigment yet) to get you started. Begin painting your strip (it will look transparent on the paper). 3. Add a tiny bit of pigment into your puddle of water; make sure to be mindful of how much paint you are adding. You want this process to be subtle and work up slowly. 4. Continue by painting where you left off with the transparent water. 5. Repeat the process by adding a bit more paint to your initial puddle of water each time. Before picking up more color, remember to rinse and pat your brush on a piece of cloth or paper in between so it’s clean. 6. By the time you reach the end of your strip of paint, your watercolor mix should be quite thick and the paint should appear concentrated and as opaque as it can get. 7. Now you have a nice transition from water to concentrated paint. The goal is for the process to be delicate, with no harsh transitions from one value to the next. 8. Repeat as many times as you wish. Try this activity a few times to experiment with different colors and to begin to feel comfortable building up color.
Creating gradients
Expand Expand © 2018 Quarto Publishing Group USA Inc.
This activity is similar to building up color, but instead of working with plain water and different values of one color, we’ll be working with two colors and slowly transitioning from one to the other. It’s a great technique for painting skies and sunsets. Be sure to use colors that are close together on the color wheel to create harmony; otherwise, your gradient will appear muddy. I used green and yellow; other good combinations are blue and purple, red and orange, or blue and green. 1. Mix two separate colors side by side. The paint should be neither too diluted nor too concentrated; aim for a 50/50 ratio of water to paint for each color. 2. Start painting your strip of color using pure yellow paint. 3. Clean your brush. Pick up just a little bit of green paint and mix it into your yellow mixture. 4. Pick up where you left off on your first brushstrokes. The transition from yellow to a slightly greener yellow should be soft and subtle. Try to avoid harsh changes in tone so the gradient doesn’t look choppy. 5. Little by little, keep adding a bit more green to your original yellow mix. In this exercise, the real work happens in the palette. 6. By the end of this paint strip, your original mix should completely transformed into pure green and you’ll have a beautiful gradient of color. 7. Try this as many times as you feel necessary and experiment with different color tones. You might get ideas for paintings by trying out different colors.
Getting Precise
Expand Expand © 2018 Quarto Publishing Group USA Inc.
This activity is a simple way to practice painting around edges of shapes in a controlled way. 1. Paint simple shapes around your dry piece of watercolor paper. I chose circles, stars, and a moon, but you can choose any simple shape you like. Triangles, diamonds, hearts, and squares can work, too. 2. Using a different color, begin painting around these shapes. You’ll want to use two different sized brushes here: one for smaller more detailed areas that are tough to reach, and a larger round brush when you’re filling out larger areas. 3. Make sure to prepare enough blue paint (about 50/50 water to watercolor). For a better flow, keep the blue area of your painting moist, so you can pick up where you left off each time. 4. Get really close to each shape. The goal is to paint as close as you can without actually touching the first shape. You will have very fine white lines between the shapes and the background. 5. Another way to practice is by painting just inside the edge of your paper, creating a border. In addition to working on brush control, you will start to notice beautiful watercolor textures appearing. This depends on how much water you use, the type of paper, and how fast you move. 6. Repeat this simple practice exercise as many times as you feel necessary. It’s a great way to get into the illustration-style watercolor groove.
Creative Watercolor: A Step-by-Step Guide for Beginners by Ana Victoria Calderon. Publication Date: December 11, 2018. © 2018 Quarto Publishing Group USA Inc.
handprint : secret of glowing color
the secret of glowing color “The one thing that you have to learn the one power truly called that of painting, is to lay on any coloured substance, whatever its consistency may be, at once, of the correct tint you want, in the exact form you want, and in the exact quantity you want. That is painting.” John Ruskin This page addresses a common shortcoming among watercolor painters: you probably do not use the right concentration of paint in water or the best painting technique to achieve the most brilliant (intense) color in your paintings. If you are like most watercolorists, you paint with too much water in your paints and fuss over wet paint with your brush. Watercolors have a more limited chromatic range than acrylics or oils: you shouldn’t give ground on color intensity if you want your watercolors to achieve vibrancy and power. The issue is knowing how to achieve maximum color intensity when you want it, no matter which paint you are using. Different amounts of dilution are necessary to get the peak chroma from different pigments and paint formulations. This page describes how to identify that point for any paint and hit it reliably when you want to. As paints are diluted with water or white pigment, their lightness increases. So we’ll also look at the predictable effects dilution has on paint lightness. the luminosity myth Many watercolorists claim that watercolors possesses a special “luminosity” that is in addition to chroma and is produced by light passing twice through pigment particles, “like light through a stained glass window.” Both these ideas are myth, and dispelling these myths will help you learn the painting methods that actually work to create glowing color. Does “Luminosity” Exist? The first myth is that “transparent” watercolors have a special color quality called “luminosity” that is separate from the paint’s lightness, chroma and hue the three colormaking attributes. In fact, there is no fourth color attribute besides lightness, chroma and hue. Recall that these colormaking attributes are sufficient to describe the color appearance of any textureless, homogenous color sample they describe how the eye sees color. Of course, real world surfaces are often visually complex pigment texture, brushstroke texture, etc. arise from uneven paint application; interference paints produce distinct spectral hues along with the paint color; glossiness arises from reflection off an extremely smooth paint surface; and so on. But these complexities affect our perception of colored materials, they do not add a new dimension of color saturation or luminosity beyond lightness, chroma and hue. “Luminosity” is a useful description of a kind of balanced contrast in lightness and chroma that watercolor painters can achieve through other means (described below). “Luminosity” is a kind of color illusion, an effect of all the colors in a painting working in context to create effective contrast or the representation of light and space. It is the visual quality of an image, not of the paint or paper. How Pigments Affect Light. The second myth? Watercolor painters sometimes claim that “luminosity” arises because light passes through transparent pigment particles, is reflected by the white paper, and passes back through the pigment particles a second time “like light through a stained glass window.” This story arose among Victorian watercolor painters. It was frequently used by the academic watercolor traditionalists in the “transparent watercolor vs. bodycolor” debate, and demonstrates their polemical goal of making “opaque” or gouache paints appear “bad” note the holy connotations of a stained glass window! The myth has been passed on, from one generation to the next, in part because of the gross misconceptions that artists have about watercolor paints on paper. I’ve confirmed the following facts with two pigment chemists (each working for a different and well known USA paint brand) and two academic colorant scientists. They all tell me exactly the same thing: watercolor pigment particles create color by selectively absorbing some light and reflecting the rest. Very little light passes through the particles, even once. The idea that most of the light from a watercolor painting has passed through the pigment particles twice, “like light through a stained glass window,” is completely false. In order to understand watercolor transparency, start with the refractive index of the pigment. This measures how much the substance refracts (bends) a beam of light that strikes it. (For comparison, the refractive index of air is 1.0, optical glass is between 1.5 to 1.8, and a diamond is around 2.4.) As a rough rule, chemists consider any pigment with a refractive index above 1.5 to be relatively “hiding” or semiopaque because the pigment affects light so strongly. The refractive index of the most transparent pigments (the phthalocyanines) is 1.4; iron blue is 1.5, ultramarine blue is 1.6, cobalt blue is 1.7, cerulean blue is 1.8, quinacridone red and chinese white are 2.0, yellow ochre is 2.2, cadmium yellow is 2.4, titanium white is 2.6, and venetian red is 2.8. In addition, most organic pigments are actually tiny dye molecules that are laked or fused onto the surface of much larger, colorless carrier particles, such as aluminum hydrate (RI of 1.5) or china clay (1.6). So it seems very few watercolor pigments are “transparent” to begin with!
technique the luminosity myth techniques for glowing color “not black, not light” learning how dilution feels learning how dilution looks how dilution affects lightness how dilution affects chroma technical data
However, the effect of the refractive index depends on the pigment context. Specifically, transparency depends on the ratio between the refractive index of a pigment and the medium around it. The surface reflection or scattering of light greatly increases at the boundary between two substances with different refractive indices. For example, both water and air appear transparent in themselves, but the surface of a lake appears reflective, and bubbles in water appear silvery, because the ratio between the refractive indices of air and water is fairly large. (The RI of air is 1.0, the RI of water is 1.33, a ratio of 1.33.) The powdered, dry watercolor pigments available in jars, even when scattered as a thin layer, appear as completely opaque powders when air is the surrounding medium (photo, right). Surface scattering also increases if this boundary is a rough rather than smooth surface: smooth window glass is transparent, but ground glass or sandblasted glass is opaque. Watercolor pigments are both individual particles and aggregates or agglomerations (irregular clumps) of particles, which have complex, fragmented, microscopically rough surfaces. Finally, surface scattering increases if we multiply the number of surfaces that the light must encounter, as happens when we make the particles smaller and present them as a mass. Thus, large crystals of sugar appear transparent, but powdered sugar appears opaque; we can see quite a distance through large drops of rain, but tiny droplets of fog hide even nearby objects from view; ice is transparent but snow is opaque; beer in the glass is transparent, but beer in the tiny bubbles of the foam is opaque; and so on. The transparency (refractive index) of a large chunk of material doesn’t tell us much about its behavior in tiny particles, such as pigment particles. What happens when light strikes a single pigment particle? Light is either scattered (reflected) at the particle surface or is partially absorbed by the pigment. Pigments that on balance absorb more light than they reflect appear dark valued; pigments that efficiently absorb only some wavelengths of light within a narrow spectral band and reflect the rest will have a specific hue that is intense or saturated. So our focus shifts to how effectively the pigment can absorb light rather than simply reflect or scatter it. three ways that light interacts with pigment particles (a) all light wavelengths are scattered at the pigment particle surface, producing white reflectance; (b) light wavelengths are selectively absorbed by the pigment, and the rest are reflected along with some scattered (white) light; (c) selective absorption is enhanced and scattering is reduced by a surrounding medium (brown) with a similar refractive index. (Colors symbolize different light wavelengths; light itself does not have color.)
The color created by a pigment is actually a mixture of colorless (scattered) and colored (absorbed) light. At the rough surface of a pigment particle or pigment aggregate, none of the scattered light has been absorbed by the pigment to create color (figure a above). If “white” light strikes the pigment, “white” light is scattered back, and this white reflectance desaturates or neutralizes the color that results from any light that has actually entered the pigment particle and been selectively absorbed and reflected by the pigment (figure b above). The Function of a Paint Layer. One of the principal functions of a paint vehicle is to increase the proportion of reflected “colored” light over scattered “white” light (figure c above). It does this by completely surrounding the pigment particles. The vehicles used in modern paint media all have very similar refractive indices 1.47 for gum arabic, 1.49 for linseed oil or polymerized acrylic resin. These are close to the refractive indices of some pigments and almost the same as the refractive indices of laking substrates used to make dyes into pigments. (For example, the RI ratio between linseed oil and aluminum hydroxide is only 1.04, and between linseed oil and ultramarine blue is only 1.09.) These small ratios mean the surrounding vehicle will greatly reduce the proportion of light that is scattered at the vehicle/pigment boundary, and increase the proportion of partially absorbed (colored) light, creating both a darker color and a more intense (higher chroma) color. Indeed, this is why almost any light absorbing surface, such as concrete, wood or fabric, appears darker and more intensely colored when it is wet. So paint vehicles can substantially reduce the light scattered by pigment particle surfaces and allow more light to be selectively absorbed by the pigment if they replace air as the boundary medium. We need to look carefully at the microscopic relationship between the air, dried vehicle, pigment particles, and support (the canvas or paper) to determine whether this occurs. Oil and acrylic paints are usually applied to a nonabsorbent ground, so all the pigment and vehicle stays on the surface; the vehicle hardens primarily through a chemical change with a relatively small loss of ingredients through evaporation, so the surface volume of paint remains roughly the same. (Oil or acrylic paintings do not lose weight as they dry.) As a result, the pigment particles remain completely surrounded by hardened vehicle, which reduces the scattering of light and creates a relatively darker, more saturated color. Much of the light scattering occurs at the single boundary between the air and the smooth paint skin, not at each of the millions of pigment particle surfaces. And the thickness of the paint layer ensures that most pigment particles are surrounded on all sides by other pigment particles, which increases the chance that light scattered by one particle will be selectively absorbed by another before it is reflected back to the viewer. These paints have a typically richer color appearance. Watercolors Don’t Form a Paint Layer. Watercolor paints are also intensely colored when wet, because the water and dissolved binder completely surround the pigment particles and reduce the surface scattering of light. But when watercolors dry, all of the water in the vehicle evaporates, signficantly reducing its total volume. (A wet painting is noticeably heavier than a fully dried painting.) Furthermore, as the water evaporates, a substantial amount of the dissolved paint vehicle (gum arabic binder, glycerin plasticizer, honey or glucose humectant), along with the dissolved surface sizing of the paper, is drawn by capillary action into the tiny spaces between cellulose fibers, where it hardens and dries. It does not remain on the surface, like an acrylic or oil vehicle. Finally, and again unlike the nonabsorbent grounds typically used in oil or acrylic paintings, the painting surface is also transformed. The individual cellulose fibers, which were compacted and flattened during paper manufacture, become somewhat untangled when wet: the paper sizing dissolves and the fibers soften and expand. When the fibers dry and shrink back to their original dimensions, they are loosened to form a deep, tangled mat. (The mechanism is much like what happens to a wool fabric after it has been washed it comes out thicker and fuzzier!) As a result, the painted paper surface viewed under a microscope looks strikingly like a deep pile or shag carpet soiled with sand and mud the textures of cellulose fibers, pigment particles and the deposits of dried vehicle and sizing all jumbled together. raw watercolor pigments
are not transparent
the microscopic reality of watercolor paint on paper before paint is applied: the relatively flat surface of new watercolor paper consists of compacted cellulose fibers under a thin coating of gelatin tub sizing (green); after paint is applied: loosened and expanded cellulose fibers are strewn with pigment particles, while the gum arabic vehicle and gelatin sizing have drained into paper crevices.
The final situation is very different from an oil painting: the largest pigment particles are left “high and dry” clinging to individual cellulose fibers, and many of the smallest particles have sunk deep into the cellulose crevices where they are hidden from light (photo, right). There is no uniform paint layer and no paint skin: the pigment particles are strewn on top of, between and underneath the cellulose tufts. Light scattered by one particle has a smaller chance of striking and being “colored” (selectively absorbed) by another particle before it is reflected back to the eye. Worse, without a thick surrounding vehicle and smooth paint skin, light scattering greatly increases at the exposed pigment particle surfaces. This is why watercolor paints appear to whiten or fade as they dry, visible proof that “white” light surface scattering has increased and the pigment particles have become more opaque. Lack of a surrounding vehicle is also why many organic pigments are less lightfast in watercolors than in oils or acrylics. Thus, there is no paint layer to represent the “stained glass” pane that light must pass through two times. The Victorian painters falsely reasoned that watercolor paints must behave in the same way as oil paints, when in fact watercolors create a completely different pigment environment. Transparency Occurs Between Particles. So why does cerulean blue, with a refractive index of 1.8, appear much more opaque than the quinacridones, with a refractive index of 2.0? Because there is a sparser coating of smaller pigment particles in the more transparent paint. Pigments in a smaller particle size hide less of the paper (or other pigment particles) underneath, making the color appear more transparent. Transparency happens between pigment particles and not through them. And this is obvious from common experience: the “transparent” appearance of dust on a table, or a “wash” of graphite pencil or charcoal over ink lines on paper. Even with a fairly heavy application, the line drawing is still clearly visible underneath, though carbon pigments absorb almost all the light that strikes them! The reason there is a sparser coating is that the color intensity of “transparent” pigment particles is usually very high: less pigment is sufficient to provide the surface color. This is probably the main reason for what appears to be watercolor paint transparency. The individual pigment particles in most “opaque” pigments venetian red, chromium oxide green, cadmium red or cerulean blue have a relatively dull color, so a greater bulk of pigment must be slathered on the paper surface to get a characteristic color appearance. These paint colors are usually formulated with a much higher concentration of pigment. Thus, chinese white appears relatively opaque, while quinacridone red appears transparent, even though both have the same refractive index (about 2.0) and the same particle size (around 0.1µm) and aggregate size. Chinese white (zinc oxide) is formulated with over three times the volume of pigment to gum vehicle as the quinacridones, because the quinacridones have a very high chroma and good tinting strength. As a result, a much smaller quantity of quinacridone pigment is applied to the same surface area of paper … just like making a much lighter scribble with your graphite pencil. techniques for glowing color Why is it useful to dispel these longstanding myths? Because a factual understanding of your painting materials ultimately gives you greater artistic skill. Believing in a nonexistent dimension of color, or a false mechanism of “luminosity” or transparency, hides from you the many ways that color intensity (chroma) can be controlled. Let’s review some basic principles. Paint colors change their apparent brightness, transparency or hue depending on the context in which they appear. This is really a color design problem rather than a color mixing or paint problem, and painters should clearly understand that “luminosity” is fundamentally a skillfully created illusion, and not the inevitable appearance of certain kinds of paints. But if we choose to focus only on paint attributes, then the generic pigment color and the manufactured pigment particle size (and particle size distribution), and the pigment load or concentration of pigment in the paint, have the largest impact on the finished paint color. In many watercolor paints, smaller pigment particles tend to be less saturated and lighter valued than the larger particles. These duller, paler and smaller particles also remain in liquid suspension longer than the more intense, darker and heavier particles, which sink first to the paper surface and into the paper crevices. In very thick applications, the lighter particles form a thin sediment on top, adding a “white” component of scattered light and obscuring the brighter color underneath. You control these paint attributes through your choice of watercolor brand, and you can guide your choice by carefully testing your watercolors for tinting strength and particle size. I find a simple yet revealing test is to mix a moderately diluted solution (roughly 1 part paint to 6 parts water) of the paint, pour the solution into a shallow mixing pan or palette, and let the solution completely evaporate. Variations in pigment color (especially those caused by the laking substrate or smaller particles) will become quite visible. By gently wiping away the upper layers with a moist paper towel, you can also see the color difference between the smallest and largest particles of paint. If we set both color context and pigment attributes aside and focus only on the paint as a brushable material, then color intensity (saturation) depends primarily on how much the paint is diluted with water when applied to the paper. The next sections of this page explore the dilution issue in detail. The fourth component of paint color is … the paper. Watercolor paper contributes a “white” light scattering and pigment obscuring effect to the finished color. A very fuzzy or untangled paper surface, or a paper that absorbs much of the paint pigment deep into the paper crevices, will adversely affect the paint color appearance. And the simple, very effective but rarely mentioned way to minimize this paper intrusion and achieve bright, pristine color is to apply the paint in one brushstroke and let it dry. This is perhaps not exactly the issue that John Ruskin had in mind when he wrote the headquote to this page, but the admonition has special relevance in watercolors. The difficulty in watercolors is not that it is “unforgiving”, as amateurs widely misbelieve: it is that it begs for fussing. Repeatedly brushing the wet paint on wet paper seems so necessary and irresistible in watercolors to smooth out irregularities in the paint texture, or combat blossoms or backruns, to adjust a color that has gone wrong, or to darken a color that has lightened too much. Yet repeated brushing of wet paper increases the unraveling of cellulose fibers at the paper surface, which increases the fuzzy canopy of microscopic fibers over the pigment particles and forces a larger number of pigment particles into the paper crevices. Both will dull the color. What confuses many painters is that the effects of repeated brushing depend on several attributes of the paper, not the paint! These include: the wetness of the paper if the paper is still damp or wet when rebrushed or repainted, the surface sizing and some of the internal sizing is still dissolved, which loosens the mat of cellulose fibers (making them more sensitive to brush abrasion) and increases the capillary action that pulls pigment particles deeper into the paper crevices the pulp content of the paper papers made with cotton linters have much shorter cellulose fibers than papers made with cotton or linen cloth or raw fiber, and these shorter fibers are more likely to loosen and fuzz up when repeatedly brushed the surface or finish of the paper hot pressed papers are more heavily compacted and tub sized, while rough papers are loosely compacted and generally have less sizing the amount of tub sizing whatever the surface finish, a thicker layer of sizing binds the surface fibers longer, and fills in many of the deeper surface crevices, holding more of the paint on the paper surface. All these attributes vary across different brands of paper, so you may have to experiment with different papers and paper finishes to find the surfaces that work best for you. It may be useful to use a sheet of Yupo printable plastic as a “control” or standard of comparison. The Yupo is actually a sheet of satin textured plastic, with no surface sizing and no crevices for the paint to sink into you can brush it or fuss with it as much as you like (or are forced to by the puddling of the paint!). To evaluate the color effects due to your paper, simply make up your usual solution of a few different paints a dark paint (ultramarine blue, PB29), an intense paint (cadmium scarlet, PR108), and a dull paint (chromium oxide green, PG17) and paint them two different ways: as a single stroke of paint that is left alone to dry, and as a single stroke of paint you repeatedly stroke, blot and blend with the brush as the paint dries. This “fussing” will produce a noticeably duller finished color. You can also compare the single stroke with a stroke that you add water to as it dries (deepening the wetting and prolonging the capillary action of the paper), or compare a stroke made on completely dry paper and a stroke made on paper that has been thoroughly soaked and is still quite damp. By comparing these different paint application methods across different brands and surface finishes of paper, you will develop a clear understanding of the impact of paper and brush techniques on the finished color. Glazing (Multiple Paint Layers). Many artists and watercolor books advocate the use of multiple paint layers, starting with dilute solutions and gradually applying thicker layers, and using only a small brush (#6 round or smaller), to create the most glowing color. There is even an artist in my area who touts paintings made with over 100 individual paint applications! Yet, despite this consensus advice, my own tests show conclusively that: paint glazed in several thin layers is not darker, richer or more saturated than a single layer of the same paint applied at the optimal consistency. See for yourself. Mix 1 level teaspoon of paint with water with 4 teaspoons of water, to make a 1:4 dilution (paint:water) mixture. (Or you can use the table below to mix a different paint color.) Completely dissolve the paint, then paint a single 2″ square of the color on a sheet of watercolor paper, using a #6 round brush. Now add 4 more teaspoons of water to your mixture (a 1:8 mixture), mix well, and paint a second 2″ square using two layers of paint but be sure to let the first layer dry completely before added the second. Now, double the quantity of water yet again (a 1:16 mixture), mix well, and paint a third 2″ square, this time applying four layers of paint. Because you’ve doubled the number of paint layers each time you doubled the quantity of water, you’ve applied the same total quantity of pigment to paper using both procedures. So this is a test of whether glazing by itself can produce a darker, richer, “more luminous” color. In my judgment, looking at these three 2″ swatches side by side, it can’t. Paint applied in several layers does have a different finished appearance, and you will see this in your paint samples. It tends to be flatter and more homogenous, because the minor imperfections of paint streaking or brush marks left in one layer are disguised by the other layers. Pigment texture flocculation in ultramarine blue, or that sweet powdery texture of cadmiums or naphthol reds is obliterated. The paper fibers tend to fluff up under repeated wetting and drying run your fingers over the different glazing samples which gives the paper a subtle velvet texture that adds to the flat effect. It is also easier to paint perfectly controlled color gradations in this way, since imperfections in the value transition from light to dark can be evened out nicely. But I can find no basis for the claim that you get a darker or richer color by this method. There are also drawbacks to multiple paint layers. Paints contain gum arabic, and when a thick layer of paint dries on the paper, the dried vehicle largely seals the surface the paint is effectively another coat of external sizing. The first layer of color is applied over absorbent paper, but the second and subsequent layers are applied over the accumulating layers of gum arabic. The common result is that the later layers of paint dry more slowly they’re not helped along by the absorbency of the paper which gives mixed pigments (and granulating pigments with a significant color difference between large and small particles) more time to separate. The result, when the layering is pushed to the limit, is a less consistent, blotchy appearance. To avoid this problem, painters who “paint in glazes” often use a separate layer to paint each pigment, to avoid pigment separation in a single layer made with mixed pigments; or they consistently work with a relatively diluted mixture, so that the amount of gum added at each step is very small and more easily managed with the brush. These problems with paint appearance are reduced if you use papers with a rough finish (R), because this breaks up the paint surface and provides greater texture for the pigment to lay on. But this rougher surface makes the multiple glazes harder to do, because the edges of color areas are randomly broken up by the paper texture, and these edges are harder to match with each new coat of paint. On the other hand, hot pressed (HP) papers are in general the least absorbent, and pigments are more likely to pool and dry slowly on a hot pressed surface. If you need to use a juicy wash, you will have to wrestle with blotching and backruns caused by the puddling water. The is the reason for using a smaller brush, which applies smaller quantities of paint. Finally, the glazing method is really labor intensive. If you feel you can’t get a desirable effect any other way, then the labor is not an objection but the cost of quality. But if you can cover a sheet of paper with bright color using only one layer, why would you do it with three? You are doing the work of three paintings, but have only one painting to show for it. Finishing Surface Layer. Whatever the cause, problems with light scattering from the paint and/or roughened paper surface can sometimes be remedied with one or more coatings of gum arabic: either applied as a foundation treatment before painting begins, or on top of the finished color as a final layer of one or more glazes. The foundation coating seals the paper surface to keep the pigment from sinking into the paper; the finish coating reduces surface scattering. You should experiment to find the best dilution, but I find that most liquid preparations sold by art retailers (from manufacturers such as Daniel Smith, DaVinci or Winsor & Newton), diluted to approximately 1 part gum arabic solution to 2 parts distilled water, will give an easily brushable coating that darkens and intensifies the apparent color (reduces white light scattering) without creating a disagreeably glossy surface. A spray semigloss fixative or colorless acrylic can produce a similar color improvement. Usually two or three coatings of gum arabic are required to produce a satisfactory result, but this allows you to vary the amount of gum arabic you apply over different parts of the painting. Be careful, however, as the gum arabic darkens the color by reducing the surface scattering this means increasing the gloss so unless gloss is what you want, aim for a matte finish that is dark but not shiny. This means the benefit depends on how much of the problem is caused by surface scattering: a gum glaze does wonderful things for a dull passage of carbon black pigment, but has a much less dramatic effect on many synthetic organic pigments. As with any glazing application, be sure the outside and inside of the paper, as well as the surface layers of paint, have completely dried before you add any finishing treatment. The English Victorian watercolorists innovated the trick of glazing the paper with one or more coats of zinc oxide (Chinese white) to seal the paper and provide a more reflective coating for the painting. Titanium white will serve just as well. This works best on a rough rather than a hot pressed finish, as the white paint has a tendency to lift if brushed too aggressively with subsequent paint layers. But then, these painters already knew that fussing was a bad thing. not black, not light Jim Kosvanec suggests a simple rule to obtain the “maximum luminosity” (he apparently means maximum chroma) in watercolors. His rule: use paint mixtures that are diluted just enough to “bead up” like water on the palette. I have found that this rule is not exact for many paints, and doesn’t really work with large puddles of mixture or well used (scratched up) plastic palette surfaces. Focusing on mixture viscosity (dilution) is the right approach, but only as an expedient. You’re forced to use the viscosity of the paint mixture as a guide to the right mixture of paint and water because you must choose the right paint mixture before you apply the paint. What you are actually aiming for is a specific dried paint appearance, which is … “not black, not light” This means that the purest, brightest dried paint color always appears as the happy medium between two extremes: If the paint is too thick, the color will appear blackened, darkened or bronzed (bronzing makes the surface look shiny, leathery, dull or blotchy). The paint will also be harder to apply smoothly, and will often appear streaked or uneven. If the paint is too thin, the color will be lightened by the white paper showing through, and this added “white” light weakens the color chroma of the paint. By avoiding both extremes, you’ll find the perfect mixture for each type of paint. The examples below show what I mean. “not black, not light” rule applied to four pigments paints shown (top to bottom): yellow ochre (PY42), quinacridone maroon (PR206), green gold (PY129), gold ochre (PY43) The optimal mixture in each row (as measured by a spectrophotometer, and confirmed by visual comparisons) is the one in the middle. Notice how the two mixtures on the left show some “black” or darkening of the color, and at the extreme left show some patches of bronzing. The two mixtures on the right are “light,” with the whiteness of the paper punching through. The middle mixture avoids both, and is the most intense color possible in watercolors with that pigment on that paper. But there is a catch: optimal paint dilution is different for different pigments and different brands of paint. Paint brands differ in the quality of pigment they use, in the amount of pigment they pack into the paint, in the thickness of the vehicle, and in the use of additives or fillers. The methods I describe next will help you learn to recognize the optimal dilution for any paint. learning how dilution feels You want to hit a visual goal, but you have to work with the paints while they are wet. You could tediously measure out paint and water recipes every time you mix a new color, but it is far more efficient to learn the signs of mixture viscosity or dilution as your guide to paint mixing. The most convenient way to do this is to start with raw paint, add water to it in measured steps, paint a color sample at each step, and observe how the dried color changes. The method of measured steps is important, because you want to learn the specific ratio of paint to water that produces the best results. microscope image of an ultramarine blue wash on cold pressed watercolor paper
Materials. You will need the following materials: (1) a large flat mixing surface, such as a flat plastic palette, an enameled butcher’s tray or large porcelain dinner plate, (2) a durable, high quality watercolor paper notebook, the spiral bound kind with high quality, heavy weight paper (see examples here and here), (3) a 1/2″ sable flat or bright brush, (4) a 1/2″ acrylic flat brush, and (5) a set of high quality kitchen measuring spoons. Use a watercolor notebook for this task. It provides a place to paint out the color swatches and to write your comments about the mixing process and the sensual qualities of the wet color mixture: it preserves your explorations for future reference. Use a flat, white mixing palette if you can, as you want to see the wet color appearance and the thickness or viscosity of the paint mixtures on a flat surface in the same way you normally see the paints you mix for painting. Procedure. Purchase a 15 ml. (1/2 fluid ounce) tube of any intense, dark paint (such as ultramarine blue, phthalo green, phthalo blue, prussian blue, pyrrole red or quinacridone violet), and follow these steps to explore the differences in mixture concentration: Raw paint (1:0). Squeeze out enough raw paint directly from the tube to completely fill a 1 teaspoon measuring spoon (about 5 ml. or 1/6 fluid ounce). Make sure to fill any voids or air pockets in the paint, then scrape off excess with the edge of a palette knife to make a level measure. This may seem like a lot of paint, but you want enough quanitity to make your measurements accurate … and you must let go of your fear of “wasting paint” if you want to achieve glowing color. Next, use the premoistened 1/2″ synthetic brush to scoop and scrape as much of the paint as you can out of the spoon onto your flat mixing surface. (Don’t use the sable brush for rough mixing work like this.) With the paint left stuck to the brush, gently paint a 1″ square patch of color at the top left of a blank page of your watercolor notebook; try to brush the paint to a thin, even coat with as few brush strokes as possible don’t “overwork” or fuss with the paint. Label this patch Raw 1:0. Syrupy concentration (1:1). Fill the 1 teaspoon with water and hold over the raw paint. Use the 1/2″ acrylic brush to dissolve as much as you can of the remaining raw paint out of the mixing spoon, at the same time dissolving the raw paint embedded in the brush or clinging to the ferrule. Then pour this mixture over the raw paint on the palette, and dissolve the paint by gently stroking and daubing it against the mixing surface with brush. You must patiently mix with the brush, as it will take a few minutes for the paint to dissolve. When you’re done, there should be no clumps of raw paint on the brush or mixing surface Examine the paint mixture carefully: it will have the thick consistency of corn syrup or molasses. If daubed on a bare area of a metal or unscratched plastic palette, the mark will retain its shape rather than contract into a round puddle; if you drag your brush through the mixture, you will create a furrow that only very slowly closes; if you wick the paint against the side of a paint well, the liquid will form a solid drip down the side (photo, below); no liquid falls from the brush when you lift it. With this mixture paint a second 1″ square patch of color just below the first, and label it Syrupy 1:1. Beside this swatch describe in your own words the paint texture or consistency. Creamy concentration (1:3). Add 2 more teaspoons of pure water, each time using the 1/2″ acrylic brush to clean the spoon further. Switch to the 1/2″ sable flat brush, and stir the mixture until the paint mixture is completely smooth, checking for any undissolved lumps of paint lurking in puddle. The mixture should now have the viscous consistency of cream or olive oil. If daubed on a bare area of palette, the mark will slowly and partially contract its shape, but will not make a round puddle; if you drag your brush through the mixture, you will see the surface underneath for a few seconds before the paint closes over the trace; if you wick the brush against the side of a paint well, the paint forms a consistent drip but with visible thinning at the edges (photo below); and no drops fall from a saturated brush when you lift it. Paint a third 1″ square patch with this mixture, and label it Creamy 1:3. Fluid concentration (1:6). Add 1 tablespoon (3 teaspoons) of pure water to the mixture, stir well, and again study its consistency. The mixture should now have the fluid consistency of milk, but it does not yet feel exactly like water you have only loosened up the creamy or oily texture without dissolving it entirely. If this mixture is daubed on a bare area of the palette, the mark will slowly contract into a round puddle; if you drag your brush through the mixture, paint will quickly close in over the trace; ripples dance over the surface as you stir it; the reflection of a beaded or curved edge will appear around the sides of the puddle; a wicked brush drip will break into segments down the side of a paint well (photo below); drops will fall from a saturated brush when you lift it. Paint another 1″ square sample with this mixture, and label it Fluid 1:6 with your comments. paint consistency and brush drip marks Watery concentration (1:9 and 1:12). Add 1 tablespoon (3 teaspoons) more of water, mix well with the 1/2″ sable flat, and paint a 1″ square patch of color. Examine the wet mixture carefully using the same judgments as before, and decide whether (1) it has thinned so much that it has the same consistency as pure water, and (2) you can clearly see the white of the paper showing through the painted color swatch once it has dried. If so, label it Watery 1:9; if not, label it Fluid 1:9. Then add another 1 tablespoon of water, mix again and paint another paint swatch, which should have the consistency of pure water and show definite paper whiteness through the color patch. Label this patch Watery 1:12. More watery concentration (1:24+). Continue by adding 4 tablespoons of water to the mixture, each time mixing thoroughly with the 1/2″ sable flat brush and painting a 1″ patch of color, to produce sample dilutions at 1:24, 1:36, 1:48 and 1:60 (you end up with 20 tablespoons of liquid, or more than 1 cup). These mixtures also have the consistency of pure water, but you will discover that the pigment texture and paint color change in subtle and interesting ways. Label these patches Watery: with the dilution ratio and any comments. You now have a series of 10 color swatches, arranged down the page in decreasing concentrations of paint, similar to the examples shown below. Look at all the samples under good lighting, both straight on and from the side, and identify (1) the patches that show bronzing, blackness or dullness, and (2) the patches where the white of the paper clearly shows through. The optimal color dilution(s) will be the one or two patches in between. Optimal mixtures will have a clean color, the most intense and characteristic color for that pigment, without any streaking, blotching, discoloration, fading or weakness. This assumes you applied the color evenly and without retouching as it dried. Remember, how you brush out the color will affect its appearance. As always apply the paint evenly and without fussing. Don’t charge the brush with so much paint that the test swatches are puddles of mixture; don’t apply a second layer of paint to a swatch, or wick more color into a wet swatch with the brush, or brush the swatch after it starts to dry. Paint all swatches in exactly the same way. Tedious as this exercise is, I urge you repeat it for a few other paints in your palette both different types of pigment (organic and inorganic, dark and light, coarse and finely divided) and different hues. Record the results in your watercolor notebook; observe how much variation there is across the different types of pigment, identify the optimal dilution for each type of pigment, and learn the sensual qualities of the paint mixtures that signal the different proportions of paint and water. Try to recognize the paint dilution just by observing how the mixture stirs, flows, and clings to the brush: learn the feel of glowing color, as well as the appearance. When you’re finished, you will have your test samples and mixing recipes in the notebook where you can refer to them as needed to refresh your memory. And you have several blank pages if you decide to extend your observations to new paint colors or new brands of paint. learning how dilution looks Let’s now look at the test swatches and the variations in the finished paint appearance. The swatches pictured below, made with a mixture of ultramarine blue and burnt sienna, illustrate the qualities of paint at each concentration. To preview the main conclusion: paints are most saturated at a creamy to fluid concentration, mixed with a paint:water ratio of between 1:4 and 1:6. When the concentration is thicker than creamy, almost all paints exhibit a dull or blackish bronzing. When the concentration is fluid or watery, the white of the paper shows through. the color appearance of different paint dilutions The raw paint patch has a flat, lifeless appearance. The textures of both paint and paper are entirely obliterated, and brushstrokes have left streaking or botches in the matte surface. The tonal value is dark, and for small areas of dark values, or for drybrush textures (prepared by flicking a damp brush across a pile of raw pigment), this concentration is perfectly usable. Paint at a syrupy concentration dries to essentially the same pigment concentration as raw paint, with approximately the same lightness (value). It is not much easier to apply with a brush. The paint flows thickly and reluctantly, and is awkward to spread in an even layer. The main problem is that paint at this concentration will almost always bronze (acquire a sticky, leathery or shiny surface texture) in areas where the paint puddles slightly as it has done along the left side of the illustration swatch. In fact, bronzing is usually more obvious and uncontrollable at this concentration than it is with raw paint! Paint at this consistency takes significantly longer to dry completely, sometimes up to an hour. And the color quality is also often poor cadmiums in particular appear grayish and dull, and phthalocyanines, quinacridones or earth pigments turn blackish. Only some of the unsaturated cobalt pigments look bright at this density. This is a good paint consistency for drybrush or other textural effects that do not require pure color as much as dark or strong color, but for most painting needs more water is desirable. The color really starts to open up and shine in the creamy concentration (usually around 1:3 to 1:5 for many types of pigment and brands of paint). This is the point where many paints reach their maximum chroma greatest brilliance of color and characteristic lightness (dark for blues, light for yellows). The paint flows from the brush evenly and easily enough to be completely workable. This mixture will not bronze when it dries, even in areas where it has puddled, and although the color is very dark it is also luminous and pleasing. Textural variations caused by pigment and paper just begin to appear. The color has a quality of “not black, not light.” There are no spots of blackened, grayed or darkened color caused by overthick application, but there is also no apparent lightness from the paper showing through the paint. For many dark or intensely tinting paints with a small particle size, such as the phthalocyanines, transparent iron oxides, metal azomethines, dioxazine violet and carbon blacks, the creamy concentration will still be too thick. These paints look best at a fluid concentration (around 1:6 to 1:8 for most brands of paint). For the mixture of ultramarine and burnt sienna, however, we can see signs that the mixture has been diluted beyond the optimal point. The paint is showing obvious textural variations granulation, flocculation that primarily appear in diluted paint mixtures, and the color has noticeably lightened. Because the white paper is starting to add to the total reflected light, the pigment color is mixed with white light, lowering its chroma. At a watery concentration (usually 1:10 up to 1:60 and higher) most paints are diluted below their peak chroma or saturation. These are the mixture dilutions most often used for washes, foundation tints, and the like; they are also the mixtures habitually used by novice painters and by painters who are anxious to “save paint” or “make colors transparent”. Don’t misunderstand: weaker paint mixtures can be highly desirable. They shift the paint’s expressive effect from a pure color statement toward a textural statement. A whole new range of flocculation and granulation effects begins to appear, and these liquid and pigment textures are unique to watercolors and visually pleasing. Because of random pooling and water flow, the paint can also produce a much greater variety of backruns and color gradations. (In fact, the paint must be applied carefully to achieve an evenly textured area.) Many types of pigment combinations phthalos with quinacridones, quinacridones with cobalts, cadmiums with earth colors tend to separate more quickly and more visibly in these weak washes, producing beautiful mottled variations of contrasting color. (In the examples above, you can see separation of the brown burnt sienna and blue ultramarine in the two lefthand bottom samples.) Use each dilution to best effect: bright and flat color from creamy concentrations, subdued but textured color in watery concentrations. Finally, notice how just by adding more water the color quality in these four dilute swatches changes from the colors of a stormy sky to the pearly grays of dawn. Always explore the full range of a paint’s color qualities, not just the color in heavy mixtures. These paint:water ratios are guidelines only. The dilution ratios and liquid texture depend on each brand’s paint formulation. Some paints have a clayey consistency out of the tube, while others are syrupy or runny; some are made with a lot of gum arabic, others are loosened up with water; some contain honey, others do not. And even if the vehicle were exactly the same for all paints, pigment quality and particle size affects the optimal dilution higher quality paints can tolerate more water. You goal is to learn the best dilutions for your preferred brand of paint, by actually working through the dilution steps described above, and noting the paint:water ratios that give you the best results for each pigment. Look at the finished color with your eyes, and learn the best way to achieve that color in the mixtures of your preferred paints. how dilution affects lightness Now it’s worthwhile to delve the relationship between paint lightness and the ratio of paint to water in a paint solution that is, how much a paint has been diluted. This reveals both the similar ways that all paints behave when they are diluted with water, and important differences in the way pigments are milled into paints. The graph below shows four examples. the effect of dilution on paint lightness paints shown: Utrecht cadmium scarlet (PR108), M. Graham phthalocyanine green (PG7), M. Graham indanthrone blue (PB60), M. Graham lamp black (PBk6)
The vertical axis is the CIE lightness of paint swatches, measured with a spectrophotometer on two different brands of paper (Arches CP and Fabriano Artistico CP) and with the paper “white” set to L* = 97. The horizontal axis shows the paint dilution, the quantity of water used to dissolve one tablespoon of paint. (One quart equals 64 tablespoons, so the maximum dilution ratio, 1:2048, signifies 1 tablespoon of paint dissolved in 8 gallons of water.) Dilution is shown on a log scale, which is able to show both very small and very large dilution ratios in the same diagram.
These paint dilution curves are siblings of the “S” curves that we find in a log/linear plot of any reproduction medium, from photographic dye density to visual pigment bleaching (diagram, right). The paint dilution curves show a somewhat sharper bend, or a stronger dilution effect, at the “toe” (bottom end) of the curve compared to the “knee” (top end). However these curves have the consistent feature that a 50% reduction in pigment density results in a value that is halfway between the extreme high and low values. The tinting strength of the paint (or the tinting strength of the pigment after it is diluted by the paint vehicle) is shown in the amount of water required to increase the paint lightness by 50%. This appears as a left to right shift in point of the 50% dilution in the dilution curves (dots in the diagram, above). The diagram shows four contrasting curves. Carbon (lamp) black (PBk6) actually darkens slightly as the raw paint is diluted, an effect of reduced caking and bronzing of the pigment; the color begins to lighten only at around a 1:7 (paint:water) dilution. This indicates a very high pigment load, relative to the tinting strength of the pigment. In contrast, the phthalocyanine green BS (PG7) ramps up immediately from the syrupy (1:1) dilution, indicating that the pigment is already partially diluted by the paint vehicle; the actual minimum lightness of the pigment is probably around 18 (green line). As phthalocyanine green is not an expensive pigment, the manufacturer has probably backed off the pigment load to buffer somewhat the pigment’s very high tinting strength. The indanthrone blue (PB60) strikes the happy medium and is ideally formulated: the creamy paint (1:2) delivers a very dark value, equal to a carbon black, without bronzing; but any further dilution starts to lighten the color. The expensive cadmium scarlet (PR108) appears formulated to provide the maximally intense color at a syrupy dilution, but lightens immediately from this point. This is typical of an expensive pigment milled by a reliable manufacturer: the brand gives you all the pigment concentration useful in a watercolor paint, and no more. The 60% solution. All these curves indicate that, once a paint begins to lighten noticeably in response to added water, the relationship between the dilution ratio and the amount of lightness increase is a straight line but on a log scale. Thus, in the graph above, the “gamma” or slope of the straight part of the S curve is the same for the three dark paints shown. This simply means that a repeated proportional increase in dilution (for example, doubling the fluid volume of the mixture, or increasing it by 50%, or any other constant proportional increase) produces an equal incremental increase on a lightness scale: The example, for carbon black, shows that lightness increases by 10 (from 40 to 50) if the dilution is increased by about 60% (from 1:25 to 1:40), and it again increases by 10 (from 50 to 60) if the dilution is again increased by 60% (from 1:40 to 1:64). Now, it’s clear that different paints begin to lighten at different dilutions; and raw paints have different darkest values depending on their color. So we can’t blindly rely on absolute rules about dilution. However, once a paint does noticeably start to lighten, then equal proportional increases in the fluid volume of the mixture will produce an approximately equal lightness increase in many different kinds of paint. And, in fact, the 60% proportion works remarkably well to produce a 10 point lightness increase in most of the deep red, magenta, purple, blue and green paints I tested, regardless of their tinting strength. In the lighter scarlet, orange and yellow paints the same proportion (60%) produces a smaller lightness increase. If the raw paint is roughly half as dark as raw carbon black, its lightness increase will also be roughly half, if you use the same percentage increase in fluid volume in both paints. generic plot of paint lightness on log paint dilution
This proportional method for creating equal value steps breaks down once the paints are diluted much above a lightness of 80 (diagram, right). You have to use a value scale, or your eye, to judge when the paint has been diluted that far. At that lightness paints in the “dark” hue range from red through purple to blue will appear strongly weakened, but turquoises and greens will still have good color; all saturated yellows start at a lightness above 80. Then the dilution curves flatten out, and the proportional increases in dilution necessarily get larger with each step. The saving recourse here is that, if you have established regular value steps in the darker values below 80, these lighter value changes are pretty easy to judge by eye. Mixing Recipes for Lightness Steps. The relationship between dilution and lightness can be analysed systematically, although this may require you to go through a lot of trial and error. I have found, too, that this method is useful for photorealist paintings that require exquisitely exact modeling (for example, figure nudes), but is otherwise much to cumbersome for the practice of wholesome art. Careful measurement should not be your standard working procedure, but what you learn at first by that method will become intuitive through experience. The table below illustrates a specific painting problem: what is the difference between a controlled lightness variation created at each step with one coat of paint, or a lightness variation that is built up across all steps through multiple glazes of paint? If you are building a value range through multiple glazes, for example to model figures, then the dried value of each layer you add must take into account the value of the layers underneath. So there are two kinds of dilution, exact and layered, to work out. The table shows 11 value steps from full strength to white, so that the lightest step can be split in half for better resolution. dilution recipe for burnt sienna Value (L) %
VR Exact Dilution Recipe* Layered Dilution Recipe* 97 0 0.000 0/684 0.000 0/684 94 5 0.001 1/684 0.001 1/684 92 10 0.005 3/608 0.003 2/608 86 20 0.010 5/494 0.005 3/570 81 30 0.023 7/304 0.013 6/456 76 40 0.044 10/228 0.021 8/380 71 50 0.089 15/152 0.046 11/228 66 60 0.140 12/76 0.050 12/228 60 70 0.190 18/76 0.050 12/228 55 80 0.240 12/38 0.050 12/228 50 90 0.290 15/38 0.050 12/228 45 100 0.343 20/38 0.054 13/228 *Recipes are in drops of paint/drops of water
Equivalent measures (T = tablespoon, t = teaspoon, 3 teaspoons in a tablespoon, 1 teaspoon = 76 drops): 684 drops = 3 T, 608 drops = 2 T + 2 t, 570 = 2T + 1.5 t, 494 = 2 T + 1/2 t, 456 = 2 T, 380 = 1 T + 2 t, 304 = 1 T + 1 t, 228 = 1 T, 152 = 2 t, 76 = 1 t, 38 = 1/2 t.
I only show you the recipes for a single paint Winsor & Newton burnt sienna, which is very good foundation color for figure painting. You can similarly use any transparent red iron oxide that can withstand fairly heavy layering without turning a scabby brown. The main observation here is that the glazes increase in concentration from a very diluted mixture to a roughly 1:20 dilution at L* = 70, and from that point the same 1:20 dilution, applied repeatedly, gives an even lightness decrease down the rest of the scale. I usually don’t use a single paint to cover the full value range. In figure painting, for example, I use burnt sienna from the lightest flesh tone down to a dark middle tone, then a darker pigment (such as benzimida brown or ultramarine blue) to take the modeling into the darkest values. A Matter of Proportion. So we end with a complex and impractical table, and three simple, consistent rules about paint dilution and lightness: Nearly all commercial watercolor paints need to be minimally diluted to a syrupy consistency, to establish a workable darkest value while avoiding bronzing and streaking. Raw paint is used in the drybrush technique, but even there the water in the brush used to pick up the raw paint is acting to dilute the paint. Once the color begins noticeably to lighten, there is a consistent relationship between the proportional increase in fluid volume and the incremental increase in lightness. This is true for any proportional increase, but a 60% increase commonly yields about a 10 point lightness increase in most paints I examined. This “60% solution” (and any other proportional rule) breaks down once the paint color is diluted to a lightness of 80 and above. Then your eye needs to take over, judging lightness intervals necessary to make a smooth transition from the darker values to the white of the paper. If you’re used to working with paints in watery mixtures, you will find the thicker mixtures involve some stumbling around before you get your bearings. However the method of proportional liquid increase provides a useful basic method for producing regular value changes in paint lightness. how dilution affects chroma As you march through the gradations in color lightness, you will see that the color appears brightest or most intense at one specific point in the series. This is the last piece of the puzzle to consider. simulation of saturated paints diluted to lightness = 80
How much water to use in watercolour painting
How much water should I use? This is one of the most common questions that beginners have about watercolour painting. And it’s not as simple as it seems.
You’re going to be annoyed about this, but in truth there’s no easy right answer to how much water you need. This is because water is used to lighten your colours, so it depends how light you want to go.
And then other factors that you need to take into account, such as what effects are you trying to get? What paper are you using? What brush are you using?
It’s a lot of questions in one but here’s how you can work out the answer!
So you have finished reading the how much water to add to watercolor paint topic article, if you find this article useful, please share it. Thank you very much. See more: watercolour tutorial step by step, how long does it take to learn watercolor, wet on wet watercolor, is it hard to learn watercolor painting, How to mix watercolors, Watercolor tips for beginners, how to become a good watercolor artist, where to learn watercolor painting