
You are looking for information, articles, knowledge about the topic nail salons open on sunday near me how to clean a ruger 10/22 magazine on Google, you do not find the information you need! Here are the best content compiled and compiled by the Chewathai27.com team, along with other related topics such as: how to clean a ruger 10/22 magazine how to clean butler creek 10/22 magazine, how to clean ruger 10/22 25 round magazine, ruger 10/22 magazine spring tension, ruger 10/22 magazine spring, how to put a ruger 10 22 magazine back together, ruger 10/22 magazine sticking, ruger 10/22 magazine assembly tool, how to adjust ruger 10/22 magazine
22 LR 25-Round Magazine. At 25 rounds, the BX-25 is the highest capacity magazine that Ruger offers for the 10/22.
Contents
What is the highest capacity magazine for a Ruger 10 22?
22 LR 25-Round Magazine. At 25 rounds, the BX-25 is the highest capacity magazine that Ruger offers for the 10/22.
How reliable is the 10 22?
This magazine is very reliable—trouble with this type is practically unheard of. The original 10-round magazine may be replaced by 15- and 25-round X-magazines. The only requirement for long-term reliability is that the magazines be cleaned every 500 rounds or so.
What is a coupled magazine?
Coupled magazines keep you at a standard length and can help you to get small and stable while still having quick access to your reload. An added bonus is that you won’t be laying on top of your reload. Instead of in your chest rig, your ammo is hanging off the side of your rifle.
What is a 25 round coupled magazine?
22LR 25 Round Coupled Magazine. These magazines are not able to be detached, as it is one unit. This magazine fits the Ruger 10/22 rifle. Each of the magazines hold up to 25 rounds of . 22LR, so in total they hold 50 rounds of .
RUGER 10/22 MAGAZINE DISASSEMBLY & CLEANING – YouTube
- Article author: www.youtube.com
- Reviews from users: 32067
 Ratings
 - Top rated: 4.9
- Lowest rated: 1
- Summary of article content: Articles about RUGER 10/22 MAGAZINE DISASSEMBLY & CLEANING – YouTube Updating …
- Most searched keywords: Whether you are looking for RUGER 10/22 MAGAZINE DISASSEMBLY & CLEANING – YouTube Updating These magazines work great, until they don’t. Here we disassemble, clean and re-assemble the Ruger 10/22 magazine. It’s easy!RUGER 10 22, RUGER BX25, RUGER MAGAZINE, RUGER CLEANING, RUGER MAGAZINE CLEANING, RUGER 10/22, RUGER 22, RUGER CLIP, GUN CLEANING, GUN MAINTENENCE, BEST 22LR
- Table of Contents:

Attention Required! | Cloudflare
- Article author: www.pewpewtactical.com
- Reviews from users: 23782 Ratings
- Top rated: 4.6
- Lowest rated: 1
- Summary of article content: Articles about Attention Required! | Cloudflare Updating …
- Most searched keywords: Whether you are looking for Attention Required! | Cloudflare Updating
- Table of Contents:
Please complete the security check to access wwwpewpewtacticalcom
Why do I have to complete a CAPTCHA
What can I do to prevent this in the future
Disassembling, cleaning, and reassembling a Ruger 10/22 rotary magazine
- Article author: www.heypete.com
- Reviews from users: 42440 Ratings
- Top rated: 4.5
- Lowest rated: 1
- Summary of article content: Articles about Disassembling, cleaning, and reassembling a Ruger 10/22 rotary magazine I used Break-Free CLP, patches, and q-tips to remove fouling. Clean the vanes on the rotors, the feed lips, the magazine cap, and the main cylindrical body of … …
- Most searched keywords: Whether you are looking for Disassembling, cleaning, and reassembling a Ruger 10/22 rotary magazine I used Break-Free CLP, patches, and q-tips to remove fouling. Clean the vanes on the rotors, the feed lips, the magazine cap, and the main cylindrical body of …
- Table of Contents:
Demystifying Ruger 10/22 Rotary Magazine Maintenance | An NRA Shooting Sports Journal
- Article author: www.ssusa.org
- Reviews from users: 33582 Ratings
- Top rated: 4.2
- Lowest rated: 1
- Summary of article content: Articles about Demystifying Ruger 10/22 Rotary Magazine Maintenance | An NRA Shooting Sports Journal To disassemble the 10/22 rotary magazine, use a 9/64 hex wrench to loosen the cap nut screw at the front of the mag. On the back of the mag is a … …
- Most searched keywords: Whether you are looking for Demystifying Ruger 10/22 Rotary Magazine Maintenance | An NRA Shooting Sports Journal To disassemble the 10/22 rotary magazine, use a 9/64 hex wrench to loosen the cap nut screw at the front of the mag. On the back of the mag is a … Don’t fear the Ruger. Avoid problems while cleaning and reassembling your Ruger 10/22 rotary magazines with these tips.rimfire rotary mag,22lr,ruger rotary magazine
- Table of Contents:
Demystifying Ruger 1022 Rotary Magazine Maintenance
Latest
Interests
See more articles in the same category here: Chewathai27.com/toplist.
Disassembling, cleaning, and reassembling a Ruger 10/22 rotary magazine
Disassembling, cleaning, and reassembling a Ruger 10/22 rotary magazine
I posted this as comments in this thread in the LiveJournal guns community, but figured it warranted its own page.
My Ruger 10/22 magazines were malfunctioning due to lack of cleaning, and had difficulty feeding rounds (the rotor wasn’t rotating). Unfortuantely, using a silencer like the excellent Gem-Tech Outback II increases the backpressure in the gun, making the action and magazines get very dirty, very quickly. Many people can go for years without cleaning their magazines, but I need to clean mine every few range sessions to keep them in good working order. Shooting a silenced 10/22 is really fun, but requires that one clean the gun and magazines more often.
I looked around for some instructions online on how to properly disassemble and reassemble the magazines, but the information I found wasn’t terribly useful. As a visual person, I decided it might be best to take pictures showing the processes so as to explain them better.
Although these instructions are made as clear and simple-to-follow as possible, they do involve disassembling mechanical components with small, spring-loaded parts. I am not responsible for any damage or injury that may occur while performing the actions described in these directions. Please be careful. If you have any questions, please feel free to contact me by email (address at the bottom of the page).
In reviewing my server logs, I’ve noticed that many people are coming to this site for general advice on disassembling and cleaning the 10/22 rifle itself. This page was made specifically for showing how to clean 10/22 magazines, but you can find an excellent guide for cleaning the rifle here.
I’ve included an exploded diagram of the magazine itself. This should allow you to visualize the interior of the magazine before you start out. It also helps in verifying that you’re putting the various parts back together in the proper way!
Enjoy!
A 9/64th inch hex wrench is required. No other tools are necessary, though gently holding the magazine body in a vise or clamp may make it easier to work with. I didn’t need one, but it might help some people.
You can click any of the images to embiggen them. They were taken with no flash, one-handed, so my apologies if they’re blurry or unclear. Let me know if this is an issue, and I’ll take better ones.
Video Disassembly Instructions
Step 1: Pre-disassembly magazine. Ensure that the magazine is unloaded. Step 2: Using the 9/64th inch hex wrench, loosen the round side with the hex-wrench socket — to loosen, turn the screw head counterclockwise. Just loosen it, don’t completely remove it yet. While loosening the hex screw, push in on the screw head. You will notice the hexagonal piece (the “cap nut”) on the opposite side of the magazine poking out. You may also notice the cap on the far side of the magazine popping out as well. For now, press the cap back into place so the hexagonal piece sticks out like so. Step 3: Remove the cap nut. Note that I bite my fingernails. I’ve done this for years. Oh well. Step 4: Remove the screw. Step 5: Remove magazine cap. Step 6: Remove the rotor. Note that one vane on the rotor is longer than the others. Keep this in mind. There’s generally no need to remove the spring from the rotor hub. Step 7: Remove the metal feed lips (“magazine throat”). Note the angle it’s at, which side is “up”, and the different sized nubs on each end. Step 8: Magazine is disassembled. Clean magazine thoroughly with a good solvent. I used Break-Free CLP, patches, and q-tips to remove fouling. Clean the vanes on the rotors, the feed lips, the magazine cap, and the main cylindrical body of the magazine. Be sure to wipe everything dry after cleaning. Having oil in the magazine will cause gunk to build up rapidly, requiring more cleaning in the future. As magazines are not high-friction devices involving lots of reciprocating motions or parts, it’s all right to leave them dry.
Step 1: Disassembled (and hopefully cleaned) magazine. Step 2: Replace metal feed lips. Insert rotor. Note there are two ends to the rotor — one with a small “shelf” where the vanes end, and one with a long “shelf”. The long side goes in first and should fit into a depression in the magazine. Turn rotor clockwise until long vane is inside feed lips. Step 3: Insert screw into the hole at the bottom of the magazine. While this can be done before Step 2, I did it in this order. Doesn’t really matter. This prevents the rotor from falling out of its little depression. Note alignment of rotor vanes with long vane inside feed lips. Step 4: Examine the small cap nut. Observe the small hole. Then examine the spring sticking out of the partially-assembled magazine. Note the small bit of spring that’s vertical. Do nothing for now, just note their existence. Step 5: Replace magazine cap. Ensure it fits properly on feed lips and that the spring protrudes from the hole in the center. Step 6: Align the small hole on the cap nut and the small vertical spring bit. They should fit together like so. Step 7: Note that the cap nut has six flat sides (duh, it’s a hexagon!). Start with the spring untensioned, then rotate it eight notches clockwise. In other words, you’re moving it one and one-third full revolutions, or 480 degrees. I find this easy to do when holding the cap nut with a pair of pliers, otherwise it slips through my fingers when under tension. When properly tensioned, use your finger to press the cap nut into the hexagonal depression in the magazine cap. Then, while holding the cap nut in place, use your hex wrench to tighten the screw on the other side. Ensure it’s tightened firmly, but do not strip the threads or screw head. Step 8: Magazine is reassembled. Verify spring tension and proper functioning by loading and unloading rounds. Ensure that each round springs smartly into position. Some magazines may require additional tensioning. If so, partially disassemble, adjust, and reassemble as described above. Enjoy!
Feel free to post links to this page if you are so inclined. If you have any questions, please don’t hesitate to email me.
Version History
11/1/05 – First public version, some minor grammatical and spelling errors found and corrected (these are generally corrected without updating the version history).
11/2/05 – Changed the instructions for the amount of spring tensioning from four notches to six notches based on comments received and range testing this evening. Four notches provides sufficient tension to feed most cartridges, but feeding problems were experienced on the last round or two causing the cartridge to be crushed by the reciprocating bolt. Further tensioning the spring allowed the last cartridge to be fed properly.
5/6/06 – Added Google Ad at the bottom of the page (sorry folks, I have to pay for the bandwidth somehow. Hopefully this isn’t intrusive.). Added exploded magazine diagram and changed some of the explanatory text to match with the exploded diagram. Widened the tables to allow for more comfortable reading and viewing.
3/1/07 – Changed the instructions on spring tensioning from six notches to eight notches to increase reliability. I’ve had some failures-to-feed from the magazines, and at least one person has contacted me to let me know that six is sometimes too little. Also, I finally got around to including the size of the hex wrench needed for disassembling the magazine (9/64th of an inch). Finally, I added a few lines about my new silencer in the introduction.
3/2/07 – Posted video instructions, hosted at Google Video.
4/4/07 – Minor updates.
4/4/08 – Added blurb to announce my blog.
3/9/10 – Removed Digg and blog link. Changed appearance of Google Ad (I dislike any ads, but am just a small amount away from finally getting enough to get paid by Google. Once this occurs, I’ll remove the ads.). Switched video from Google Video to YouTube, as Google Video is depreceated. Will likely spruce up the page in the next few weeks, as it’s looking rather dated.
1/26/12 – Finally got enough for Google to send ad payment, so I removed the Google ad code. Still haven’t spruced up the website. Sorry.
10/29/14 – This page is now licensed under a CC-BY 4.0 International license.
Disassembling, cleaning, and reassembling a Ruger 10/22 rotary magazine by Pete Stephenson is licensed under a Creative Commons Attribution 4.0 International License.
Pete Stephenson – p…@heypete.com
Demystifying Ruger 10/22 Rotary Magazine Maintenance
If you’ve never cleaned your Ruger 10/22’s rotary magazine because it seems too complex to take apart and reassemble, we’re going to demystify the process for you. In order to avoid struggling with its spring-loaded reassembly after cleaning, we’ll show you an inexpensive tool to improve your quality of life: the Tandemkross 10/22 Mag Tuner and Assembly Tool.
While disassembling the 10/22 rotary magazine is no big deal, reassembly can be tricky, especially since the spring must be rewound to exactly the correct tension or the magazine will not feed properly.
The middle of a match, when your 10/22 goes “click” instead of “bang,” is no time to discover it’s gummed up with bullet wax and crud, or that you wound the magazine spring a bit too loose. To avoid this debacle, let’s take the mag apart, clean and reassemble it properly to ensure trouble-free operation.
Simple Takedown
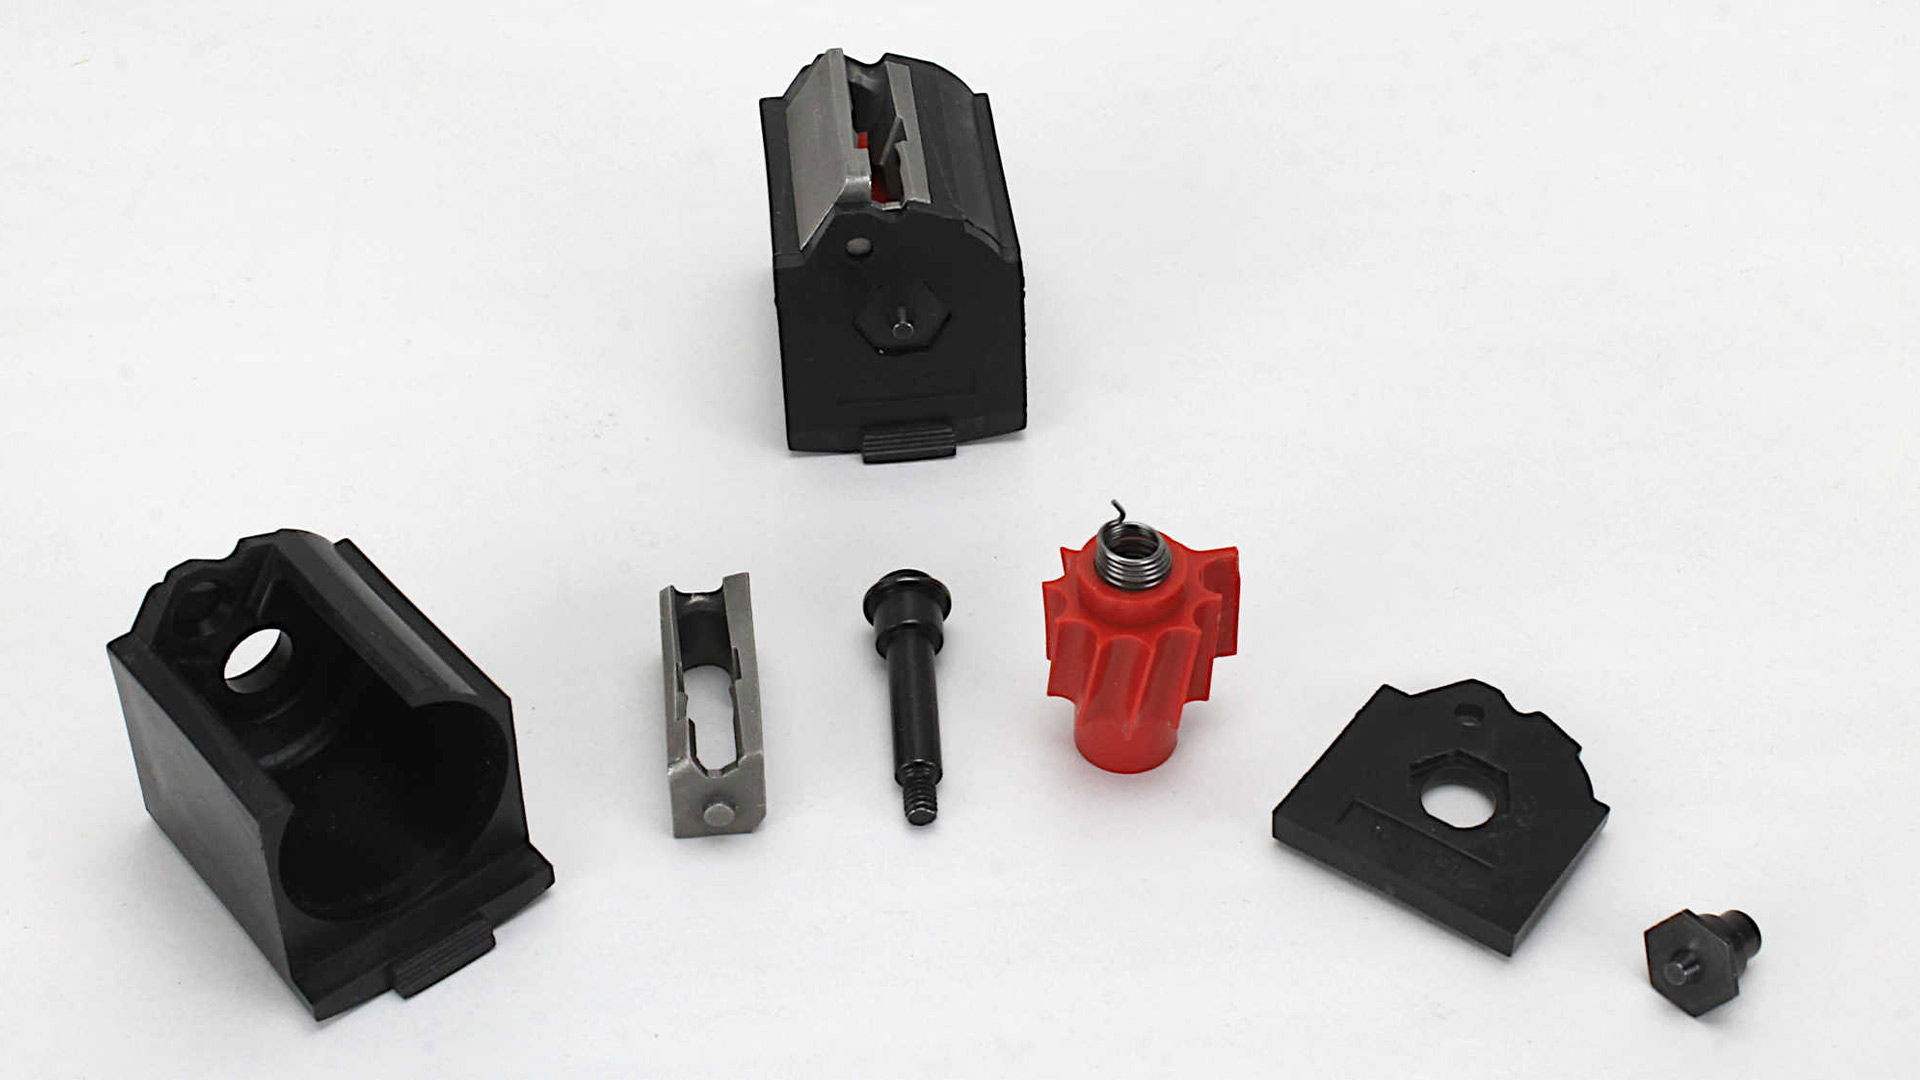
To disassemble the 10/22 rotary magazine, use a 9/64 hex wrench to loosen the cap nut screw at the front of the mag. On the back of the mag is a hex-shaped cap nut. Hold thumb pressure against it as you remove the cap nut screw and allow the back plate with cap nut to rotate counterclockwise under spring pressure. When the pressure is relieved, you’ll find the 10/22 rotary magazine disassembles into seven component parts, including a captive rotor spring. You can remove the rotor spring too, but this isn’t necessary for routine cleaning.
Step one is to remove the magazine’s cap nut screw.
To reassemble the magazine, replace the feed lips assembly onto the magazine body. It has raised, round nubs (keys) of dissimilar size on each end, so it fits back together only one way and you can’t get it wrong. Hold it in place with a finger and drop the rotor into the magazine body with the protruding spring end up. That red rotor looks somewhat like a gear with teeth. One of these “teeth” is longer than the others and serves as a stop when it bumps against the feed lip assembly. Turn the rotor clockwise so that the stop rests against the feed lips assembly. Then replace the back plate.
The cap nut and back plate are under spring pressure—control them while disassembling.
The hexagon-shaped cap nut has a tiny receptacle hole to capture the end of the rotor spring. This is what winds tension onto the spring as you rotate the cap nut with the rotor stop up against the feed lips assembly. Insert the spring end into the cap nut’s receptacle and turn the cap nut with finger pressure until you feel the rotor’s stop contact the feed lips assembly, if it’s moved. From this point, using one of the flat hexagon edges as reference, that edge must be turned clockwise against spring pressure for the distance of exactly 8 corresponding flat edges in the back plate. This is one full turn, plus the distance of two additional flat edges, or one and one-third turns. The cap nut takes a 7/16-inch wrench.
The feed lips assembly has round keys on the ends, permitting only correct reinstallation.
A visual aid can be a big help. Make a pencil mark on one of the cap nut’s flat edges and watch it as you count it pass seven flat edges in the back plate to align with the eighth flat edge (1⅓ turns). Push the cap nut down into place and hold it with thumb pressure as you insert and tighten the cap nut screw.
The mag rotor stop appears as a longer “gear tooth” here on the left side of the rotor. It stops against the feed lips assembly.
Nifty Tools
All easier said than done, as it can be difficult to simultaneously hold the back plate in place while also turning the cap nut against spring pressure with a 7/16-inch wrench and then snap the nut into its recess. Under increasing spring pressure, the cap nut tends to slip out from the wrench as you turn it, or it jumps free, unwinding the spring, as it transitions any gap between wrench and recess.
The mag rotor stop appears as a longer “gear tooth” here on the left side of the rotor. It stops against the feed lips assembly.
Those folks at Tandemkross, makers of innovative accessories and tools for rimfire competitive shooters, have obviously struggled with the Ruger 10/22 rotary magazines themselves. Following the axiom that frustration is the real mother of invention, someone there has found an easier way to reassemble the magazine. The Tandemkross Mag Tuner and Assembly Tool is actually a three-piece tool kit consisting of a synthetic cap nut tool, a synthetic reassembly assist tool and a standard 9/64 hex wrench. The kit comes in a zippered plastic pouch to keep the pieces together. An attached key ring and small carabiner permits attaching the pouch to whatever you want.
The Tandemkross Mag Tuner Assembly Tool kit makes 10/22 magazine reassembly a snap.
With the Tandemkross kit, insert the reassembly assist tool through the front of the magazine body and drop the rotor onto it. Replace the back plate. Use the Tandemkross cap nut tool to hold the cap nut captive as you withdraw the reassembly assist tool from the magazine body.
Insert the Tandemkross reassembly assist tool.
Turn the cap nut one and one-third turns (eight flats), then push the spring-loaded tool handle down to snap the cap nut down into its recess. Remove the tool then hold the cap nut in place with your thumb as you insert and tighten the cap nut screw.
The rotor stop is shown here contacting the feed lips assembly.
Note that you can use the cap nut tool’s handle as a visual reference, too. Put a pencil mark at the back plate’s 12 o’clock hexagonal flat edge position. With the rotor stop contacting the feed lips assembly, count two hexagonal flats on the cap nut counterclockwise from 12 o’clock (at about the 8 o’clock position) and mark it with the pencil—this is the flat you want to end up at 12 o’clock for proper spring tension.
The back plate has recessed hexagonal flats that correspond to the six flats on the cap nut.
Attach the cap nut tool so that one of its handles overhangs the marked cap nut flat, turn the tool a full one and one-third revolutions until that handle is at 12 o’clock and snap the cap nut into its recess. If the pencil marks are aligned, you did it correctly.
Mark the back plate at 12 o’clock and the cap nut at the 8 o’clock flat.
There’s an excellent three-minute video on the Tandemkross website that clearly illustrates use of the tool kit.
Use the Tandemkross cap nut tool to easily reinstall the cap nut and snap it into the recess in the back plate.
You don’t have to buy the tool kit to view the procedure, but if you do, you may end up buying one because the low $14.99 price is worth the cost of frustration lost and confidence gained in keeping those rotary mags operating perfectly.
So you have finished reading the how to clean a ruger 10/22 magazine topic article, if you find this article useful, please share it. Thank you very much. See more: how to clean butler creek 10/22 magazine, how to clean ruger 10/22 25 round magazine, ruger 10/22 magazine spring tension, ruger 10/22 magazine spring, how to put a ruger 10 22 magazine back together, ruger 10/22 magazine sticking, ruger 10/22 magazine assembly tool, how to adjust ruger 10/22 magazine