
You are looking for information, articles, knowledge about the topic nail salons open on sunday near me how to decorate an explosion box on Google, you do not find the information you need! Here are the best content compiled and compiled by the Chewathai27.com team, along with other related topics such as: how to decorate an explosion box how to decorate explosion box for birthday, how to put together an explosion box, explosion box ideas for anniversary, explosion box ideas for mother’s day, diy cake explosion box, explosion box gift, explosion box ideas for girlfriend, exploding card box
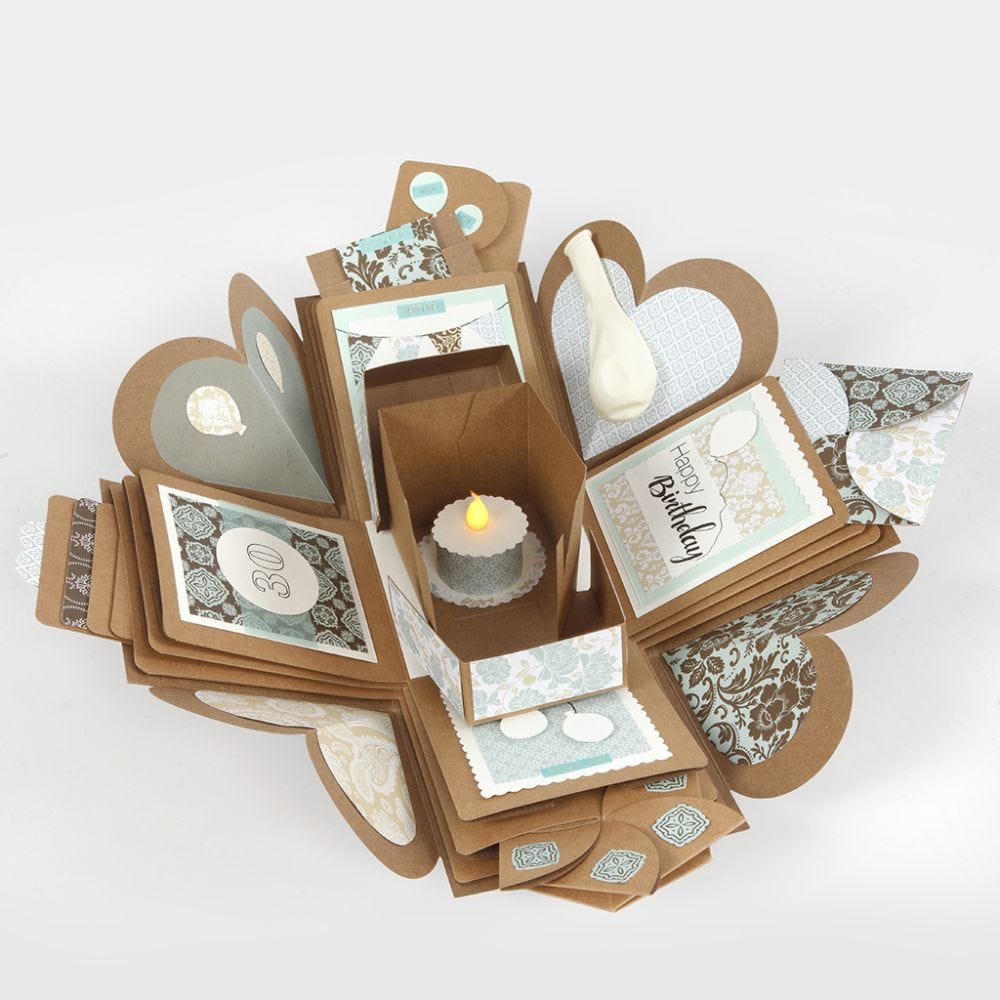
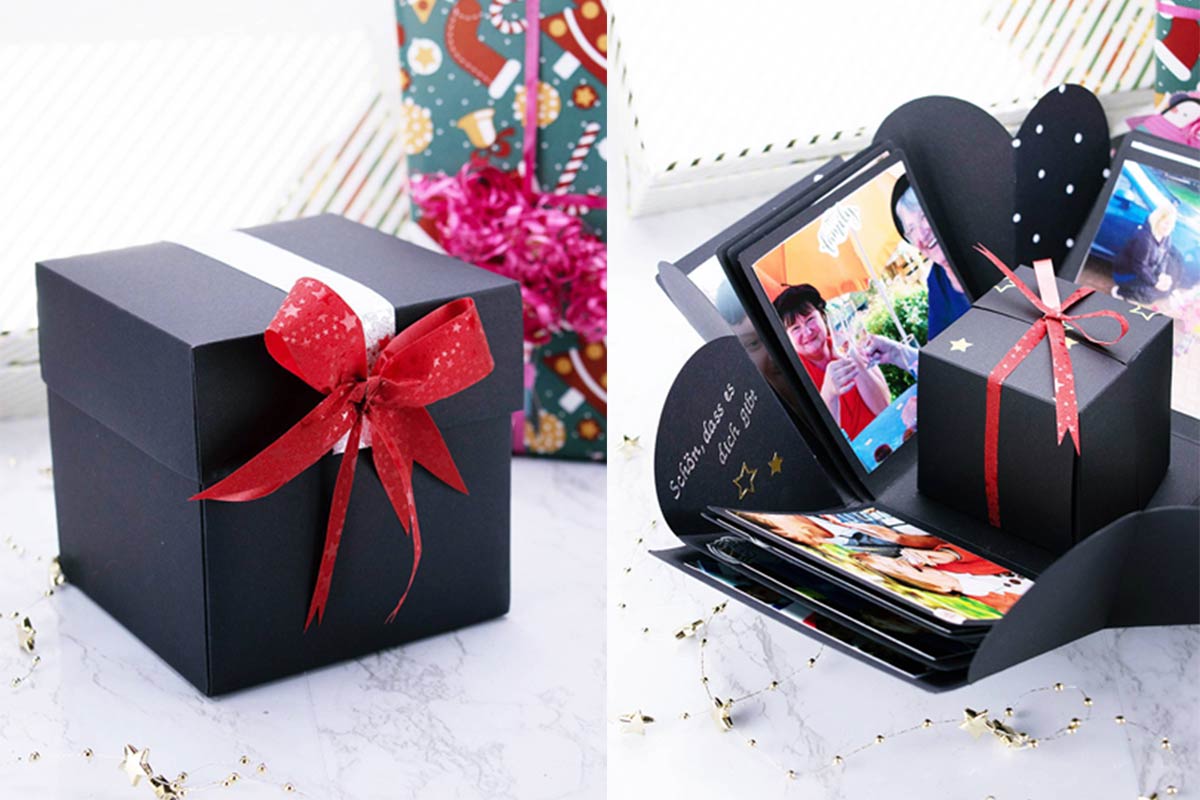
Decorate the inside of the box with decorations and fitted design paper. Fill the box with small decorative parts and inlays, photos and small messages to suit your chosen theme; e.g. birthday. Cut out small pieces of design paper for the lid and the sides of the small box which is inside the large explosion box.Tape for photo:5.7” x 4.1″. Sticker: 5.3″x4. 9″. Our explosive box can hold 36-60 photos.
…
Here’s the list of the things that you’ll usually find inside an exploding box:
- Waterfall card. Instead of pictures, you can change it with photos of your beloved ones. …
- Double-slider card. …
- Pockets. …
- Endless card. …
- Slider card. …
- Flower envelope card/origami. …
- Spinning pull card. …
- Shaker card.
- Step 1: Print the Templates. …
- Step 2: Fold Your Explosion Box. …
- Step 3: Glue the Layers Together. …
- Step 4: Assemble the Outer Shell of the Box. …
- Step 5: Make Your Explosion Gift Box Lid. …
- Step 6: Personalize Your Explosion Box.
Contents
What can you put in an explosion box?
…
Here’s the list of the things that you’ll usually find inside an exploding box:
- Waterfall card. Instead of pictures, you can change it with photos of your beloved ones. …
- Double-slider card. …
- Pockets. …
- Endless card. …
- Slider card. …
- Flower envelope card/origami. …
- Spinning pull card. …
- Shaker card.
How do you make an explosion box template?
- Step 1: Print the Templates. …
- Step 2: Fold Your Explosion Box. …
- Step 3: Glue the Layers Together. …
- Step 4: Assemble the Outer Shell of the Box. …
- Step 5: Make Your Explosion Gift Box Lid. …
- Step 6: Personalize Your Explosion Box.
What size pictures do you need for an explosion box?
Tape for photo:5.7” x 4.1″. Sticker: 5.3″x4. 9″. Our explosive box can hold 36-60 photos.
What do you put in a birthday explosion box?
- Several sheet of 12 x 12 cardstock (I used 4 for the box itself and 1 for the lid)
- Complimentary scrapbook paper.
- Scissors.
- A glue stick.
- Pictures.
- Decorations (I used ribbons and tin boxes, but you could use paper flowers, small bottles, whatever you like)
How do you make an explosion box step by step?
- Step 1: Print out your template of choice and cut where necessary. …
- Step 2: Fold your explosion box. …
- Step 3: Glue the layers together. …
- Step 4: Assemble the lid. …
- Step 5: Put it all together and personalize.
How many photos are in a explosion box?
36 pcs photos of 6×8. 9cm/2.36×3.
How do you make an exploding box for your boyfriend?
…
Step 3: The Base and the Lid.
- Mark at 15 and 30 cm on each side,
- Unite the points.
- Make a heart shape on each corner.
- Score every heart in the middle.
- Cut the unwated part around the hearts.
- Fold the sides.
- Fold the hearts in the middle.
How do you make a memory box?
- Pick a memory box theme. What kind of memory box do you want to make? …
- Choose a box. The next step is to choose a box. …
- Decorate your box. If you are going the DIY memory box route, then you can now decorate your memory box! …
- Put stuff inside your box. …
- Organize your memory box.
An explosion box decorated for a birthday | DIY guide
- Article author: www.cchobby.com
- Reviews from users: 2758
 Ratings
 - Top rated: 3.4
- Lowest rated: 1
- Summary of article content: Articles about An explosion box decorated for a birthday | DIY guide Updating …
- Most searched keywords: Whether you are looking for An explosion box decorated for a birthday | DIY guide Updating See the creative idea for An explosion box decorated for a birthday and follow the free guide | Make your own An explosion box decorated for a birthday and order the materials for low online prices here
- Table of Contents:
Shortcuts
About Creativ Company
Information
Customer service
Exploding Box! – An article about things that you’ll usually find inside it : hika_lyra — LiveJournal
- Article author: hika-lyra.livejournal.com
- Reviews from users: 39094 Ratings
- Top rated: 4.5
- Lowest rated: 1
- Summary of article content: Articles about Exploding Box! – An article about things that you’ll usually find inside it : hika_lyra — LiveJournal Updating …
- Most searched keywords: Whether you are looking for Exploding Box! – An article about things that you’ll usually find inside it : hika_lyra — LiveJournal Updating Oh no, dont call the police, I did not put a bomb in a box. Nope, exploding box is not the same as cube-shaped bomb. So, this post wont explain about wires, timers, explosions, and such. So, what is an exploding box? Well, if you dont know, this gif might explain it: An exploding box…Oh no, dont call the police, I did not put a bomb in a box. Nope, exploding box is not the same as cube-shaped bomb. So, this post wont explain about wires, timers, explosions, and such. So, what is an exploding box? Well, if you dont know, this gif might explain it: An exploding box…
- Table of Contents:

DIY Exploding Box for Beginners – YouTube
- Article author: www.youtube.com
- Reviews from users: 43197 Ratings
- Top rated: 3.7
- Lowest rated: 1
- Summary of article content: Articles about DIY Exploding Box for Beginners – YouTube Updating …
- Most searched keywords: Whether you are looking for DIY Exploding Box for Beginners – YouTube Updating In our today’s master class for beginners, we’ll show how to make an exploding box. This stylish box will become an original gift for your friends and family…explosion box, magic box, paper crafting, diy explosion box, exploding box card, How-to (hobby), do it yourself (hobby), exploding box tutorial, exploding box scrapbook, DIY Crafts Tutorials, Explosion Box, surprise box, gift box, explosion box tutorial, explosion box ideas, explosion box card tutorial, how to make explosion box
- Table of Contents:
Exploding Box DIY Printable Template | The Dating Divas
- Article author: www.thedatingdivas.com
- Reviews from users: 31964 Ratings
- Top rated: 4.4
- Lowest rated: 1
- Summary of article content: Articles about Exploding Box DIY Printable Template | The Dating Divas Updating …
- Most searched keywords: Whether you are looking for Exploding Box DIY Printable Template | The Dating Divas Updating A super easy DIY explosion box tutorial with detailed instructions, ideas and a printable template! Learn how to make your own exploding card!
- Table of Contents:
What is an Explosion Box
DIY Exploding Box Step-By-Step Tutorial
Exploding Picture Box Supplies
How to Make an Exploding Picture Box
Extra Exploding Gift Box Ideas
You Might Also Like
Amazon.com
- Article author: www.amazon.com
- Reviews from users: 38032 Ratings
- Top rated: 4.8
- Lowest rated: 1
- Summary of article content: Articles about Amazon.com Updating …
- Most searched keywords: Whether you are looking for Amazon.com Updating
- Table of Contents:
Explosion Box DIY Instructions – Chaotically Yours
- Article author: chaoticallyyours.com
- Reviews from users: 9612 Ratings
- Top rated: 4.9
- Lowest rated: 1
- Summary of article content: Articles about Explosion Box DIY Instructions – Chaotically Yours Updating …
- Most searched keywords: Whether you are looking for Explosion Box DIY Instructions – Chaotically Yours Updating Learn how to make your own unique DIY explosion box. This unique and thoughtful gift explodes with memories as soon as you open it.
- Table of Contents:
What Is An Explosion Box
Explosion Box Supplies
Folding Your Box
Explosion Box Layers
Hexaflexagons
Making The Top
Materials
Tools
Instructions
How to Create a DIY Photo Explosion Box: Step-by-Step: MyPostcard blog
- Article author: blog.mypostcard.com
- Reviews from users: 7675 Ratings
- Top rated: 3.6
- Lowest rated: 1
- Summary of article content: Articles about How to Create a DIY Photo Explosion Box: Step-by-Step: MyPostcard blog Although the beautifully decorated shop windows in the city center are filled with countless gift eas, the spark doesn’t always materialize. …
- Most searched keywords: Whether you are looking for How to Create a DIY Photo Explosion Box: Step-by-Step: MyPostcard blog Although the beautifully decorated shop windows in the city center are filled with countless gift eas, the spark doesn’t always materialize. Personal & exciting: The homemade DIY Christmas explosion box is the perfect gift for someone who has it all. Here’s your step-by-step guide.
- Table of Contents:
A personalized DIY gift idea for Christmas – The Explosion Box
What is an Explosion Box
Things you‘ll need
How to make your own Explosion Box
The ideal personalized Christmas gift
About the author
Explosion Box Ideas – Etsy
- Article author: www.etsy.com
- Reviews from users: 44789 Ratings
- Top rated: 3.3
- Lowest rated: 1
- Summary of article content: Articles about Explosion Box Ideas – Etsy Check out our explosion box eas selection for the very best in unique or … Valentine’s Day Explosion Card DECORATIONS Cutting Project (Please read full … …
- Most searched keywords: Whether you are looking for Explosion Box Ideas – Etsy Check out our explosion box eas selection for the very best in unique or … Valentine’s Day Explosion Card DECORATIONS Cutting Project (Please read full … Check out our explosion box ideas selection for the very best in unique or custom, handmade pieces from our shops.
- Table of Contents:
Find something memorable
join a community doing good
PRINCESS CASTLE Exploding Box SVG Instant Download Svg Project for Cricut ScanNcut Silhouette Assembly video included 3d svg cut
explosion box 15th 15th birthday card cut file15 birthday cardsvg cards15th birthday cardlayered cardcricutsilhouette
3D Personalized Pink and Silver Wedding Explosion Box with Heart Shaped Box
Explosion Gift Box DIY Photo Album Scrapbook for Birthday Anniversary Wedding Proposal Hexagon Black Valentine’s Day Gift Idea
3D wedding card Wedding explosion box Folded wedding card Wedding gift idea Wedding gift box Wedding cake card Exploding wedding box
Birthday gift ideas Explosion Box for mom sister wife daughter brother husband exploding box pop up card
Flower Explosion Box – Paper Flower – 3D Card – Templates – Video Tutorial – Instant Download – SVG – Silhouette – Scan&Cut – 3D – DIY
Personalised explosion box Anniversary gift for boyfriend girlfriend husband wife birthday Gift For Mom Multi layer photo box
Boyfriend Gift Box Explosion Gift Box 1 Year Anniversary Gift for Boyfriend Fiance Gift for Him Explosion Box Miss you Gift
The perfect gift for Valentine’s Day Birthday Wedding Day Love Box Explosion Box for Lovers and All Others
Explosion gift box (5 layers) DIY Photo Album Anniversary Exploding Gift Box for boyfriend husband birthday gift
Explosion Box Gender Reveal Surprise Box 1st Birthday Baby Shower Baby Gifts Oh Baby Personalized Gift Party Decor Sweet 16
Exploding Surprise Photo Box 1st Anniversary Couple Gift Fiance Boyfriend Birthday Explosion Gifts For Him Her
Explosion Photo Box – Personalized Explosion Gift Box – Hexagon Explosion Box Kit – Bestfriend Gift Box – Girlfriend Valentines Birthday
EXPLOSION BOX for BABY Girl or Boy- Baby Shower – Gender Reveal – Welcome Baby – Baby Explosion Card for Girl or Boy – Birth Announcements
Explosion Gift Box DIY • 2 to 8 Layer Photo Box • Make your own Anniversary Birthday Graduation Mother’s Day Father’s Day Christmas Box
DIY Explosion Box Three Tier multicolor Clearance boyfriend girlfriend gift holiday
Birthday Explosion Box; Birthday milestone 3d card; Explosion card; Birthday 3 dimensional card; 50th birthday box; Pop up birthday card
Explosion Box – Baby in Green
Explosion Box Gift Idea Shabby Pink Exploding Ephemera Mother’s Day Gift Junk Journal Kit Mini Book Printable Digital Kit Download
Creative Surprise Explosion Gift Box Creative Album Surprise for Birthday Valentine’s Day Gift
Explosion Gift Box DIY Photo Album Anniversary Exploding Gift Box for Boyfriend Girlfriend Wife Husband Birthday Gift Surprise Unique Gift
Explosion Box
Mother’s Day SVG 3D Box Cricut Template Mother’s Day Explosion Box Laser Cut File Happy Mother’s Day Silhouette Cameo Gift for Mom AI DXF
Gender Reveal White Exploding Gift Box With Flying Butterflies
Explosion shirt tshirt t shirt tee Nuclear Graphic Design shirt Science geek Nerdy Cool Illustration Unisex shirt Gift idea for Men
Explosion Box Template 5x5x5 Exploding Endless Gift PDF SVG DXF Eps Png Jpg Die Cut Cricut Silhouette ScanNCut Pazzles Tutorial Instruction
Valentine’s Day Explosion Card DECORATIONS Cutting Project (Please read full description and store policies before purchase)
Black explosion box several sizes and 3 layers with heart corner for special occasion photo box or suprise box personalized gift box
Father’s Day Explosion Box Father’s day gift box unique gift for father in law gift from daughter fathers day gift from daughter
SVG Exploding Box SVG Fun Project Scalable to Any Size
Baby Girl Explosion Box
Love Heart Red & Black Exploding Gift Box – Explosion Gift Box – INCLUDES FREE GAME – Valentine’s Day Gift – Cardstock
Elegant Gray Linen Rose – Hexagonal Heart Exploding Box – Large & small exploding box – PDF File Printable – Unique design by Simply D Rave
EXPLOSION BOX BABY Shoes baby shoes explosion box gender reveal baby shower
Explosion Box Gender Reveal
Personalised Love Photos and Quotes Gift Explosion box I Love You AnniversaryBirthday gift for fiancée husband wife boyfriend
Personalised Photo Box – Pop out Heart Box – Bridesmaid – Birthday Gift for Friends & Family – Wedding Favour
Explosion Box Magic Winter
Customizable explosion box
Common questions
Footer
Update your settings
Required Cookies & Technologies
Personalized Advertising
See more articles in the same category here: https://chewathai27.com/toplist.
Exploding Box! – An article about things that you’ll usually find inside it
Usually people use exploding box as a gift for their loved ones, filling the insides with photos, wishes, pictures, and sometimes prin-outs of their screenshot messages. It is quite easy to make them, and you’ll find a lot of exploding box videos in youtube (and I’m going to upload one next week!). I won’t discuss how to make and exploding box in here, but I’ll discuss what are the insides of an exploding box.
I’ve made two exploding boxes, one is very simple, and the other, hmm not so much. Here’s the picture of my first exploding box:
How the box looked like:
When it is opened:
I use that box ^ as a wrapping box for my friend’s present and as a card that contains the wishes. As you can see from the picture above, every side of the cube have a paper which me and my friends wrote on it.
Well, that looks simple and easy.
But, it is indeed a simple exploding box.
Most of people make interseting crafts inside the exploding box. And some are kinda complicated and need a hand that is handy with scissors or cutters… And most of exploding boxes that I found on youtube are very creative. So I make this article to help some people find ideas of what to put inside their exploding box, because oh man, finding an idea could rack one’s brain.
Here’s the list of the things that you’ll usually find inside an exploding box:
1. Waterfall card
Instead of pictures, you can change it with photos of your beloved ones. And this is a link to a youtube tutorial (not mine!): https://youtu.be/15OfdFi_wZY
2. Double-slider card
Here’s a link to a youtube tutorial: https://youtu.be/c3YiFmyyp00
3. Pockets
With those pockets, you can put your wishes inside, or more photos 😀
4. Endless card
Usually people use this to convey short messages. It is really cute! You can see a tutorial in here: https://youtu.be/gTK4ZIzpkv8
5. Slider card
This is a normal slider card, not as mind-blowing (hmm) as double slider but it is still fun and cute :D. Here’s a tutorial link: https://youtu.be/7sx5znEnzzE and https://youtu.be/S0Q-lnbqw9U
6. Flower envelope card/origami
There are more kinds of this card with other shapes, you can write a message inside the flower 😀
7. Spinning pull card
Tutorial: Well, i don’t exactly found this in an exploding box videos that I’ve watched, but still, this is a great idea!Tutorial: https://youtu.be/KebfQv3fILQ
8. Shaker card
It is fun to shake it! XD
(There’s so much of this type in youtube, just type ‘shaker card’ and you will a lot of kinds of it easily :D) Tutorial: https://youtu.be/-bOl_NzMIoc (There’s so much of this type in youtube, just type ‘shaker card’ and you will a lot of kinds of it easily :D)
There’re much more ideas to make, such as a maze, pop-up pictures, and many more. Here’s a playlist of my favourite exploding boxes:
That’s all folks! I hope this post inspire you 😀
P.S. The gifs I use in this article are not mine! And some pictures are not mine either.
Step-by-Step Guide for How to Make a DIY Explosion Box
What is an Explosion Box?
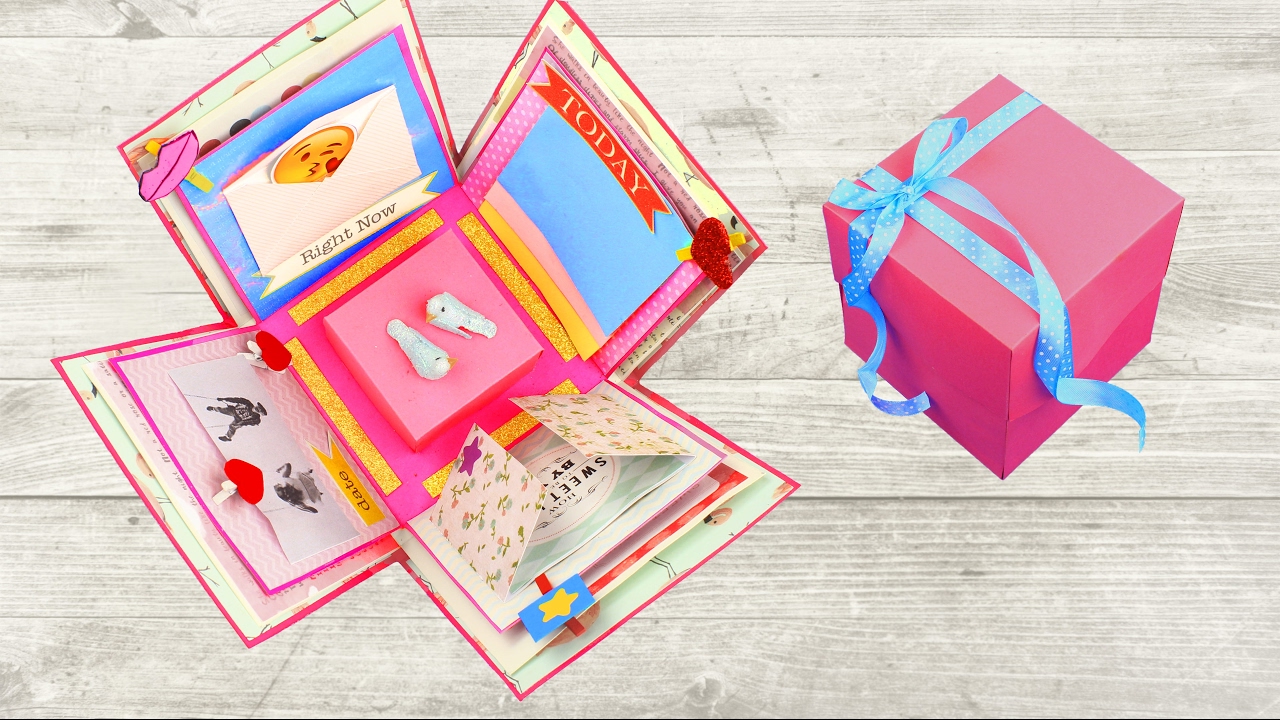
An exploding picture box is a way of taking a typical, boring card to the next level! Basically, a DIY explosion box is a gift in and of itself! How fun, right? The gift is a little box that when the lid is removed, the box sides “explode” out with over twenty sides to cover in creative ways. Think pictures, doodles, sweet love notes, and even stickers!
The good news? We have made creating your own DIY exploding box super easy with step-by-step instructions, ideas, and even templates! Don’t spend a dime and instead use our FREE printable exploding box template to make your own picture box! We PROMISE it is easier than it looks, and the receiver will LOVE it!
DIY Exploding Box Step-By-Step Tutorial
Ready to make something meaningful, but also quick and easy? This DIY surprise box looks complicated, but it is easy as can be! With our free templates, and the fact that you don’t even have to buy fancy paper or measure anything, you’ll have an adorable explosion box in no time! Just print, cut, glue, and personalize! We have made it super easy for you to make these exploding cards! You’re welcome! 😉
Step-by-step tutorial for creating a DIY explosion box.
By the way, this explosion box gift idea is so easy to whip up, you’ll be glad you saved the money and made it by hand. Certainly, there are many options for buying an exploding box, but why waste the money when handmade gifts are more personalized and more special?
Free printable exploding box card.
The explosion box is packed with all of your love and memories! Let’s make one!
Disclaimer: This post contains affiliate links. To learn more about ’em, click here
Exploding Picture Box Supplies
When making your own box card, you will need to grab the following supplies:
How to Make an Exploding Picture Box
Exploding cards are cheap, cute, clever, and much more meaningful than a regular card. In a single box card, you have created a meaningful gift that can be kept forever! So, let’s get to it! Here’s exactly how to make an explosion box.
Step 1: Print the Templates
Download and print the free PDF printables from the link at the bottom of this page. Your explosion box templates will include three slightly different sized layers, a lid, and an outside layer. All of these pages are pre-measured and labeled so all you need to do is print and cut them out.
Printable templates for creating a DIY surprise box.
Step 2: Fold Your Explosion Box
Carefully fold each of the square edges of the box card template. We made it super easy for you to see where to fold by changing up the color for each square. You can use a ruler to make your lines crisp and straight. Keeping everything as straight as possible will be very important in this project.
Step 3: Glue the Layers Together
Now, you need to put all of your layer pieces together. Start with layer 3 on the very bottom and position layer 2 so that it is nestled on top of layer 3. Use adhesive to glue the backside of the center white square of layer 2 to the front side of the center white square of layer 3.
Assembling your explosion box DIY project.
Do the same steps to attach layer 1 to layer 2. Make sure that they are centered nicely and fold the sides in again.
Step-by-step guide for creating an explosion box DIY card.
Step 4: Assemble the Outer Shell of the Box
In order to have your explosion gift box be colorful on the outside as well as the inside, we have one more layer for you. Apply adhesive to the entire backside of the outside layer and carefully press the outside layer onto the backside of the most bottom layer of your box (layer 3).
Picture box creation DIY.
This will give layer 3 a two-sided look and give your box a fun pattern (even when it is closed.) ***Important note: If you are using your own paper and it has color on both sides, you can skip this step.
Colorful, DIY surprise box for a birthday or anniversary gift.
Step 5: Make Your Explosion Gift Box Lid
Finally, you will want to make the lid to be able to close your box. Go ahead and fold along all of the lines distinguished by a new color/pattern. Then, apply adhesive to each of the pink squares.
Gift Box Lid Tutorial
Now for the trickiest part of all. Take a pink corner square and pinch it so that the patterned sides come together and the adhesive presses the two pink sides together. This will convert the pink square into a small triangle on the inside of the box. Secure with a paper clip until the adhesive dries and repeat with the three remaining pink corner squares.
How to make a gift box lid.
Now, fold the sides of your exploding box toward the center and place your lid on top to hold it all in. When that lid is removed it should all explode out!
Explosion box DIY gift idea for him or for her.
Step 6: Personalize Your Explosion Box
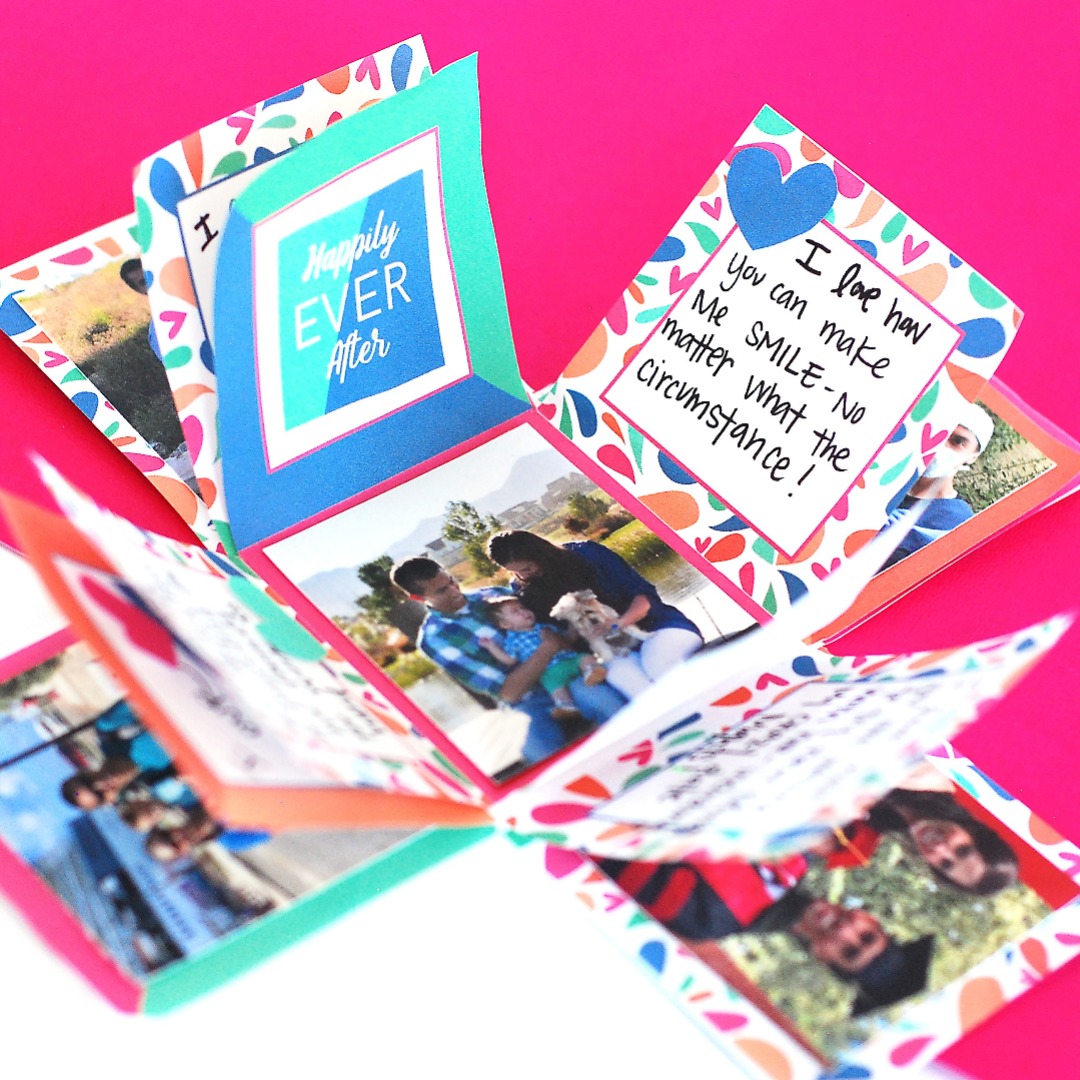
Now it is time to personalize your explosion box card! This is what I love most about this card. This isn’t a card from the store that has one distinct place to write a message. This unique love note has twenty different flaps that you can customize with special pictures, mementos, or personal messages from you – whatever YOU want to make it special.
Interactive elements and decorations for your DIY explosion box.
To really give your project that extra special touch, we have created several interactive elements and printable decorations for you that you can add to the flaps of your love note. The sweet phrases and images are easy to add and will give your DIY surprise gift box a finished, cohesive look (printable linked below!)
Free printable card ideas for special occasions.
Extra Exploding Gift Box Ideas
I just love the uniqueness of this gift / card, but also all of the options. The possibilities for what you could do with this box are endless! You could make an explosion box card for just about any special occasion: birthday, anniversary, Valentine’s Day—you name it! You could even do this “just because” as a way to say “I love you.”
Unique, affordable, free, cute, DIY gift idea.
For the record, the possibilities are endless for what you can add to the sides of your explosion box. The first exploding box card that I ever made, I wrote something I loved about my spouse on about half of the flaps and the other flaps I placed pictures of us together. This time, I tried to write things I love about him as well as favorite memories that we have shared together (to coordinate with the pictures!).
Love note in the form of a DIY surprise box.
We hope you enjoyed making your DIY explosion box! See, it wasn’t so bad, was it? 🙂
Now that you have made your own explosion box, let’s find you more great ideas. If you are on the hunt for more simple, creative ideas for showing someone love, check out our:
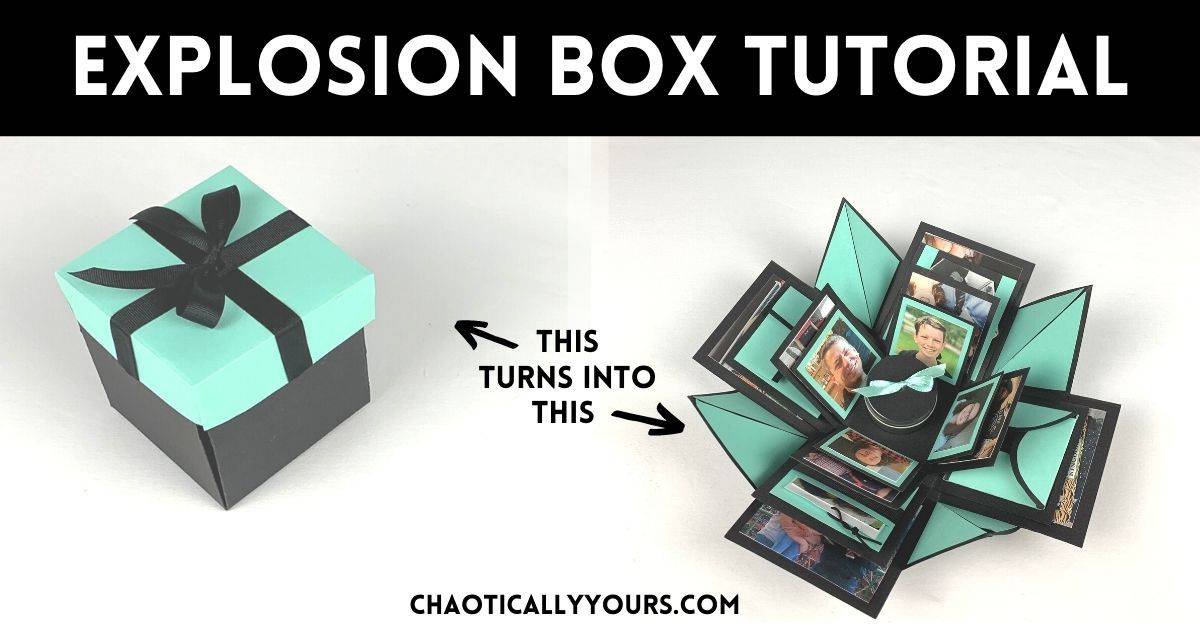
Explosion Box DIY Instructions
In today’s post, I’ll teach you how to make an explosion box: a unique personalized gift that bursts open with photos and memories as soon as you open it!
I’m always looking for fun and unique gift ideas, especially for family members. I always feel like I’m struggling to find the perfect gift for the “person who has everything.”
That’s why when I came across the idea for a DIY explosion box (also known as an explode box or an exploding memory box) , I got super excited. The simple concept of an exploding box full of memories would be the perfect gift for so many people on my list!
Links in this post may be affiliate links, which means I may earn a commission if you make a purchase from any of them, at no additional cost to you. You can find out more information by reading my full disclaimer.
What Is An Explosion Box?
An explosion box is an origami box that pops open and “explodes” as soon as the recipient takes the top off, revealing pictures, messages, and even gifts inside. It’s a bigger version of our Explosion Cards project.
There are SO many ways you can use this DIY exploding box. Birthdays, anniversaries, graduations, prom-posals and even engagements could be celebrated with an explosion box.
The personalization aspect of the project is what makes it so versatile! I’ve even seen people make fandom explosion boxes for things like Harry Potter or Star Wars. The possibilities really are endless with this one.
Made from some pretty basic supplies and some simple origami techniques, explosion boxes are surprisingly easy to put together. I’m happy to spill all the details about how to make an explosion box.
Explosion Box Supplies
To make an exploding box you’ll need a few basic things:
I was able to find all the supplies I needed at my local craft store, but they’re also available on Amazon as well.
If you’ve ever been a scrapbooker, this project is a great way to use up some of those older supplies you still have lying around.
Folding Your Box
You’ll want to start your explosion box by folding a piece of 12 x 12 cardstock into a box.
In order to do this, you need to fold flaps at 4 inches in on each side of the card stock, making 9 smaller 4×4 inch squares on the page. The video below should give you a good idea of how to accomplish this.
I used my rotary blade cutting mat from my sewing supplies to help me measure accurately. If you have one, I highly recommend using it for this project.
In the video, I just used a ruler and my fingers to fold the box, but a scoring tool would come in very handy here. I actually found one at my local dollar store after I finished this project.
After you have your cardstock folded into 9 squares, you need to create the corners. To do this, simply bring the folded edge of each corner together, pinching the excess cardstock into a triangle on the inside of the box. Again, see the video below.
After you have your corners folded, you can trim them to give the box a better effect. For this project I made star tips by drawing a line from the tip of the angular fold to the center of the adjoining fold of one of the smaller squares.
I then trimmed along the line and the edge of the box to create a point effect.
I’ve also seen explosion boxes where people made hearts out of the corners as well. This is a super cute effect that is easily achieved as well.
Explosion Box Layers
After you have the first layer of your explosion box complete, you’ll want to cut and fold additional layers for the inside. Each layer should be smaller that the last, to give that exploding box effect to the project.
I made a four layer box, cutting each layer 1.5 inches smaller than the last. You could use smaller increments if you’d like to include more layers. It’s completely up to you.
You just want to make sure you fold each layer into the 9 square pattern like the outside layer, just adjusting your measurements appropriately.
For the sake of explanation, let’s pretend you’re making a four layer explosion box just like I did.
For my box, here’s how I set up the layers:
Outside of the box: 12 inch x 12 inch – folds every 4 inches
Layer #2: 10.5 inch x 10.5 inch – folds every 3.5 inches
Layer #3: 9 inch x 9 inch – folds every 3 inches
Layer #4: 7.5 inch x 7.5 inch – folds every 2.5 inches
After you’ve folded all your layers, you’ll want to cut the corner boxes out of your three inside layers, giving you a plus shape.
When you have all your layers cut, place them on top of each other, gluing the centers together as you go. You’re finished explode box should look like this:
Now that it’s all assembled, you can get to the fun part! You’ll be decorating your explosion box!
You’ll want to gather pictures and memorabilia to place inside your box. I didn’t want to use original prints for my photobox, so I scanned and printed some digital photos I had on my computer onto some card stock.
This way I could cut them to the exact sizes I needed without ruining the only copy I had of some photos.
After trimming them to the appropriate size, I glued them inside the box flaps.
I used a complimentary color card stock and ribbons to do most of the other my decorating. Instead of elaborate prints or tons of color, I chose to use origami methods on four of the flaps in my explosion box diy project.
I used this basic overlapping fold technique twice in the box, once with curved edges and once with square ones. This basically works by just folding the pieces over each other like you would to loosely close a box.
I also did a little pull out pocket that I really love. I folded a piece of cardstock to create the pocket and glued the sides together. Then I decorated it with a little piece of ribbon.
I attached the picture to another piece of car stock and put a pull cord on it with a small piece of thin black elastic cording.
It turned out so cute!
Hexaflexagons
The last origami technique I used in my DIY explosion box was the most complicated.
I used a geometric origami shape called a Hexaflexagon to make an infinity loop of pictures. You can see it demonstrated in the video at the top of the page, but it turned out really cool!
First I made a hexaflexagon out of copy paper. I have an entire tutorial about how to make a Hexaflexagon. They’re really cool, versatile origami infinity loops.
Once I had my hexaflexagon made, I cut three pictures to fit inside of the shape. I then cut the pictures each into three diamond shape parts and glued them to the loops inside the hexaflexagon.
It took a little trimming and finagling to make sure it came out right, but the end result was totally worth it. Seriously, watch the demo video to see how cool it is!!
I then cut two small strips of card stock and glued them to the sides of the appropriate flap, creating little straps inside the explosion box.
I just slipped the hexaflexagon underneath those straps so it would be held in place and easily removed when you want to look at it.
After I’d decorated all the panels of my explosion box, I placed a small tin from the dollar store decorated with a little bow right in the middle to be used for a small gift. I’ve also used tiny bottles and other cool items in the center, but this time I wanted to keep it simple.
Making The Top
The final step for your explosion box is to make the top. This part can be a little tricky because your measurements need to be exact.
For my top, I cut a 7 inch x 7 inch square and then fold it 1 & 3/8ths (one and three eighths) of an inch in on each side.
Lucky for you, I made a printable for you to use! You can just print it directly on to an 8.5 x 11 inch piece of card stock and fold accordingly.
You can download the printable by clicking the link below:
Explosion Box Lid
For the sides, just use the same folding technique as the bigger box, just glue the folds to the side instead of trimming them.
I decorated the top of my explode box with some ribbon and a nice simple bow.
And now you have your finished explosion box! Don’t you love it!!!??? I would love to see your versions! Share them on my facebook page!
Here’s a FREE, condensed, printable version of this tutorial!
Yield: 1 box Explosion Box DIY Instructions Print Make this one of a kind DIY Explosion box using just a few simple materials. Active Time 2 hours Total Time 2 hours Difficulty Easy Estimated Cost $7.00 Materials Several sheet of 12 x 12 cardstock
Complimentary scrapbook paper
Pictures
Decorations (I used ribbons and tin boxes, but you could use paper flowers, small bottles, whatever you like) Tools Scissors
A glue stick
A paper cutter (optional)
A scoring tool (optional) Instructions Fold one piece of 12×12 inch cardstock in 4 inch increments, creating nine 4 x 4 inch squares. Bring the edges of the folded corners together to create a triangle. Do this on each corner. Trim triangles to desired shapes (hearts, start points, etc.) Make several smaller versions of this shape with the ratio of 3:1 measurements (i.e. 12 x12 inch paper with nine 4×4 inch boxes, 9×9 inch paper with nine 3×3 inch boxes, etc.) For each smaller box, cut off the corner squares, creating a plus shape. Nest each layer inside each other, gluing together between layers. Decorate as desired. Make top from the printable on the original post (https://chaoticallyyours.com/explosion-box/) Fold top according to instructions and glue side folds to the inside. Decorate top. Pull up the sides of the box and place the lid on top.
How To Make An Explosion Box
So you have finished reading the how to decorate an explosion box topic article, if you find this article useful, please share it. Thank you very much. See more: how to decorate explosion box for birthday, how to put together an explosion box, explosion box ideas for anniversary, explosion box ideas for mother’s day, diy cake explosion box, explosion box gift, explosion box ideas for girlfriend, exploding card box