
You are looking for information, articles, knowledge about the topic nail salons open on sunday near me how to draw yourself as a disney princess on Google, you do not find the information you need! Here are the best content compiled and compiled by the Chewathai27.com team, along with other related topics such as: how to draw yourself as a disney princess how to draw like a disney artist, disney princess drawing style, how to draw disney style pdf, how to draw disney style male, how to draw disney princess, draw like disney, how to draw disney style animals, how to draw disney hair
Contents
How do you make yourself look like a Disney princess?
…
To make your image more Elsa-like, follow these steps:
- Download the YouCam Perfect app.
- Click Edit.
- Tap Animation.
- Select Wraparounds.
- Choose the Ice effect.
How do I make myself a princess?
- Wear Beautiful dresses/ skirts. …
- Treat yourself some Beautiful Flowers. …
- Write Beautiful Poems in your Diary. …
- Spritz yourself with your favorite perfume. …
- Wear a Beautiful Pink Ribbon in your hair. …
- Drink your tea from your favorite teacup.
How do you become a princess in 7 days?
How to be a Princess in 7 Days or Less Hardcover – October 13, 2005. In this sparkly gift book, Princess Emily tells every little girl how she can become a princess. Her simple seven-day makeover plan includes fashion and beauty advice, etiquette, and decorating tips.
Why is Anna not a Disney Princess?
The Disney Princesses are a magical group, but ultimately they boil down to a merchandise and film franchise from a business perspective. Frozen is its own merchandise and film franchise. Basically, Anna and Elsa aren’t princesses because they’re plenty profitable on their own!
How can I be like a princess at home?
Behaving like a princess is about more than just using your manners. Princesses are strong women who use their courage and intelligence to help others. Princesses boldly face responsibility, all the while letting their inner beauty bring light to everyone around them.
How can I turn my face into a Disney character?
- Download Voilà AI Artist from the app store.
- Choose “3D Cartoon”
- Upload a picture or take a photo of yourself.
- Save the photo to your camera roll and upload it to Instagram or Facebook.
How do you get a Disney face?
To open the lens, Snapchat users can go to the camera screen and click the smiling face icon to the right of the camera button. A search bar will appear in the bottom right corner of the screen, in which, if you type cartoon, the lenses will appear.
How do you turn a picture into a Disney character?
- Download Voilà AI Artist from the app store.
- Choose “3D Cartoon”
- Upload a picture or take a photo of yourself.
- Save the photo to your camera roll and upload it to Instagram or Facebook.
What is the Disney Face app?
Snapchat has released a new Cartoon 3D Style lens that lets users turn their selfies into Disney or Pixar characters. It changes your face into a modern-day princess. Many Snapchatters have used this lens globally, according to the business, and it has been watched over 1.7 billion times, said reports.
What is my princess?
My Princess (Korean: 마이 프린세스) is a 2011 South Korean romantic comedy television series, starring Song Seung-heon, Kim Tae-hee, Park Ye-jin, and Ryu Soo-young. It aired on MBC from January 5 to February 24, 2011 on Wednesdays and Thursdays at 21:55 for 16 episodes.
Best App to Turn Yourself Into a Disney Princess: 5 Photo Effects | PERFECT
- Article author: www.perfectcorp.com
- Reviews from users: 22615
 Ratings
 - Top rated: 3.5
- Lowest rated: 1
- Summary of article content: Articles about Best App to Turn Yourself Into a Disney Princess: 5 Photo Effects | PERFECT Updating …
- Most searched keywords: Whether you are looking for Best App to Turn Yourself Into a Disney Princess: 5 Photo Effects | PERFECT Updating Make your childhood dream come true and turn yourself into a real life Disney princess with Disney princess filters using YouCam Perfect photo editing app.
- Table of Contents:
Best App to Disney Yourself with Disney Princess Photo Effects
Making Your Disney Princess Photo Editing Dreams Come True
Download YouCam Perfect The Best App to Turn Yourself Into a Disney Character

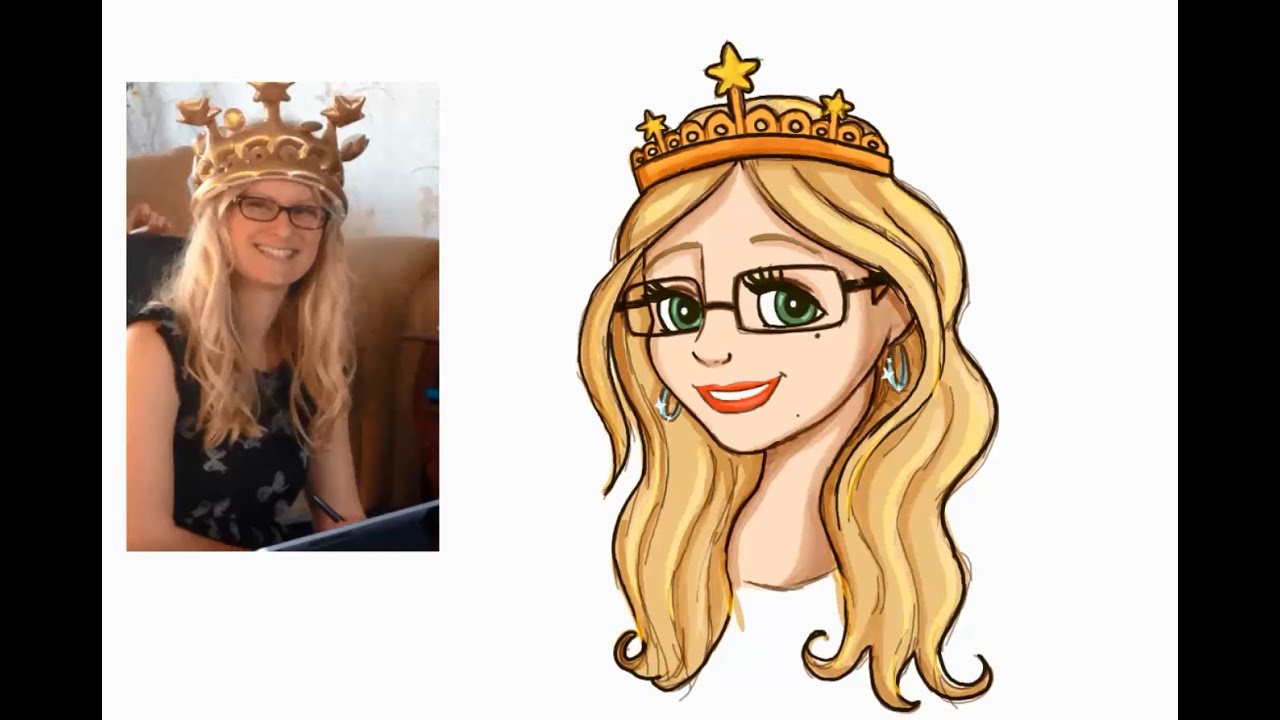
🎨 How to Draw YOURSELF as a DISNEY PRINCESS 👸 👑 – Drawing Tutorial – YouTube
- Article author: www.youtube.com
- Reviews from users: 46635 Ratings
- Top rated: 4.4
- Lowest rated: 1
- Summary of article content: Articles about 🎨 How to Draw YOURSELF as a DISNEY PRINCESS 👸 👑 – Drawing Tutorial – YouTube Updating …
- Most searched keywords: Whether you are looking for 🎨 How to Draw YOURSELF as a DISNEY PRINCESS 👸 👑 – Drawing Tutorial – YouTube Updating Follow these easy steps and learn how to draw yourself as a Disney Princess. This drawing tutorial will help you draw a Disney style face that you can tweak …draw yourself as a disney princess, how to draw disney princess, disney drawing tutorial, animationamy, draw disney face, how to draw faces, how to draw cartoon, draw self, draw yourself, disney princess, disney princess drawing, draw disney princess, how to draw cartoon faces, draw cartoon character, how to draw disney style, draw disney style, how to disney style, drawing myself, drawing disney, drawing tutorial
- Table of Contents:
20 WAYS TO INSTANTLY MAKE YOURSELF FEEL LIKE A PRINCESS AT HOME..
- Article author: www.la-vania.com
- Reviews from users: 2580 Ratings
- Top rated: 4.3
- Lowest rated: 1
- Summary of article content: Articles about 20 WAYS TO INSTANTLY MAKE YOURSELF FEEL LIKE A PRINCESS AT HOME.. Updating …
- Most searched keywords: Whether you are looking for 20 WAYS TO INSTANTLY MAKE YOURSELF FEEL LIKE A PRINCESS AT HOME.. Updating I am very excited to share this post with you today. I don’t know why but one of the things that always makes me so happy is if I treat myself like a princess and I believe that with these tips you can truly feel like a princess and you can do it at any budget.. I think that especially with everything that’s going on in the world it’s so important to take care of yourself to feel happy and to do the things you love. I am a firm believer that every girl, every woman is a princess. And with these
- Table of Contents:

How to Draw Rapunzel from Tangled | Disney Princess – YouTube
- Article author: www.youtube.com
- Reviews from users: 1204 Ratings
- Top rated: 3.2
- Lowest rated: 1
- Summary of article content: Articles about How to Draw Rapunzel from Tangled | Disney Princess – YouTube Updating …
- Most searched keywords: Whether you are looking for How to Draw Rapunzel from Tangled | Disney Princess – YouTube Updating Rapunzel’s an amazing artist, and with the help of Walt Disney Company artist Kim Kha, you can be one too! Watch and draw along as Kim shows you how to draw …disney, disney princess, disney princesses, princess, dream big, dream big princess, Pocahontas, Merida, Pixar, Brave, Frozen, Anna, Tiana, The Princess and The Frog, Belle, Beauty and the Beast, Tangled, Rapunzel, Ariel, The Little Mermaid, Mulan, Jasmine, Aladdin, tangled, how to draw rapunzel, draw tangled, tangled song
- Table of Contents:

🎨 How to Draw YOURSELF as a DISNEY PRINCESS 👸 👑 – Drawing Tutorial – YouTube | Disney princess drawings, Princess drawings, Drawing tutorial
- Article author: www.pinterest.com
- Reviews from users: 5997 Ratings
- Top rated: 3.9
- Lowest rated: 1
- Summary of article content: Articles about 🎨 How to Draw YOURSELF as a DISNEY PRINCESS 👸 👑 – Drawing Tutorial – YouTube | Disney princess drawings, Princess drawings, Drawing tutorial Updating …
- Most searched keywords: Whether you are looking for 🎨 How to Draw YOURSELF as a DISNEY PRINCESS 👸 👑 – Drawing Tutorial – YouTube | Disney princess drawings, Princess drawings, Drawing tutorial Updating Jun 9, 2020 – Follow these easy steps and learn how to draw yourself as a Disney Princess. This drawing tutorial will help you draw a Disney style face that you can tweak …
- Table of Contents:

How to Draw in the Disney Style: 7 Steps (with Pictures) – wikiHow
- Article author: www.wikihow.com
- Reviews from users: 24345 Ratings
- Top rated: 3.7
- Lowest rated: 1
- Summary of article content: Articles about How to Draw in the Disney Style: 7 Steps (with Pictures) – wikiHow Updating …
- Most searched keywords: Whether you are looking for How to Draw in the Disney Style: 7 Steps (with Pictures) – wikiHow Updating You may cry during Frozen, laugh hard in every single minute of Tangled, or get a thrill from the excitement of Big Hero 6. If the Disney animations are near and dear to your heart, you may want to learn how to draw like them. Start with…
- Table of Contents:
Steps
Download Article
Community Q&A
Tips
Things You’ll Need
You Might Also Like
About This Article
Did this article help you

Drawing Disney Characters – how to articles from wikiHow
- Article author: www.wikihow.com
- Reviews from users: 20086 Ratings
- Top rated: 3.3
- Lowest rated: 1
- Summary of article content: Articles about Drawing Disney Characters – how to articles from wikiHow Learn everything you want about Drawing Disney Characters with the wikiHow Drawing Disney Characters Category. Learn about topics such as How to Draw Mickey … …
- Most searched keywords: Whether you are looking for Drawing Disney Characters – how to articles from wikiHow Learn everything you want about Drawing Disney Characters with the wikiHow Drawing Disney Characters Category. Learn about topics such as How to Draw Mickey … Learn everything you want about Drawing Disney Characters with the wikiHow Drawing Disney Characters Category. Learn about topics such as How to Draw Mickey Mouse, How to Draw Minnie Mouse, How to Draw Disney Characters, and more with our helpful step-by-step instructions with photos and videos.
- Table of Contents:
How to Draw Disney Characters
- Article author: design.tutsplus.com
- Reviews from users: 17508 Ratings
- Top rated: 4.8
- Lowest rated: 1
- Summary of article content: Articles about How to Draw Disney Characters Updating …
- Most searched keywords: Whether you are looking for How to Draw Disney Characters Updating
Many people start drawing because they’re attracted by the look of their favorite characters—and in many cases, these favorite characters come from Disney movies. Disney style looks simple, yet… - Table of Contents:
1 Anatomy of a Disney Head
2 How to Draw a Disney Head
3 How to Draw Disney Eyes
4 How to Draw a Disney Nose
5 How to Draw Disney Lips
6 How to Draw Disney Hair
7 How to Draw a Disney Body
8 How to Draw a Real Disney Character
So Magical!
It needs a human touch
- Article author: www.fiverr.com
- Reviews from users: 16659 Ratings
- Top rated: 4.3
- Lowest rated: 1
- Summary of article content: Articles about It needs a human touch Updating …
- Most searched keywords: Whether you are looking for It needs a human touch Updating Complete the task and we’ll get you right back into Fiverr.
- Table of Contents:
~Draw yourself as a Disney Princess/Prince! :)~ | Disney Pin Forum
- Article author: www.disneypinforum.com
- Reviews from users: 10191 Ratings
- Top rated: 3.1
- Lowest rated: 1
- Summary of article content: Articles about ~Draw yourself as a Disney Princess/Prince! :)~ | Disney Pin Forum ~Draw yourself as a Disney Princess/Prince! … where people drew themselves as a WiR Sugar Racer… so let’s do Princes and Princesses now! …
- Most searched keywords: Whether you are looking for ~Draw yourself as a Disney Princess/Prince! :)~ | Disney Pin Forum ~Draw yourself as a Disney Princess/Prince! … where people drew themselves as a WiR Sugar Racer… so let’s do Princes and Princesses now! Hi everybody! :wavey: ^_^
I was thinking the other day how much I enjoyed fireheadfred’s thread where people drew themselves as a WiR Sugar Racer… so…
- Table of Contents:
See more articles in the same category here: https://chewathai27.com/toplist.
Best App to Turn Yourself Into a Disney Princess: 5 Photo Effects
A dream is a wish your heart makes … at least, that’s what the lyrics to a very famous Disney tune have us believe. We’re inclined to follow that mantra, especially when it comes to transforming ourselves into real-life Disney princesses. In the modern world, it’s not just a dream — it’s a reality, thanks to the best photo editing app, YouCam Perfect, that help make your vision come true.
Best App to Disney Yourself with Disney Princess Photo Effects
But can you really transform yourself into a Disney princess? Well, we’ll leave the dresses and glass slippers to you, but with YouCam Perfect app, you can definitely make some magic with your images. How? Let’s just say that YouCam Perfect makes it incredibly easy to add effects to photos and, well, Disney yourself!
5 Photo Effects to Recreate Disney Princess Characters
The app features five incredible photo effects that do all of the hard work for you — no actual costumes or professional-level photo editing skills needed. Here’s the lowdown, princess. Let’s get started!
1. Turn Yourself Into Princess Elsa: Magic Frozen Effect
Let it go? Not so fast, queen. If you’ve got visions of Elsa dancing through your head, hold them close. Using YouCam perfect, you can turn yourself into the stunning ice princess you know you are. The star of Disney’s Frozen is a vision in her ethereal blue gown and chunky white-blonde braid strewn delicately over a shoulder. Alongside Elsa, ice is the star of this show. To make your image more Elsa-like, follow these steps:
Download the YouCam Perfect app
Click Edit
Tap Animation
Select Wraparounds
Choose the Ice effect
Love the look of a snowy backdrop? Tap Weather under the Effects menu in Animation and add realistic snow effects to your image. Adjust the speed of the snowfall and select whether you’d like it to accumulate or not. The effect is dazzling and oh so very Elsa.
Read More: Make Your Social Media Pop with Animated Wraparound Effects
2. Turn Yourself Into Princess Jasmine: Moon Effect
Aladdin’s Jasmine reigns in her bright turquoise harem pants and matching crop top. It’s the iconic outfit that people instantly link to the 1992 hit animated film — and with good reason. Whether or not you’ve got your Jasmine costume ready, you can still make like the princess herself by following these easy directions:
Click Edit
Tap Animation
Select Effects
Choose the Moon effect under the Light menu
With its starry night sky and full moon, the animation transforms your image into a genuine Disney masterpiece that will have you feeling like the glamorous leading princess in no time. What more could you ask of a picture?
3. Turn Yourself Into Princess Ariel: Bubbles Effect
Going under the sea is surprisingly easy when you have a Disney character app at your disposal. Now you can make your childhood fantasy a reality by transforming your picture into Ariel from The Little Mermaid. A mermaid costume is a pretty good idea if you can swing it, but even without the clothes you’ve got yourself a decent replica when you follow these steps:
Click Edit
Tap Animation
Select Effects
Choose the Bubbles effect under the Summer menu
Little bubbles and gently lapping waves make this an especially cool and effective animation that lends your image that aquatic finishing touch that’s worthy of a second look.
4. Turn Yourself Into Princess Pocahontas: Misty Effect
When it was released in 1995, Pocahontas broke some barriers, namely because it was the first Disney animated film to feature a woman of color. While the movie didn’t depict historical events as they happened, it was also the first Disney film to tell a story rooted in history. If you want to honor the character, it’s easy to do so with YouCam Perfect.
Click Edit
Tap Animation
Select Effects
Choose the Fog effect under the Weather menu
Speed up the fog to lend your picture that truly misty finish, or take a more subtle approach with a slow fog that adds a haunting finishing touch to your image.
5. Turn Yourself Into Princess Mulan: Fire Photo Effect
Mulan is championed for her strength, outspokenness, courage, and resilience. She’s the antithesis of the typical Disney princess, making her a true icon in her own right. You can honor that fiery character and robust zest for life by using specialized photo effects to lend a touch of her spirit to your image.
Click Edit
Tap Animation
Select Effects
Choose the Fire effect under the Art menu to transform yourself into the fearless warrior
The flames can be as fast or as slow as you like thanks to the adjustment bar on the app — you’ll love the way it adds a fierce finish to your picture.
Making Your Disney Princess Photo Editing Dreams Come True
YouCam Perfect is the perfect photo editing app for anyone who wants to achieve next-level status with their pictures. It offers an extensive range of photo editing and beautifying tools that can transform virtually any image in just a few taps. What’s that mean for you? You can experiment with features galore — and even turn yourself into a Disney princess courtesy of advanced photo effects.
If you’re interested in Disney princess topic, check out our article 5 Disney Princess Makeup Ideas for Your Next Costume Party for more inspiration.
Download YouCam Perfect: The Best App to Turn Yourself Into a Disney Character
You’ve always wondered if there was a turn-yourself-into-a-Disney-princess app. It turns out there is! Head to the App Store or Google Play to download YouCam Perfect for free .
Subscribe to our YouTube channel, and follow us on Instagram to get more creative editing ideas and awesome selfie tips!
How to Draw Disney Characters
Many people start drawing because they’re attracted by the look of their favorite characters—and in many cases, these favorite characters come from Disney movies. Disney style looks simple, yet it’s very expressive and flexible—after all, it was made for animation, where many drawings must be sketched quickly and consistently. So it’s perfect for beginners who don’t want to get caught up in details!
If you want to learn how to draw Disney characters, whether real ones or your imaginary ones, you’ve come to the right place. In this tutorial I’ll show you how to draw a Disney-style character—the head, eyes, nose, lips, hair, and the whole body. I’ll explain the proportions, so that you can draw your characters consistently. I’ll show you many tricks that you’re not likely to find anywhere else, all in one place and easy to swallow.
Disclaimer: I don’t work for Disney, and the guidelines I’m presenting in this article are not official—they’re only a result of my own analysis of the style. Also, in this tutorial we’ll only tackle Disney human characters, and only the good ones—animals and villains will get their own tutorials later!
1. Anatomy of a Disney Head
Although drawing is about lines, lines are only the end result of placing a 3D object into a flat surface. This means that if you want to draw something from imagination, you must be able to imagine the 3D object first, not the lines. So let’s take a look at how a Disney-style head is constructed, so that you can create a visual model of it in your mind.
The base for the whole head is a sphere. It can be elongated or flattened later, but it’s always safe to start with a sphere. It represents the cranium.
The sphere is then divided into six roughly equal parts—each half into thirds. Making one of the sixths smaller or bigger is a good way to differentiate a character.
Now, the face must be placed on the front of the sphere. The face can be divided into two parts with a line going between the eyes: from the hairline to the bottom of the eyes, and from the eyes to the bottom of the chin (touch these points on your face to memorize it better).
The proportion between these two parts depends on the style of the character:
For babies, the upper part should be bigger than the lower part.
For “cute” females and boys, the parts should be equal.
For males and realistic females, the lower part should be bigger than the upper part (though usually still bigger in males).
To keep the size and the placement of these parts constant, they should be based on the sections that can be found on the sphere (e.g. 1/3, 2/3, 1/2, etc.). Currently, the most popular “recipe” for cute princesses seems to be:
The face starts at 2/3 of the upper half of the sphere (the hairline).
The face is as long as the sphere.
An ellipsoid should be attached to this sphere—this is the mouth and jaw area. Its bottom should obviously be placed at the bottom of the face.
Imagine this head is made of clay. Push in the front to create sockets for the eyes right at the middle line of the sphere, two thirds high.
Place the eyeballs inside the sockets, one third high. The distance between the eyes should be just enough to fit a third eye in between.
Divide the lower half of the face into thirds.
Use these sections to place the other elements of the face: the nose at the halfway point, the lips at 2/3, the chin below them, and the cheeks under the eyes, slightly to the sides.
The ear should be placed right behind the jaws, somewhere between the eye line and the nose line.
And this is how all this “anatomy” leads to the final look of a Disney head!
2. How to Draw a Disney Head
Now that you know the anatomy, let’s practice the proportions in a more practical way. We’re going to draw a generic Disney princess with the universal proportions I’ve just described.
Step 1
Draw a circle (the sphere of the cranium). Mark its perpendicular diameters.
Step 2
Divide the lower half into thirds to mark the area of the eyes. The 1/3 point will be the top of the eyes, and 2/3 the bottom. Try to see these face parts in your mind, and you’ll keep it from becoming a confusing mess of guide lines.
Step 3
Measure the length of half of the circle, and then draw it right under the 2/3 section (under the eyes).
Step 4
Divide this area into thirds to create some guide lines for the elements of the face.
Step 5
Draw a line across the eye area. The higher it is, the higher the outer corner of the eye will be.
Step 6
Sketch the outline of the face. If you can imagine the position of the cheeks and chin, you can outline them now—if not, just draw a general outline that you will adjust later.
Step 7
Mark the distance of the eyes—there should be space for three of them. Leave a thin band of empty space on both sides of the head.
Step 8
Draw the curve of the eye socket. This will help us draw the eyebrows later.
Step 9
Draw the cheeks and the chin. The position of the cheeks is arbitrary (we only need them for their shape), but it’s safe to put them around half of this area’s height.
Your generic Disney head is sketched and ready for details!
3. How to Draw Disney Eyes
How to Draw Eyes in Various Views
As you already know, a flat drawing of a head is a rendering of something 3D, and it’s the same with the eyes—they’re spherical, not circular. If you only draw your faces in the front view, you can ignore that fact, but if you want to draw any other views, it’s crucial to understand how the eyes’ position changes.
In the front view, all three eyeballs (two real + the imaginary one) are placed next to each other. In the side view, they cover each other perfectly. All the views in between will be some in-between stages:
The same will happen to the diameters of each circle—in the front view, they will be straight, and in the side view completely curved. The in-between stages must be estimated according to this rule.
Drawing the diameters will help you place the pupils correctly. Notice how their shape changes transitionally, too!
When placing the pupils, keep one thing in mind: to make them more focused, draw them slightly rotated towards the middle each time. This will give the impression that the eyes are looking at something close.
Once you have the eyeballs, it’s time to cover them with the eyelids. They should wrap the spherical shape of each eyeball, so their shape will change depending on the view.
Draw the eyelashes. Here’s where some cartoon rules come into play: in real life, the eyelashes change shape very drastically in rotation. To make them easier to animate, in Disney style they always look like side-view lashes—they just change their position. In the side view or close to it, the eyelashes are placed in the front of the eye; in the front view or close to it, they’re placed on the sides.
Draw the eyelids over the eyelashes, following the curve of the eyeball. Their size is very important to create the unique look of a character. Also, marking the lower eyelids the same way can quickly make your character look older!
Finally, outline the eyes. Remember to always keep the shine dots asymmetrical! Also, the nose will partially cover the other eye in the views close to the side.
How to Rotate the Eyes
But eyes can move independently from the rotation of the head, right? Let me show you how to achieve this effect. Draw the curved diameters of the eyeballs, adjusting their shape to both (imaginary) ends of the motion. This may require some practice to understand, but once you get it, you’ll never have a problem with drawing eyes again!
It’s like a double rotation: first you rotate the eyeballs along with the head, and then you rotate them again.
In general, the eyelids and lashes should follow the position of the eyes, not their rotation, but sometimes it may be necessary to change their shape a little:
Showing Emotions with Eyes
Eyes are the most important part when it comes to showing the emotions of a character. You can achieve various emotions by rotating the eyes, putting the eyelids low or high, changing the side of the iris/pupil, and, most easily, by changing the shape and position of the eyebrows. You can learn more about drawing facial expressions from these tutorials:
Various Eye Styles
These were the general rules. To create various styles, you can play with them, achieving a unique look for your character—showing their personality and ethnicity.
Step 1
All right, let’s get back to the actual drawing. It should be easy now that you understand the rules! Draw the curve of the eyelids, imagining the eyeballs they wrap.
Step 2
Draw the iris and the pupil. You can draw them in default view, or experiment with the rotation.
Step 3
Draw the eyelashes.
Step 4
Draw the upper eyelids.
Step 5
Draw the eyebrows.
4. How to Draw a Disney Nose
The Structure of a Disney Nose
Disney noses are very easy to draw: start with a tilted ellipsoid…
… put two little spheres on the sides…
… and mark the triangular bottom of the nose.
As always, keep in mind the 3D form of the nose. This will help you draw it in rotation.
The nose holes should be sketched with a curve and never filled with black (unless in a very, very extreme view from below).
Of course, the nose is more than just the tip—it curves towards the eyebrows. However, the part in between is usually ignored, to keep the face smooth.
If you want to learn more about nose anatomy, check out this tutorial:
Disney Nose Styles
This simple structure of a nose can be modified to create various styles. Just like with the eyes, the shape of a nose can indicate the personality and ethnicity. As for the sex, Disney males usually have more prominent noses, with the whole top outlined.
Step 1
Let’s add the nose to our drawing. First, define its position—the safest one will be the middle of the bottom of the lower half of the face.
Step 2
Draw the tip of the nose and its curve. Notice how it changes in perspective.
Step 3
Draw the nostrils on the sides.
Step 4
Draw the bottom of the nose.
Step 5
Draw the nose holes.
5. How to Draw Disney Lips
The Structure of Disney Lips
Disney lips are simple, yet expressive. You can draw them as a flattened ellipsoid.
They’re divided with a long, flat “V”. the upper lip is usually smaller than the lower one.
At this point, you just need to outline the whole shape of the lips.
Keep in mind their 3D shape!
The corners of the lips are very important.
You don’t have to draw these lines in any view except side view, but it’s good to remember about them during rotation.
You can learn more about the anatomy of lips here:
Showing Emotion With Lips
The mouth can show many emotions, and it’s easier than it looks! You should simply start with a curve/two curves showing the shape you want to achieve, with the bottom of the lower lip marked.
Then you can add the corners…
… and outline the whole mouth.
The inside of the mouth needs to be drawn sometimes. You can draw teeth, tongue, or nothing at all—look at yourself in the mirror to decide which combination will be the best for the expression you want to portray.
The lips should be darker than white skin (but brighter than black skin). If you leave them completely unpigmented in the sketching phase, it may make the whole face look weird, so shade them at least subtly to avoid any confusion.
Disney Lip Styles
As with any face part, lips come in many shapes and sizes. Younger characters can have narrow lips; older or more conventionally beautiful ones have big and full lips. Males usually have very subtle lips, with no outline and barely any pigment.
Step 1
Let’s draw the lips now. They don’t lie flat on the face—in the side view, you can see them between the nose and the chin. Mark this line.
Step 2
Draw the curve of the lips now, depending on the expression. They can be placed at 2/3 of the lower half of the face.
Step 3
Add the volume of the lips.
Step 4
Outline the lips and add the corners.
6. How to Draw Disney Hair
Surprisingly, Disney hair is very easy to draw, because it’s made deliberately simple for animation. It’s supposed to bring a real hairstyle to mind without actually having any details. This effect is achieved by focusing more on the rhythm than on the individual hairs, and this is a must—how could you draw something consistently if it’s highly detailed and complex in shape? So let’s keep it simple!
Step 1
Before you add the hair, make sure the head is finished. Add the ear…
… the neck…
… and the shoulders.
Outline the shape of the face in the final way. Keep in mind that females usually have round or pointed faces, while males tend to have sharply defined jaws.
Step 2
Divide the upper half of the sphere into thirds.
Step 3
The hairline starts usually at 2/3. Start your hairstyle here. It should be voluminous and lifted from the head, so it’s good to start it with a strand wrapping the forehead.
Step 4
Draw the basic outline of the hairstyle.
Step 5
Draw the “edges” of the hairstyle. Imagine the hair as a fabric that flows gently down from the head.
Step 6
You can divide the hair into strands, especially if you want to make the hairstyle less tidy.
Step 7
Finally, you can add some directing lines to suggest the 3D shape of the hair.
You can learn more about various hairstyles here:
And voila—our generic Disney character is finished! Even though it’s no one in particular, you can certainly get some Rapunzel and Ariel vibe from her. This is because all Disney characters are built from the same recipe—certain factors are only modified each time to create a unique look.
7. How to Draw a Disney Body
There is no such thing as a universal set of Disney body proportions, as each movie has its own style, but we can create an estimate. These statements seem to be true most of the time:
The males are taller than females.
Males are built more similar to real-life proportions than females.
Males have broad shoulders.
Females have tiny waists, narrow shoulders, and narrow hips (an hourglass silhouette).
Females have long, slender necks.
The breasts, if present, are placed around the halfway point of the chest, and they’re usually small to medium size.
But there are also other, less strict rules that can help you draw a Disney silhouette:
The area above the crotch and the area under it are at least equal in height. This proportion can be modified to make the character look taller or slimmer.
The upper half of the female body can be divided into thirds: the head, the chest with the neck, and the waist with the hips. However, it mostly fits young, teenage characters (which many princesses are)—in adults it’s better to keep the neck separate from the proportions, to make the torso longer.
Males have bigger chests—their “hourglass” is visibly asymmetrical.
You can use the diagram below as a reference, but remember to always check how the character you want to draw deviates from it—having this kind of reference will help you remember other sets of proportions.
Step 1
If you want to draw a Disney body, you need to start as with normal figure drawing—with gesture. You can do it from imagination, but it’s much safer to find nice pose references—for example, something out of SenshiStock’s amazing gallery. Remember not to trace the photos, but only draw by looking at them. This is especially important here, where you need to change the proportions on the fly.
To draw a gesture, focus on simple lines indicating the rhythm. Draw the torso as an “8”, the head as a circle/oval, and the limbs as curves.
You can learn more about drawing gestures here:
Step 2
Put the proportions on the body, adding some very simple forms—the chest, the waist, and the hips, and marking the joints. You don’t have to use a ruler to measure the head—you can trust your eyes!
Step 3
Place all the simplified body forms on the silhouette. You can still use the reference to see the perspective and the shape of body parts, but adjust them to the style you’re going for.
Step 4
Finally, clean up the lines. The reference can be still very useful here, especially when it comes to the hands and feet!
8. How to Draw a Real Disney Character
As I mentioned before, each movie uses a slightly different version of Disney style, so it’s not possible to create universal guidelines for all characters. Describing them all individually would also make this tutorial huge and indigestible.
However, I can give you a tool for drawing every existing Disney character by modifying the rules we’ve just learned. I’ll use Elsa from Frozen as an example, but you can use your favorite character for this exercise.
Step 1
I’ll use the pose from the previous exercise, this time adjusting it to the specific proportions of Elsa’s body. To find the correct proportions, I used this process:
I copied some screenshots of Elsa in various poses to my drawing software (you can print them).
I drew lines as in my reference—top of the head, bottom of the head, base of the neck, base of the chest, waist, hips, knees, ankles, and the soles of the feet.
I measured how the head’s height fits into these lines—I discovered that the chest can fit the head if I exclude the neck, and that the legs look long because the torso and the neck are long, not because the legs are longer than usual (the basic equal upper body-lower body proportion is kept).
Once I found the proportions, I applied them to my pose. Elsa has a very slender body, with slim arms and legs and little muscle definition. This additional information is important for creating a correct body.
Step 2
The next step is to find the correct proportions of the face. Here I copied an image of Elsa’s face (sometimes it’s possible to find original character model sheets for this task) and marked the proportions on it—the line under the eyes, over the eyes, the eyebrows, the hairline, the chin, etc. Then I compared it to my generic Disney face to find out what makes Elsa special. I discovered, among other things, that:
The eyes are big, slightly taller than the classic 1/3.
The upper eyelids are big; they often cover the top of the iris, creating a mysterious look.
The eyes are almond-shaped.
The lips are very narrow.
The outline of the face is quite round.
The eyebrows are thin and dark.
The nose is small and delicate.
The eyelashes are dark, very doll-like.
The eyeshadow on the upper eyelids brings attention to them, making the eyes look even larger.
The hairstyle is messy, giving a lot of extra volume to the head area.
The neck is long and slender.
Of course, such written information can’t really replace a visual reference, so always keep some in sight!
Step 3
Time to add the head to our Elsa! First, the cranium-sphere, divided into halves and then thirds. These lines curve a little, because the head is slightly rotated to the top (it’s the same rule as with the eyeballs).
Step 4
Draw the lower half of the face. In my case it starts in the classic way, on the 2/3 section.
Step 5
Divide this area into halves and into thirds.
Step 6
Draw the curve of the eye-sockets.
Step 7
Draw the eyeballs.
Step 8
Define the direction of the eyeballs.
Step 9
Add the cheeks, the chin, and the ear, and draw the outline of the face.
Step 10
Draw the nose and the lips. Remember to consult your references to make sure you’re drawing them in the right place!
Step 11
Draw the details: the iris/pupil, the eyelashes, the eyelids, the eyebrows, and the lips.
Step 12
Time for the messy hairstyle! This is usually when the resemblance to the character starts showing visibly.
Having problems with the braid? Check out this tutorial:
Step 13
Finally, draw the final lines. Don’t forget about giving some pigment to the lips, the pupils, the irises, the eyebrows, the eyelashes, and to the eyeshadow, if your character wears it. In most cases, a character will not look like themselves without this diversity of values!
Step 14
Let’s draw the rest of the body now. Elsa wears a beautiful magical dress that can be drawn easily from multiple references (watching certain scenes from the movie can also help!).
Step 15
When you’re done, define the final lines and erase the guide lines.
So Magical!
Now you know all about drawing Disney characters… but only the human, good ones. Stay tuned for the next part, where I’ll teach you how to draw Disney animals!
In the meantime, you may be interested in our cartoon drawing tutorials:
So you have finished reading the how to draw yourself as a disney princess topic article, if you find this article useful, please share it. Thank you very much. See more: how to draw like a disney artist, disney princess drawing style, how to draw disney style pdf, how to draw disney style male, how to draw disney princess, draw like disney, how to draw disney style animals, how to draw disney hair