
You are looking for information, articles, knowledge about the topic nail salons open on sunday near me how to make a flashlight flicker on Google, you do not find the information you need! Here are the best content compiled and compiled by the https://chewathai27.com team, along with other related topics such as: how to make a flashlight flicker how to make lights flicker, flashlight flickering fix, why is my phone flashlight flickering, nebo flashlight flickering, how to get an led to flicker, flashlight flickering android, how to make a flashlight brighter, blinking flashlight iphone
Contents
What causes LED flashlight flicker?
It could be a number of things. But most commonly, LED bulbs may flicker or dim in your home when there are voltage fluctuations in your home’s wiring. When electrical loads turn on and off in your home, this creates a change in voltage levels, which may cause the LED lights to occasionally dim or flicker.
Why does my flashlight on my phone flicker?
This could mean that the plug is bad, this is usually the case with micro USB cables probably 9 out of 10 times. It could also indicate that the charging port is bad or broken. This is usually rare but it goes back to the treatment of the phone and it does happen.
How do I make my flashlight dimmer?
Swipe down on your notification bar at the top to reveal your Quick Settings tiles as you would typically do when turning on the flashlight. But instead of touching the icon to turn the light on, tap the “Flashlight” text beneath the icon to bring up a brightness level menu.
How do you make LED bulbs flicker?
- Place newspaper down on a work surface. …
- Cut two 6-inch pieces of electric wire with wire cutters. …
- Solder the end of one of the wires to one of the two contacts on the resistor. …
- Solder the other contact on the resistor directly to the short pin on the red LED.
How do you make an LED flicker like a candle?
Connecting a Single LED
Connecting to a Candle Flicker LED is very simple and requires only a simple dropping resistor. The resistor goes in series with the LED and power/battery to limit current to 20mA. Each LED has two leads, an Anode (positive) and Cathode (negative).
Do LED lights flicker like fluorescent?
Most people cannot notice the flicker in fluorescent lights that have a flicker rate of 120 cycles per second (or 120 Hz). Flicker with LED lights may be more noticeable due to the fact that LED lights flicker between less than 10% and 100%, where as fluorescent lights dim to about 35% and back to 100%).
How do I make my iPhone flashlight flash?
- Open the Settings app, tap Accessibility, then tap Audio/Visual.
- Turn on LED Flash for Alerts.
Do LEDs flicker on camera?
LEDs that flicker usually do so at imperceptibly high rates and are therefore not visible to the naked eye. Therefore, you can rest assured that any flickering visible on camera is in fact the light operating normally. The only blinking that should be a cause of concern is when it is visible to the unaided eye.
Why do iphones flash in the dark?
It’s called Attention Aware and it’s used to dim the display or lower the volume of notifications if you’re paying attention to your handset. Like Face ID, this feature could also be detecting movement. But it’s also possible that this is intended and regular behavior.
Why did my iPhone beep and flash?
By default, your iPhone is set to receive alerts from the government such as AMBER alerts and Emergency alerts. Sometimes, your iPhone will beep loudly to make sure you notice the alert. If you want to stop receiving these alerts, open the Settings app and tap Notifications.
Why does my iPhone flash for no reason?
Your security camera is probably picking up the light from the TrueDepth camera used for faceid. This light is not visible to the naked eye, but some digital cameras can detect it. Don’t worry about it. it’s normal.
How do I shake my phone to turn on flashlight?
Shake the Flashlight On
Just shake your phone, and the Flashlight will turn on. You can turn on the Flashlight even if the screen of your Android device is off, then just shake it again to turn the Flashlight off. If you feel you have to shake your phone too hard, you can change the sensitivity in the app’s settings.
How do I make my iPhone flashlight darker?
- Swipe down from the top-right of the screen.
- Tap and hold on the flashlight icon.
- Select the desired brightness level.
Can flickering lights cause a fire?
Yes, flickering lights can be a warning sign that there is a fire hazard in your home. When lights flicker all over the house and are not associated with a large or major appliance, such as an air conditioner, turning on it could mean that there is an issue with the wiring, which could cause a fire.
Do lights flicker really fast?
What is light flicker? Light flicker refers to rapid or quick and, repeated changes in the brightness of light over time – light that appears to flutter and be unsteady. It is caused when the voltage supplied to a light source changes or when the power line voltage itself fluctuates.
Flicker Light How-to – YouTube
- Article author: www.youtube.com
- Reviews from users: 1830
 Ratings
 - Top rated: 3.8
- Lowest rated: 1
- Summary of article content: Articles about Flicker Light How-to – YouTube Updating …
- Most searched keywords: Whether you are looking for Flicker Light How-to – YouTube Updating How to build a quick, easy and inexpensive flicker light.Halloween, Halloween Props, Halloween lighting
- Table of Contents:
Flicker Light How-to – YouTube
- Article author: www.nbpower.com
- Reviews from users: 35547 Ratings
- Top rated: 3.9
- Lowest rated: 1
- Summary of article content: Articles about Flicker Light How-to – YouTube Updating …
- Most searched keywords: Whether you are looking for Flicker Light How-to – YouTube Updating How to build a quick, easy and inexpensive flicker light.Halloween, Halloween Props, Halloween lighting
- Table of Contents:
Why is my flashlight flickering? – Android Forums at AndroidCentral.com
- Article author: forums.androidcentral.com
- Reviews from users: 42570 Ratings
- Top rated: 4.3
- Lowest rated: 1
- Summary of article content: Articles about Why is my flashlight flickering? – Android Forums at AndroidCentral.com Updating …
- Most searched keywords: Whether you are looking for Why is my flashlight flickering? – Android Forums at AndroidCentral.com Updating Why,my,flashlight,flickering,the, you, and, this, flashlight, that, charging, phone, are, while, plugged, but, cables, have, issue, plug, when, not, how, having, would, dollar, water, much, damage, can, was, case, times, any, your, time, dont, think, use, type, did, app, they, micro, happen, been, exposed, bad, also, cable, usb, after, flickers, usuallyI have a Moto G7 phone, and when I turn the flashlight on it continuously flickers and the phone won’t charge.
It isn’t that old, and I haven’t dropped it or exposed it to much water, and it refuses to charge on any cables I have. It there something wrong or am I just an *****? - Table of Contents:
There’s an Easy Way to Change Flashlight Brightness on Your Galaxy Phone « Android :: Gadget Hacks
- Article author: android.gadgethacks.com
- Reviews from users: 23881 Ratings
- Top rated: 4.0
- Lowest rated: 1
- Summary of article content: Articles about There’s an Easy Way to Change Flashlight Brightness on Your Galaxy Phone « Android :: Gadget Hacks Updating …
- Most searched keywords: Whether you are looking for There’s an Easy Way to Change Flashlight Brightness on Your Galaxy Phone « Android :: Gadget Hacks Updating Before all the fancy night mode settings in phone cameras, we used the LED flash to take low-light photos. While it’s not used for pictures as much anymore, the LED on the back of your Galaxy is still pretty handy as a flashlight. But did you know there’s an easy way to adjust the brightness of this flashlight?
- Table of Contents:
Join the Next Reality AR Community
Related
Be the First to Comment
Share Your Thoughts
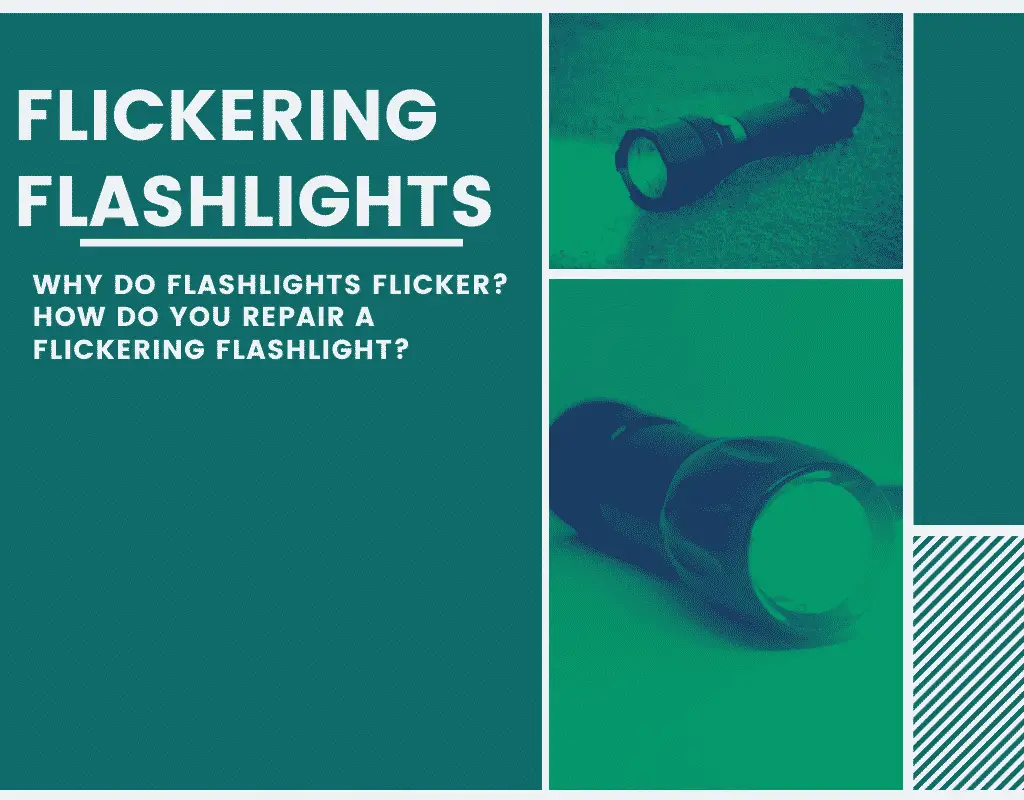
Why Do Flashlights Flicker? How To Repair A Flickering Flashlight Without Spending A Dime – The Hiking Authority
- Article author: thehikingauthority.com
- Reviews from users: 38120 Ratings
- Top rated: 4.6
- Lowest rated: 1
- Summary of article content: Articles about Why Do Flashlights Flicker? How To Repair A Flickering Flashlight Without Spending A Dime – The Hiking Authority Flickering flashlights are a wespread issue, but is there an easy way to fix it or are you stuck with a barely functioning flashlight? …
- Most searched keywords: Whether you are looking for Why Do Flashlights Flicker? How To Repair A Flickering Flashlight Without Spending A Dime – The Hiking Authority Flickering flashlights are a wespread issue, but is there an easy way to fix it or are you stuck with a barely functioning flashlight? There are a few reasons why flashlights flicker and go out, but it’s usually caused some kind of connection problem. Either the batteries aren’t making contact with the battery contact spring or it has a faulty switch. You can usually fix the problem by cleaning off the contacts and making sure they’re getting a good connection with the battery.
- Table of Contents:
Why Do Flashlights Flicker
Related Posts
Hiking Authority
About The Site Owner
Amazon Affiliate Disclaimer
How to Fix a Flickering Flashlight – Easy Solutions
- Article author: www.electrity.com
- Reviews from users: 24638 Ratings
- Top rated: 3.5
- Lowest rated: 1
- Summary of article content: Articles about How to Fix a Flickering Flashlight – Easy Solutions Check to see whether the lights flicker by jiggling the light switch. A loose connection in your light fixtures may cause flickering. This is … …
- Most searched keywords: Whether you are looking for How to Fix a Flickering Flashlight – Easy Solutions Check to see whether the lights flicker by jiggling the light switch. A loose connection in your light fixtures may cause flickering. This is … Lights that flicker are a frequent occurrence. On the other hand, the reason may be difficult to identify and might include anything from a broken bulb to bad
- Table of Contents:
Fixing flickering lights
Fixing light switches that are not connected
Frequently asked questions
Conclusion
Recent Posts
Categories
How To Fix A Flickering Flashlight? [Fix Within 6 Steps]
- Article author: electrotalks.com
- Reviews from users: 39328 Ratings
- Top rated: 4.9
- Lowest rated: 1
- Summary of article content: Articles about How To Fix A Flickering Flashlight? [Fix Within 6 Steps] 1. Check and tighten bulb: · 2. Check for loose wiring: · 3. Check for worn-out batteries: · 4. Check for dirt-insulated connection: · 5. Check for Faulty Switch:. …
- Most searched keywords: Whether you are looking for How To Fix A Flickering Flashlight? [Fix Within 6 Steps] 1. Check and tighten bulb: · 2. Check for loose wiring: · 3. Check for worn-out batteries: · 4. Check for dirt-insulated connection: · 5. Check for Faulty Switch:. Now, here in this article, we will provide you with some easy and effective steps about how to fix a flickering flashlight? let’s start diving into steps
- Table of Contents:
How to fix a flickering flashlight problem [Step by Step]
Conclusion
Recently Published
![How To Fix A Flickering Flashlight? [Fix Within 6 Steps]](https://electrotalks.com/wp-content/uploads/2020/12/How-To-Fix-A-Flickering-Flashlight.jpg)
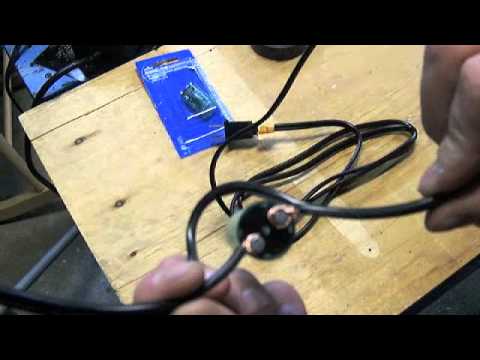
LED Flickering Torch : 6 Steps (with Pictures) – Instructables
- Article author: www.instructables.com
- Reviews from users: 5074 Ratings
- Top rated: 4.4
- Lowest rated: 1
- Summary of article content: Articles about LED Flickering Torch : 6 Steps (with Pictures) – Instructables Updating …
- Most searched keywords: Whether you are looking for LED Flickering Torch : 6 Steps (with Pictures) – Instructables Updating LED Flickering Torch:
Starting in 2009 for Halloween, we needed a realistic looking flickering light effect that would mimic an actual fire torch, but not use real flame.I'd also been wanting to experiment with using AVR Microcontrollers for some time, and t…
- Table of Contents:
Introduction LED Flickering Torch
Step 1 The Controller Design Schematic
Step 2 The Controller Design Layout
Step 3 Controller Assembly
Step 4 Controller Software
Step 5 Final Assmbly
Step 6 Final Notes
Be the First to Share
Recommendations
5 Comments

Flickering Torch Prop : 6 Steps (with Pictures) – Instructables
- Article author: www.instructables.com
- Reviews from users: 10852 Ratings
- Top rated: 4.8
- Lowest rated: 1
- Summary of article content: Articles about Flickering Torch Prop : 6 Steps (with Pictures) – Instructables Updating …
- Most searched keywords: Whether you are looking for Flickering Torch Prop : 6 Steps (with Pictures) – Instructables Updating Flickering Torch Prop: I wanted to make a prop torch for part of a costume that would be fairly robust, re-usable (i.e. not a one shot prop) but also be fairly safe. Since I wanted to make it look like fire, I made it flicker with an Arduino sketch and a LED array.
- Table of Contents:
Introduction Flickering Torch Prop
Step 1 Gather Materials
Step 2 Making the Body
Step 3 Making the Flame
Step 4 The Electronics Bit
Step 5 Putting It All Together
Step 6 Improvements
Be the First to Share
Recommendations
Comments

How to make a lightbulb flicker? – Ars Technica OpenForum
- Article author: arstechnica.com
- Reviews from users: 48395 Ratings
- Top rated: 4.9
- Lowest rated: 1
- Summary of article content: Articles about How to make a lightbulb flicker? – Ars Technica OpenForum Not necessarily replicating flame, although another challenge I have this year is trying to convince the audience I have a blow torch firing … …
- Most searched keywords: Whether you are looking for How to make a lightbulb flicker? – Ars Technica OpenForum Not necessarily replicating flame, although another challenge I have this year is trying to convince the audience I have a blow torch firing …
- Table of Contents:
Error 403 (Forbidden)
- Article author: www.quora.com
- Reviews from users: 14044 Ratings
- Top rated: 3.3
- Lowest rated: 1
- Summary of article content: Articles about Error 403 (Forbidden) Like the water, the atmosphere is moving around and warping the light-waves as they travel trough the air. This warping is also driven by temperature and … …
- Most searched keywords: Whether you are looking for Error 403 (Forbidden) Like the water, the atmosphere is moving around and warping the light-waves as they travel trough the air. This warping is also driven by temperature and …
- Table of Contents:
See more articles in the same category here: https://chewathai27.com/toplist.
Why is my flashlight flickering?
Welcome to AC forums. How many questions is this?Does the phone not charge when the flashlight is “On” or the phone doesn’t charge period?The Flashlight flickers when the charging cable is plugged in or it always flickers?I like how you say the phone hasn’t been exposed to much water. What is “not much water”? I’ve seen damage after 3 seconds of exposure so it can be difficult to gauge the effects of water/moisture damage. Did the issue begin after it was exposed to any water?How long ago has it been since you can remember the flashlight working correctly?Is your flashlight app the stock app or one that you installed from the Play Store?At this time we don’t know if the charging issue and the flashlight issue are connected because I can think of a few times when having the device plugged in and needing the flashlight might happen at the same time. My advice if this is the case would be NOT to use the flashlight while plugged in. I cannot think of any reason that this would cause an issue but if this is how you are using the phone and these are the results I would caution against continuing the practice. It’s the old adage, I went to the Dr and told him it hurt when I did this, his reply was don’t do that.If you are having issues with charging outside of having the flashlight on, have you tried pressing on the plug while charging? Not sure if which direction your plug faces but you may find that pressing the plug down or lifting it up while plugged in completes the connection and the phone begins charging. This could mean that the plug is bad, this is usually the case with micro USB cables probably 9 out of 10 times. It could also indicate that the charging port is bad or broken. This is usually rare but it goes back to the treatment of the phone and it does happen. The easiest way to determine if it is the cable is to, as you have try other cables, but if they are cables that you use regularly they may also be affected, as micro USB is a very weak connector type and is prone to damage rather easily. Most of the Dollar Trees and Dollar Generals in my area have 3 ft cables for a dollar if expense is a factor.Please register an account to provide more information and to fill in some of the blanks and questions we have. This link will help you do that… https://forums.androidcentral.com/as…-new-post.html Update: Happened again, I’m on a roll tonight… I just type too much. Typing while B. Diddy was posting.
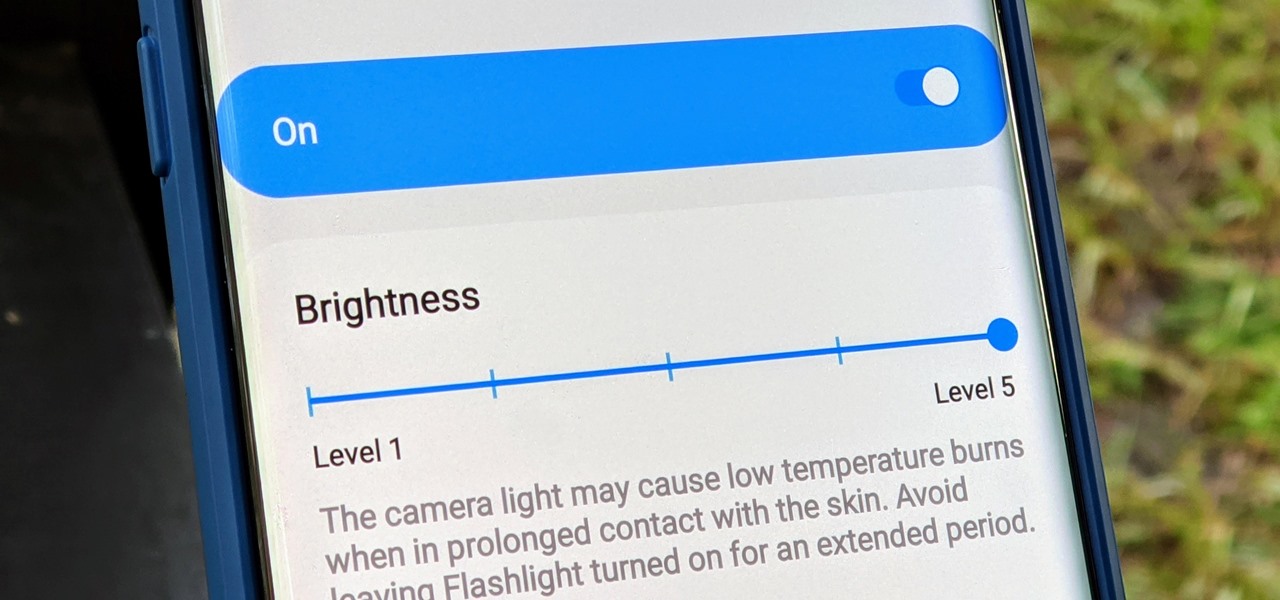
There’s an Easy Way to Change Flashlight Brightness on Your Galaxy Phone
Before all the fancy night mode settings in phone cameras, we used the LED flash to take low-light photos. While it’s not used for pictures as much anymore, the LED on the back of your Galaxy is still pretty handy as a flashlight. But did you know there’s an easy way to adjust the brightness of this flashlight?
Swipe down on your notification bar at the top to reveal your Quick Settings tiles as you would typically do when turning on the flashlight. But instead of touching the icon to turn the light on, tap the “Flashlight” text beneath the icon to bring up a brightness level menu. Flip the flashlight switch to “On,” then adjust the slider from “Level 1” to “Level 5”, depending on how bright you want it to be.
Once you’re finished choosing your brightness level, tap the “Done” button to save the setting. Then tap the icon again to turn it off after that. Whenever you turn your light on now, it’ll be using the newly adjusted level of brightness you just set. This can easily be overlooked since some might not realize the flashlight icon had an extra setting attached to it in the first place.
Why Do Flashlights Flicker? How To Repair A Flickering Flashlight Without Spending A Dime
Flashlights seem like such a simple product, but they can have a lot of issues. Your flashlight can be working flawlessly one minute and it’s flickering like crazy a few minutes later. Flickering flashlights are a widespread issue, but is there an easy way to fix it or are you stuck with a barely functioning flashlight?
Why do flashlights flicker and I can fix a flickering flashlight? There are a few reasons why flashlights flicker and go out, but it’s usually caused some kind of connection problem. Either the batteries levels are low, they aren’t making contact with the battery contact spring or it has a faulty switch. You can usually fix the problem by cleaning off the contacts and making sure they’re getting a good connection with the battery.
In the rest of this post I’ll explain why flashlights flicker and teach you how to repair the most common problems. It shouldn’t take long to fix a flickering flashlight and you probably have everything you need in your bathroom cabinet (rubbing alcohol and Q-Tip). The only thing you may need to buy is a pair of split ring pliers (these things) or fine tipped needle nose pliers to tighten the spring retaining rings.
Why Do Flashlights Flicker?
Flickering flashlights are almost always caused by a few common issues. Either there’s some issue with the battery (usually a dead battery or spring connector that’s loose) or there’s an issue with one of the connections.
Flashlights use simple designs so there’s hardly ever a mechanical issue that can’t be fixed by one of the steps in this post. Here are the most common reasons why your flashlight may be flickering. I’ll explain how to fix all of these problems in detail below. This is a lengthy article, but it shouldn’t take longer than 10-15 minutes to run through all of the repairs.
Battery Issues Are The Most Common Cause Of Flashlight Flickering The Flashlight Case Isn’t Seated Properly (misaligned threads and inverted housing). The Retaining Ring on the spring and switch assembly has loosened over time. There’s carbon/dirt buildup on the electrical connections (clean with Q-Tip and Rubbing Alcohol) Burrs on the metal housing are causing connection issues(use sand paper). Loose wiring and bulbs are rarely the problem, but you can check (solder problem areas and tighten bulbs).
In the rest of this post I’ll go over each of these steps in detail. This is a lengthy post, but the entire flashlight repair process shouldn’t take longer than 10-15. There’s rarely mechanical issues so this guide should solve the problem in 99% of cases where you have a flickering flashlight.
How To Fix A Flickering Flashlight
You can almost always fix a flashlight by going through this list of common fixes. I put this list in order from the most common problems to the least common. So start off at the top of the list and work your way down to the bottom.
Flashlight flickering is almost always caused by the battery not creating a proper connection with the rest of the electrical system. That could mean the batteries dead, something isn’t properly tightened or misaligned, the connections need to be cleaned, or there could be an issue with the switch or connector spring.
Flashlights use a fairly basic design so the issue is almost always caused by a faulty connection somewhere. You should be able to fix a flickering flashlight if you can find the bad connection. The only time you might run into problems is if there’s a problem with the flashlight driver.
It’s very rare to have a flashlight mechanically fail so if you follow all these steps you should be able to fix 99+ percent of flashlight problems. This is a fairly lengthy guide, but it shouldn’t take longer than 10-15 minutes to run through all of these common issues.
1. Low Voltage and Dead Batteries May Cause Flickering
This might sound stupid, but 90% of flickering issues are caused by a dying or low voltage battery. I just made that statistic up, but that’s been that’s been the case with most of my flashlights. I’ve spent hours messing around with every possible fix and it ends up being a bad battery.
Most of the time it’s because I’ve tried using an old battery that I had sitting at the bottom of a drawer, but it’s also happened with brand new batteries. You may not have realized this, but batteries can actually expire if they sit on the shelf for too long.
Make sure you look at the best if used by date marked on the battery to see if it’s expired. I’ve ran into that problem multiple times with batteries that I’ve purchased on Amazon and at discount stores. They have old stock sitting on their shelves that hasn’t sold in a year and the batteries are almost dead.
Try A Different Brand Of Battery
I’ve had flickering issues with certain brands of batteries that don’t have a high enough voltage to power my flashlights. It’s usually because I tried to cheap out and purchased garbage batteries. I’ve had problems in the past with the Ladda Rechargeable batteries from IKEA, dollar store batteries, and the cheap batteries they give away at Harbor Freight.
They have enough juice to power low voltage items like TV remotes, but can’t handle the voltage demands of higher lumen LED flashlights. Try to test a different brand of battery to see if that’s the problem before messing around with some of these more challenging repairs.
2. Issues With The Flashlight Case
Whenever you open up the flashlight and fool around with the batteries it can cause problems. You can bend the battery springs causing a connection issue, put the battery holder in backwards, not tighten screw in the end of the case all the way, or miss a thread that causes a misaligned connection.
If messing around with the flashlight case fixes the flickering issue or completely kills the light it’s probably some a problem with how you put the flashlight case back together.
Make Sure You Tighten The Flashlight Head
Almost everybody puts the batteries into the tail end of the flashlight. Most people don’t even realize that the front end of the battery tube can be unscrewed. So they focus all of their attention on the back end and completely ignore the threads on the front of the battery tube.
This can cause issues depending on how you hold the flashlight when unscrewing and screwing in the case. It’s easy to accidentally unscrew the front portion of the tube interrupting the current. Unscrew and tighten both ends of the tube to make sure they have a good connection.
Look For Misaligned Threads and Loose Pieces Of The Case
If any part of the flashlight body isn’t tightened properly it could cause flickering issues. It might not be a problem with a fully charged battery, but as the battery drains there won’t be enough voltage getting to the LED Driver.
Start off by tightening every part of the tube assembly. There’s usually a main body, the part with the battery spring assembly (sometimes a rear push button switch), and the front head of the flashlight that contains the bulb and electronics. If any of those pieces are misaligned or not tight enough you won’t have a proper connection.
If that doesn’t work check the threads on the case to see if they’re aligned properly. Look at both the inside and outside of the tube to see if the threads are the same on both ends. It’s easy to flip around a tube or accidentally misalign the threads. If you notice any gaps in the body unscrew the case and see if you can get tighten things up by making sure you properly align the threads.
Tighten Up The Front Bezel
The front bezel is another part of the flashlight that people often overlook. Most people focus on the rear battery terminal and completely ignore the front bezel. It may not seem like the front bezzle plays a role in supplying current to the LED bulb, but it’s the last connection to the LED.
This is a really common problem with flashlights that have adjustable beam widths where you tighten/loosen the front bezel. If your trying to widen the beam and go past the outermost point you can easily interfere with the current running to the LED bulb. People rarely remove the front bezel so it’s probably not a misalignment issue so just tighten it back up to see if that solves the problem.
Check to Make Sure You Put The Flashlight Back Together Properly
Almost every flashlight can be taken apart so you can get to the electrical components inside the flashlight. I’m a tinkerer at heart, so I’m always messing around with anything that I buy. That can very easily lead to problems if I’m not paying attention.
All it takes is accidentally reversing one of the tubes, misaligning the thread as you’re screwing the case back together, or not tightening one of the sides all the way. There are a wide number of problems that can misalign or prevent your battery from having a proper connection. A fraction of a millimeter could mean the difference between a perfectly functioning flashlight and one that’s constantly flickering.
Start by checking the connection to make sure the battery spring hasn’t moved and try to tighten each section of the flashlight case. If that doesn’t work completely unscrew the end cap and make sure you check to see if the threads on both end are the exact same size and there’s no difference in the coating.
If one side is anodized and the other has bare threads that could mean that you accidentally put the tube on backwards. Flip the tube around and try screwing it back down the other way.
The part of the flashlight tube with bare metal usually attaches to the back end of the flashlight if there’s a push button switch. Anodized aluminum doesn’t conduct electricity so you need to have bare metal touching the conduction points.
The Flashlight Could Have Come From The Factory With Improper Connections
This can be a problem even if you’ve never taken the flashlight apart. Most flashlights are made in foreign countries using cheap day labor with employees that are forced to hit production quotas.
When speed increases quality control and testing will always decrease. It’s easy for an employee that’s putting together hundreds of flashlights per hour to accidentally make a mistake. All it takes is accidentally putting a tube on backwards to interfere with the connection.
The threads on one end might be a slightly different length that can cause a loose connection or one side may be anodized, which reduces conductivity, and the other side isn’t. This may not be a problem with a brand new battery, but you’ll end up with a poor connection once the voltage drops. So the flashlight may work well at first, pass inspection, and suddenly start having flickering issues once the battery drains.
Problem 3. Tighten The Retaining Ring, Check The Switch and Spring
There are three parts of the switch that can cause flickering issues: the retaining ring, spring, and switch assembly. If any of these components are loose you won’t get a tight connection to the battery. Luckily you can replace the switch assembly for $2-3 and it’s easy to install a new switch assembly.
You can buy replacement switch assemblies from any online flashlight part store. They’re all interchangeable as long as you measure the switch assembly before ordering. Pull out the old switch and install a new one
Replacing a switch on a cheap flashlight that’s under $10-$15 probably isn’t worth it. I recommend starting off by checking to see if the flashlight has some kind of warranty. Most budget manufacturers won’t have a warranty, but some of the mid-tier brands offer lifetime replacements.
I’ve had a lot of luck with Coast Flashlights over the years. They’re not even close to being the nicest flashlights on the market, but they’re fairly reliable and have lifetime warranties. Just take the flashlight back to the store you bought it at and they’ll hand you a brand new replacement.
Tighten The Spring Retaining Ring On End Switch Flashlights
The spring retaining ring is a very common issue with budget flashlights. Retaining rings are a simple design that holds the switch in, but they tiny little screws that can become loose over time. A loose retaining ring won’t allow the switch to make a complete connection.
A loose retaining ring can cause issues, but the simple design is actually a good thing since you can buy a new switch board for a few dollars. When you have a flashlight with a switch built into the end and a retaining ring it’s a double edge sword. The retaining rings come loose all the time, but it’s easy to replace and repair the switch.
Unfortunately there’s no easy way to tighten a loose retaining ring down so that it won’t come loose. You’re dealing with electronic equipment so you can’t use any kind of chemical fastener like electrical paste or anything like that, but thankfully, it’s easy to tighten the retaining ring.
To tighten the retaining ring you need to use a pair of split ring pliers (these pliers) or very fine needle nose plyers. The plyer nose needs to be smaller than the holes on the retaining ring so they need to be small. Insert the pliers into the holes in the retaining ring and tighten them up.
Look For Retaining Rings In The Head
It’s also important to realize that some flashlights have retaining rings in the head. They pose the same exact problem. Just remove the head and check to see if there’s a retaining ring holding in the spring connector. Expensive flashlights usually press fit the spring into the head, but you may have to tighten a second retaining spring in the flashlight head.
Don’t Replace The Switch and Spring Assembly Just Yet
The flashlight spring and switch can also cause issues. You can usually tell if there’s a problem with the switch assembly by pressing down the button. The switch will start to feel a little bit different. The switch may start to feel mushy, the springs aren’t snapping back correctly, or it may not feel like you’re engaging the switch every time.
It’s rare to have a bad switch, but it can happen. Replacing a switch and spring assembly on an end cap is cheap and easy. The entire spring/switch assembly costs less than $5 including shipping so it’s definitely an option for repairing moderately priced and expensive flashlights.
End button switches are easy to replace. Measure the retaining ring (in millimeters) of the push button switch and order a new one, unscrew the retaining ring, pull out the old switch, install the new switch, and tighten down the old retaining ring.
Side switches are much harder to replace, so it’s probably better to file a warranty claim. They can usually be removed with a pair of pliers, but they need a special eswitch that has to be soldered into place. Soldering irons are easy to use, but there’s a slight learning curve. There’s only two pieces of solder so you should be able to figure it out after watching a quick Youtube video.
You may not be able to replace the spring on a cheap flashlight if it doesn’t have a retaining ring. There’s a certain price point where it’s not worth dealing with it. If the entire flashlight costs less than $15 it doesn’t make sense to spend $5 on a new spring. Just buy a new flashlight and stop messing around.
I mentioned this above, but if you’re on a tight budget I recommend Coast Flashlights. I’m starting to sound like a broken record, but they’re the best manufacturer that I’ve found in the $10-$40 range and they have a lifetime replacement warranty. If you have any problems just fill out the warranty form and they’ll send you a replacement within 2-3 weeks.
4. Clean The Flashlight Connections
If you’re still having a problem after tightening all the connections, it usually boils down to the electrical connection. That can be fixed very easily with rubbing alcohol and a Q-Tip. Dirt and grime build up on the electrical connections over time, but you can easily clean them off.
Sometimes it can come from the factory dirty so make sure you check all the connections to see if there’s any buildup. It doesn’t matter how old your flashlight is, you should always try to clean the electrical connections to see if that cures the flickering problem.
I’m always amazed by how much carbon and dirt can build up on the inside of a flashlight. After a few years of use the contact rings and springs will start to look black and have smudges all over the place. Cleaning all the connections on the edges of the body, head, bezels, end caps, battery contacts, spring assembly, retaining rings, etc.
One of the best ways to clean off the electrical connections is to use a Q-Tip and rubbing alcohol on all the connections. Just soak the Q-Tip in rubbing alcohol and wipe down all of the connections. It will eventually start come back, but it’s easy to clean off so that’s not a big deal.
5. Check For Burrs On The Body Assembly (Not Very Common)
You can occasionally get a burr on the end of the flashlight body assembly that can cause a poor connection. I used to work in a camping gear repair shop so I’d have to repair 10-20 flashlights per week. I only had to deal with burrs a handful of times and it was usually a secondary issue, but it was on the list of things that I had to check.
If you notice any burrs or weak connections on the machined edges of your body assembly you’ll have to deal with the problem. The flashlight body is used to conduct electricity so any kind of burrs could cause connection issues. This is usually only an issue when threads are anodized, but it can cause problems tightening any piece of the body assembly.
Run your finger over the edge of the body assembly to check for burrs. It should feel smooth to the touch. Any bumps or sharp spots in the edges could be causing connection issues. That small high spot could be the only piece making a connection so you need to sand it down.
Just place a piece of medium/high grit sandpaper on a table and run the body over top of it. Keep sanding until the edge feels smooth to the touch. It’s easy to sand down aluminum so it shouldn’t take longer than 30 seconds to a minute to wear down any burrs.
Once you’re done sanding the body, it’s a good idea to rub down the body connections with a Q-Tip and rubbing alcohol. This won’t make a huge difference since it’s a large connection, but it should help increase the battery efficiency a little bit. So it’s worth taking the extra 30 seconds to do the job right.
6.Loose Flashlight Wiring and Bulb Issues
On halogen and incandescent flashlights you may run into issues with loose wiring and loose or old bulbs, but that won’t a problem with modern LED flashlights. A loose bulb may cause flickering issues, but that can easily be fixed by tightening it up.
If it’s an old bulb that you’ve been using for a while this is the perfect time to replace the bulb with a modern LED bulb. You can get the same lumen value while using a fraction of the energy (25% of incandescent and 10% of halogen).
A flashlight’s wiring is rarely a problem unless you’re messing around with the flashlight head and accidentally break them off. Most flashlights have 4 wires. There’s one hot wire connecting the driver to the bulb and 3 wires connecting the the battery pack to the driver.
This is one of those steps that you should only check as a last resort. You’re more likely to break off the connections than find a problem with the soldering. If none of the fixes below work, check the soldering that attaches each of the wires.
Make sure each of the wires are completely covered in solder and none of them are loose. If you notice a loose wire you’ll have to solder it back onto the flashlight driver and battery connector spring. Soldering is a fairly simple process and you should be able to figure it out after watching a short YouTube video.
Some LED Flashlights Are Designed To Rapidly Flicker To Reduce Battery Usage
How fast is your LED flashlight flickering? If it’s a slow flicker than it’s some kind of battery current issue somewhere in the system. A fast flicker that’s very hard to see may just be the way the flashlight was designed.
Flashlights need to have some kind of power regulation device that limits the amount of power going to the LED. Premium flashlight manufactures use a current modulation device (called the driver) to control the current using sophisticated circuitry. This type of setup needs to be designed specifically for the LED’s characteristics and the type of battery used, which makes it more expensive.
Budget manufacturers get around the government regulations by using a method called PWM (aka Pulse width modulation). They use a very fast strobe effect to regulate the current. Quality PWM flashlights will flash faster than the eye can see at about 240 frames per second (we see 30-60 fps).
That works great, until it doesn’t. When a PWM flashlight is working well you won’t notice a difference, but when it’s not working right it can create a strobe affect that’s barely noticeable. It might not sound like a big deal, but it can cause headaches, nausea, and make you dizzy.
So you have finished reading the how to make a flashlight flicker topic article, if you find this article useful, please share it. Thank you very much. See more: how to make lights flicker, flashlight flickering fix, why is my phone flashlight flickering, nebo flashlight flickering, how to get an led to flicker, flashlight flickering android, how to make a flashlight brighter, blinking flashlight iphone