
You are looking for information, articles, knowledge about the topic nail salons open on sunday near me how to make river cane arrows on Google, you do not find the information you need! Here are the best content compiled and compiled by the https://chewathai27.com team, along with other related topics such as: how to make river cane arrows harvesting river cane for arrows, making bamboo arrows, making primitive arrows, how to taper bamboo arrows, sinew for bow making, huntprimitive youtube, bamboo bow, red cedar bow
Contents
What is the best wood to make an arrow out of?
Woods are various, but currently the most common is pine. Port Orford cedar is a traditional favourite; it is lighter and holds its straightness better than pine. Good shafts in this material are however more difficult to get hold of. Other woods are used such as; ash, birch, poplar, hazel, beach, and oak.
Can you make your own arrows?
Building your own arrows allows you to save about 5 to 10 dollars per dozen, but there’s an even better reason for building your own. You can experiment with all the components, with the various fletching styles and shaft sizes until you find the perfect arrow for your bowhunting requirements.
Can you make arrows out of bone?
Arrowheads can be made out of just about anything workable and durable, including glass, scrap metal, coins, rock or bone.
Is bamboo good for making a bow?
Taking it back to basics
Bamboo is the perfect material for a bow as it’s flexible; a bow must be able to flex and spring back to shape, to give the arrow its much-needed propulsion!
Does pine make good arrows?
Better target arrows are made of imported Norway Pine and Port Orford Cedar. Excellent hunting arrows are also made of these woods.
Is bamboo good for arrows?
Although bamboo and cane arrows can be a little on the delicate side, they make excellent and super fast hunting or target arrows if properly tuned.
What kind of wood did Indians use to make bows and arrows?
Ash, hickory, locust, Osage orange, cedar, juniper, oak, walnut, birch, choke cherry, serviceberry, and mulberry woods were used.
Is fletching your own arrows worth it?
the short answer is it is totally worth it. The one thing that you don’t get as frustrated when a fletch comes off. You simply take it home and replace it.
Are bone arrows better than normal arrows the forest?
Gameplay. Bone arrows do 40% more damage than regular arrows. Bone arrows, like all other arrows, are capable of head shots. This will most likely instantly kill a cannibal if it strikes them in the head.
How long does it take to make an arrow?
50 minutes to cut the shaft. 30 minutes for fletching. 15 minutes for attaching the arrowhead. 25 minutes to make the arrowhead itself.
How do you craft an arrow in Minecraft?
Add Items to make an Arrow
In the crafting menu, you should see a crafting area that is made up of a 3×3 crafting grid. To make an arrow, place 1 flint, 1 stick, and 1 feather in the 3×3 crafting grid.
How do you make an arrow on the keyboard?
- Make the “left” arrow : Alt + 2 7 : ←
- Make the “right” arrow : Alt + 2 6 : →
- Make the “down” arrow : Alt + 2 5 : ↓
- Make the “up” arrow : Alt + 2 4 : ↑
How do you draw arrows?
- Step 1: First, draw 2 parallel lines.
- Step 2: Next, draw a small dot centered between the parallel lines, but out to one side. …
- Step 3: Next, draw two perpendicular lines at the “dot” ends of the lines you just made. …
- Step 4: Last, connect the ends of the lines you just drew to the dot.
Making River Cane Arrows – Traditional Bowhunter Magazine
- Article author: tradbow.com
- Reviews from users: 27696
 Ratings
 - Top rated: 4.4
- Lowest rated: 1
- Summary of article content: Articles about Making River Cane Arrows – Traditional Bowhunter Magazine Soak a thin strand of leg or back sinew and then chew it for several minutes until it’s completely softened and rehydrated. Then wrap it around … …
- Most searched keywords: Whether you are looking for Making River Cane Arrows – Traditional Bowhunter Magazine Soak a thin strand of leg or back sinew and then chew it for several minutes until it’s completely softened and rehydrated. Then wrap it around …
- Table of Contents:
About the Author Billy Berger
Related Posts
3 Comments
Leave A Comment Cancel reply
Title

Making River Cane Arrows
- Article author: www.tradgang.com
- Reviews from users: 25673 Ratings
- Top rated: 3.2
- Lowest rated: 1
- Summary of article content: Articles about Making River Cane Arrows Re: Making River Cane Arrows … Take a 3/8 open end wrench when searching. Slip it over the canes to find the right size. 3/8 is about right for … …
- Most searched keywords: Whether you are looking for Making River Cane Arrows Re: Making River Cane Arrows … Take a 3/8 open end wrench when searching. Slip it over the canes to find the right size. 3/8 is about right for … Making River Cane Arrows
- Table of Contents:
How to build cane / bamboo arrows – YouTube
- Article author: www.youtube.com
- Reviews from users: 2713 Ratings
- Top rated: 3.3
- Lowest rated: 1
- Summary of article content: Articles about How to build cane / bamboo arrows – YouTube Updating …
- Most searched keywords: Whether you are looking for How to build cane / bamboo arrows – YouTube Updating This video shows how I make my arrows that I sell to customers. There are many way to build arrow, this is how I have found the most success. I have taken ov…cane, bamboo, arrows, cedar, bow, primitive, archery, Billy Berger, Thad Beckum, Shawn Woods
- Table of Contents:
Arrows
- Article author: www.longbow-archers.com
- Reviews from users: 24572 Ratings
- Top rated: 3.5
- Lowest rated: 1
- Summary of article content: Articles about Arrows Updating …
- Most searched keywords: Whether you are looking for Arrows Updating Longbow Archers is a Reference Site for the Longbow with direct link in History, Associations, Competitions, Technical, latest Research and TrendsArrows,Medieval Arrows,longbow,Medieval longbow,LONGBOW,facts and information on the longbow,how to make a longbow, weapon used in medieval ages, medieval warfare,how to shoot a traditional longbow,bow,longbow archery,longbow archers,warbow,Fraternity of St George,medieval archers,traditional archery,roving marks,have a go at archery,artillery shooting,international shoots,associatons of archery,technique to shoot the longbow,longbowman,direct connection with history,weapons of war
- Table of Contents:
How to Make Primitive Arrows – The Basics
- Article author: practicalselfreliance.com
- Reviews from users: 29995 Ratings
- Top rated: 3.9
- Lowest rated: 1
- Summary of article content: Articles about How to Make Primitive Arrows – The Basics Updating …
- Most searched keywords: Whether you are looking for How to Make Primitive Arrows – The Basics Updating
- Table of Contents:
Reader Interactions
Primary Sidebar
Footer

Sensible Survival: A Quickie River-Cane Arrow
- Article author: sensiblesurvival.blogspot.com
- Reviews from users: 43635 Ratings
- Top rated: 4.6
- Lowest rated: 1
- Summary of article content: Articles about Sensible Survival: A Quickie River-Cane Arrow River cane makes better arrows because it is round. Bamboo has a tendency to have a groove or flat area on one se of the canes, which does not … …
- Most searched keywords: Whether you are looking for Sensible Survival: A Quickie River-Cane Arrow River cane makes better arrows because it is round. Bamboo has a tendency to have a groove or flat area on one se of the canes, which does not …
- Table of Contents:
Pages
Friday January 28 2011
Welcome to Sensible Survival
Blog Archive
Some Interesting Sites Dealing with Preparedness and Wilderness Survival
Subscribe To
Making Bamboo Arrows : 10 Steps (with Pictures) – Instructables
- Article author: www.instructables.com
- Reviews from users: 35262 Ratings
- Top rated: 4.5
- Lowest rated: 1
- Summary of article content: Articles about Making Bamboo Arrows : 10 Steps (with Pictures) – Instructables Updating …
- Most searched keywords: Whether you are looking for Making Bamboo Arrows : 10 Steps (with Pictures) – Instructables Updating Making Bamboo Arrows: INTRODUCTIONA Primitive Technology Disclaimer.I firmly believe that in Preindustrial Societies, the onus of learning was on the pupil. Anyone who wants to succeed will find a way to learn. Real learning is an active endevor. We learn best by care…
- Table of Contents:
Introduction Making Bamboo Arrows
Step 1 Making (quality) Bamboo Arrows
Step 2 Straightening Shafts
Step 3 Removing the Nodes
Step 4 Building the Nocks
Step 5 Cutting the Nocks
Step 6 Forshafts
Step 7 Prepping Feathers
Step 8 Fletching
Step 9 Points
Step 10 Test Drive
Be the First to Share
Recommendations
33 Comments

River Cane Arrows – Shannon Outdoors
- Article author: shannonoutdoors.com
- Reviews from users: 12802 Ratings
- Top rated: 3.4
- Lowest rated: 1
- Summary of article content: Articles about River Cane Arrows – Shannon Outdoors River cane arrows may have small dips and bumps but when properly spined will shoot perfectly. These arrows are built to +- 2 pounds in spine and +- 10 grains … …
- Most searched keywords: Whether you are looking for River Cane Arrows – Shannon Outdoors River cane arrows may have small dips and bumps but when properly spined will shoot perfectly. These arrows are built to +- 2 pounds in spine and +- 10 grains …
- Table of Contents:
Description
Reviews
Related products
Lightning Bolt
Sinew Backed Bows
Smokin’ Sudbury
We are here to help
Footer
Arrows — Dan Spier
- Article author: www.danspier.com
- Reviews from users: 36396 Ratings
- Top rated: 4.1
- Lowest rated: 1
- Summary of article content: Articles about Arrows — Dan Spier River cane is a type of plant similar to bamboo that grows in low, wet areas such as creek and river banks–thus the name “river cane.” The stalks of this plant … …
- Most searched keywords: Whether you are looking for Arrows — Dan Spier River cane is a type of plant similar to bamboo that grows in low, wet areas such as creek and river banks–thus the name “river cane.” The stalks of this plant …
- Table of Contents:
See more articles in the same category here: 670+ tips for you.
Making River Cane Arrows
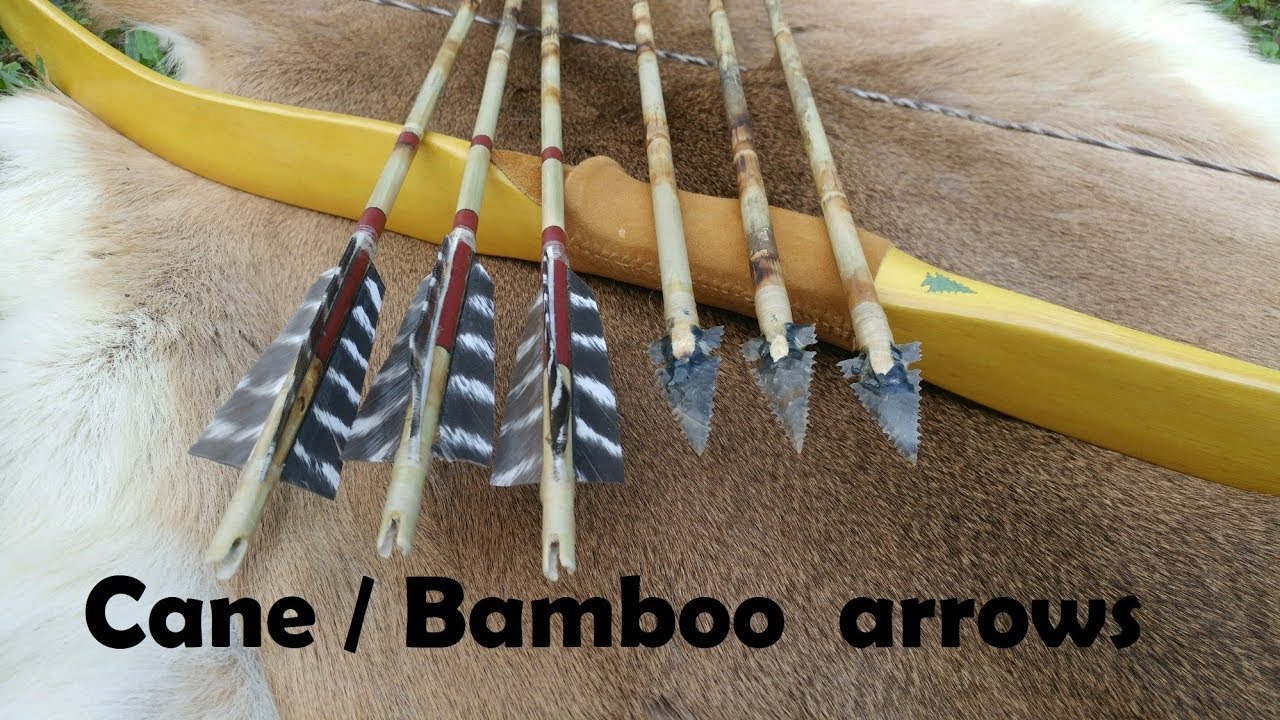
For hundreds and probably thousands of years, native people of the southeastern United States used river cane for many important material goods. It was used to make dwellings, it was split and woven into strong mats and baskets, it was shaved on one side to make razor-sharp knives, and made into blowguns, spears, and arrows. Early Spanish accounts describe southeastern Indians armed with arrows “…made of certain canes…like reeds…” as well as the incredible force with which those arrows were propelled. River cane would split upon hitting the chain mail of the Spanish and create serious wounds when it impaled the wearer with long, sharp splinters.
River cane is the only bamboo native to North America. It’s commonly found along floodplains and river bottoms in many southeastern and midwestern states. In prehistory it was much more widespread, forming massive canebrakes that would stretch for long distances. Early settlers converted those fertile floodplains into farmland, greatly reducing river cane’s footprint.
The most relevant use of river cane today is for arrows, and for that it’s superb. Besides requiring minimal work to be made into an arrow, it’s incredibly strong, possesses a gradual taper for a natural forward-of-center balance, straightens easily, and stays straight. When properly matched to a bow it flies perfectly, achieves excellent penetration, and provides pinpoint accuracy. I consider myself lucky to live in Georgia, where I have unlimited access to this incredible natural arrow material.
To begin, a source of river cane must first be located. It likes bottomlands and floodplains where its tendril-like roots can spread easily through soft, silty soil. Not all stands of river cane are equal, however. Some cane has severe kinks at the joints, making it useless for arrows. Other stands contain very straight cane with almost perfectly aligned joints. I suspect genetics or local growing conditions may affect the straightness of certain patches. As in prehistory, you must search until you find the best, straightest cane.
I prefer arrow cane between 1/2 and 5/8 inch in diameter at ground level and seven to eight feet tall. That size gives the perfect taper and thickness for arrows. Sight down each cane to ensure there are no severe kinks, and then cut them at ground level with a pair of pruning shears. This doesn’t kill the cane, but actually stimulates new shoots since cane grows from long roots that spread like runners a few inches under the ground. I usually cut ten to twenty shafts, wrap them together with a spiral wrap of twine, and then take them home to let them season. I leave them tied in the bundle and check the tightness of the twine once a week. As the cane dries it shrinks, and the wrapping will loosen. To prevent the cane from warping with this new-found freedom, retighten the twine as needed so the canes stay straight. Retighten the twine as needed and let the cane season for at least six weeks.
Once dry, the cane will likely need straightening. This is a joy because cane straightens very easily and holds that straightness better than any other arrow material. I begin by first heating the joints over a small fire or gas stove. Move each section in and out of the heat, slowly but thoroughly heating the cane and taking care not to scorch it. When it reaches a certain temperature, it can be bent straight with surprising ease. Once that joint is corrected, let it cool and then move to the next joint. Cane gets hot, so use pot holders during this process.
Once the joints are straight, the sections between the joints will need attention. Using the same process as before, heat and straighten the crooked sections between the joints and then sight down the shaft as it’s rotated to determine which crooked spots still need correcting. This usually requires several straightening sessions. Once straight, leave the shafts for a day or two and then recheck them. Straighten any shafts that drift off course.
The joints on river cane usually swell to a slightly thicker diameter than the rest of the cane. Though it’s tempting to scrape them down so they are the same diameter as the rest of the shaft, leave them thicker. Reducing the joints to the same diameter as the rest of the shaft will severely weaken the shaft at that point. Early in my arrow making career, I broke several arrows while target shooting because I had scraped the joints down. The arrows couldn’t withstand any glancing shots that side-slapped the target. After inspecting the broken shafts, I realized my mistake. I now “leave ’em proud” and have never had one fail.
As stated earlier, cane has a gradual thickness taper from one end to the other. This makes it very easy to select the area of cane that will have the correct spine, or stiffness, for your particular bow. Need stiffer spine? Simply make your arrow from the thicker portion of the cane. Weaker spine can be obtained by making the arrow from the skinnier portion. A spine tester can be used, though experience will tell you, just by feel, what will work.
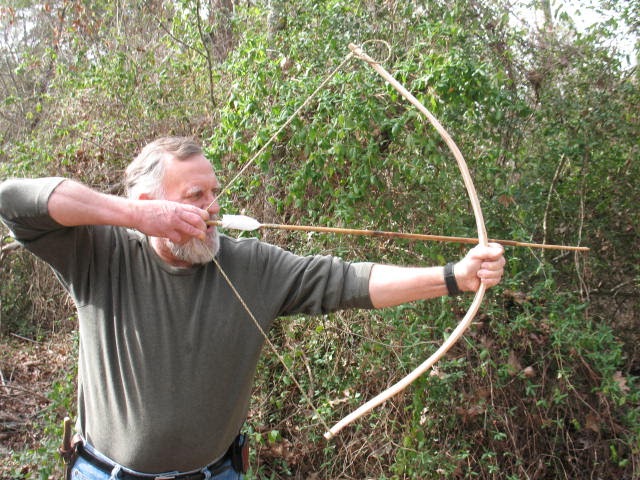
I prefer my arrows to be several inches longer than my draw length. The extra length that protrudes beyond the bow at full draw acts as a counterbalance to the thrust the arrow experiences when it’s shot. This helps the arrow bend around the handle and fly true to the target. I cut my cane arrows so they are two inches longer than my draw length, and then I add a hardwood foreshaft to the tip to give it a bit more length. I recommend that you cut the arrow several inches longer than your draw length for the same reasons.
The thicker end of the cane should always be the forward portion of the arrow. This thicker, heavier end gives a natural forward-of-center balance point to the arrow, resulting in better arrow flight. I’ve examined countless Native American reed arrows in museums. All of them were done the same way, with the larger end forward and a hardwood foreshaft inserted, so we’ll follow suit.
Cane is so slick that wrappings won’t stay put, so use a stone flake or coarse sandpaper to scratch up the forward inch of the cane in preparation for a reinforcing wrap of sinew. I’ve seen old reed and hardwood arrows in museums that were treated the same way. Soak a thin strand of leg or back sinew and then chew it for several minutes until it’s completely softened and rehydrated. Then wrap it around the front of the shaft. Tuck the sinew under itself on the last wrap, pull it tight, and set it aside to let the sinew dry thoroughly.
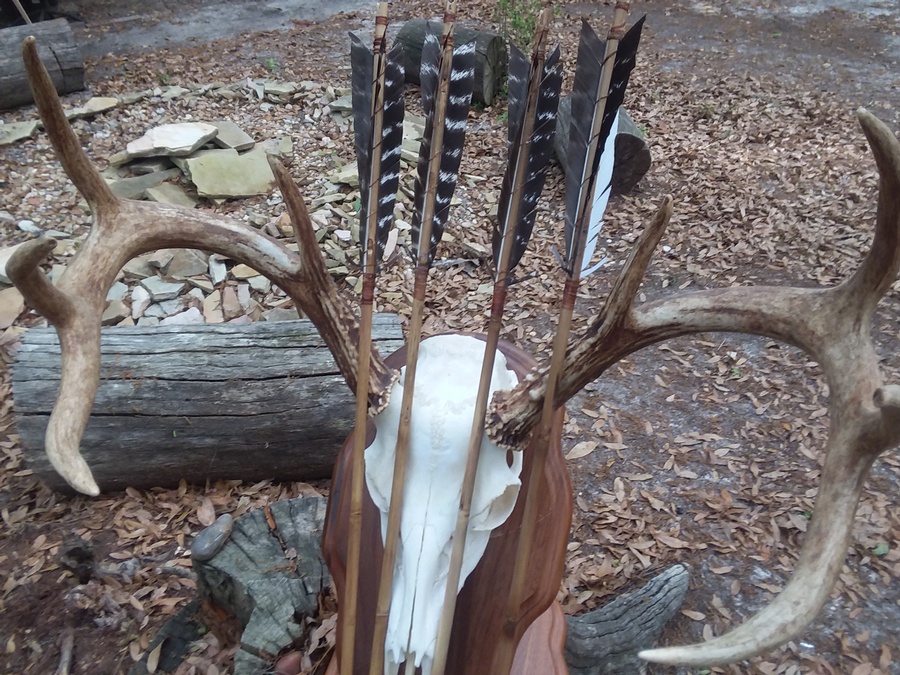
Scuff up the area where the feathers will be applied with 120-grit sandpaper so the glue will grip. If you intend to paint under the feathers, this also provides a surface to apply the paint. Carve and shape the nock on the smaller end of the cane, then scratch up the area just forward of the nock with a sharp flint flake or coarse sandpaper so the sinew wrapping will grip. Scratch up the area where the forward fletch wraps will go as well. Wrap the rear of the feathers on with a strand of chewed sinew or nylon thread, taking care to space the feathers equidistant from each other. Tuck the sinew under itself and pull it tight on the last wrap.
To prevent the feathers from expanding and lifting away from the shaft, dip your finger in water and wet the underside of each quill for several minutes to swell the feathers. While the quill is still wet, begin wrapping the fronts of the feathers down with another wrapping of sinew. I gently pull the feathers forward with each wrap to ensure the feather is stretched and won’t pull away from the shaft. Offset the front of each feather in relation to the rear so the arrow will spin in flight and improve accuracy. When wrapping is completed, set the shaft aside to let the sinew dry.
To glue the feathers, push each feather sideways to expose the underside of the quill, then use a flattened toothpick to apply glue to the underside of the quill. I prefer hide glue or wood glue for this purpose, since it takes time to dry and lets me apply glue to all three feathers. However, Super Glue or modern fletch glue can also be used. Then I split the web of each feather and apply a spiral wrapping of thin thread to hold the quill tight against the shaft while the glue dries. This ensures a strong glue bond. Once the glue dries, remove the thread wrapping and trim the feathers to their appropriate height with a pair of scissors.
Now a foreshaft needs to be shaped and fitted into the front of the arrow. I prefer dogwood for my foreshafts, although any hard, dense wood like oak, hickory, or mesquite can also be used. It needs to be straight, and it needs to be carved so it has a smaller diameter end that fits into the cane for about an inch, with a shoulder that butts up against the cane. This shoulder prevents the foreshaft from being shoved into the cane when the arrow strikes the target.
Once the foreshaft is shaped and fitted, it can be tipped with a variety of points. It can be left blunt for practice or small game hunting, or it can be tipped with rubber blunts, steel trade points, or hunting points of stone or bone. Multiple foreshafts with different point types can be made for a single arrow, and different foreshafts can be inserted depending on the type of game you intend to hunt.
Properly made cane arrows will amaze you with their performance. They fly perfectly and are incredibly durable and amazingly accurate. I’ve used my own primitive cane arrows to pick squirrels off branches at twenty yards, shoot bumblebees off flowers, and shoot squirrels through the heart. I even made a perfect vital shot on a rabbit at forty yards with one. I’ve had deer drag cane arrows through thick brush and heavy wild hogs fall and bend them into horseshoe shapes and they haven’t broken. For me, there is immeasurable satisfaction in making a “primitive” arrow that matches and in some cases exceeds the performance of the most advanced arrow available today.
Making River Cane Arrows
Is there some trick to finding River cane that isn’t tapered real severe over a 30″ length?
I’ve looked at a bunch of threads and web sites about making them and I really haven’t seen that part mentioned, yet all the arrows I see look pretty uniform in diameter. I have access to a bunch of it around here and about the only thing I could think of was to take an arrow with me and try to get them as close to that as I could. I can only seem to find it about 3 nodes long then it’s either really big or really small.
I want to try my hand at it but I’m scratching my head over this. I don’t see the ones I’ve found so far working very well.
?????
Edit:
Mods I did it again, this same post is in the classifieds, please delete. We need a delete button here so we can take care of this ourselfs.
Arrows
Arrows used in longbow shooting have to be made out of wood and have natural feathers. Woods are various, but currently the most common is pine. Port Orford cedar is a traditional favourite; it is lighter and holds its straightness better than pine. Good shafts in this material are however more difficult to get hold of. Other woods are used such as; ash, birch, poplar, hazel, beach, and oak. Ash and oak are particularly suited for making war/livery/military arrows, which have to weigh between 1000 and 1500 grain.
The points are usually made of brass, iron or horn. For the nocks plastic is allowed, but the more traditionally-minded use inserts made of horn or hardwood. The feathers or fletching can be either glued onto the arrow-shaft (the most usual method), or they can be bound with thread as well as glued, as they would have been in the Middle-Ages.
The photographs show arrows that have inset horn nocks and fletching that are glued and bound.
The photographs above show the different shapes of fletchings that can be used. Parabolic feathers (yellow and blue) are the most common and have the best flight characteristics. Their length varies from 1 and 1/4 inch to 5 inches (3.2 to 12.7cm). The white and grey-barred fletchings are known as shield fletchings and have a slightly more “authentic look”, but wind resistance is a little greater than for parabolic. Shield fletchings are usually between 4 and 6 inches long (10.2 to 15.2cm). The white and red fletchings are closest to “the real thing”. These fletchings are longer (up to 7 1/4 inches, or 18.4 cm) and their wind resistance is greater than the shield fletchings.
Points and knocks
The close-up shows (right picture) the lightness and thinness of the flight points. To the left 20 grain 1/4 inch brass; to the right a horn point, inserted and glued, weighing only 10 grains. The photograph to the left shows the difference between the feathers of a flight arrow and an ordinary arrow. The ordinary arrow is used for target shooting. Its fletchings are 4 inches long and 1/2 an inch high (10.2 x 1.3 cm).
The arrow will stabilize fairly quickly in flight in as little as 25 yards (23 m) from leaving the bow. The arrow to the right is a flight arrow. Its fletchings are only 1 and 7/8 inch long and 1/4 inch high (4.8 x 0.6 cm).
The arrow will take a least 50 yards to stabilize (46 m) after it has left the bow and is therefore not good (even quite dangerous) for target shooting. These are arrows that built for out and out distance shooting.
Both arrows have “full knock” inserts made out of horn.
The photograph on the right shows some very short arrows; they are in fact crossbow bolts. Crossbow bolt have a very flat shooting trajectory and are very fast. We have included the photograph to show they have been fletched with only two feathers. Two feathers do not give sufficient directional stability and such arrows can “plane” into unpredictable turns.
So you have finished reading the how to make river cane arrows topic article, if you find this article useful, please share it. Thank you very much. See more: harvesting river cane for arrows, making bamboo arrows, making primitive arrows, how to taper bamboo arrows, sinew for bow making, huntprimitive youtube, bamboo bow, red cedar bow