
You are looking for information, articles, knowledge about the topic nail salons open on sunday near me how to open gate cathedral ward on Google, you do not find the information you need! Here are the best content compiled and compiled by the https://chewathai27.com team, along with other related topics such as: how to open gate cathedral ward how to open all gates in cathedral ward, cathedral ward walkthrough, how to get to grand cathedral bloodborne, 3 gates cathedral ward, cathedral ward map, bloodborne how to open gate in central yharnam, cathedral ward enemy, how to get to old yharnam from cathedral ward
Contents
How do you get the door password in Cathedral Ward?
If you interacted with the skull in the Grand Cathedral, you will now have the password: “Fear the Old Blood”. With the door open, make sure to inspect the “Gatekeeper” to get a Madman’s Knowledge as you head down the staircase and into the woods.
How do I get into the Cathedral Ward without emblem?
After defeating blood starved beast go back to cathedral ward and enter the door on the right. Now once you’re at the healing church workshop go right and drop down the hole. Enter the building and roll your way down.
How do I get into the Cathedral Ward elevator?
Starting at the Cathedral Ward Lamp, take your first right into the now unlocked door, leading to a room with an elevator. As you climb aboard to ascend to the top, turn around and face the opposite direction.
How do I get the key to the Upper Cathedral Ward?
Directly to your right an Ogre is waiting, take care of him, then look down into the square opening and you will see a dead man in a chair with an item. Drop down and receive the Upper Cathedral Key.
How do you open the main gate Stormveil?
Walk through the door, pillage the remains for Golden Rune [5], push the lever to open the Stormveil Castle main gate, exit through the door facing east and pillage the remains for Commoner’s Simple Garb, and activate the Gateside Chamber site of grace.
How do I find my Bloodborne password?
To get the password, the player must defeat Vicar Amelia and interact with the skull on the altar. Inspecting his corpse yields a Madman’s Knowledge.
What is Vicar Amelia weak to?
Being a beast, Vicar Amelia is weak against fire and serration damage. Rope Molotov Cocktails can be effective when Vicar Amelia is stunned. The Flamesprayer can stun-lock her and deal massive damage.
What does fear the old blood mean?
The old blood is a reference to the blood of a Great One, found deep within the chalice dungeons. This event and discovery is pivotal in setting the scene for the game and sealing the fate of Yarnham and its citizens. The academics at the college of Byrgenwerth discovered the potential healing properties of the blood.
What special emblem is needed to open the gate in Bloodborne?
The Hunter Chief Emblem is a Key Item in Bloodborne, and allows access towards the Grand Cathedral in the Cathedral Ward. This emblem is the only key that will allow you access to the plaza leading to Vicar Amelia, and must be bought from the Hunter’s Dream Merchant for 10,000 Blood Echoes.
How do you use the elevator in Cathedral Ward?
Once the Brainsucker is dead, pick up backtrack along the street and you’ll find an elevator which will take you up and return you to Cathedral Ward at the gate just beyond the Tomb Of Oedon. You can now operate the lever and open the gate giving you a shortcut back to the Tomb and the Lamp.
How do you open the abandoned workshop door in Bloodborne?
In order to access the Abandoned Old Workshop, you must first defeat the Blood-Starved Beast in Old Yharnam and then speak to Gehrman back in Hunter’s Dream. This will then open up the right-hand door from the Cathedral Ward lamp, which leads to a great tower, the Healing Church Workshop.
How do I open the door to Vicar Amelia?
Her fight arena can be reached without using the Hunter Chief Emblem. This is done by killing the Blood-Starved Beast, which triggers the unlocking of the door in Oedon Chapel that leads to the Healing Church Workshop. This area can be traversed to get behind the gate that would normally be opened by the emblem.
Where do I get the radiant sword Hunter badge?
The Radiant Sword Hunter Badge is found inside of the Healing Church Workshop connected to Cathedral Ward. The Badge unlocks a number of rare items for purchase in the Hunter’s Dream: Ludwig’s Holy Blade.
How to open the main gate in Cathedral Ward in Bloodborne? | FAQ – Bloodborne Game Guide & Walkthrough | gamepressure.com
- Article author: guides.gamepressure.com
- Reviews from users: 11484
 Ratings
 - Top rated: 4.9
- Lowest rated: 1
- Summary of article content: Articles about How to open the main gate in Cathedral Ward in Bloodborne? | FAQ – Bloodborne Game Guide & Walkthrough | gamepressure.com First of all, you need to defeat the Cleric Beast, the boss on the Great Brge. You then receive the option to buy the Sword Hunter Badge from … …
- Most searched keywords: Whether you are looking for How to open the main gate in Cathedral Ward in Bloodborne? | FAQ – Bloodborne Game Guide & Walkthrough | gamepressure.com First of all, you need to defeat the Cleric Beast, the boss on the Great Brge. You then receive the option to buy the Sword Hunter Badge from …
- Table of Contents:

Bloodborne – How To Open The Main Gate in Cathedral Ward – YouTube
- Article author: www.youtube.com
- Reviews from users: 1478 Ratings
- Top rated: 4.5
- Lowest rated: 1
- Summary of article content: Articles about Bloodborne – How To Open The Main Gate in Cathedral Ward – YouTube Updating …
- Most searched keywords: Whether you are looking for Bloodborne – How To Open The Main Gate in Cathedral Ward – YouTube Updating How to open the main gate in cathedral ward. Please click like if this helps you!bloodborne, how to, open, main, gate, playstation, ps4, guide, walkthrough
- Table of Contents:

IGN Error 403 – Unavailable (IFW-U01)
- Article author: www.ign.com
- Reviews from users: 37548 Ratings
- Top rated: 4.3
- Lowest rated: 1
- Summary of article content: Articles about IGN Error 403 – Unavailable (IFW-U01) Updating …
- Most searched keywords: Whether you are looking for IGN Error 403 – Unavailable (IFW-U01) Updating
- Table of Contents:
IGN Error 403 – Unavailable (IFW-U01)
- Article author: www.ign.com
- Reviews from users: 7082 Ratings
- Top rated: 3.8
- Lowest rated: 1
- Summary of article content: Articles about IGN Error 403 – Unavailable (IFW-U01) Updating …
- Most searched keywords: Whether you are looking for IGN Error 403 – Unavailable (IFW-U01) Updating
- Table of Contents:
Cathedral Ward | Bloodborne Wiki
- Article author: bloodborne.wiki.fextralife.com
- Reviews from users: 42293 Ratings
- Top rated: 4.2
- Lowest rated: 1
- Summary of article content: Articles about Cathedral Ward | Bloodborne Wiki Cathedral Ward walkthrough for Bloodborne: All items, enemies, … You must open the gate that has Messengers around the lever, … …
- Most searched keywords: Whether you are looking for Cathedral Ward | Bloodborne Wiki Cathedral Ward walkthrough for Bloodborne: All items, enemies, … You must open the gate that has Messengers around the lever, … Cathedral Ward walkthrough for Bloodborne: All items, enemies, NPCs and secrets for Cathedral Ward in Bloodborne
- Table of Contents:
Question: How Do You Open The Gate In The Upper Cathedral Ward? – glantraethfc.com
- Article author: glantraethfc.com
- Reviews from users: 13546 Ratings
- Top rated: 4.8
- Lowest rated: 1
- Summary of article content: Articles about Question: How Do You Open The Gate In The Upper Cathedral Ward? – glantraethfc.com The Healing Church Workshop is found to the right of the Cathedral Ward lamp, but the door only … With the Orphanage Key in-hand the door will now open. …
- Most searched keywords: Whether you are looking for Question: How Do You Open The Gate In The Upper Cathedral Ward? – glantraethfc.com The Healing Church Workshop is found to the right of the Cathedral Ward lamp, but the door only … With the Orphanage Key in-hand the door will now open.
- Table of Contents:
What level should I be to fight Ebrietas
How do you unlock the door at the top of the healing church
How do you get Bladestone chunks in Demon’s Souls
Where do I get the upper Cathedral key
How do you open the door to the celestial emissary
Is celestial emissary a great one
How do you get to unseen village
How do you open the door in Upper Cathedral ward
Where can I farm blood stone chunks
Where is healing church workshop
How do you farm insight
Is Upper Cathedral Ward optional
What level should I be for upper Cathedral ward
Can you Parry celestial emissary
What order should I fight the bosses in Bloodborne
Where do I go after ROM
How do you get to the abandoned workshop
Related Question Answers
Similar Asks
Bloodborne: Upper Cathedral Ward and how to beat Celestial Emissary | VG247
- Article author: www.vg247.com
- Reviews from users: 9384 Ratings
- Top rated: 3.6
- Lowest rated: 1
- Summary of article content: Articles about Bloodborne: Upper Cathedral Ward and how to beat Celestial Emissary | VG247 Take the doorway and head down the hallway to the right to find a Madman’s Knowledge; a Netherbeast will attack when you turn around to head … …
- Most searched keywords: Whether you are looking for Bloodborne: Upper Cathedral Ward and how to beat Celestial Emissary | VG247 Take the doorway and head down the hallway to the right to find a Madman’s Knowledge; a Netherbeast will attack when you turn around to head … The Upper Cathedral Ward is an optional area and so is the Celestial Emissary boss fight, but it’s worth it for the rewards.
- Table of Contents:
How to beat Celestial Emissary
Tagged With
Comments
More On Bloodborne
Latest Articles

Bloodborne: Cathedral Ward, unlock the Triumph gesture and find the Hunter Attire set | Eurogamer.net
- Article author: www.eurogamer.net
- Reviews from users: 26967 Ratings
- Top rated: 4.0
- Lowest rated: 1
- Summary of article content: Articles about Bloodborne: Cathedral Ward, unlock the Triumph gesture and find the Hunter Attire set | Eurogamer.net At this point, you can use the Oedon Tomb Key you got from the boss to open the gate here, but before doing so, go over the left-hand corner to … …
- Most searched keywords: Whether you are looking for Bloodborne: Cathedral Ward, unlock the Triumph gesture and find the Hunter Attire set | Eurogamer.net At this point, you can use the Oedon Tomb Key you got from the boss to open the gate here, but before doing so, go over the left-hand corner to … This article explains how to explore Cathedral Ward, unlock the Triumph gesture and find the Hunter Attire set in Blood…
- Table of Contents:
Exploring Bloodborne’s Cathedral Ward area
How to unlock the Triumph gesture in Bloodborne
How to kill the Gravekeepers and find the Hunter Attire set
Where to find Alfred in Bloodborne
Find the Old Yharnam lamp
Tagged With
Comments
More On Bloodborne
Latest Articles
See more articles in the same category here: 670+ tips for you.
How to open the main gate in Cathedral Ward in Bloodborne? | FAQ – Bloodborne Game Guide & Walkthrough
How to open the main gate in Cathedral Ward in Bloodborne? | FAQ Bloodborne Guide
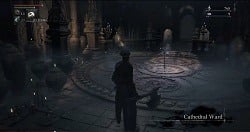
The gate across which you access the main yard.
After you defeat Father Gascoigne you will walk into the Cathedral ward. As you exit the cathedral through the left exit, and turn right, you make it to the large locked gate, after you climb the big stairs. Opening it is necessary to access the main yard and then, the rest of the locations. There are two different ways to open the gate.
The bigger the opponents, the more Blood Echoes.
The first one is not too demanding, nor time consuming. First of all, you need to defeat the Cleric Beast, the boss on the Great Bridge. You then receive the option to buy the Sword Hunter Badge from Messengers, in the Hunter’s Dream. After you buy it, you can use it to open the gate. The only problem at this stage, is the price of the badge (10 000 Blood Echoes). If you run out of opponents, you can respawn them, by returning to the Hunter’s Dream, and back to Cathedral ward. You also receive lots of cocktails for killing the large opponents, which is why killing them is highly profitable. After you have collected the amount, effect the purchase.
The balcony that you get to, after you use the lift – by jumping off it, you open all the gates.
As a matter of fact, you do not need to open the gate at this side, which would require you to spend your Blood Echoes. This method is the easiest and the fastest, but there also is an option to open the gate at the other side. To do this, you need to visit Old Yharnam, where you need to defeat the Blood-starved Beast. This is when, at the Odeon’s Chapel the door on the right will swing open – it leads to the Healing Church Workshop. After you jump off it, o the very bottom, and go left at the intersection (after you leave the building) you find a lift to Cathedral ward. Climb down from the balcony that you get to and open the nearest gate, and then another two, including the one leading up to the central yard.
Bloodborne Wiki Guide
The Forbidden Woods is the third required area in Bloodborne, that can be entered after defeating Vicar Amelia in the Cathedral Ward.
Finding the Forbidden Woods
advertisement
From Vicar Amelia’s Grand Cathedral, head down the long staircase until you reach the large plaza with the two Cathedral Giants. Look for the one kneeling down beside a large doorway and head past him, then turn left to head into a small room that has a narrow bridge going over the alley below. On the other side of the small bridge you’ll find Alfred, who will tell you a bit more about the Vilebloods he seeks to destroy in Cainhurst Castle, and how he is looking for a way to get there.
Head down the stairs and to the large imposing door, where a voice will ask for a password. If you interacted with the skull in the Grand Cathedral, you will now have the password: “Fear the Old Blood”. With the door open, make sure to inspect the “Gatekeeper” to get a Madman’s Knowledge as you head down the staircase and into the woods.
Loading
From the entrance to the woods, take the long winding path down the hill. After the first set of stairs, check around a tree to the right to get some Thick Coldblood. As you get close to a large windmill, you’ll run into a Wolfman, and an Afflicted Townsfolk on a small hill who will start lobbing oil urns at you. While they don’t do much damage – be careful not to get on fire after being hit by one. Be sure to check the corpse near them for a Pebble. From here, you can go right past the oil thrower up side path that leads to an Executioner guarding a small cave with some a Madman’s Knowledge and an Adept Blood Gemstone. The path on the left will head down to the large windmill (the gate is locked) and the waypoint lantern for the woods. There’s a few Carrion Crows hiding among the graves by the locked door, and a body with some Antidotes around the side of the building. In addition, look for the two townsfolk across the bridge – one with a rifle. From here you can see another large windmill in the distance – these two windmills will be your main landmarks in this dreary forest, so remember them.
Heading over the bridge to take out the townsfolk, use caution. Notice the planks of wood in the middle of the road? They hide a pressure trap that will release a spiked log in the trees to come smashing down. Not only will it swing back and forth several times, but will eventually snap and go rolling towards the side of the bridge – so make sure you either avoid the trap or get clear once it’s sprung. Also make sure to head left around the cliff edge behind some graves to find Twin Blood Stone Shards.
Continuing on, the road angles down on the left, with a higher path on the right. The raised area has a patrolling Wolfman, while the lower path leads into a veritable trap of Afflicted Dogs and townsfolk, as well as a body with some Coldblood Dew. Many of them use torches and oil urns as well, making a deadly combination to get caught up in. Either lure the main aggressors away and charge the oil throwers, or drop down behind them from the path above. As you clear the area with the bonfires, be sure to loot the bodies for some Blood Vials and Twin Blood Stone Shards At the end of this section you can head down a small path on the right with a Skull Beast who will flee towards some Carrion Crows at the end of the path.
The next road leads down a right path, but do not take it. It leads to a wooden platform that will break, sending you on a one-way trip into a small village full of hostiles – with no means of escape. Instead, head up the hill on the left that’s covered in yellow flowers. This leads up to an old shack with a Wolfman guarding a corpse with some Beast Blood Pellets, and beyond that, another body with Thick Coldbood. Head down the path here to the real entrance to the village. This entrance has its own booby-traps: beware the other spike log trap just before the gate into town.
advertisement
Inside the small village is a building on the right containing two townsfolk along with a body holding a Pungent Blood Cocktail. There’s also an alcove on the left with more townsfolk (one sitting down) near a body with some Blood Vials, and two more near the center of the town, with a Wolfman on the far side. Beware the village center, as the wooden planks will break open if you try and cross, and you’ll fall into a small pit full of Carrion Crows, as well as a body with some Antidotes. Be sure to check each building for items, and the building on the far right will have a locked gate, and a corpse carrying some Pungent Blood Cocktails. You can also head down a small path near the center of the village (by the dead burning horse) to go behind some of the shacks. The first building has nothing, but the second will have a corpse holding some Beast Blood Pellets.
Trying to head through the town to the path on the other side ends in a large pool full of Crippled Ghouls. Notice the color of the pool? It’s slick with oil, and the Afflicted Townsfolk above will toss molotovs from above. A direct hit will likely kill you, so unless you up for sprinting and hoping for the best, head back to the village entrance gate, and go right up the hill. As you head up, you can grab some Quicksilver Bullets from the body on a ridge above the shacks. Note the lantern by a little shack on the left. Speak to the occupant to get some cryptic advice about a chapel to the right of the Great Cathedral. He’ll give you a Tonsil Stone along with the advice, and you can use it to get to an optional area – The Nightmare Frontier.
Further up the hill is a large building with a gate on the side. Trying to get through this gate will only have an Afflicted Townsfolk shut it on you – thought you can check the inside the building for a Blue Elixir. Going around the other side leads through several dog kennels, and many will leap out to attack given the chance. Don’t give them that chance. The other side of the building has a ladder leading to the roof, where several Carrion Crows guard a corpse wearing White Church Attire.
Loading
Secret Shortcut to Central Yharnam
You can take a left from the dog kennels that leads into a small cave entrance. As you head down the slope you can find a corpse with some Antidotes. These will become incredibly useful as you reach the main cave chamber. The cave is mostly covered in purple poisonous water that will rapidly drive up your slow poison meter just by standing in the water. To make matters worse, three Frenzied Coldblood. Make your way across to the small island where the giant was resting, and run to the giant grave in the middle to quickly grab a Dirty Blood Gemstone. Then run behind the large rock on the left to find a Nourishing Blood Gemstone. Now run from the island to the other passage at the far side. From here you can take a detour to where the far giant patrols, and quickly grab more Frenzied Coldblood. Back in the other tunnel, head up the slope to a ladder. This ladder leads all the way into a small graveyard that contains some Coldblood Dew and a gate leading to
Speaking of Madman’s Knowledge by a ladder leading up to a rooftop full of Carrion Crows and an entrance to the second floor of the clinic. Here you can head left to find an entirely different type of enemy – a Communion Rune, and the door to the left leads to Oedon Writhe Rune if you beat her, but you won’t get a potentially important item if you don’t visit her later instead. Iosefka won’t go down without a fight either, boasting a
Whatever you decide to do, be sure to check the room where you first started the game. There is a new item on the table you woke up on – a Cainhurst Summons – addressed directly to you! This item can be used to travel to the optional area,
You can take a left from the dog kennels that leads into a small cave entrance. As you head down the slope you can find a corpse with some. These will become incredibly useful as you reach the main cave chamber. The cave is mostly covered in purple poisonous water that will rapidly drive up your slow poison meter just by standing in the water. To make matters worse, three Cathedral Giants (unclothed and weaponless – but no less dangerous) are patrolling the cave. There are also several Carnivorous Worms lurking just under the water, mostly around the small island one of the giants is resting on. The giants may not have their weapons , but they still have a long reach with their fists, and can do a running start that boasts impressive range. Lure them one at a time to the cave entrance and choose your attacks carefully so as not to get out-ranged. From the entrance, run right along the shore to find a body with some. Make your way across to the small island where the giant was resting, and run to the giant grave in the middle to quickly grab a. Then run behind the large rock on the left to find a. Now run from the island to the other passage at the far side. From here you can take a detour to where the far giant patrols, and quickly grab more. Back in the other tunnel, head up the slope to a ladder. This ladder leads all the way into a small graveyard that contains someand a gate leading to Central Yharnam , and Iosefka’s Clinic – the first locked gate you saw in the game.Speaking of Iosefka , take the route down the stairs opposite the gate to find an Eldritch Horror , and aby a ladder leading up to a rooftop full of Carrion Crows and an entrance to the second floor of the clinic. Here you can head left to find an entirely different type of enemy – a Celestial Entity . These strange blue creatures will run right at you given the opportunity – but are weak to thrusting attacks. Past the first room is a chest with a, and the door to the left leads to Iosefka ‘s chamber. She’ll call out from above that you should leave while you have the chance. It’s up to you if you want to attack her or not – but know that attacking her now may get you anif you beat her, but you won’t get a potentially important item if you don’t visit her later instead. Iosefka won’t go down without a fight either, boasting a Threaded Cane and pistol, as well as Numbing Mist Blood Vials , and a magical attack that sprouts damaging tentacles from her arm.Whatever you decide to do, be sure to check the room where you first started the game. There is a new item on the table you woke up on – a- addressed directly to you! This item can be used to travel to the optional area, Cainhurst Castle
Loading
From the dog kennels, head up and around the path to defeat the Afflicted Townsfolk guarding the gate he locked on you. Then head towards the large hut near the top of the hill that a few Afflicted Dogs roam around. Beware. as an Abductor waits on the other side of the house, guarding some Blood Vials. You can enter the hut to find a magic item – the Beast Roar. From this part of the hill, you can climb onto the roof and do battle with the multiple townsfolk above the oil pool. Watch for the molotov throwers as you advance, and rush them before they can get a hit on you. When you finally reach the far side, you can drop down to a ledge below. This ledge has a body on it with several Molotov Cocktails, so make use of them and throw them at the Crippled Ghouls below. Any hit in the oil pool will instantly kill them. When you clear the ghouls to the far side of the pool, head right through a cave to unlock a shortcut from the village building and grab two Twin Blood Stone Shards.
Up ahead, a Wolfman stands on a left path guarding Twin Blood Stone Shards, while two townsfolk stand near a house on the right, with a rifleman on the roof above. Take them out and look down the long path leading to the other large windmill. There’s a cannon at the far end of the path, and someone is manning it. He’ll start firing as soon as you head to your right into the house and break the barrels to find a connection to the next house and from there just rush the cannon, and be careful a hit from the cannonball is sure to kill you. Watch for other townsfolk in the huts as you make your way up. The first hut on the right has some Blood Vials, and leads to the second hut on the right. There’s also a far hut on the left that has a Wolfman guarding some Beast Blood Pellets. Once you get to the last hut, sprint out and rush behind the cannon before he can fire (yes, he can still fire point blank). With the cannon out of the way, you can head into the large windmill. Don’t forget to check around the side to find a corpse with Twin Blood Stone Shards.
advertisement
Inside the dark and creepy windmill, you’ll see a lone man with a torch make his way down the stairs on the opposite side. You can follow him – and the windmill boasts no other dangers – but all is not as it seems. If you let him, the man will cross the bottom floor and stand before a corpse. You can try to get off a sneak attack, but be warned. If he turns to face you, he’ll grab his head in pain before – SURPRISE – it bursts into a deadly bouquet of snakes! These enemies are especially dangerous due to their ability to swing an axe, and use their multiple snake heads to attack with slow poison damage. Be especially careful if the enemy reaches out to grab you, as one grab and you’ll be dead.
With the Snake Head dead, grab the Madman’s Knowledge it was guarding. You have a few paths to take. The exit where the enemy was walking down the stairs leads to a drop off point lower down the windmill, where a Wolfman guards a ladder back up to a higher platform inside the windmill. There’s a body with a Cannon on a lower ledge, and you can take the opposite exit to find a Poison Knife by the exit. Outside you can find more Poison Knives, and a strange man is in the corner bent over three corpses. He will ask if you know of a safe place for him to say. He is also incredibly untrustworthy. If you decide to let him go to the chapel, you might as well say goodbye to everyone else you sent there. If you’re feeling bold, you can also try to kill him – but he won’t like that. He’ll turn into an Abhorrent Beast, a giant werewolf with electric attacks and even uses forceful sonic blasts. Fighting him is highly dangerous, unless you want to try running back into the windmill and poke at him – where it’s harder for him to attack you. If you manage to kill him, he’ll drop a Beast Rune
Back at the bottom of the windmill, one path leads to an elevator that can’t be used just yet, while another path leads outside and across a bridge. There’s another Snake Head here, and if you take the path above him, you can find some Twin Blood Stone Shards, and enter another elevator leading back to the first windmill, and the lantern waypoint.
Loading
This next area of the woods is going to get very confusing, and full of snakes. As you head down, you’ll see a literal Snake Pile. These guys move slow, but have long reaching attacks that cause slow poison, so remember your antidotes. As you engage the first one, be sure the one in a corner on the right doesn’t ambush you. On your left, grab the Shining Coins in front of the large tomb. There will be areas on both sides of the path, as well as the main road itself. Further down the left you’ll find another Twin Blood Stone Shards among the graves, and another beyond a large tombstone. Over on the left, find the other large tombstone for a Madman’s Knowledge. There’s also some Twin Blood Stone Shards by the cliff beyond some trees. Further up you can find another one tucked behind a large grave by the cliff, past even more snakes. If you head around the large tomb by a cliff, you can stay by the cliffside to find another Snake Head who stands by a corpse with more Twin Blood Stone Shards.
As you continue down the path, a Greater Snake Pile will rear their collective heads, in addition to the multitude of biting snake heads, the back one will also spit concentrated poison when you stray to far from it. They can be tough to find an opening, so dodge and race up with big attacks to finish them quickly. Another Greater Snake Pile is up a path on the right. There’s Twin Blood Stone Shards up at the top of the path here, and Thick Coldblood to the right of the Greater Snake Pile, as well as a Clear Deep Sea Rune behind the large tomb.
Once you defeat the Greater Snake Pile in the middle of the road, take a right under the path that had the other snakes to find a group of three Snake Heads. One will be facing you, so lead him out first, then sneak up on the other two. Once they are dead you can help yourself to a Blood Stone Chunk. Continuing down, there’s a small cleft on the left containing two Greater Snake Piles. They can be tough to lure out, so be careful if you drop in from above. If you manage to defeat both of them, you can help yourself to a Deep Sea Rune, Twin Bloodstone Shards, and a Murky Blood Gemstone. From there, another greater snake pile guards a large tombstone on the right with some Frenzied Coldblood around the corner. You can also take a left and go up a right slope to find more Frenzied Coldblood.
Follow the path and take a left to find a Giant Boar facing a large tombstone. You can sneak up behind it and do a sneak attack and preform a very painful looking visceral attack. Beware the two Snake Heads that patrol the area under the fallen log, as they can summon more snakes if they see you. Just up ahead you can run over a fallen log to find a corpse on the other platform with Graveguard Attire. It’s missing a helmet, which is actually on the corpse above. To get it, head back up the main path to where you fought the first greater snake pile in the middle of the road. Head up the right side along a large ridge where you can make out some creatures below. Don’t drop in just yet, and look for a part where you can jump from a rock to the other side of the ridge. Follow it to get to the Graveguard Mask. Head back to the ravine and drop down at the very end. Here you’ll have to make your way out of the ravine while fighting several Celestial Entities, some of which have laser beam-like ranged attacks. As you head up the path, be sure to check the corpses for Madman’s Knowledge, and an Anti-Clockwise Metamorphosis Rune.
advertisement
As you exit the ravine, you’ll find yourself at a firefly lake. The first right takes you back to where you found the first Giant Boar, as well as Twin Blood Stone Shards. The far path at the opposite end leads past a Snake Head, and an elevator that connects back to the large windmill that you faced your first Snake Head in. The second path on the right from the firefly link slopes down into a large muddy pool that a Giant Boar patrols. You can follow him to the end and do an attack from behind. You can also take the left path through the muddy water under the tree roots to find several Crippled Ghouls guarding a Dissipating Lake Rune. Further beyond the pool, you’ll find one more Giant Boar by several bonfires, and a Sharp Blood Gemstone. You can lure him into them to damage him, just beware of his charges.
Head down the path and take a right to go up some stairs to a gate. Beyond the gate is a single Snake Head, and Clockwise Metamorphosis Rune. Back on the main path, follow it all the way down into a murky graveyard. At this point, you may want to return to the Hunter’s Dream and level up if you have a lot of Blood Echoes. The next boss is just beyond the archway, and this boss can spell trouble if you aren’t prepared.
Shadow Of Yharnam
Loading
This boss fight will test your ability to constantly be on the move, dodge, and position your foes to capitalize on them. The three enemies all move at different speed, and you can use this to easily split them up. The katana wielder will chase you aggressively, while the other katana wielder who holds a candle walks slower, and the mage is the slowest of all. This means you can easily kite the enemies around, engaging just the one melee enemy, before the others catch up. You can either bait the katana wielder to attack you away from the others, or lure the two melee-oriented enemies behind the large tombstone, then rush to take on the mage by himself.
The battle area also has several small tombstones, and one massive one that you can use as a wall. These can be used to separate the enemies, most notably the mage. You can hide behind the massive tombstone and fight the two melee enemies while rotating around so that the tombstone constantly prevents the mage from hitting you. If you are lucky, the slower melee enemy may also get caught between it, leaving just the aggressive one to fight you. You can also parry their melee attacks and use visceral attacks to great effect, especially when the other enemies cannot hit you during the animation.
When one enemy reaches near death status, they all will transform. Snakes appear from their chest, and each gains a new power:
Mage – Can throw new forms of fireballs, causing wider destruction
Melee w/Candle – Buffs his sword with fire, can stretch his reach out a dozen feet.
Other Melee – Attacks faster, gains several wide reaching attacks.
advertisement
To maximize your potential, try and kill the one you have damaged when they start convulsing and transforming, as they will be unable to attack for a few moments.
They are somewhat weak to bolt damage and can be temporarily paralyzed when shocked so try bringing bolt papers if you have them.
The best way to deal with them is to focus on the fire mage first because you can’t keep your eye on him as well as the other two. When he’s dead, attack the melee with candle next because he’s stronger than the pure melee swordsman when he’s by himself making the last part a lot harder. The Swordsman doesn’t use many powerful attacks when he’s by himself so save him for last and dodge his attacks while getting in a few quick strikes on him.
When only one is left, the boss will often begin summoning giant snakes in several areas. Look for the red circles in the ground to figure out where they are going to appear, and position yourself accordingly. It’s best to keep attacking and not let up as much as possible or else it will summon the snakes.
Alternate strategy: Instead of burning one down the player can try to get all 3 around 1/3 health. Since all three will transform into more difficult enemies when any one of them reaches about 25% remaining health it will be easier to quickly burn them down post-transformation if all three have relatively low health.
With the boss destroyed, you will gain the Blood Rapture Rune, as well the waypoint lantern for this area, and the gate to Byrgenwerth will be unlocked. At this point you can continue on, or use the Tonsil Stone to enter The Nightmare Frontier, or use the Cainhurst Summons to travel to Cainhurst Castle.
Was this guide helpful? Leave feedback
Healing Church Workshop
The Healing Church Workshop is an optional side area located in the Cathedral Ward. You can only visit this area once you have beaten the Blood-Starved Beast in Old Yharnam, whereupon Gherman in the Hunter’s Dream will give you cryptic advice to visit the Healing Workshop by “Ascending to Oedon Chapel”.
Loading
advertisement
Starting at the Cathedral Ward Lamp, take your first right into the now unlocked door, leading to a room with an elevator. As you climb aboard to ascend to the top, turn around and face the opposite direction. As you ascend, there will be a doorway you can run through as the elevator is going up, or on the way down again. Run along the balcony and back into the upper area of the Odeon Chapel. Here you can find two items: The Formless Oedon Rune, and a Messenger Urn Festival accessory for your messengers. From here you can drop back down to the lantern, and take the elevator back up to the floor above.
Take care as you enter this room, as wheelchair-bound Huntsman holding a Gatling gun will open fire on you from the right. Thankfully he is slow to turn, and you can sprint around behind him and take him out. Open the chest at the far end for the Communion Rune, and head out onto the bridge to the second tower.
This small walkway has two snipers firing down on you from above, as well as a Huntsman on the far side who will rush you. Lure him out of range of the snipers, then dart across to the other side where they can’t shoot you. You can head around the outside ring here to find a broken section (don’t jump down just yet) and a Skull Beast on the other side. Before you enter the tower, take note of the enemies inside. A shield-bearing Huntsman waits on the right, another on the left, and a rifleman and two more townsfolk further back. Try and bait the two nearest the door to run out – where you can make short work of them, then rush the rifleman and take out his friends afterwards. There’s another chest here with a Bloodtinge Gemstone.
Going up the stairs, there will be another Gatling gun toting man up here, as well as another townsfolk. Take them out quickly, and then cautiously head towards the door. A Huntsman’s Minion is waiting just outside, so don’t run out or risk getting knocked off the tower. Lead him inside to kill him, then sprint out and take out the snipers (or just push them off the tower). Grab the Thick Coldblood on the body that was between them, then head around to the other side of the tower that has a ladder to the third floor. You can run past the door here to the dead end with more Thick Coldbood, then carefully survey the inside of the tower. The two wheelchair huntsmen here don’t just have firearms, they have flamethrowers! Dodge or rush them before they can blast you, and then open the final chest with your reward – The Radiant Sword Hunter Badge. The door beyond is locked for the moment, so instead head back down to the broken area on the first tower ring. Drop down to find another path inside leading to a very large pit full of broken wooden platforms.
Loading
Secret Area: Look for the lines of rope just to the left of the entrance. If you look below, you’ll see that they lead to a very tiny platform. You’ll have to walk off the main platform towards the ropes on the wall in order to land on the small platform (which will take a lot of health). From here, drop down to the right in front of a large door. This door leads to the Abandoned Workshop – the Yharnam inspiration for the Hunter’s Dream. The place looks exactly like the Hunter’s Dream (minus the gravestones and Messengers) and even has a lifeless doll in the old abandoned house. Where the Bath Merchant is supposed to be, you can find the Doll Attire, as well as the Old Hunter Bone in front of a grave near the back entrance to the building. Inside, you can find One Third of Umbilical Cord on the main table, as well as a waypoint lantern, and a Small Hair Ornament that you can give to the doll back in the Hunter’s Dream. She will reward you with a Tear Stone.
Look for the lines of rope just to the left of the entrance. If you look below, you’ll see that they lead to a very tiny platform. You’ll have to walk off the main platform towards the ropes on the wall in order to land on the small platform (which will take a lot of health). From here, drop down to the right in front of a large door. This door leads to the Abandoned Workshop – the Yharnam inspiration for the Hunter’s Dream. The place looks exactly like the Hunter’s Dream (minus the gravestones and Messengers) and even has a lifeless doll in the old abandoned house. Where the Bath Merchant is supposed to be, you can find the, as well as thein front of a grave near the back entrance to the building. Inside, you can findon the main table, as well as a waypoint lantern, and athat you can give to the doll back in the Hunter’s Dream. She will reward you with a
Cross the tiny wooden platform to the other side, and drop down to the other long platform going perpendicular to the one you are on now. From here, go to the opposite side the barrels are on and drop down once more, then cross the narrow beam towards a corpse on a tiny beam below. Walk straight onto the length of the tiny beam to get a Messenger Top Hat. Drop down to the larger platform below, and look for a tiny beam poking out just below with another item. Again, walk onto the length of the beam from above to get a Madman’s Knowledge.
Now comes the tricky part. Look below to your right to see another narrow wooden platform far below. You have to walk off the right side of this platform and hit it directly. Hitting the side will most likely bounce you off and you’ll keep falling to the floor below and die. If you hit it dead one, heal up and either jump to the wall where there’s more platforms, or onto the trash heap at the bottom.
advertisement
You won’t be alone here, as there is a Beast-Possessed Soul with its back to you facing the door out. You can try and sneak up for a big attack, but if it turns, be ready for a different kind of fight. This magical beast boasts not only big swiping attacks, but the ability to launch fireballs from his hands. These have a decent range, and he can also launch a wave of them at you. Luckily, he’s fairly weak in the health department, so keep on him to defeat him. He will drop the Beast Rune when he falls, and will be gone forever.
Opening the door, you’ll be in an alley that leads back towards the Cathedral Ward. There’s a man in the window on the right who won’t have much to say, and a side alley on the left. If you continue up ahead, you’ll find a big open area – but beware. A group of strangely dressed huntsmen will patrol the area with an Rabid Dog, but a new enemy will have started appearing around the Cathedral Ward since you took down the Blood-starved Beast, and is hiding on the left side of this plaza. These Kidnappers are tall robed men with large bloody sacks slung over their shoulders. They may not look like much – but they hit like a truck. If that wasn’t bad enough, they’ll often buff themselves with a red aggressive haze around half their health, making them even faster and stronger – so BE CAREFUL! If you are killed by one of these guys, you won’t just die. Instead, you’ll be literally abducted and thrown into a new area full of tough enemies.
Once you’ve cleared the plaza, grab the Madman’s Knowledge in the corner, and head up down the alley just before the T junction. This alley has another Rabid Dog waiting up ahead, and some Carrion Crows around the corner. You can find a body up ahead with some cosmetic Yharnam Attire.
Back at the T junction, fight off the townsfolk patrol and left and down some stairs to find a creepy looking thing bent over a corpse. This is actually a Brainsucker, and a magic-using one at that. Fight this enemy with extreme caution, as he can use stunning spell magic to freeze you in place, setting him up for his next attack where he violently and disgustingly feeds on your head with a leech-like head protrusion. Not only will it do tons of damage, but it will literally drain the Insight right out of you! Luckily, this enemy does have one big weakness – fire. If you manage to kill him, you’ll be rewarded with a special Fire Blood Gemstone. Now you can take the opposite path to an elevator, leading back up to the platform looking down on the gate leading to Oedon’s Chapel. Here you can finally grab the Thick Coldblood up here before dropping back to the Cathedral Ward.
With this area complete, you can either explore Hemwick Charnel Lane if you haven’t already, go take on Vicar Amelia, or start heading to the Forbidden Forest if you’ve beaten her.
You can also let yourself get beaten by the Kidnappers to find a new optional area – Yahar’gul the Hidden Village.
Up Next: Hemwick Charnel Lane Old Yharnam Hemwick Charnel Lane
Was this guide helpful? Leave feedback
So you have finished reading the how to open gate cathedral ward topic article, if you find this article useful, please share it. Thank you very much. See more: how to open all gates in cathedral ward, cathedral ward walkthrough, how to get to grand cathedral bloodborne, 3 gates cathedral ward, cathedral ward map, bloodborne how to open gate in central yharnam, cathedral ward enemy, how to get to old yharnam from cathedral ward