
You are looking for information, articles, knowledge about the topic nail salons open on sunday near me how to remove markup from screenshot on Google, you do not find the information you need! Here are the best content compiled and compiled by the Chewathai27.com team, along with other related topics such as: how to remove markup from screenshot Remove unwanted object, How to remove text from image, Wonderhowto, Gadgethack, How to remove watermark, Mosaic removal online, Remove person from photo online, How to see hidden text in image
The TouchRetouch app will allow you to remove scribbles on photos or screenshots on your Android device as well as your iPhone.Find an image that has blacked-out text, open it in the Photos app, and tap “Edit” in the top right to open the image editor. You’ll be using the tools at the bottom to remove the highlighter.Navigate to the project’s Drawings tool using the Procore app on an iOS mobile device. Tap the drawing that contains the item you want to delete. Tap the drawing markup you want to delete. Tap Delete.
- Go to app store to download Snapseed.
- Open the app and then upload the image.
- Select the ‘healing’ tool to remove unnecessary markups from your photo.
Contents
How do I remove scribbles from my screenshot for free?
The TouchRetouch app will allow you to remove scribbles on photos or screenshots on your Android device as well as your iPhone.
How do I get rid of the black marker on my iPhone screenshot?
Find an image that has blacked-out text, open it in the Photos app, and tap “Edit” in the top right to open the image editor. You’ll be using the tools at the bottom to remove the highlighter.
How do I get rid of markup photos on my iPhone?
Navigate to the project’s Drawings tool using the Procore app on an iOS mobile device. Tap the drawing that contains the item you want to delete. Tap the drawing markup you want to delete. Tap Delete.
How do I delete text markup?
Select the content you wish to mark as deleted text. Click on the Block Styles button in the toolbar. Scroll down near the bottom of the list and select Deleted text.
Can you remove markup from photos?
To do this, all you need to do is simply select the mark-up that you want to remove (this can be text, drawings, shapes, or any other mark-up you have added to the image), then, once you have selected the piece of mark-up that you want to remove, simply hit the ‘delete’ button to remove them.
How do you remove marker from a picture?
Apply no more than a short stroke in a place covered by permanent-marker. Wait 30 seconds, then take a soft cloth and gently wipe the dry-erase marks away. If the permanent-marker came away with the dry-erase marker, then reapply dry-erase marker over a larger area, no more than a square inch.
How do I remove paint from a screenshot?
How do I remove painted parts of an edited screenshot? Take the Mr Clean Magic Eraser sponge and rub vigorously on the screen until the painted parts are gone.
How do I remove a shaded text from a picture?
- Get the TouchRetouch app from Google Play Store.
- Open the app, tap “Albums” and select the photo that you want to process.
- Go to the toolbar and choose “Quick Repair”, then “Quick Brush” at the bottom of the screen.
- Highlight the text that you want to erase and tap “Remove”.
How do I delete a doodle?
Since all Doodles are part of a comment, you must delete the entire comment in order to delete the Doodle.
Can I Unedit a picture?
Open Google Photos on your Android/ PC/ Mac/ iPhone. Open the edited photo that you want to unedit. Click Edit > Revert. Click Save > Save as copy.
What is Markup on iPhone photos?
Apple is expanding the iPhone’s photo editing abilities in iOS 10 with a new feature called “Markup” that lets you doodle, magnify, and place text on any picture you have within the Photos app.
How do I remove paint from a screenshot?
How do I remove painted parts of an edited screenshot? Take the Mr Clean Magic Eraser sponge and rub vigorously on the screen until the painted parts are gone.
How do you get rid of scribbles on Snapchat?
Just select the Magic Eraser icon, paint over the object you want removed, and Snap will “Photoshop” it out automatically.
How do I delete a doodle?
Since all Doodles are part of a comment, you must delete the entire comment in order to delete the Doodle.
How do I Unedit someone else’s photo?
Open Google Photos on your Android/ PC/ Mac/ iPhone. Open the edited photo that you want to unedit. Click Edit > Revert. Click Save > Save as copy.
How to Remove Markup From Photo?
- Article author: clippingfly.com
- Reviews from users: 35000
 Ratings
 - Top rated: 4.9
- Lowest rated: 1
- Summary of article content: Articles about How to Remove Markup From Photo? Updating …
- Most searched keywords: Whether you are looking for How to Remove Markup From Photo? Updating Did you know, you can learn how to remove markup from photo yourself? Use these tools to save yourself from paying extra money for expert help.
- Table of Contents:
Can You Remove Markup From A Photo
How To Remove Markup From Photo
Conclusion
About Us
Our Services
Error 403 (Forbidden)
- Article author: www.quora.com
- Reviews from users: 46796 Ratings
- Top rated: 4.2
- Lowest rated: 1
- Summary of article content: Articles about Error 403 (Forbidden) Updating …
- Most searched keywords: Whether you are looking for Error 403 (Forbidden) Updating
- Table of Contents:
Warning: Sensitive Info You Black Out in Images Can Be Revealed with a Few Quick Edits on Your iPhone « iOS & iPhone :: Gadget Hacks
- Article author: ios.gadgethacks.com
- Reviews from users: 32578 Ratings
- Top rated: 4.0
- Lowest rated: 1
- Summary of article content: Articles about Warning: Sensitive Info You Black Out in Images Can Be Revealed with a Few Quick Edits on Your iPhone « iOS & iPhone :: Gadget Hacks Updating …
- Most searched keywords: Whether you are looking for Warning: Sensitive Info You Black Out in Images Can Be Revealed with a Few Quick Edits on Your iPhone « iOS & iPhone :: Gadget Hacks Updating These days, most images we post online or share with others come from our smartphones. Whenever personal data is in them, such as debit card numbers, addresses, phone numbers, passwords, and other sensitive information, it’s easy to jump into your iPhone’s markup tools to black out the text before sharing. But a digital marker may not hide everything.
- Table of Contents:
Blacking Out Text with the Markup Tools
Removing Highlighter Obfuscation from Images
Trying It Out on Different Background & Highlighter Colors
Making It Harder for People to Reveal Your Private Info
Join the Next Reality AR Community
Related
Be the First to Comment
Share Your Thoughts
Delete Drawing Markups (iOS) – Procore
- Article author: support.procore.com
- Reviews from users: 27106 Ratings
- Top rated: 5.0
- Lowest rated: 1
- Summary of article content: Articles about Delete Drawing Markups (iOS) – Procore Updating …
- Most searched keywords: Whether you are looking for Delete Drawing Markups (iOS) – Procore Updating How to delete drawing markups from the Drawings tool using the Procore app on an iOS mobile device.
- Table of Contents:
Objective
Things to Consider
Steps
See Also

How to add markup for inserted/deleted text | Web Resources | University of Waterloo
- Article author: uwaterloo.ca
- Reviews from users: 28926 Ratings
- Top rated: 4.3
- Lowest rated: 1
- Summary of article content: Articles about How to add markup for inserted/deleted text | Web Resources | University of Waterloo Updating …
- Most searched keywords: Whether you are looking for How to add markup for inserted/deleted text | Web Resources | University of Waterloo Updating Content maintainers can use deleted text and inserted text to markup updates and modifications in a document. Browsers will normally strike a line through deleted text and underline inserted text. How to add markup for deleted text How to add markup for inserted text How to add markup for deleted text From the Administration bar, select My Workbench. Select Create/Manage
- Table of Contents:
Information for
How to add markup for deleted text
How to add markup for inserted text
Related links

Warning: Sensitive Info You Black Out in Images Can Be Revealed with a Few Quick Edits on Your iPhone « iOS & iPhone :: Gadget Hacks
- Article author: ios.gadgethacks.com
- Reviews from users: 3619 Ratings
- Top rated: 4.8
- Lowest rated: 1
- Summary of article content: Articles about Warning: Sensitive Info You Black Out in Images Can Be Revealed with a Few Quick Edits on Your iPhone « iOS & iPhone :: Gadget Hacks Take a screenshot and tap its thumbnail — or open an image or … To he sensitive data, you don’t have to leave the Markup tools in the … …
- Most searched keywords: Whether you are looking for Warning: Sensitive Info You Black Out in Images Can Be Revealed with a Few Quick Edits on Your iPhone « iOS & iPhone :: Gadget Hacks Take a screenshot and tap its thumbnail — or open an image or … To he sensitive data, you don’t have to leave the Markup tools in the … These days, most images we post online or share with others come from our smartphones. Whenever personal data is in them, such as debit card numbers, addresses, phone numbers, passwords, and other sensitive information, it’s easy to jump into your iPhone’s markup tools to black out the text before sharing. But a digital marker may not hide everything.
- Table of Contents:
Blacking Out Text with the Markup Tools
Removing Highlighter Obfuscation from Images
Trying It Out on Different Background & Highlighter Colors
Making It Harder for People to Reveal Your Private Info
Join the Next Reality AR Community
Related
Be the First to Comment
Share Your Thoughts
How to Remove Scribbles on a Picture iPhone? [Answered 2022]- Droidrant
- Article author: droidrant.com
- Reviews from users: 40329 Ratings
- Top rated: 4.7
- Lowest rated: 1
- Summary of article content: Articles about How to Remove Scribbles on a Picture iPhone? [Answered 2022]- Droidrant To do so, simply tap the camera icon on your iOS mobile device. Next, open the Drawings tool. In this tool, choose the markup you’ … …
- Most searched keywords: Whether you are looking for How to Remove Scribbles on a Picture iPhone? [Answered 2022]- Droidrant To do so, simply tap the camera icon on your iOS mobile device. Next, open the Drawings tool. In this tool, choose the markup you’ …
- Table of Contents:
How Do You Remove Pen Marks From Screenshots
How Do I Get Rid of Markup on My iPhone
How Do You Unedit a Picture
How Can I Remove Paint Marks From a Picture
How Do You Remove Marker From a Picture
Can You Remove Markups
How Do I See Highlighter on iPhone
Post navigation
Follow
Search
How To Remove Scribbles On A Screenshot Iphone? [Solved] 2022 – How To’s Guru
- Article author: howtosguru.com
- Reviews from users: 44198 Ratings
- Top rated: 4.0
- Lowest rated: 1
- Summary of article content: Articles about How To Remove Scribbles On A Screenshot Iphone? [Solved] 2022 – How To’s Guru Open the Photos app and find the photo with the markup. Tap on the photo and then tap the three dots in the bottom right corner. Tap “Remove Markup.” If you … …
- Most searched keywords: Whether you are looking for How To Remove Scribbles On A Screenshot Iphone? [Solved] 2022 – How To’s Guru Open the Photos app and find the photo with the markup. Tap on the photo and then tap the three dots in the bottom right corner. Tap “Remove Markup.” If you … Learn How To Remove Scribbles On A Screenshot Iphone? easily. You will learn here the best possible method to solve your queries about How To Remove Scribbles On A Screenshot Iphone?
- Table of Contents:
FAQ
Related
Recent Posts
Categories
How To Remove Scribbles On A Screenshot Iphone? [Solved] 2022 – How To’s Guru
- Article author: ph.kienthuccuatoi.com
- Reviews from users: 26485 Ratings
- Top rated: 4.4
- Lowest rated: 1
- Summary of article content: Articles about How To Remove Scribbles On A Screenshot Iphone? [Solved] 2022 – How To’s Guru Open the Photos app and find the photo with the markup. Tap on the photo and then tap the three dots in … …
- Most searched keywords: Whether you are looking for How To Remove Scribbles On A Screenshot Iphone? [Solved] 2022 – How To’s Guru Open the Photos app and find the photo with the markup. Tap on the photo and then tap the three dots in … Learn How To Remove Scribbles On A Screenshot Iphone? easily. You will learn here the best possible method to solve your queries about How To Remove Scribbles On A Screenshot Iphone?
- Table of Contents:
FAQ
Related
Recent Posts
Categories
How To Remove Scribbles On A Screenshot Iphone – Thisisguernsey.com
- Article author: www.thisisguernsey.com
- Reviews from users: 24319 Ratings
- Top rated: 3.2
- Lowest rated: 1
- Summary of article content: Articles about How To Remove Scribbles On A Screenshot Iphone – Thisisguernsey.com Open the photo you want to edit. · Tap Edit. Tools. · Select the tools you want to use with your photo and … …
- Most searched keywords: Whether you are looking for How To Remove Scribbles On A Screenshot Iphone – Thisisguernsey.com Open the photo you want to edit. · Tap Edit. Tools. · Select the tools you want to use with your photo and … In other words, pixelation occurs when the pixels are stretched to a point beyond their original size. This in turn causes the fuzziness or blurry sections in
- Table of Contents:
How do you remove markup from a picture
How do you Uncensor a picture on Iphone
How do you get rid of Snapchat scribble
How do I undo markup
How do you get rid of drawing on a picture on Snapchat
How do you remove a sticker from a Snapchat picture
Where is the magic eraser on Snapchat
How do you un edit a photo you edited on iPhone
How do you Photoshop on iPhone
Did Snapchat remove magic eraser
How do I remove the censored part of a picture
How do I revert an edited photo to the original
How do you know photo is edited or not
How do you remove pixels from a photo
How do you remove censors
How do I Unpixelate an image for free
How do you make a picture not blurry
What does pixelated picture mean
How do I Unblur a picture to inspect
How do I clear a picture
What is pixelation on a phone
Related Posts
Recent Posts
Earnings Disclaimer
Who We Are
Explore More
See more articles in the same category here: https://chewathai27.com/toplist.
Warning: Sensitive Info You Black Out in Images Can Be Revealed with a Few Quick Edits on Your iPhone
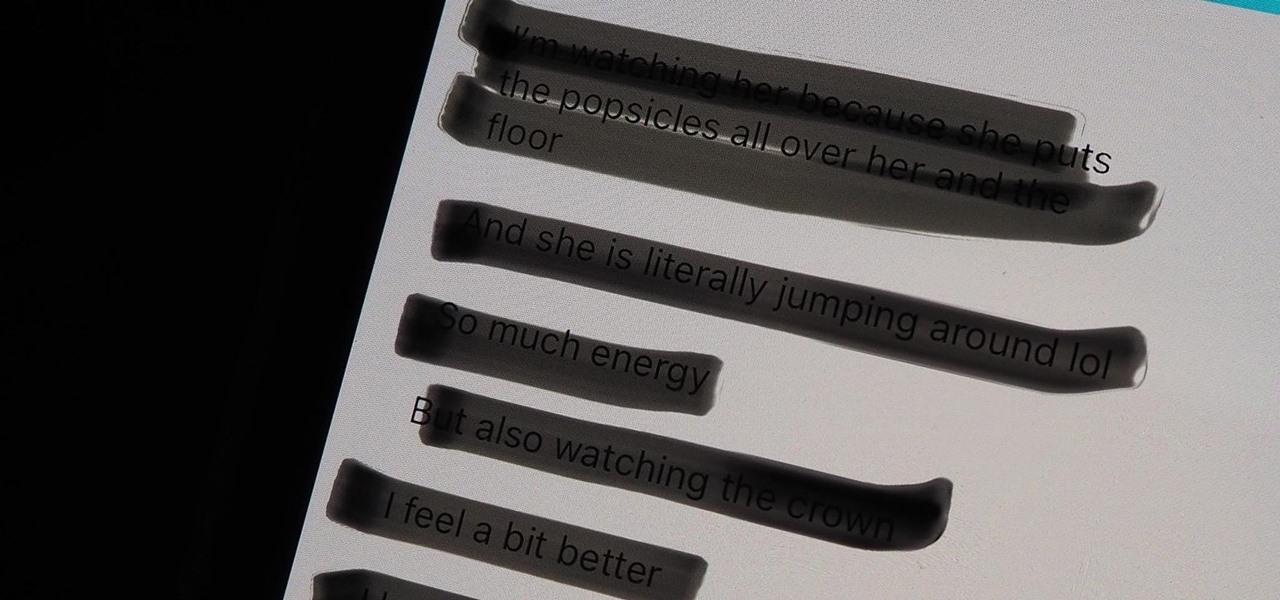
These days, most images we post online or share with others come from our smartphones. Whenever personal data is in them, such as debit card numbers, addresses, phone numbers, passwords, and other sensitive information, it’s easy to jump into your iPhone’s markup tools to black out the text before sharing. But a digital marker may not hide everything. When using Markup in iOS, whether it’s from Photos, Files, Mail, or another app, or right in the screenshot editor, you may only be partially hiding data you want to keep a secret. The marker, aka highlighter, is a popular tool for quick obfuscation because of its thick strokes, but it has an opacity problem that’s not visible to the naked eye. Don’t Miss: Blur Faces and Text in Videos with This Free, Easy-to-Use Video Editing App for iPhone Since it’s a highlighter and not a solid marker, one swipe with your finger will create a transparent layer over the text, effectively highlighting it — even with the opacity at 100 percent. If you move your finger back and forth a few times, it layers the effect, seemingly creating a non-transparent solid line that looks like it’s hiding the stuff underneath it. But for many colors, and most importantly, black and white, you can adjust the marker in editing to reveal the sensitive information it’s hiding. Affected iOS versions: iOS 15, iOS 14, iOS 13, iOS 12, iOS 11.
Blacking Out Text with the Markup Tools To test it out, use the highlighter in Markup to obscure some text in a photo or screenshot. If you already have some obfuscated images, skip to the next section to see how to reveal what’s hidden. Take a screenshot and tap its thumbnail — or open an image or document in an app like Photos, Files, or Mail — then find the Markup tools. Once you do, tap the highlighter tool, which looks like a thick marker. Tap the highlighter again to set the thickness and opacity (make sure the slider is to the far right). Next, tap the color picker and choose black, which is the most common color for obfuscation. Don’t Miss: Wipe & Obfuscate Identifying Information in Your Protest Photos for More Anonymous Sharing Using your finger, draw over the information you want to hide, back and forth a few times, until you can’t see what’s there. You might have to apply a few layers to conceal the text adequately. When ready, save the image or document as you usually would.
Removing Highlighter Obfuscation from Images Now for the fun part. Find an image that has blacked-out text, open it in the Photos app, and tap “Edit” in the top right to open the image editor. You’ll be using the tools at the bottom to remove the highlighter. Depending on how many black strokes are hiding the text, you can reveal the hidden information with two to six adjustments. Try these out and see what happens: Brilliance : 100%
: 100% Shadows : 100%
: 100% Brightness: 100% If you still can’t make out what’s there very well, try adding one or all of these: Exposure : 100%
: 100% Highlights : 100%
: 100% Contrast: –100% Zoom in to the highlighted area if necessary to see it better. Although you won’t be able to distinguish everything underneath the black highlighter, you should see enough. If it’s a phone number, email, password, or address, you’ll have a good chance at making out most of it — if not all of it. Don’t Miss: Edit Videos Using the Crop, Filter & Adjustment Tools in Your iPhone’s Photos App Several other variables may make this process easier or more difficult. If the black highlighter isn’t very thick, you might be able to remove it somewhat with just two or three different adjustment tools instead of all six listed above. Also, the color of the text and the background could make the process more difficult. It’ll be easier to remove the highlighter if you’re dealing with black or dark text with a light background. But if the text is a light color, like yellow, and the background is also light-colored, you could have difficulty viewing what’s underneath the black highlighter.
Trying It Out on Different Background & Highlighter Colors Depending on the highlighter color, you may have to use other photo editing tools or adjust the same tools up or down. For example, try using Brightness (100) on a red highlighter. If that doesn’t work, also try Highlights (100). Still a no-go? Then try some of the other adjustment tools out. For white highlighter, try Sharpness (100), Brightness (–100), Contrast (–100), and Brilliance (100). Below you can see several different highlighter colors and how the photo editing tools affect them. Don’t Miss: Toggle Adjustments in Your iPhone’s Photos Editor to Compare Effects Before & After If you’re in Dark Mode, it doesn’t make much of a difference. Taking the same steps as mentioned before, black highlighter and white highlighter will disappear with the right tools, as seen below.
Making It Harder for People to Reveal Your Private Info To hide sensitive data, you don’t have to leave the Markup tools in the dust. It’s still possible to keep the stuff you’re making disappear never come back again. And if all else fails, there are third-party solutions.
Tip 1: Add More Highlighter Layers The highlighter, which gives you the best look, can still be used to hide content. You just need to use more layers. Instead of just swiping back and forth over what you’re trying to hide, lift your finger off the screen before each new swipe. Doing so will add heavier layers of highlighter, making it much harder to reveal with simple adjustment tweaks.
Tip 2: Use Highlighter on Certain Settings Pages Believe it or not, but if you take a screenshot of specific information on your iPhone, iOS will help obfuscate that data when you’re using Markup tools. It seems to work better when you’re obfuscating from an app like Photos, not from the screenshot editor, so be careful. For example, the “About” page Settings –> General. If you swipe once or twice on, say, your serial number or IMEI, iOS will think you’re highlighting it. But swipe three or four times, and iOS will believe you are trying to hide it and will help you out by making it impossible to see. Sometimes it only takes two swipes. In “Passwords” (iOS 14, iOS 15), “Passwords & Accounts” (iOS 12, iOS 13), or “Accounts & Passwords” (iOS 11) in Settings, a screenshot removes the password from the page automatically — a nice security feature. But you can also use three or four swipes to obfuscate the username.
Tip 3: Use the Pen Tool Instead The pen tool in Markup, the icon at the far left, is a solid “marker.” When set at 100% opacity, a single layer of the pen in any color is enough to hide what’s underneath from prying eyes and image editing tools. A pencil tool is also an option, but it acts more like a highlighter since you need several layers to obfuscate something effectively. If the layers are thin, someone might be able to reveal the information later. So it’s best to stick with the pen when you need 100% certainty.
Tip 4: Or Even the Shape Tool You could also use another Markup tool to hide information. Instead of using the drawing tools, tap on the plus (+) sign in the bottom right, and choose one of the shapes available. Situate it over the text to be hidden, then tap the icon in the bottom left to see more options. For the arrow tool, you can make it a thick line instead. For the comment box, square, and circle, you can fill it in, so it’s all a solid color. Then, you can choose a color if the current one isn’t what you want. No matter what you do in the image editing tools later, there’s no way to reveal what’s underneath.
How to add markup for inserted/deleted text | Web Resources
Content maintainers can use deleted text and inserted text to markup updates and modifications in a document. Browsers will normally strike a line through deleted text and underline inserted text.
How to add markup for deleted text
From the Administration bar, select My Workbench. Select Create/Manage Content and select the content type you wish to use “deleted text” and/or “inserted text” to (like Web Page). Select the content you wish to mark as deleted text.
Click on the Block Styles button in the toolbar.
Scroll down near the bottom of the list and select Deleted text. The phrase or sentence you selected will now be changed to deleted text style.
How to add markup for inserted text
Warning: Sensitive Info You Black Out in Images Can Be Revealed with a Few Quick Edits on Your iPhone
These days, most images we post online or share with others come from our smartphones. Whenever personal data is in them, such as debit card numbers, addresses, phone numbers, passwords, and other sensitive information, it’s easy to jump into your iPhone’s markup tools to black out the text before sharing. But a digital marker may not hide everything. When using Markup in iOS, whether it’s from Photos, Files, Mail, or another app, or right in the screenshot editor, you may only be partially hiding data you want to keep a secret. The marker, aka highlighter, is a popular tool for quick obfuscation because of its thick strokes, but it has an opacity problem that’s not visible to the naked eye. Don’t Miss: Blur Faces and Text in Videos with This Free, Easy-to-Use Video Editing App for iPhone Since it’s a highlighter and not a solid marker, one swipe with your finger will create a transparent layer over the text, effectively highlighting it — even with the opacity at 100 percent. If you move your finger back and forth a few times, it layers the effect, seemingly creating a non-transparent solid line that looks like it’s hiding the stuff underneath it. But for many colors, and most importantly, black and white, you can adjust the marker in editing to reveal the sensitive information it’s hiding. Affected iOS versions: iOS 15, iOS 14, iOS 13, iOS 12, iOS 11.
Blacking Out Text with the Markup Tools To test it out, use the highlighter in Markup to obscure some text in a photo or screenshot. If you already have some obfuscated images, skip to the next section to see how to reveal what’s hidden. Take a screenshot and tap its thumbnail — or open an image or document in an app like Photos, Files, or Mail — then find the Markup tools. Once you do, tap the highlighter tool, which looks like a thick marker. Tap the highlighter again to set the thickness and opacity (make sure the slider is to the far right). Next, tap the color picker and choose black, which is the most common color for obfuscation. Don’t Miss: Wipe & Obfuscate Identifying Information in Your Protest Photos for More Anonymous Sharing Using your finger, draw over the information you want to hide, back and forth a few times, until you can’t see what’s there. You might have to apply a few layers to conceal the text adequately. When ready, save the image or document as you usually would.
Removing Highlighter Obfuscation from Images Now for the fun part. Find an image that has blacked-out text, open it in the Photos app, and tap “Edit” in the top right to open the image editor. You’ll be using the tools at the bottom to remove the highlighter. Depending on how many black strokes are hiding the text, you can reveal the hidden information with two to six adjustments. Try these out and see what happens: Brilliance : 100%
: 100% Shadows : 100%
: 100% Brightness: 100% If you still can’t make out what’s there very well, try adding one or all of these: Exposure : 100%
: 100% Highlights : 100%
: 100% Contrast: –100% Zoom in to the highlighted area if necessary to see it better. Although you won’t be able to distinguish everything underneath the black highlighter, you should see enough. If it’s a phone number, email, password, or address, you’ll have a good chance at making out most of it — if not all of it. Don’t Miss: Edit Videos Using the Crop, Filter & Adjustment Tools in Your iPhone’s Photos App Several other variables may make this process easier or more difficult. If the black highlighter isn’t very thick, you might be able to remove it somewhat with just two or three different adjustment tools instead of all six listed above. Also, the color of the text and the background could make the process more difficult. It’ll be easier to remove the highlighter if you’re dealing with black or dark text with a light background. But if the text is a light color, like yellow, and the background is also light-colored, you could have difficulty viewing what’s underneath the black highlighter.
Trying It Out on Different Background & Highlighter Colors Depending on the highlighter color, you may have to use other photo editing tools or adjust the same tools up or down. For example, try using Brightness (100) on a red highlighter. If that doesn’t work, also try Highlights (100). Still a no-go? Then try some of the other adjustment tools out. For white highlighter, try Sharpness (100), Brightness (–100), Contrast (–100), and Brilliance (100). Below you can see several different highlighter colors and how the photo editing tools affect them. Don’t Miss: Toggle Adjustments in Your iPhone’s Photos Editor to Compare Effects Before & After If you’re in Dark Mode, it doesn’t make much of a difference. Taking the same steps as mentioned before, black highlighter and white highlighter will disappear with the right tools, as seen below.
Making It Harder for People to Reveal Your Private Info To hide sensitive data, you don’t have to leave the Markup tools in the dust. It’s still possible to keep the stuff you’re making disappear never come back again. And if all else fails, there are third-party solutions.
Tip 1: Add More Highlighter Layers The highlighter, which gives you the best look, can still be used to hide content. You just need to use more layers. Instead of just swiping back and forth over what you’re trying to hide, lift your finger off the screen before each new swipe. Doing so will add heavier layers of highlighter, making it much harder to reveal with simple adjustment tweaks.
Tip 2: Use Highlighter on Certain Settings Pages Believe it or not, but if you take a screenshot of specific information on your iPhone, iOS will help obfuscate that data when you’re using Markup tools. It seems to work better when you’re obfuscating from an app like Photos, not from the screenshot editor, so be careful. For example, the “About” page Settings –> General. If you swipe once or twice on, say, your serial number or IMEI, iOS will think you’re highlighting it. But swipe three or four times, and iOS will believe you are trying to hide it and will help you out by making it impossible to see. Sometimes it only takes two swipes. In “Passwords” (iOS 14, iOS 15), “Passwords & Accounts” (iOS 12, iOS 13), or “Accounts & Passwords” (iOS 11) in Settings, a screenshot removes the password from the page automatically — a nice security feature. But you can also use three or four swipes to obfuscate the username.
Tip 3: Use the Pen Tool Instead The pen tool in Markup, the icon at the far left, is a solid “marker.” When set at 100% opacity, a single layer of the pen in any color is enough to hide what’s underneath from prying eyes and image editing tools. A pencil tool is also an option, but it acts more like a highlighter since you need several layers to obfuscate something effectively. If the layers are thin, someone might be able to reveal the information later. So it’s best to stick with the pen when you need 100% certainty.
Tip 4: Or Even the Shape Tool You could also use another Markup tool to hide information. Instead of using the drawing tools, tap on the plus (+) sign in the bottom right, and choose one of the shapes available. Situate it over the text to be hidden, then tap the icon in the bottom left to see more options. For the arrow tool, you can make it a thick line instead. For the comment box, square, and circle, you can fill it in, so it’s all a solid color. Then, you can choose a color if the current one isn’t what you want. No matter what you do in the image editing tools later, there’s no way to reveal what’s underneath.
So you have finished reading the how to remove markup from screenshot topic article, if you find this article useful, please share it. Thank you very much. See more: Remove unwanted object, How to remove text from image, Wonderhowto, Gadgethack, How to remove watermark, Mosaic removal online, Remove person from photo online, How to see hidden text in image