
You are looking for information, articles, knowledge about the topic nail salons open on sunday near me how to remove power supply pins on Google, you do not find the information you need! Here are the best content compiled and compiled by the Chewathai27.com team, along with other related topics such as: how to remove power supply pins how to remove broken pin from connector, how to remove pins from wiring harness, how to remove male atx pins, how to remove atx power connector from motherboard, diy atx pin removal tool, how to remove pins from atx power supply, psu pin, how to remove playmobil connectors
Contents
How do I remove a stuck 24 pin connector?
- 1) Make sure you have completely compressed the power connector latch.
- 2) Try a gentle rocking motion along the length of the power connector while pulling it out. …
- 3) Try needle nose pliers to hold the connector clip open while gently prying the gap with a flat screwdriver.
How do you unplug a 4 pin connector?
Insert a small flat screwdriver under the latch and try pulling out the fan plug. You may need to very carefully pull the fan plug with a needle nose pliers to get a good grip on it.
How do you extract Molex pins?
To disconnect a Molex connector (male and female connection), simple press down on outside clip and pull the connectors apart. The power connectors have hooks that allow the connectors to latch into the connector housing. Once the crimped wire has been inserted into the housing, it will be difficult to remove.
How do you get a stuck power supply cable out of a motherboard?
The easiest way is to make sure the latch clip is released, and to rock it lengthwise back-and-forth until it comes out. If it still fights you, you can try putting the tip of a flat head screwdriver between the plug, and the motherboard end , and pry it out gently.
What is a 4 pin floppy connector?
the four-pin polarized Berg connectors used to connect 3½-inch floppy disk drive units to the power supply unit, usually referred to as simply a “floppy power connector”, but often also referred to as LP4. This connector has a 2.50 mm (0.098 in) pitch (not 2.54 mm).
What is Perif on PSU?
Perif usually refers to 4-pin molex connectors. For example, these are used for some fan connections (when the user wants to connect them directly to the PSU), most IDE drives, and some older SATA drives. The labels on the PSU-side just tell you where to connect the modular plugs you plan on using.
Do I need both 8 pin CPU power connector?
If you have two, connect two. The extra 8 pin connector is used to power added cards in the pci slots as well as added power for overclocking. In testing, I used only one which worked fine.
What is molex4 pin?
Often refers to the 4-pin connectors used to attach DC power to the drives inside a PC cabinet. Molex is a large manufacturer of electronics plugs and sockets that dates back to the 1940s.
How To Use ATX Power Supply Pin Removal & Extraction Tool 24 pin, 8 pin, 6 pin, 4 pin. – YouTube
- Article author: www.youtube.com
- Reviews from users: 6630
 Ratings
 - Top rated: 3.6
- Lowest rated: 1
- Summary of article content: Articles about How To Use ATX Power Supply Pin Removal & Extraction Tool 24 pin, 8 pin, 6 pin, 4 pin. – YouTube Updating …
- Most searched keywords: Whether you are looking for How To Use ATX Power Supply Pin Removal & Extraction Tool 24 pin, 8 pin, 6 pin, 4 pin. – YouTube Updating How To Tip for using ATX Power Pin Removal Tool. This two prong hand tool is using for removing (or extracting) cables and wires from PC power supply connect…best ATX pin removal tool, atx pin removal tool diy, how to remove 8 pin connector, how to remove pins from 24 pin motherboard connector, ATX pin extractor tool 24 pin, ATX 8 pin extractor removal tool
- Table of Contents:
De-pin a PSU cable using only staples! (READ DESCRIPTION!) – YouTube
- Article author: www.youtube.com
- Reviews from users: 16733 Ratings
- Top rated: 3.7
- Lowest rated: 1
- Summary of article content: Articles about De-pin a PSU cable using only staples! (READ DESCRIPTION!) – YouTube Updating …
- Most searched keywords: Whether you are looking for De-pin a PSU cable using only staples! (READ DESCRIPTION!) – YouTube Updating !WARNING! The HDPLEX 400 2.0 Pinout is DIFFERENT than the one shown in this video! Do not use the pinout sheet I show on camera! HDPLEX has corrected this s…Molex, Mini-Fit Jr., PSU Sleeving, Extraction Guide, Depinning PSU, Wiring Tutorial
- Table of Contents:

🛠 How To De-pin Connectors | TECHNICALLY SPEAKING | – YouTube
- Article author: www.youtube.com
- Reviews from users: 26660 Ratings
- Top rated: 4.3
- Lowest rated: 1
- Summary of article content: Articles about 🛠 How To De-pin Connectors | TECHNICALLY SPEAKING | – YouTube Updating …
- Most searched keywords: Whether you are looking for 🛠 How To De-pin Connectors | TECHNICALLY SPEAKING | – YouTube Updating After Dave’s last video we’ve received a metric ton of comments asking about the method and techniques for de-pinning connectors. Not to leave you guys hangi…haltech, auto wiring basics, auto wiring connectors, auto wiring tips, auto wiring tutorial, depinning automotive connectors, depinning gm connectors, depinning honda connectors, depinning molex connectors, depinning tools, auto wiring mistakes, nacho dave, haltech dave, technically speaking, how to depin a connector, how to depin wire harness, how to depin a connector without tool, how to depin ecu connector, how to depin obd2 ecu plug, depinning connector
- Table of Contents:

How to remove to ATX power connector pins WITHOUT special tools! – Guides and Tutorials – Linus Tech Tips
- Article author: linustechtips.com
- Reviews from users: 12159 Ratings
- Top rated: 4.3
- Lowest rated: 1
- Summary of article content: Articles about How to remove to ATX power connector pins WITHOUT special tools! – Guides and Tutorials – Linus Tech Tips Start by taking a few staples. You need to get them separated but due to their size this can be a little tricky. I found the easiest way to do … …
- Most searched keywords: Whether you are looking for How to remove to ATX power connector pins WITHOUT special tools! – Guides and Tutorials – Linus Tech Tips Start by taking a few staples. You need to get them separated but due to their size this can be a little tricky. I found the easiest way to do … This guide applies to 20/4 pin motherboard connectors, 4/8 pin CPU power connectors as well as 6/8 pin GPU connectors. It can be used to assist you in sleeving your cables and/or replacing your connectors. I’m not responsible for you breaking your PSU/power connectors and voiding your warranty. T…
- Table of Contents:
Create an account or sign in to comment
Create an account
Sign in
My Most Chaotic Client EVER – Kallmekris Tech Makeover
Your Smart Home Is Stupid
China doesn’t need us anymore…
You can hit this with a SHOVEL
Am I becoming a hater
i put a little coke in his coffee ☕
How to remove the pins from an ATX power supply with staples | Overclock.net
- Article author: www.overclock.net
- Reviews from users: 8762 Ratings
- Top rated: 4.1
- Lowest rated: 1
- Summary of article content: Articles about How to remove the pins from an ATX power supply with staples | Overclock.net Now, while holding down on the staples, pull on the wire. It may take a bit more force than you expect and you can use the needle nose pliers to … …
- Most searched keywords: Whether you are looking for How to remove the pins from an ATX power supply with staples | Overclock.net Now, while holding down on the staples, pull on the wire. It may take a bit more force than you expect and you can use the needle nose pliers to … After doing a search of OCN I couldn’t find a tutorial on removing pins from an ATX power supply using staples (there may be one but I couldn’t find it)…
- Table of Contents:

How do you remove a 24 pin power supply? | TechShift.net
- Article author: techshift.net
- Reviews from users: 7535 Ratings
- Top rated: 3.3
- Lowest rated: 1
- Summary of article content: Articles about How do you remove a 24 pin power supply? | TechShift.net How do I start my power supply without a motherboard? Do all motherboards have 24 pin connectors? Is it safe to mix PSU cables? What does ATX … …
- Most searched keywords: Whether you are looking for How do you remove a 24 pin power supply? | TechShift.net How do I start my power supply without a motherboard? Do all motherboards have 24 pin connectors? Is it safe to mix PSU cables? What does ATX … How do you remove a 24 pin power supply?
- Table of Contents:
[SOLVED] How to remove the psu cable from motherboard?? | TechPowerUp Forums
- Article author: www.techpowerup.com
- Reviews from users: 6883 Ratings
- Top rated: 3.8
- Lowest rated: 1
- Summary of article content: Articles about [SOLVED] How to remove the psu cable from motherboard?? | TechPowerUp Forums The easiest way is to make sure the latch clip is released, and to rock it lengthwise back-and-forth until it comes out. If it still fights you, … …
- Most searched keywords: Whether you are looking for [SOLVED] How to remove the psu cable from motherboard?? | TechPowerUp Forums The easiest way is to make sure the latch clip is released, and to rock it lengthwise back-and-forth until it comes out. If it still fights you, … Crazy how difficult it was…. :% HOW do i remove the psu cable from the motherboard?? I try squeezing the knob on it, but i cannot get it off…
- Table of Contents:
Removing and Replacing a Power Supply
- Article author: docs.oracle.com
- Reviews from users: 35571 Ratings
- Top rated: 4.5
- Lowest rated: 1
- Summary of article content: Articles about Removing and Replacing a Power Supply
This document describes how to replace the power supply in the Sun Disk … On the Sun Storage J4400 Array, the connectors and LEDs on the SIM boards at the … … - Most searched keywords: Whether you are looking for Removing and Replacing a Power Supply
This document describes how to replace the power supply in the Sun Disk … On the Sun Storage J4400 Array, the connectors and LEDs on the SIM boards at the … This guide describe how to install a power supply in a Sun Disk Shelf-24×3.5 - Table of Contents:
ESD Precautions
Power Supply Components
Procedure
Documentation Support and Training
Documentation Comments
See more articles in the same category here: Top 122 tips update new.
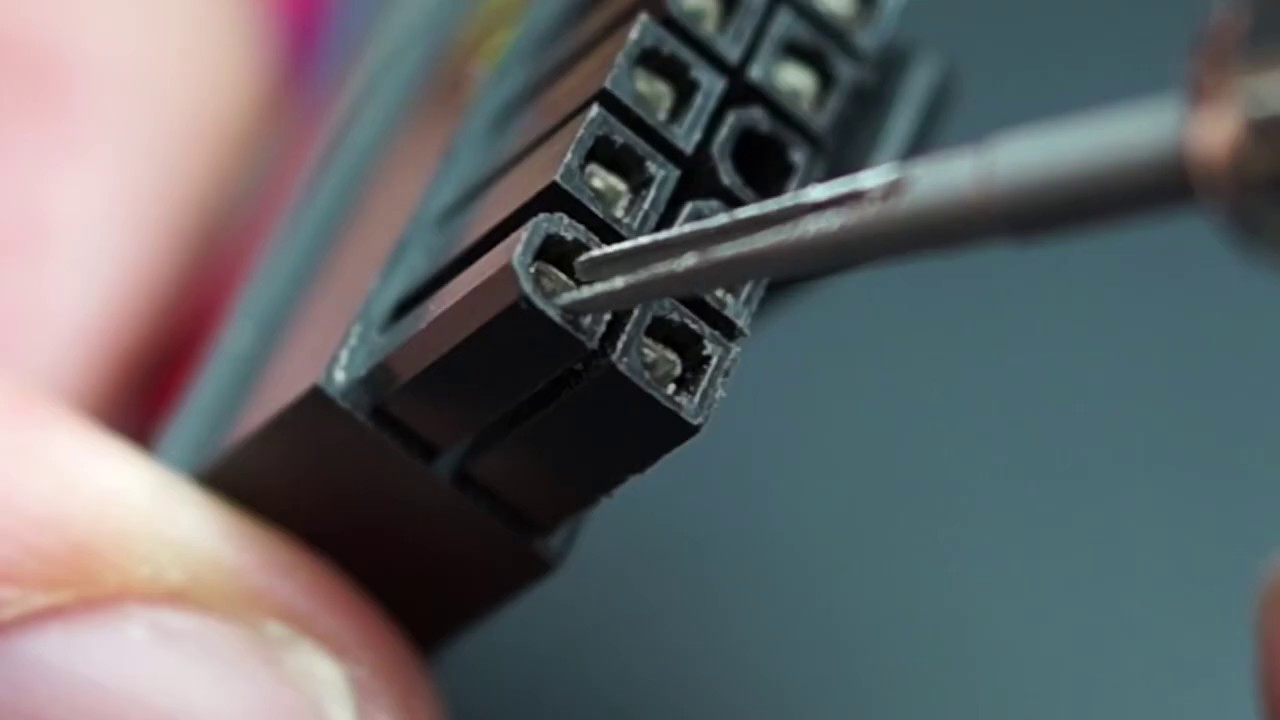
How to remove the pins from an ATX power supply with staples
Common desk staples (not the “Heavy Duty” staples you’d use to secure roofing paper or wall insulation)
Needle nose pliers
Your fingers
A bit of patience
After doing a search of OCN I couldn’t find a tutorial on removing pins from an ATX power supply using staples (there may be one but I couldn’t find it). Just a lot of questions on how to do it.Why spend $25+ on a pin removal tool that may break when you can spend $1.50 on 2000 staples and get the job done just as easy?Why would you want to remove the pins on your ATX cables? You may want to make custom length cables or maybe you want to sleeve your power supply or maybe you screwed up and accidentally cut a lead to your PSU and need to repair it. Whatever. So here’s how I do it.Tools:First take two sets of two staples and bend them into an “L” shape. Using the needle nosed pliers makes this a bit easier.Next insert each pair of staples into either side of the pin housing. Be sure the staples are between the pin and the plastic housing.Now push up on the wire while pushing down on the staples. You should feel a very slight “click” as the staples compress the tabs on the pin. You can also use the needle nose pliers to push in the staples if they don’t go in by the force of your finger.Now, while holding down on the staples, pull on the wire. It may take a bit more force than you expect and you can use the needle nose pliers to pull the wire if needed. The pin will pop free.Slide the pin out and you’re done!Before you put the pin back in the housing lift the tabs back up a little (I use a razor blade but any small instrument will work).
[SOLVED] How to remove the psu cable from motherboard??
some
minstreless said: Finally! I got it loose! I did what you said, but wiggling it back and forth with heavy force was needed…. Click to expand…
WD-40 is a hydrocarbon petroleum distillate. As such, it is not advisable to get onplastics, regardless how careful you are or how little you use. Unless you know for a fact it is safe on all the plastics used on your particular motherboard and power supply connector, I recommend using Electrical contact cleaner instead.That could suggest one of the connectors was slightly damaged or misshapen somehow – perhaps through abuse, excessive heat, or a defect at the factory. It does take some force, but it should not be “heavy” force. It could also suggest there is some corrosion within the connector that was acting like glue. That should not happen either, but can if some contaminants got in there before it was first connected. But again, that can be taken care of with some electrical contact cleaner.
Removing and Replacing a Power Supply
Removing and Replacing a Power Supply
This document describes how to replace the power supply in the Sun Disk Shelf-24×3.5” SAS-2 and in the Sun Storage J4400 Array.
Caution – Only trained service personnel should remove the covers on this equipment.
This product is intended for restricted access, whereby access is controlled through the use of a means of security (for example, key, lock, tool, badge access), and personnel authorized for access have been instructed on the reasons for the restrictions and any precautions that they need to take.
This document assumes that you have:
Identified the chassis containing the failed power supply.
Received the replacement power supply.
ESD Precautions
When performing this service action, observe the following electrostatic discharge (ESD) precautions:
Remove all plastic, vinyl, and foam material from the work area.
Wear an antistatic wrist strap at all times when handling any component.
Before handling any component, discharge any static electricity by touching a grounded surface.
Do not remove a component from its antistatic protective bag until you are ready to install it.
After removing a component from the chassis, immediately place it on an antistatic surface or in antistatic packaging.
Handle any card that is part of a component only by its edges and avoid touching the components or circuitry.
Do not slide a component over any surface.
Limit body movement (which builds up static electricity) during the removal and replacement of a component.
Power Supply Components
Each chassis contains two hot-swappable, redundant power supplies. If one power supply is turned off or malfunctions, the other power supply maintains electrical power. Each power supply contains two internal fans that provide cooling for the system.
FIGURE 1 identifies the power supply components.
Note – FIGURE 1 shows the Sun Disk Shelf-24×3.5” SAS-2. On the Sun Storage J4400 Array, the connectors and LEDs on the SIM boards at the bottom of the system are arranged differently. However, the power supply connectors and LEDs identified in FIGURE 1 are the same for both systems.
FIGURE 1 Power Supply LEDs and Components (Back View)
Figure Legend 1 AC power LED 4 Power supply fault LED 2 DC power LED 5 Universal power connector 3 Fan fault LED 6 Power switch
Procedure
To replace a failed power supply, you must complete the following steps, which are described in detail in the remainder of this guide:
1. Remove the failed power supply. See To Remove a Failed Power Supply.
2. Install the replacement power supply. See To Install a New Power Supply.
3. Verify the installation. See To Verify the Installation.
Caution – Potential loss of data access. Never remove a power supply unless the power fault LED or fan fault LED is amber (FIGURE 1).
Caution – Electrical shock hazard. The power supplies in this equipment can produce high energy hazards. Only trained personnel with authorized access to this equipment should remove and replace modules in the system.
To Remove a Failed Power Supply
1. From the back of the cabinet, locate the failed power supply.
The power supply fault or fan fault LED is amber (FIGURE 1).
2. Ensure that the power supply on/off switch is in the “O” (off) position.
3. Remove the power cord tie strap from the power cord.
4. Unplug the power cord from its power supply connector.
5. Remove the power supply from the system (FIGURE 2):
a. Loosen the two captive screws on the power supply ejection levers.
Note – You might need a Phillips No. 2 screwdriver to loosen the screws.
b. Swing the ejection levers fully outward to eject the power supply from the chassis.
Caution – Be careful to not damage the circuit board connector extending from the back of the power supply.
FIGURE 2 Removing a Power Supply
To Install a New Power Supply
Caution – Follow all ESD precautions (see ESD Precautions) and use care when handling either the new or failed power supply.
1. Unpack the new power supply.
Caution – Be careful to not damage the circuit board connector extending from the back of the power supply.
2. Place the failed power supply in the packing materials so that you can return it to Oracle for proper disposal.
3. Insert the new power supply into the chassis by completing the following steps (FIGURE 3):
a. Swing both ejection levers to the fully open position.
b. Align the power supply with the open slot and slide it into the chassis until it engages with the chassis connectors and the ejection levers begin to swing closed.
c. Simultaneously push both ejection levers toward the middle of the power supply to seat it in the chassis.
d. Tighten the two ejection lever captive screws to secure the power supplies.
FIGURE 3 Installing a Power Supply
4. Ensure that the power supply on/off switch is in the “O” (off) position.
5. Plug the power cord into the new power supply and attach the power cord tie strap to the power cord.
To Verify the Installation
1. Place the power supply on/off switch to the “I” (on) position.
2. Verify that the AC and DC power LEDs are lit steady green and that the power supply fault LED is off.
Documentation, Support, and Training
Documentation Comments
We are interested in improving the product documentation and welcome your comments and suggestions. Submit comments about this document by clicking the Feedback[+] link at:
http://docs.sun.com
Please include the title and part number of your document with your feedback:
Sun Disk Shelf-24×3.5″ SAS-2 and Sun Storage J4400 Array Power Supply Replacement Guide, part number 820-7245-11
Copyright © 2010, Oracle and/or its affiliates. All rights reserved.
So you have finished reading the how to remove power supply pins topic article, if you find this article useful, please share it. Thank you very much. See more: how to remove broken pin from connector, how to remove pins from wiring harness, how to remove male atx pins, how to remove atx power connector from motherboard, diy atx pin removal tool, how to remove pins from atx power supply, psu pin, how to remove playmobil connectors