
You are looking for information, articles, knowledge about the topic nail salons open on sunday near me 아두 이노 심박 센서 on Google, you do not find the information you need! Here are the best content compiled and compiled by the https://chewathai27.com/to team, along with other related topics such as: 아두 이노 심박 센서 아두이노 심박센서 블루투스, 아두이노 심박센서 모듈, 심장박동센서 원리, 아두 이노 펄스 센서 lcd, 광학심박센서, 아두이노 센서 종류, PPG 센서
[솔다/아두이노] 아두이노로 심박수 체크하기 -심박센서 모듈-
- Article author: devicemart.blogspot.com
- Reviews from users: 8143
 Ratings
 - Top rated: 3.4
- Lowest rated: 1
- Summary of article content: Articles about [솔다/아두이노] 아두이노로 심박수 체크하기 -심박센서 모듈- 특별한 센서를 이용해서 아두이노로 맥박을 측정해보려고합니다. -. 하트모양이 인쇄된 이 귀여운 기판은. 아두이노 심박측정 센서 모듈입니다. …
- Most searched keywords: Whether you are looking for [솔다/아두이노] 아두이노로 심박수 체크하기 -심박센서 모듈- 특별한 센서를 이용해서 아두이노로 맥박을 측정해보려고합니다. -. 하트모양이 인쇄된 이 귀여운 기판은. 아두이노 심박측정 센서 모듈입니다.
- Table of Contents:
전선 선택 방법 전선 굵기 선정 규격별 허용전류 저항 전압강하 계산식
[전선] AWG 규격 – SQ(mm2) 스퀘어 규격 사이즈 변환표◎ M-TAP 탭 가공치수 드릴작업 기초홀 작업치수 탭가공
오디세이로 BLDC모터 및 액추에이터 제어하기
전선 선택 방법 전선 굵기 선정 규격별 허용전류 저항 전압강하 계산식
[전선] AWG 규격 – SQ(mm2) 스퀘어 규격 사이즈 변환표◎ 스터드볼트 (STUD Bolt)의 정의와 규격
![[솔다/아두이노] 아두이노로 심박수 체크하기 -심박센서 모듈-](https://1.bp.blogspot.com/-lutu0Z78QVc/XRMaoc1FSeI/AAAAAAAANR0/uoLnAeDZt8AWiHtKv64hL7jP2kFFM782gCLcBGAs/w1200-h630-p-k-no-nu/20190626.png)
[아두이노] 심장박동 센서의 사용 #1 – 심박수 측정
- Article author: deneb21.tistory.com
- Reviews from users: 14805 Ratings
- Top rated: 4.3
- Lowest rated: 1
- Summary of article content: Articles about [아두이노] 심장박동 센서의 사용 #1 – 심박수 측정 이 센서는 말 그대로 심장박동수를 관찰하는 기기를 만들 수 있으며 블루투스, 와이파이 모듈 등과 연동하면 스마트폰 등과 연동해서 건강관리 기능을 … …
- Most searched keywords: Whether you are looking for [아두이노] 심장박동 센서의 사용 #1 – 심박수 측정 이 센서는 말 그대로 심장박동수를 관찰하는 기기를 만들 수 있으며 블루투스, 와이파이 모듈 등과 연동하면 스마트폰 등과 연동해서 건강관리 기능을 … 아두이노의 센서 중에 심장박동을 측정할 수 있는 센서가 있습니다. 손가락 등 몸에 부착하면 심장박동과 심장박동수(Heart Rate, BPM – Beats Per Minute)를 측정할 수 있는 센서 입니다. 이 센서는 말 그대로..
- Table of Contents:
티스토리툴바
![[아두이노] 심장박동 센서의 사용 #1 - 심박수 측정](https://img1.daumcdn.net/thumb/R800x0/?scode=mtistory2&fname=https%3A%2F%2Ft1.daumcdn.net%2Fcfile%2Ftistory%2F2542EF3A576F59CD0C)
아두이노(ARDUINO) 의 모든 것 – 전자부품쇼핑몰 아이씨뱅큐
- Article author: www.icbanq.com
- Reviews from users: 5452 Ratings
- Top rated: 3.5
- Lowest rated: 1
- Summary of article content: Articles about 아두이노(ARDUINO) 의 모든 것 – 전자부품쇼핑몰 아이씨뱅큐 Gravity: 아두이노용 아날로그 심박 측정 모니터 (ECG) For Arduino [SEN0213 · 아두이노용 심박맥동센서 모듈 / KEYES KY-039 Finger Heartbeat Detection Sensor. …
- Most searched keywords: Whether you are looking for 아두이노(ARDUINO) 의 모든 것 – 전자부품쇼핑몰 아이씨뱅큐 Gravity: 아두이노용 아날로그 심박 측정 모니터 (ECG) For Arduino [SEN0213 · 아두이노용 심박맥동센서 모듈 / KEYES KY-039 Finger Heartbeat Detection Sensor. 아두이노(ARDUINO) – 모든 관련 전자부품 판매, 국내 최대 전자부품 쇼핑몰, 아이씨뱅큐 아두이노(ARDUINO) – 모든 관련 전자부품 판매, 국내 최대 전자부품 쇼핑몰, 아이씨뱅큐
- Table of Contents:
아두이노(Arduino) BEST
아두이노(Arduino)
심장박동센서8개의 상품
결제 및 주문
심박센서의 원리와 사용방법 :: 남보공방
- Article author: makernambo.com
- Reviews from users: 31810 Ratings
- Top rated: 4.7
- Lowest rated: 1
- Summary of article content: Articles about 심박센서의 원리와 사용방법 :: 남보공방 통상 저가의 심박센서는 녹색LED 하나를 사용하지만 여기에 적외선LED를 추가 … 아두이노 IDE에서 스케치 -> 라이브러리 포함하기-> 라이브러리관리 … …
- Most searched keywords: Whether you are looking for 심박센서의 원리와 사용방법 :: 남보공방 통상 저가의 심박센서는 녹색LED 하나를 사용하지만 여기에 적외선LED를 추가 … 아두이노 IDE에서 스케치 -> 라이브러리 포함하기-> 라이브러리관리 … 1. 심박센서 원리 심박센서는 LED불빛을 손끝에 비추고 여기에서 반사되는 빛을 측정하는 방식이다. 심장이 박동되어 손끝에 피가 흐를 때에는 세포에 혈액세포에 빛이 흡수되므로 반사되어 측정되는 빛의 감도가..메이킹,피지컬컴퓨팅,IOT,아두이노,ESP
- Table of Contents:
심박센서의 원리와 사용방법
티스토리툴바
See more articles in the same category here: https://chewathai27.com/to/blog.
[솔다/아두이노] 아두이노로 심박수 체크하기 -심박센서 모듈-
1 2 3 4 5 6 7 8 9 10 11 12 13 14 15 16 17 18 19 20 21 22 23 24 25 26 27 28 29 30 31 32 33 34 35 36 37 38 39 40 41 42 43 44 45 46 47 48 49 50 51 52 53 54 55 56 57 58 59 60 61 62 63 64 65 66 67 68 69
/* Pulse Sensor Amped 1.4 by Joel Murphy and Yury Gitman http://www.pulsesensor.com ———————- Notes ———————- ———————- This code: 1) Blinks an LED to User’s Live Heartbeat PIN 13 2) Fades an LED to User’s Live HeartBeat 3) Determines BPM 4) Prints All of the Above to Serial Read Me: https://github.com/WorldFamousElectronics/PulseSensor_Amped_Arduino/blob/master/README.md ———————- ———————- ———————- */
// Variables int pulsePin = 0 ; // Pulse Sensor purple wire connected to analog pin 0 int blinkPin = 13 ; // pin to blink led at each beat int fadePin = 5 ; // pin to do fancy classy fading blink at each beat int fadeRate = 0 ; // used to fade LED on with PWM on fadePin
// Volatile Variables, used in the interrupt service routine! volatile int BPM; // int that holds raw Analog in 0. updated every 2mS volatile int Signal; // holds the incoming raw data volatile int IBI = 600 ; // int that holds the time interval between beats! Must be seeded! volatile boolean Pulse = false ; // “True” when User’s live heartbeat is detected. “False” when not a “live beat”. volatile boolean QS = false ; // becomes true when Arduoino finds a beat.
// Regards Serial OutPut — Set This Up to your needs static boolean serialVisual = true ; // Set to ‘false’ by Default. Re-set to ‘true’ to see Arduino Serial Monitor ASCII Visual Pulse
void setup(){ pinMode(blinkPin,OUTPUT); // pin that will blink to your heartbeat! pinMode(fadePin,OUTPUT); // pin that will fade to your heartbeat! Serial. begin ( 115200 ); // we agree to talk fast! interruptSetup(); // sets up to read Pulse Sensor signal every 2mS // IF YOU ARE POWERING The Pulse Sensor AT VOLTAGE LESS THAN THE BOARD VOLTAGE, // UN-COMMENT THE NEXT LINE AND APPLY THAT VOLTAGE TO THE A-REF PIN // analogReference(EXTERNAL); }
// Where the Magic Happens void loop(){ serialOutput() ; if (QS == true ){ // A Heartbeat Was Found // BPM and IBI have been Determined // Quantified Self “QS” true when arduino finds a heartbeat fadeRate = 255 ; // Makes the LED Fade Effect Happen // Set ‘fadeRate’ Variable to 255 to fade LED with pulse serialOutputWhenBeatHappens(); // A Beat Happened, Output that to serial. QS = false ; // reset the Quantified Self flag for next time ledFadeToBeat(); // Makes the LED Fade Effect Happen delay( 1000 ); // take a break }
void ledFadeToBeat(){ fadeRate -= 15 ; // set LED fade value fadeRate = constrain(fadeRate, 0 , 255 ); // keep LED fade value from going into negative numbers! analogWrite(fadePin,fadeRate); // fade LED Colored by Color Scripter
[아두이노] 심장박동 센서의 사용 #1
/* Pulse Sensor Amped 1.4 by Joel Murphy and Yury Gitman http://www.pulsesensor.com
———————- Notes ———————- ———————-
This code:
1) Blinks an LED to User’s Live Heartbeat PIN 13
2) Fades an LED to User’s Live HeartBeat
3) Determines BPM
4) Prints All of the Above to Serial
Read Me:
https://github.com/WorldFamousElectronics/PulseSensor_Amped_Arduino/blob/master/README.md
———————- ———————- ———————-
*/
// Variables
int pulsePin = 0 ; // Pulse Sensor purple wire connected to analog pin 0
int blinkPin = 13 ; // pin to blink led at each beat
int fadePin = 5 ; // pin to do fancy classy fading blink at each beat
int fadeRate = 0 ; // used to fade LED on with PWM on fadePin
// Volatile Variables, used in the interrupt service routine!
volatile int BPM; // int that holds raw Analog in 0. updated every 2mS
volatile int Signal; // holds the incoming raw data
volatile int IBI = 600 ; // int that holds the time interval between beats! Must be seeded!
volatile boolean Pulse = false ; // “True” when User’s live heartbeat is detected. “False” when not a “live beat”.
volatile boolean QS = false ; // becomes true when Arduoino finds a beat.
// Regards Serial OutPut — Set This Up to your needs
static boolean serialVisual = true ; // Set to ‘false’ by Default. Re-set to ‘true’ to see Arduino Serial Monitor ASCII Visual Pulse
void setup(){
pinMode(blinkPin,OUTPUT); // pin that will blink to your heartbeat!
pinMode(fadePin,OUTPUT); // pin that will fade to your heartbeat!
Serial. begin ( 115200 ); // we agree to talk fast!
interruptSetup(); // sets up to read Pulse Sensor signal every 2mS
// IF YOU ARE POWERING The Pulse Sensor AT VOLTAGE LESS THAN THE BOARD VOLTAGE,
// UN-COMMENT THE NEXT LINE AND APPLY THAT VOLTAGE TO THE A-REF PIN
// analogReference(EXTERNAL);
}
// Where the Magic Happens
void loop(){
serialOutput() ;
if (QS = = true ){ // A Heartbeat Was Found
// BPM and IBI have been Determined
// Quantified Self “QS” true when arduino finds a heartbeat
fadeRate = 255 ; // Makes the LED Fade Effect Happen
// Set ‘fadeRate’ Variable to 255 to fade LED with pulse
serialOutputWhenBeatHappens(); // A Beat Happened, Output that to serial.
QS = false ; // reset the Quantified Self flag for next time
}
ledFadeToBeat(); // Makes the LED Fade Effect Happen
delay( 1000 ); // take a break
}
void ledFadeToBeat(){
fadeRate – = 15 ; // set LED fade value
fadeRate = constrain(fadeRate, 0 , 255 ); // keep LED fade value from going into negative numbers!
analogWrite(fadePin,fadeRate); // fade LED
}
심박센서의 원리와 사용방법
1. 심박센서 원리
심박센서는 LED불빛을 손끝에 비추고 여기에서 반사되는 빛을 측정하는 방식이다. 심장이 박동되어 손끝에 피가 흐를 때에는 세포에 혈액세포에 빛이 흡수되므로 반사되어 측정되는 빛의 감도가 감소되고 이에 따라 저항값이 변동되므로 흐르는 전압도 변화되게 된다. 이 전압변화를 증폭시켜 펄스로 인식하고 심장의 박동으로 인식하는 것이다. 통상 저가의 심박센서는 녹색LED 하나를 사용하지만 여기에 적외선LED를 추가하고 적외선 반사량을 측정함으로써 혈중산소포화도 측정 용도로 사용하기도 한다.
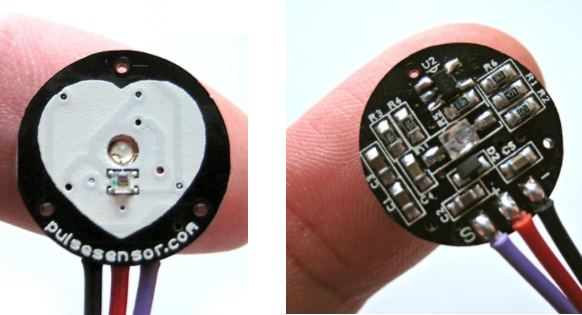
2. 심박센서의 구조
심박센서는 전면에 LED전구와 수광센서가 나란히 배열되어 있으므로 이위에 손가락 끝을 올려놓고 측정하면 되고, 통상 3개의 단자가 있는데 전원공급용 +, – 단자와 신호수신을 S단자가 있는데 이 S단자에 출력되는 신호를 아두이노 등에서 아날로그 신호로 읽어 해성하면 된다.
3. 심박센서 사용을 위한 Library설치
아두이노 IDE에서 스케치 -> 라이브러리 포함하기-> 라이브러리관리 화면에서 Pulsesensor를 검색하여 설치하면 된다.
4. 심박센서 작동 예제
Pulsesensor 라이브러리를 설치하고 파일 -> 예제 메뉴를 보면 다음과 같이 pulsesensor 관련 예제들이 포함되어 있는것을 확인할 수 있다.
예제 중 가장 간단한 GettingSstartedProject를 선택해서 실행시켜 본다.
/* PulseSensor™ Starter Project and Signal Tester * The Best Way to Get Started With, or See the Raw Signal of, your PulseSensor™ & Arduino. * * Here is a link to the tutorial * https://pulsesensor.com/pages/code-and-guide * * WATCH ME (Tutorial Video): * https://www.youtube.com/watch?v=82T_zBZQkOE * * ————————————————————- 1) This shows a live human Heartbeat Pulse. 2) Live visualization in Arduino’s Cool “Serial Plotter”. 3) Blink an LED on each Heartbeat. 4) This is the direct Pulse Sensor’s Signal. 5) A great first-step in troubleshooting your circuit and connections. 6) “Human-readable” code that is newbie friendly.” */ // Variables int PulseSensorPurplePin = 0; // Pulse Sensor PURPLE WIRE connected to ANALOG PIN 0 int LED13 = 13; // The on-board Arduion LED int Signal; // holds the incoming raw data. Signal value can range from 0-1024 int Threshold = 550; // Determine which Signal to “count as a beat”, and which to ingore. // The SetUp Function: void setup() { pinMode(LED13,OUTPUT); // pin that will blink to your heartbeat! Serial.begin(9600); // Set’s up Serial Communication at certain speed. } // The Main Loop Function void loop() { Signal = analogRead(PulseSensorPurplePin); // Read the PulseSensor’s value. // Assign this value to the “Signal” variable. Serial.println(Signal); // Send the Signal value to Serial Plotter. if(Signal > Threshold){ // If the signal is above “550”, then “turn-on” Arduino’s on-Board LED. digitalWrite(LED13,HIGH); } else { digitalWrite(LED13,LOW); // Else, the sigal must be below “550”, so “turn-off” this LED. } delay(10); }
예제프로그램을 실행시켜 보기 위해서는 +,-전원단자를 연결하고 S단자에서 나온 케이블을 아두이노 A0 (아날로그 단자 0번) 단자에 연결한다.
프로그램을 LOAD하고 녹색LED 불빛이 보이는 쪽 위에 손가락을 대고 있으면 심박 작동에 따라 아두이노 내장LED가 깜박깜박하는 것을 확인할 수 있다.
아두이노 IDE에서 툴 -> 시리얼 모니터를 선택해서 보면 다음과 같이 심장박동을 챠트형태로 확인할 수 있다.
심장의 박동수는 위 파형의 피크값 사이의 시간 간격을 계산하여 1분에 볓번 발생되는지 산출한 숫자인데 예제 중 Getting_BPM_to_Monitor 프로그램을 실행시켜 표시해 볼 수 았다.
5. 평균 심박수
심박수는 운동 또는 긴장상태에서는 빨라지고 편안하게 안정된 상태에서는 느려진다. 남녀구분이나 나이에 따라서도 달라지는데 휴식기의 평균 심박수는 다음과 같다고 한다.
So you have finished reading the 아두 이노 심박 센서 topic article, if you find this article useful, please share it. Thank you very much. See more: 아두이노 심박센서 블루투스, 아두이노 심박센서 모듈, 심장박동센서 원리, 아두 이노 펄스 센서 lcd, 광학심박센서, 아두이노 센서 종류, PPG 센서