
You are looking for information, articles, knowledge about the topic nail salons open on sunday near me 라즈베리 파이 아두 이노 블루투스 통신 on Google, you do not find the information you need! Here are the best content compiled and compiled by the https://chewathai27.com/to team, along with other related topics such as: 라즈베리 파이 아두 이노 블루투스 통신 아두이노 라즈베리파이 데이터 전송, 아두이노 라즈베리파이 센서값 전송, 라즈베리파이 아두이노 연결, 라즈베리파이 아두이노 시리얼 통신 파이썬, 라즈베리파이4 블루투스 통신, 라즈베리파이 블루투스 통신 예제, 라즈베리파이 블루투스 통신, 아두이노 라즈베리 파이 무선 통신
라즈베리파이4 아두이노 블루투스 통신하기
- Article author: popcorn16.tistory.com
- Reviews from users: 28374
 Ratings
 - Top rated: 4.2
- Lowest rated: 1
- Summary of article content: Articles about 라즈베리파이4 아두이노 블루투스 통신하기 지난 라즈베리파이↔️안드로이드 블루투스 통신에 이어서, HC-06모듈을 사용한 라즈베리파이↔️아두이노 블루투스 통신방법을 정리해봤습니다. …
- Most searched keywords: Whether you are looking for 라즈베리파이4 아두이노 블루투스 통신하기 지난 라즈베리파이↔️안드로이드 블루투스 통신에 이어서, HC-06모듈을 사용한 라즈베리파이↔️아두이노 블루투스 통신방법을 정리해봤습니다. 지난 라즈베리파이↔️안드로이드 블루투스 통신에 이어서, HC-06모듈을 사용한 라즈베리파이↔️아두이노 블루투스 통신방법을 정리해봤습니다. 아두이노 블루투스 통신, 라즈베리파이 블루투스 통신, 안드로이드..
- Table of Contents:
1 아두이노 세팅
2 라즈베리파이에 필요한 라이브러리 설치
3 블루투스 페어링
4 라즈베리파이→아두이노 데이터 전송 예제
5 아두이노→라즈베리파이 데이터 전송 예제
‘관리하지않음아두이노’ 관련글
티스토리툴바

라즈베리파이로 아두이노 블루투스 제어 – 개발일기
- Article author: developmentdiary.tistory.com
- Reviews from users: 24113 Ratings
- Top rated: 4.2
- Lowest rated: 1
- Summary of article content: Articles about 라즈베리파이로 아두이노 블루투스 제어 – 개발일기 라즈베리파이 아두이노 블루투스 통신. apt-get업데이트 … 블루투스 기기찾기(아두이노 블루투스모듈 맥주소 찾기). scan on. 블루투스 연결. …
- Most searched keywords: Whether you are looking for 라즈베리파이로 아두이노 블루투스 제어 – 개발일기 라즈베리파이 아두이노 블루투스 통신. apt-get업데이트 … 블루투스 기기찾기(아두이노 블루투스모듈 맥주소 찾기). scan on. 블루투스 연결. 블루투스로 servo모터 제어 https://developmentdiary.tistory.com/508?category=892090 라즈베리파이 아두이노 블루투스 통신 apt-get업데이트 sudo apt-get update sudo apt-get upgrade 블루투스 패키지 설치 s..
- Table of Contents:

Arduino UNO와 Raspberry PI 3간 Bluetooth 통신 테스트 – 멈춤보단 천천히라도
- Article author: webnautes.tistory.com
- Reviews from users: 6289 Ratings
- Top rated: 4.3
- Lowest rated: 1
- Summary of article content: Articles about Arduino UNO와 Raspberry PI 3간 Bluetooth 통신 테스트 – 멈춤보단 천천히라도 HC-05를 연결한 Arduino UNO와 Raspberry PI 3간 통신 테스트를 진행했습니다. 1. bluetoothctl 명령을 사용하여 페어링하는 방법 2. …
- Most searched keywords: Whether you are looking for Arduino UNO와 Raspberry PI 3간 Bluetooth 통신 테스트 – 멈춤보단 천천히라도 HC-05를 연결한 Arduino UNO와 Raspberry PI 3간 통신 테스트를 진행했습니다. 1. bluetoothctl 명령을 사용하여 페어링하는 방법 2. HC-05를 연결한 Arduino UNO와 Raspberry PI 3간 통신 테스트를 진행했습니다. 1. bluetoothctl 명령을 사용하여 페어링하는 방법 2. LED 제어 테스트 1. bluetoothctl 명령을 사용하여 페어링하는 방법 라즈베리..
- Table of Contents:
라즈베리파이로 블루투스 통신하기 > 라즈베리파이 | 메이크쉐어
- Article author: www.makeshare.org
- Reviews from users: 39895 Ratings
- Top rated: 3.7
- Lowest rated: 1
- Summary of article content: Articles about 라즈베리파이로 블루투스 통신하기 > 라즈베리파이 | 메이크쉐어 이번 포스팅은 라즈베리파이의 블루투스 기능을 통해서 스마트폰으로 … 아두이노와 HC-06으로 통신해보셨다면, 이제 라즈베리파이를 이용해서 … …
- Most searched keywords: Whether you are looking for 라즈베리파이로 블루투스 통신하기 > 라즈베리파이 | 메이크쉐어 이번 포스팅은 라즈베리파이의 블루투스 기능을 통해서 스마트폰으로 … 아두이노와 HC-06으로 통신해보셨다면, 이제 라즈베리파이를 이용해서 … 라즈베리파이라즈베리파이를 사용하면서 블루투스 기능을 사용해볼 기회가 많지 않습니다. 주로 1) 블루투스 스피커를 사용하거나 2) 블루투스 키보드와 마우스를 연결하는데 사용하곤하죠. 이번 포스팅은 라즈베리파이의 블루투스 기능을 통해서 스마트폰으로 데이터를 전송하고 반대로 스마트폰에서 라즈베리파이로 데이터를 전송하는 방법에 대해서 공유합니다. 1) 패키지 업데이트 하기 sudo apt-get updatesudo…
- Table of Contents:
최신글
최신댓글
 Read More
라즈베리파이 3 B+ HC-06 블루투스 모듈연결 – 라이프온룸
- Article author: lifeonroom.com
- Reviews from users: 32791 Ratings
- Top rated: 4.6
- Lowest rated: 1
- Summary of article content: Articles about 라즈베리파이 3 B+ HC-06 블루투스 모듈연결 – 라이프온룸 아두이노 결선 과 프로그래밍 !! 우선 결선은 아래와 같이 해주시면 됩니다. Arduino – Bluetooth HC-06. 결선을 완료 했으면 스케치를 … …
- Most searched keywords: Whether you are looking for 라즈베리파이 3 B+ HC-06 블루투스 모듈연결 – 라이프온룸 아두이노 결선 과 프로그래밍 !! 우선 결선은 아래와 같이 해주시면 됩니다. Arduino – Bluetooth HC-06. 결선을 완료 했으면 스케치를 … 오늘은 라즈베리파이에서 HC-06 으로 블루투스 연결을 해볼게요. 먼저 준비물이 뭐가 필요한지 보고 갈게요 !1. 준비물라즈베리파이 3 B+아두이노 HC-06 블루투스 모듈브레드보드 및 점퍼선 수-수준비물이 완료 되었으면 아두이노에 블루투스를 결선하고 스케치를 짜서 주입해 봅시다.
- Table of Contents:
1 준비물
2 아두이노 결선 과 프로그래밍 !!
3 Raspberry pi 3 에서 Pair
3 Python 으로 블루투스 연결
Ho-Joon Lee : 아두이노 <-> 라즈베리파이 블루투스 시리얼 연결 part 1
- Article author: nel78.egloos.com
- Reviews from users: 49624 Ratings
- Top rated: 3.7
- Lowest rated: 1
- Summary of article content: Articles about Ho-Joon Lee : 아두이노 <-> 라즈베리파이 블루투스 시리얼 연결 part 1 1. Arduino UNO와 HC-06 Bluetooth 모듈을 다음처럼 연결하고 Arduino UNO에 전원을 연결합니다. … 2. 필요한 패키지를 설치합니다. … Raspberry Pi 3의 … …
- Most searched keywords: Whether you are looking for Ho-Joon Lee : 아두이노 <-> 라즈베리파이 블루투스 시리얼 연결 part 1 1. Arduino UNO와 HC-06 Bluetooth 모듈을 다음처럼 연결하고 Arduino UNO에 전원을 연결합니다. … 2. 필요한 패키지를 설치합니다. … Raspberry Pi 3의 … Ho-Joon Lee
- Table of Contents:
‘라즈베리파이, 아두이노’ 카테고리의 글 목록
- Article author: jcdgods.tistory.com
- Reviews from users: 39432 Ratings
- Top rated: 4.7
- Lowest rated: 1
- Summary of article content: Articles about ‘라즈베리파이, 아두이노’ 카테고리의 글 목록 ‘라즈베리파이, 아두이노’ 카테고리의 글 목록. … Raspberry에서 어떻게 아두이노에 데이터를 줄까? … HC-06 모듈로 Bluetooth 통신 해보기 1. …
- Most searched keywords: Whether you are looking for ‘라즈베리파이, 아두이노’ 카테고리의 글 목록 ‘라즈베리파이, 아두이노’ 카테고리의 글 목록. … Raspberry에서 어떻게 아두이노에 데이터를 줄까? … HC-06 모듈로 Bluetooth 통신 해보기 1. ‘라즈베리파이, 아두이노’ 카테고리의 글 목록IT 방랑기
- Table of Contents:
라즈베리파이 아두이노 27
티스토리툴바
개발자 최남기 :: 4. 라즈베리파이 블루투스 사용하기
- Article author: namki-learning.tistory.com
- Reviews from users: 8054 Ratings
- Top rated: 4.4
- Lowest rated: 1
- Summary of article content: Articles about 개발자 최남기 :: 4. 라즈베리파이 블루투스 사용하기 그리고 통신하고자 하는 블루투스 장치의 맥 주소를 알아봅니다. 저같은 경우는 이미 스마트폰을 통해서 아두이노 자동차의 블루투스 맥 주소를 알고 … …
- Most searched keywords: Whether you are looking for 개발자 최남기 :: 4. 라즈베리파이 블루투스 사용하기 그리고 통신하고자 하는 블루투스 장치의 맥 주소를 알아봅니다. 저같은 경우는 이미 스마트폰을 통해서 아두이노 자동차의 블루투스 맥 주소를 알고 … 라즈베리파이 블루투스를 사용해봅니다. 1. 블루투스를 사용하기 위해 관련 라이브러리를 설치합니다. sudo apt install bluez sudo pip3 install pybluez pybleno 모두다 설치했으면 파이썬을 키고 import blueto..
- Table of Contents:

See more articles in the same category here: 316+ tips for you.
라즈베리파이4 아두이노 블루투스 통신하기
지난 라즈베리파이↔️안드로이드 블루투스 통신에 이어서, HC-06모듈을 사용한 라즈베리파이↔️아두이노 블루투스 통신방법을 정리해봤습니다. 아두이노 블루투스 통신, 라즈베리파이 블루투스 통신, 안드로이드 블루투스 통신 각각 포스팅과 겹치는 부분이 많지만, 일단 처음 사용자를 대상으로 포스팅을 자세히 해봤습니다 🙂
1. 아두이노 세팅
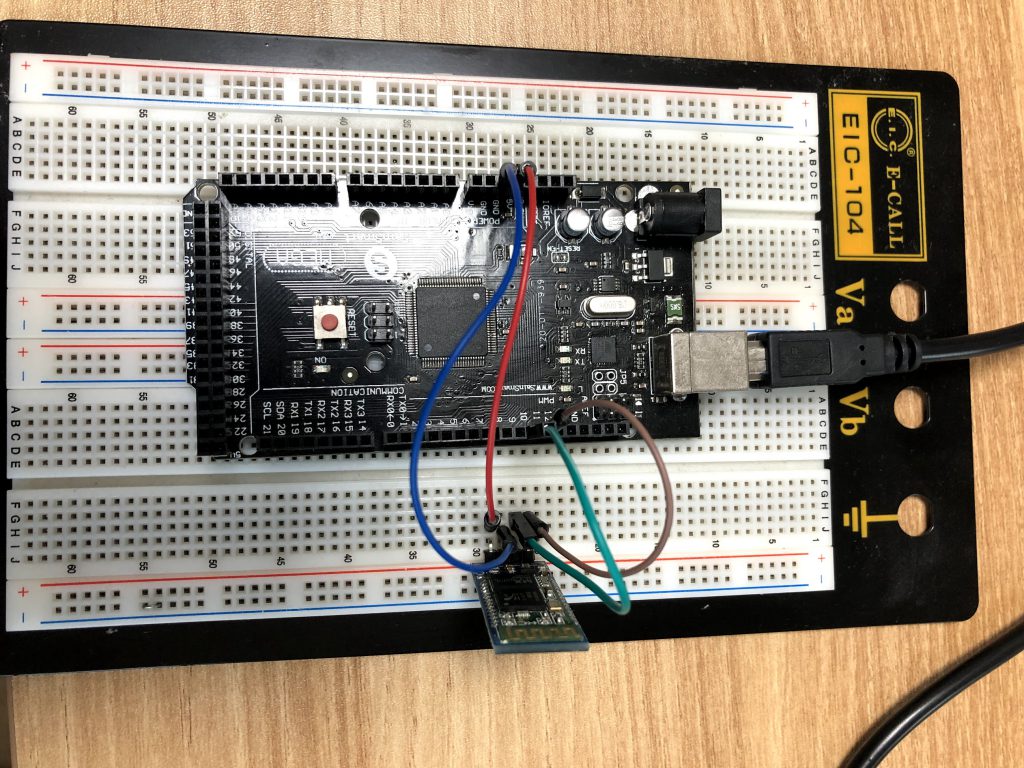
아두이노에 HC-06모듈을 다음과 같이 연결해줍니다.
아두이노 보드 구성
VCC는 아두이노 5V에, GND는 아두이노 GND에, TXD는 7번핀, RXD는 8번 핀에 연결해줍니다.
보드 구성이 끝나면, 아래의 코드를 업로드해주세요.
#include
int RX=7; int TX=8; SoftwareSerial bluetooth(RX, TX); void setup(){ Serial.begin(9600); bluetooth.begin(9600); } void loop(){ if (bluetooth.available()) { Serial.write(bluetooth.read()); } if (Serial.available()) { bluetooth.write(Serial.read()); } } 시리얼 모니터를 켜고, AT를 입력했을 때, OK라고 뜨면 연결에 성공한 것입니다.
OK가 뜨지 않는다면, 시리얼 모니터의 보드레이트와 전송 옵션을 변경해서 시도하셔야 합니다. 이전 아두이노 안드로이드 블루투스 통신하기 (HC-06 AT 무응답 해결) 포스팅을 참고해주세요.
AT // OK AT+NAME Arduino // OKsetname
AT+NAME 명령어를 통해서 블루투스 기기 이름을 변경해주세요.
라즈베리파이에서 블루투스 스캔할 때 기기를 확인하려면 unique 한 이름으로 변경해주셔야 합니다.
2. 라즈베리파이에 필요한 라이브러리 설치
라즈베리파이에서 터미널을 열고 다음 명령어를 순서대로 입력해주세요.
// 라즈베리파이 업데이트 Sudo apt-get update Sudo apt-get upgrade // 필요한 라이브러리 설치 Sudo apt-get install bluetooth blueman bluez Sudo apt-get install python-bluetooth // 재부팅 Sudo reboot
3. 블루투스 페어링
라즈베리파이와 아두이노 사이에 블루투스 페어링을 먼저 해줄 겁니다.
sudo bluetoothctl power on scan on
scan on을 했을 때, 조금 기다리면 아두이노 HD-06 모듈이 스캔되어서 나타납니다.
라즈베리파이 화면 캡쳐 – scan on
블루투스 기기를 찾았다면, MAC 주소를 확인해주세요.
제 모듈의 MAC 주소는 98:D3:51:FD:E4:0C 였고, 이 주소를 사용해서 페어링을 해줬습니다.
pair MAC주소 // 예시 : pair 98:D3:51:FD:E4:0C
페어링을 시도하면 “Enter PIN code: “가 뜹니다.
0000이나 1234를 입력하시면 됩니다. 저는 1234를 입력해서 연결에 성공했습니다.
라즈베리파이 화면 캡쳐 – 페어링
trust MAC주소
장치 신뢰까지 세팅이 되었습니다.
4. 라즈베리파이→아두이노 데이터 전송 예제
이제 라즈베리파이에서 아두이노에 데이터를 전송해보겠습니다. 라즈베리파이의 기본 프로그램인 Thonny Python IDE를 켜고 다음 코드를 복붙 한 뒤 실행합니다.
from bluetooth import * socket = BluetoothSocket( RFCOMM ) socket.connect((“98:D3:51:FD:E4:0C”, 1)) print(“bluetooth connected!”) msg = input(“send message : “) socket.send(msg) print(“finished”) socket.close()
코드에서 connect옆의 MAC주소는 이전에 확인한 자기 모듈의 MAC주소로 변경해주시면 됩니다. 파이썬 코드를 잠깐 설명드리면, 블루투스 연결 후 입력한 메시지를 1번 전송하고 블루투스 연결을 해제하는 코드입니다.
라즈베리파이 화면 캡쳐
RUN 버튼을 눌러서 실행합니다.
hello라는 문자열을 입력했을 때, 아두이노 시리얼 모니터에서 hello 문자열을 전송받았습니다.
아두이노 시리얼 모니터
5. 아두이노→라즈베리파이 데이터 전송 예제
이번에는 아두이노에서 라즈베리파이로 데이터를 전송하는 예제입니다. 아두이노 코드를 변경할 필요는 없습니다. 아래 코드를 복붙 하고 실행해주세요.
from bluetooth import * socket = BluetoothSocket( RFCOMM ) socket.connect((“98:D3:51:FD:E4:0C”, 1)) print(“bluetooth connected!”) while True: data = socket.recv(1024) print(“Received: %s” %data) if(data==”q”): print(“Quit”) break socket.close()
마찬가지로 connect 옆의 MAC주소는 각자 모듈의 MAC주소로 변경해주시면 됩니다.
아두이노 시리얼 모니터에서 데이터를 입력하면,
라즈베리파이 캡쳐 화면
라즈베리파이에서 수신하는 것을 확인할 수 있습니다.
a를 보냈을 때 b’a’로 전송을 받았습니다. 이전 라즈베리파이4↔️안드로이드 블루투스 통신 때도 이랬는데, 아무래도 라즈베리파이 쪽의 문제인 것 같습니다.. 해결방법을 찾으면 공유하겠습니다.
잘못된 내용이 있다면 언제든지 댓글이나 메일로 알려주시면 감사하겠습니다.
이 포스팅이 도움이 되었다면 공감 부탁드립니다.
궁금한 점은 언제든지 댓글 남겨주시면 답변해드리겠습니다:D
라즈베리파이로 아두이노 블루투스 제어
블루투스로 servo모터 제어
https://developmentdiary.tistory.com/508?category=892090
라즈베리파이 아두이노 블루투스 통신
apt-get업데이트
sudo apt-get update
sudo apt-get upgrade
블루투스 패키지 설치
sudo apt-get install bluetooth blueman bluez
sudo apt-get install python-bluetooth
블루투스 설정
sudo bluetoothctl
블루투스 기기찾기(아두이노 블루투스모듈 맥주소 찾기)
scan on
블루투스 연결
pair <블루투스기기 맥주소>
PIN입력
1234
bluetooth agent란
bluetooth ‘페어링 코드’를 관리하는것
들어오는 ‘페어링 코드’에 응답하거나 코드를 보낼수 있습니다.
agent 등록(정확하지 않음)
agent on
agent defalut설정(정확하지 않음)
default-agent
코드
sudo nano blue.py
1 2 3 4 5 6 7 8 9 10 11 12 13 14 15 16 from bluetooth import * client_socket = BluetoothSocket( RFCOMM ) client_socket.connect(( “FF:FF:FF:FF:FF:FF” , 1 )) #블루투스 연결 맥주소 넣어주기 while True: msg = raw_input ( “Send : ” ) #보낼메시지 입력받기 print msg #보낼메시지 출력 client_socket.send(msg) #소켓통신을 통해 메세지 보내기 print “Finished” client_socket. close () #소켓 통신 종료
cs
실행
python blue.py
입력창에 ‘1’ 또는 ‘2’를 입력하여 동작확인
참고
http://blog.naver.com/PostView.nhn?blogId=icbanq&logNo=221658773541&categoryNo=78&parentCategoryNo=&from=thumbnailList
Arduino UNO와 Raspberry PI 3간 Bluetooth 통신 테스트
반응형
HC-05를 연결한 Arduino UNO와 Raspberry PI 3간 통신 테스트를 진행했습니다.
1. bluetoothctl 명령을 사용하여 페어링하는 방법
2. LED 제어 테스트
1. bluetoothctl 명령을 사용하여 페어링하는 방법
라즈베리파이와 Arduino UNO간 페어링하는 방법을 설명합니다.
1. Arduino UNO와 HC-05 Bluetooth 모듈을 다음처럼 연결하고 Arduino UNO에 전원을 연결합니다.
Arduino UNO D3 → HC-05 Bluetooth 모듈 RXD Arduino UNO D2 → HC-05 Bluetooth 모듈 TXD Arduino UNO GND → HC-05 Bluetooth 모듈 GND Arduino UNO 5V → HC-05 Bluetooth 모듈 VCC
2. 필요한 패키지를 설치합니다.
pi@raspberrypi:~ $ sudo apt-get install bluetooth bluez bluez-tools
Raspberry Pi 3의 터미널에서 bluetoothctl 명령을 실행합니다.
현재 디폴트로 설정되어 있는 Raspberry Pi 3에 내장된 Bluetooth 모듈의 맥어드레스를 출력해줍니다.
[bluetooth] # 옆에 커서가 깜박이면서 명령 입력 대기모드가 됩니다.pi@raspberrypi:~ $ bluetoothctl
[NEW] Controller B8:27:EB:DA:FA:66 raspberrypi [default] [bluetooth]#bluetoothctl는 블루투스 디바이스를 검색하고 페어링 및 연결 등의 목적으로 사용할 수 있는 유틸리티입니다.
대화형 명령 방식이라서 명령을 입력하면 바로 결과를 보여줍니다.
3. show를 입력하면 Raspberry Pi 3에서 사용중인 모듈의 정보를 보여줍니다.
블루투스 모듈의 맥어드레스는 B8:27:E8:DA:FA:66입니다.
Powered: yes 현재 모듈의 전원이 켜져 있습니다.
Discoverable: no 다른 블루투스 장치에서 검색할 수 없도록 설정되어 있습니다.
Pairable: yes 페어링이 가능하도록 설정되어 있습니다.
Discovering: no 현재 다른 블루투스 장치를 검색하고 있지 않습니다.
UUID 목록은 라즈베리파이에서 제공하는 블루투스 서비스입니다.
[bluetooth]# showController B8:27:EB:DA:FA:66
Name: raspberrypi
Alias: raspberrypi
Class: 0x480000
Powered: yes
Discoverable: no
Pairable: yes
UUID: Headset AG (00001112-0000-1000-8000-00805f9b34fb) UUID: Generic Attribute Profile (00001801-0000-1000-8000-00805f9b34fb) UUID: A/V Remote Control (0000110e-0000-1000-8000-00805f9b34fb) UUID: Generic Access Profile (00001800-0000-1000-8000-00805f9b34fb) UUID: PnP Information (00001200-0000-1000-8000-00805f9b34fb) UUID: A/V Remote Control Target (0000110c-0000-1000-8000-00805f9b34fb) UUID: Audio Source (0000110a-0000-1000-8000-00805f9b34fb) UUID: Handsfree Audio Gateway (0000111f-0000-1000-8000-00805f9b34fb) Modalias: usb:v1D6Bp0246d052B
Discovering: no
4. 모듈의 전원이 꺼져있다면(Powered: no) 다음 명령으로 모듈의 전원을 켜줍니다.
[bluetooth]# power on [CHG] Controller B8:27:EB:DA:FA:66 Class: 0x6c0000Changing power on succeeded
[CHG] Controller B8:27:EB:DA:FA:66 Powered: yes5. 에이전트를 활성화하고 기본값으로 설정합니다. 페어링 핀 코드를 요청 및 확인을 하기 위해 필요합니다.
[bluetooth]# agent onAgent registered
[bluetooth]# default-agentDefault agent request successful
6. 주변에 있는 블루투스 디바이스를 검색합니다. HC-05가 검색될 때까지 대기합니다.
[bluetooth]# scan onDiscovery started
[CHG] Controller B8:27:EB:DA:FA:66 Discovering: yes [NEW] Device 00:09:A7:24:A7:CF Beoplay E8 [NEW] Device 57:F3:99:2E:15:7B 57-F3-99-2E-15-7B [NEW] Device 54:BD:5A:3F:4E:62 54-BD-5A-3F-4E-62 [NEW] Device 44:CD:06:A2:89:EC 44-CD-06-A2-89-EC [NEW] Device 9C:8C:6E:E1:7E:23 9C-8C-6E-E1-7E-23 [NEW] Device 5E:5A:12:DB:1E:AC 5E-5A-12-DB-1E-AC [NEW] Device 64:1C:B0:14:A8:44 64-1C-B0-14-A8-44 [NEW] Device 4D:A4:8C:6C:A6:00 4D-A4-8C-6C-A6-00 [NEW] Device 5A:F6:24:E8:93:7C 5A-F6-24-E8-93-7C [NEW] Device 20:15:08:13:18:58 20-15-08-13-18-58 [CHG] Device 20:15:08:13:18:58 LegacyPairing: no [CHG] Device 20:15:08:13:18:58 Name: HC-05 [CHG] Device 20:15:08:13:18:58 Alias: HC-057. 주변 블루투스 디바이스 검색을 중지합니다.
[bluetooth]# scan offDiscovery stopped
[CHG] Controller B8:27:EB:DA:FA:66 Discovering: no8. pair 명령과 앞에서 확인한 HC-05의 블루투스 모듈 맥어드레스를 같이 적어주면 페어링이 진행됩니다.
핀번호로 1234를 입력하고 엔터키를 누릅니다.
[bluetooth]# pair 20:15:08:13:18:58Attempting to pair with 20:15:08:13:18:58
[CHG] Device 20:15:08:13:18:58 Connected: yesRequest PIN code
[agent] Enter PIN code: 12349. 잠시 후 페어링이 완료됩니다.
[CHG] Device 20:15:08:13:18:58 UUIDs: 00001101-0000-1000-8000-00805f9b34fb [CHG] Device 20:15:08:13:18:58 ServicesResolved: yes [CHG] Device 20:15:08:13:18:58 Paired: yesPairing successful
[CHG] Device 20:15:08:13:18:58 ServicesResolved: no [CHG] Device 20:15:08:13:18:58 Connected: no [bluetooth]#10. 페어링 완료후, trust 명령을 해줘야 합니다.
[bluetooth]# trust 20:15:08:13:18:58 [CHG] Device 20:15:08:13:18:58 Trusted: yes Changing 20:15:08:13:18:58 trust succeeded11. info 명령과 블루투스 모듈 맥어드레스를 같이 적어주면 모듈 상태를 보여줍니다. Paired와 Trusted 항목이 yes입니다.
[bluetooth]# info 20:15:08:13:18:58 Device 20:15:08:13:18:58 Name: HC-05 Alias: HC-05 Class: 0x001f00 Paired: yes Trusted: yes Blocked: no Connected: no LegacyPairing: yes UUID: Serial Port (00001101-0000-1000-8000-00805f9b34fb)12. 페어링을 취소하는 방법을 잠시 설명하겠습니다. 지금 진행하지는 마세요.
paired-devices 명령으로 현재 페어링된 디바이스 확인을 할 수 있습니다.
[bluetooth]# paired-devicesDevice 20:15:08:13:18:58 HC-05
remove 명령과 HC-05 블루투스 모듈 맥어드레스를 같이 적어주면 페어링 설정이 Raspberry Pi 에서 삭제됩니다.
[bluetooth]# remove 20:15:08:13:18:58 [DEL] Device 20:15:08:13:18:58 HC-05 Device has been removed13. quit 명령으로 bluetoothctl를 종료합니다.
[bluetooth]# quitAgent unregistered
[DEL] Controller B8:27:EB:DA:FA:66 raspberrypi [default]2. LED 제어 테스트
1. 아두이노 우노에 다음 코드를 업로드합니다.
#include
SoftwareSerial softwareSerial(2, 3); // RX, TX
void setup() {
softwareSerial.begin(9600); pinMode(LED_BUILTIN, OUTPUT); }
void loop() {
if (softwareSerial.available() > 0 ) {
char command = softwareSerial.read(); int ledStatus = digitalRead(LED_BUILTIN);
switch (command){
case ‘1’: if (ledStatus == LOW){ digitalWrite(LED_BUILTIN, HIGH); softwareSerial.println(“LED가 켜졌습니다.
“); } else{ softwareSerial.println(“이미 LED가 켜져있습니다.
“); } break;
case ‘2’: if (ledStatus == HIGH){ digitalWrite(LED_BUILTIN, LOW); softwareSerial.println(“LED가 꺼졌습니다.
“); } else{ softwareSerial.println(“이미 LED가 꺼져있습니다.
“); } break;
case ‘S’: case ‘s’: if (ledStatus == LOW){ softwareSerial.println(“LED 상태: 꺼짐
“); } else { softwareSerial.println(“LED 상태: 켜짐
“); } break; } } }
2. HC-05의 맥어드레스를 확인합니다.
pi@raspberrypi:~ $ hcitool scan
Scanning …
20:15:08:13:18:58 HC-05
보이지 않는 경우 앞에서 확인한 맥어드레스를 사용하세요.
3. HC-05와 시리얼 통신을 하기 위해 /dev/rfcomm0 디바이스를 생성합니다.
pi@raspberrypi:~ $ sudo rfcomm bind rfcomm0 20:15:08:13:18:58
4. 아래 첨부한 miniterm 소스 코드를 miniterm.c로 저장하여 컴파일합니다.
http://www.openfoundry.org/svn/xenids/xen-4.0.0/tools/misc/miniterm/miniterm.c
pi@raspberrypi:~ $ gcc -o miniterm miniterm.c
/******************************************************************************
* miniterm.c
*
* Adapted from the example program distributed with the Linux Programmer’s
* Guide (LPG). This has been robustified and tweaked to work as a debugging
* terminal for Xen-based machines.
*
* Modifications are released under GPL and copyright (c) 2003, K A Fraser
* The original copyright message and license is fully intact below.
*/
/*
* AUTHOR: Sven Goldt ([email protected])
*
* This program is free software; you can redistribute it and/or
* modify it under the terms of the GNU General Public License
* as published by the Free Software Foundation; either version 2
* of the License, or (at your option) any later version.
*
* This program is distributed in the hope that it will be useful,
* but WITHOUT ANY WARRANTY; without even the implied warranty of
* MERCHANTABILITY or FITNESS FOR A PARTICULAR PURPOSE. See the
* GNU General Public License for more details.
*
*/
#include
#include
#include
#include
#include
#include
#include
#include
#include
#define DEFAULT_BAUDRATE 115200
#define DEFAULT_SERDEVICE “/dev/ttyS0”
#define ENDMINITERM 0x1d
volatile int stop = 0;
void child_handler(int s)
{
stop = 1;
}
int cook_baud(int baud)
{
int cooked_baud = 0;
switch ( baud )
{
case 50: cooked_baud = B50; break;
case 75: cooked_baud = B75; break;
case 110: cooked_baud = B110; break;
case 134: cooked_baud = B134; break;
case 150: cooked_baud = B150; break;
case 200: cooked_baud = B200; break;
case 300: cooked_baud = B300; break;
case 600: cooked_baud = B600; break;
case 1200: cooked_baud = B1200; break;
case 1800: cooked_baud = B1800; break;
case 2400: cooked_baud = B2400; break;
case 4800: cooked_baud = B4800; break;
case 9600: cooked_baud = B9600; break;
case 19200: cooked_baud = B19200; break;
case 38400: cooked_baud = B38400; break;
case 57600: cooked_baud = B57600; break;
case 115200: cooked_baud = B115200; break;
}
return cooked_baud;
}
int main(int argc, char **argv)
{
int fd, c, cooked_baud = cook_baud(DEFAULT_BAUDRATE);
char *sername = DEFAULT_SERDEVICE;
struct termios oldsertio, newsertio, oldstdtio, newstdtio;
struct sigaction sa;
static char start_str[] =
“************ REMOTE CONSOLE: CTRL-] TO QUIT ********\r
“;
static char end_str[] =
”
************ REMOTE CONSOLE EXITED *****************
“;
while ( –argc != 0 )
{
char *p = argv[argc];
if ( *p++ != ‘-‘ )
goto usage;
if ( *p == ‘b’ )
{
p++;
if ( (cooked_baud = cook_baud(atoi(p))) == 0 )
{
fprintf(stderr, “Bad baud rate ‘%d’
“, atoi(p));
goto usage;
}
}
else if ( *p == ‘d’ )
{
sername = ++p;
if ( *sername == ‘\0’ )
goto usage;
}
else
goto usage;
}
/* Not a controlling tty: CTRL-C shouldn’t kill us. */
fd = open(sername, O_RDWR | O_NOCTTY);
if ( fd < 0 ) { perror(sername); exit(-1); } tcgetattr(fd, &oldsertio); /* save current modem settings */ /* * 8 data, no parity, 1 stop bit. Ignore modem control lines. Enable * receive. Set appropriate baud rate. NO HARDWARE FLOW CONTROL! */ newsertio.c_cflag = cooked_baud | CS8 | CLOCAL | CREAD; /* Raw input. Ignore errors and breaks. */ newsertio.c_iflag = IGNBRK | IGNPAR; /* Raw output. */ newsertio.c_oflag = OPOST; /* No echo and no signals. */ newsertio.c_lflag = 0; /* blocking read until 1 char arrives */ newsertio.c_cc[VMIN]=1; newsertio.c_cc[VTIME]=0; /* now clean the modem line and activate the settings for modem */ tcflush(fd, TCIFLUSH); tcsetattr(fd,TCSANOW,&newsertio); /* next stop echo and buffering for stdin */ tcgetattr(0,&oldstdtio); tcgetattr(0,&newstdtio); /* get working stdtio */ newstdtio.c_iflag &= ~(BRKINT | ICRNL | INPCK | ISTRIP | IXON); newstdtio.c_oflag &= ~OPOST; newstdtio.c_cflag &= ~(CSIZE | PARENB); newstdtio.c_cflag |= CS8; newstdtio.c_lflag &= ~(ECHO | ICANON | IEXTEN | ISIG); newstdtio.c_cc[VMIN]=1; newstdtio.c_cc[VTIME]=0; tcsetattr(0,TCSANOW,&newstdtio); /* Terminal settings done: now enter the main I/O loops. */ switch ( fork() ) { case 0: close(1); /* stdout not needed */ for ( c = (char)getchar(); c != ENDMINITERM; c = (char)getchar() ) write(fd,&c,1); tcsetattr(fd,TCSANOW,&oldsertio); tcsetattr(0,TCSANOW,&oldstdtio); close(fd); exit(0); /* will send a SIGCHLD to the parent */ break; case -1: perror("fork"); tcsetattr(fd,TCSANOW,&oldsertio); close(fd); exit(-1); default: write(1, start_str, strlen(start_str)); close(0); /* stdin not needed */ sa.sa_handler = child_handler; sa.sa_flags = 0; sigaction(SIGCHLD,&sa,NULL); /* handle dying child */ while ( !stop ) { read(fd,&c,1); /* modem */ c = (char)c; write(1,&c,1); /* stdout */ } wait(NULL); /* wait for child to die or it will become a zombie */ write(1, end_str, strlen(end_str)); break; } return 0; usage: printf("miniterm [-b
] [-d ] “);
printf(“Default baud rate: %d
“, DEFAULT_BAUDRATE);
printf(“Default device: %s
“, DEFAULT_SERDEVICE);
return 1;
}
5. 다음처럼 실행 후, 테스트를 해봅니다.
1을 누르면 아두이노에 연결된 LED가 켜지고 2를 누르면 LED가 꺼집니다.
s를 입력하면 현재 LED 상태를 출력합니다. 종료시에는 Ctrl + ] 를 입력하세요.
pi@raspberrypi:~ $ ./miniterm -b9600 -d/dev/rfcomm0
************ REMOTE CONSOLE: CTRL-] TO QUIT ********
LED가 켜졌습니다.
이미 LED가 켜져있습니다.
LED가 꺼졌습니다.
LED 상태: 꺼짐
LED 상태: 꺼짐
LED가 켜졌습니다.
LED가 꺼졌습니다.
LED가 켜졌습니다.
LED가 꺼졌습니다.
LED 상태: 꺼짐
LED가 켜졌습니다.
LED가 꺼졌습니다.
************ REMOTE CONSOLE EXITED *****************
마지막 업데이트 2019. 8. 8
반응형
So you have finished reading the 라즈베리 파이 아두 이노 블루투스 통신 topic article, if you find this article useful, please share it. Thank you very much. See more: 아두이노 라즈베리파이 데이터 전송, 아두이노 라즈베리파이 센서값 전송, 라즈베리파이 아두이노 연결, 라즈베리파이 아두이노 시리얼 통신 파이썬, 라즈베리파이4 블루투스 통신, 라즈베리파이 블루투스 통신 예제, 라즈베리파이 블루투스 통신, 아두이노 라즈베리 파이 무선 통신