
You are looking for information, articles, knowledge about the topic nail salons open on sunday near me 아두 이노 부트 로더 on Google, you do not find the information you need! Here are the best content compiled and compiled by the https://chewathai27.com/to team, along with other related topics such as: 아두 이노 부트 로더 아두이노 isp, 아두이노 퓨즈 비트, 아두이노 제작, Arduino without bootloader
아두이노 부트로더 – 위키배움터
- Article author: ko.wikiversity.org
- Reviews from users: 35704
 Ratings
 - Top rated: 3.9
- Lowest rated: 1
- Summary of article content: Articles about 아두이노 부트로더 – 위키배움터 아두이노 부트로더 … 아두이노 체계에서 프로그램 된 코드는 업로드 방식을 사용한다. 업로드는 AVR이나 ARM 등을 기반으로 하는 마이크로컨트롤러를 기반 … …
- Most searched keywords: Whether you are looking for 아두이노 부트로더 – 위키배움터 아두이노 부트로더 … 아두이노 체계에서 프로그램 된 코드는 업로드 방식을 사용한다. 업로드는 AVR이나 ARM 등을 기반으로 하는 마이크로컨트롤러를 기반 …
- Table of Contents:
목차
개요[편집]
부트로더 쓰는 과정[편집]
ATmega328P의 경우[편집]
ATmega168P의 경우[편집]
ATmega8-16P의 경우[편집]
같이 보기[편집]
각주[편집]
둘러보기 메뉴
Bootloader | Arduino Documentation | Arduino Documentation
- Article author: www.arduino.cc
- Reviews from users: 32869 Ratings
- Top rated: 4.4
- Lowest rated: 1
- Summary of article content: Articles about Bootloader | Arduino Documentation | Arduino Documentation The bootloader is a small piece of software that allows uploading of sketches onto the Arduino board. It comes preprogrammed on the … …
- Most searched keywords: Whether you are looking for Bootloader | Arduino Documentation | Arduino Documentation The bootloader is a small piece of software that allows uploading of sketches onto the Arduino board. It comes preprogrammed on the … The bootloader is a small piece of software that allows uploading of sketches onto the Arduino board. It comes preprogrammed on the microcontrollers on Arduino boards.
- Table of Contents:
What’s a Bootloader
Not Using a Bootloader
Burning the Bootloader
Bootloading an Arduino Mini
It Still Doesn’t Work! (Parallel Programmer on Windows XP)
Versions of the Bootloader
How Does it Work
Source Code
Contribute to Arduino
Missing something
Suggest Changes
아두이노 UNO 보드를 이용해서 부트로더 굽기 | Hard Copy World
- Article author: www.hardcopyworld.com
- Reviews from users: 27470 Ratings
- Top rated: 4.4
- Lowest rated: 1
- Summary of article content: Articles about 아두이노 UNO 보드를 이용해서 부트로더 굽기 | Hard Copy World 부트로더를 직접 굽는 날이 올줄이야… 아두이노 Pro Mini 보드를 제작할 일이 생겨서 부트로더를 구울 기회(?)가 생겼습니다. …
- Most searched keywords: Whether you are looking for 아두이노 UNO 보드를 이용해서 부트로더 굽기 | Hard Copy World 부트로더를 직접 굽는 날이 올줄이야… 아두이노 Pro Mini 보드를 제작할 일이 생겨서 부트로더를 구울 기회(?)가 생겼습니다. 부트로더를 직접 굽는 날이 올줄이야… 아두이노 Pro Mini 보드를 제작할 일이 생겨서 부트로더를 구울 기회(?)가 생겼습니다. 주문했던 ISP Programmer 모듈이 도착하지 않아 부랴부랴 아두이노 UNO 보드를 이용해서 부트로더를 구웠습니다. 이리저리 자료를 찾아봤는데.. 맘에 쏙 드는 자료가 잘 없었네요. 가장 유용하게 쓸만한 자료는 아두이노 공식 페이지에서 제공하는 자료입니다. http://arduino.cc/en/Tutorial/ArduinoISP (여기서는 아두이노 UNO 보드를 이용해서 아두이노 Pro Mini 3.3v […]
- Table of Contents:
아두이노 UNO 보드를 이용해서 부트로더 굽기
Programmer 보드와 Target 보드
사전작업 – Programmer 보드에 스케치 올리기
Programmer 보드 – Target 보드 연결
부트로더 굽기
주의사항

The Answer’s Engineering Blog :: Arduino bootloader 올리기
- Article author: answerofgod.tistory.com
- Reviews from users: 46353 Ratings
- Top rated: 4.6
- Lowest rated: 1
- Summary of article content: Articles about The Answer’s Engineering Blog :: Arduino bootloader 올리기 아두이노 부트로더에 대한 자세한 설명은 위 링크를 눌러보시면 나옵니다. 일반 ATMEGA 칩을 사면 부트로더가 없어서 Arduino에서 프로그래밍이 … …
- Most searched keywords: Whether you are looking for The Answer’s Engineering Blog :: Arduino bootloader 올리기 아두이노 부트로더에 대한 자세한 설명은 위 링크를 눌러보시면 나옵니다. 일반 ATMEGA 칩을 사면 부트로더가 없어서 Arduino에서 프로그래밍이 … Arduino IDE를 사용하기 위해서는 bootloader가 있어야 합니다. 아두이노 부트로더 구조 아두이노 부트로더에 대한 자세한 설명은 위 링크를 눌러보시면 나옵니다. 일반 ATMEGA 칩을 사면 부트로더가 없어서 Ardui..
- Table of Contents:
Arduino bootloader 올리기
아두이노 부트로더 구조
티스토리툴바
Nạp bootloader cho vi điều khiển trên Arduino | Cộng đồng Arduino Việt Nam
- Article author: arduino.vn
- Reviews from users: 13539 Ratings
- Top rated: 4.4
- Lowest rated: 1
- Summary of article content: Articles about Nạp bootloader cho vi điều khiển trên Arduino | Cộng đồng Arduino Việt Nam Bootloader là một chương trình nhỏ được nạp sẵn vào chip vi điều (VĐK) khiển trên Arduino. Bạn lập trình cho Arduino một cách dễ dàng được … …
- Most searched keywords: Whether you are looking for Nạp bootloader cho vi điều khiển trên Arduino | Cộng đồng Arduino Việt Nam Bootloader là một chương trình nhỏ được nạp sẵn vào chip vi điều (VĐK) khiển trên Arduino. Bạn lập trình cho Arduino một cách dễ dàng được …
- Table of Contents:
Bạn đang ở đây
1 Tại sao ta cần bootloader
2 Nối dây
3 Tiến hành thực hiện
LOW
Bài 5 Tải chương trình mẫu lên Intel Galileo
Mục lục
아두이노 우노 – 부트 로더(Bootloader)
- Article author: mosesnah.tistory.com
- Reviews from users: 39823 Ratings
- Top rated: 3.2
- Lowest rated: 1
- Summary of article content: Articles about 아두이노 우노 – 부트 로더(Bootloader) 아두이노 우노 – 부트 로더(Bootloader). 뇌졍욱 2018. 1. 2. 14:48. 안녕하세요 🙂 저번 포스팅에서는 MCU(Micro Controller Unit)에 대해 이야기하였습니다. …
- Most searched keywords: Whether you are looking for 아두이노 우노 – 부트 로더(Bootloader) 아두이노 우노 – 부트 로더(Bootloader). 뇌졍욱 2018. 1. 2. 14:48. 안녕하세요 🙂 저번 포스팅에서는 MCU(Micro Controller Unit)에 대해 이야기하였습니다. 안녕하세요 🙂 저번 포스팅에서는 MCU(Micro Controller Unit)에 대해 이야기하였습니다. 밑의 주황색 글씨가 MCU 관련 포스팅으로 가는 링크입니다. ↓ http://mosesnah.tistory.com/1 오늘은 DIY(Do It Yourse..
- Table of Contents:
Atmega328u 에 부트로더 굽기
- Article author: arduino.tistory.com
- Reviews from users: 10282 Ratings
- Top rated: 3.9
- Lowest rated: 1
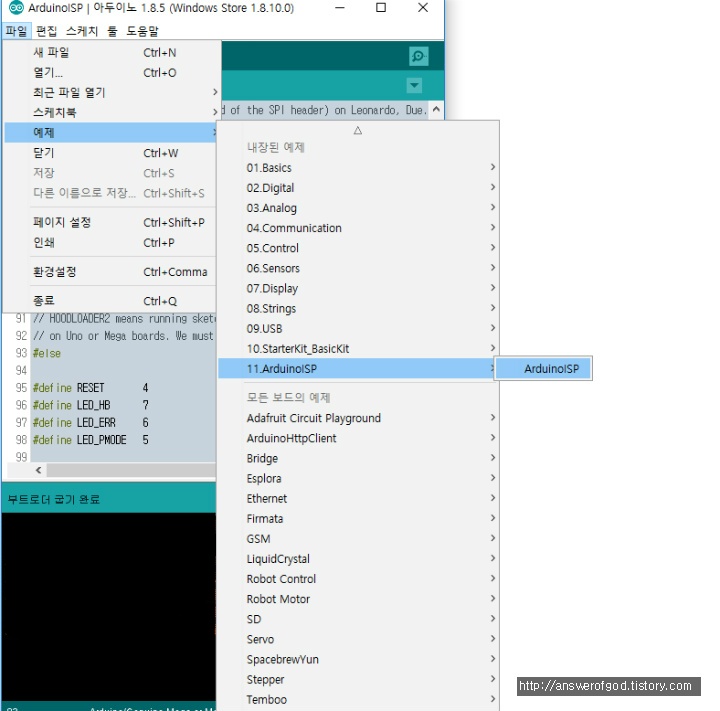
- Summary of article content: Articles about Atmega328u 에 부트로더 굽기 부트로더 굽는 방법 · 1. arduino e 를 실행한다. · 2. PC 와 아두이노 우노를 USB 케이블로 연결한다. · 3. [파일] – [예제] – [11.ArduinoISP] – [ … …
- Most searched keywords: Whether you are looking for Atmega328u 에 부트로더 굽기 부트로더 굽는 방법 · 1. arduino e 를 실행한다. · 2. PC 와 아두이노 우노를 USB 케이블로 연결한다. · 3. [파일] – [예제] – [11.ArduinoISP] – [ … 바람C 님의 블로그입니다.
- Table of Contents:
Atmega328u 에 부트로더 굽기
ATMEGA328P 또는 ATMEGA328 에 부트로더 굽기

아두이노 나노 (Arduino Nano) 부트로더 굽기 – 프로미니(Pro mini) 사용 :: MindEater™ – Life Sketch
- Article author: mindeater.tistory.com
- Reviews from users: 14195 Ratings
- Top rated: 3.7
- Lowest rated: 1
- Summary of article content: Articles about 아두이노 나노 (Arduino Nano) 부트로더 굽기 – 프로미니(Pro mini) 사용 :: MindEater™ – Life Sketch 이 경우 부트로더를 직접 구워주어야 USB를 이용하여 프로그램을 스케치 파일을 업로드 할 수 있다. 부트로더(Bootloader)를 올리는 방법을 찾아보니 … …
- Most searched keywords: Whether you are looking for 아두이노 나노 (Arduino Nano) 부트로더 굽기 – 프로미니(Pro mini) 사용 :: MindEater™ – Life Sketch 이 경우 부트로더를 직접 구워주어야 USB를 이용하여 프로그램을 스케치 파일을 업로드 할 수 있다. 부트로더(Bootloader)를 올리는 방법을 찾아보니 … 아두이노 프로미니만 사용하다가 뜻하지 않게 Nano를 사용하게 됐다. 헌데,,, 2 천원 중후반대 저렴한 호환보드를 구입하면 부트로더가 없는 것들이 많은데… 이 경우 부트로더를 직접 구워주어야 USB를 이용하여..MindEater의 블로그, 우주 그 모든 것에 대한 스케치독서,DIY,카메라,사진,캠핑,리뷰,IT,배터리,자작,전기,전자,컴퓨터,여행
- Table of Contents:
MindEater™ – Life Sketch
‘Arduino Sketch’ 카테고리의 다른 글
티스토리툴바
See more articles in the same category here: https://chewathai27.com/to/blog.
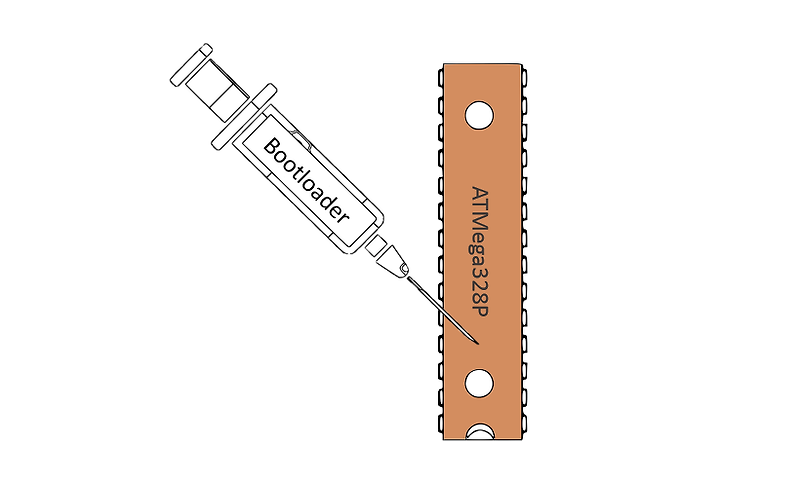
아두이노 부트로더
아두이노 체계에서 프로그램 된 코드는 업로드 방식을 사용한다. 업로드는 AVR이나 ARM 등을 기반으로 하는 마이크로컨트롤러를 기반으로 하는 부트로더 방식을 사용한다. 즉, AVR을 사용한 아두이노는 이 칩의 부트로더 방식을 사용하여 업로드가 이루어 진다.
개요 [ 편집 ]
아두이노의 부트로드는 결국 장착된 마이크로컨트롤러의 부트로더를 사용하므로 새로 만들려면 먼저 부트로더를 장착해야 한다.
만약 어떤 새로 구입한 AVR 칩을 아두이노에서 동작 시키려면 우선 이 칩에 부트로더를 써야하고 이를 통해 시리얼 통신 채널을 통한 업로드가 가능하다.
부트로더가 장착된 마이크로컨트롤러는 UART 통신만 호스트와 연결한다면 아두이노가 되는 것이다.
아두이노 우노의 경우 ATmega328P의 타켓 마이크로컨트롤러의 부트로더에 의해 업로드가 이루어진다.
아두이노 우노 R3, 업로드 구조
부트로더 쓰는 과정 [ 편집 ]
ISP나 기타 장치로 쓸 수 있으나 기존의 아두이노를 사용하여 다른 칩이나 아두이노 보드의 칩에 쓸수 있다. 아두이노를 이용하여 프로그래머를 만들려면 가장 먼저 필요한 일은 아두이노가 ISP가 되는 것이다. 이것이 장착되면 Arduino as ISP로 이름 붙여진 프로그래머가 된다.
아두이노 우노로 ‘Arduino as ISP’ 만들기 [ 편집 ]
ATmega8-16P 칩을 사용할 경우, 부트로더는 다른 아두이노를 사용하여 부트로더를 쓸 수 있다.
이제 아두이노 우노를 ISP을 만들어 ATmega8의 굽기 프로그래머로 만드는 과정이다.
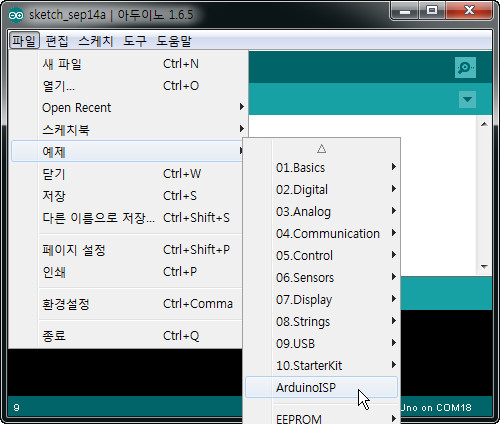
아두이노 우노 ArduinoISP 용 스케치 선택 아두이노 우노 ArduinoISP 업노드 완료
아두이노 우노를 사용해 부트로더를 굽는 순서는 다음과 같다:
아두이노 우노를 호스트에 연결하고 아두이노 우노를 Arduino as ISP 기능의 프로그래머로 만든다. 아두이노 IDE에서 메뉴 : 파일 -> 예제 -> ArduinoISP을 선택하여 프로그램을 준비한다. 컴파일과 업로드를 거치면 아두이노 우노는 프로그래머가 되었다. 굽기 위한 칩에 맞는 보드가 있는지 검토하고 없다면 보드를 추가(boards.txt 파일에 추가)한다. 다른 아두이노 보드나 브레드 보드에 해당 칩을 연결하고 프로그래머와 SPI통신을 연결한다. 만약 칩에 맞는 보드를 추가 했다면, 아두이노 IDE을 다시 실행해야 한다. ‘프로그래머’을 Arduino as ISP 선택한다. 해당 칩의 보드를 선택한다. 여기서의 보드는 업로드할 때와 같은 보드를 말한다. 부트로더 굽기를 실행한다.
ATmega328P의 경우 [ 편집 ]
ATmega328P 칩의 경우는 아두이노 우노와 같은 칩이다. 따라서 모든 설정은 우노를 사용하면 된다. 별도의 보드 추가없이 쉽게 진행할 수 있다.
우선 아두이노 우노를 프로그래머로 사용하기 위해 Arduino as ISP로 준비를 했다.
다음으로 브레드 보드에 ATmega328P 칩을 활용한 회로를 구성한다.
브레드보드 아두이노 ATmega328P 연결 모양
회로가 완성되면 아두이노 우노와 연결한다.
ATmega328P 부트로더 프로그래머 연결
부트로더 굽기 [ 편집 ]
지금까지 준비한 ‘Arduino as ISP’와 하드웨어가 구성되었다면, 굽기에 들어간다.
ATmega328P 부트로더 굽기 ATmega328P 부트로더 굽기 완료
부트로드를 굽기위한 설정은 그림과 같이 설정한다:
보드 : Arduino UNO 직렬 통신 포트 설정 프로그래머 : Arduino as ISP
이제 부트로더 굽기를 실행한다.
별 문제 없이 완료되면 화면에 그림 처럼 나타난다. 문제가 있다면 대응을 해야 한다.
응용프로그램 작성 및 업로드 [ 편집 ]
정상적으로 완료되면 USB2Serial를 사용하여 업로드 준비를 한다. 아두이노 USB2Serial를 사용 하였고, 경우에 FTDI 모듈을 사용하면 된다.
예제 프로그램을 사용하여 업로드를 확인하면:
ATmega328P 브레드보드 아두이노 Blink 업도드 완료
이제 LED가 깜박임이 보인다.
브레드보드 아두이노 ATmega328P와 USB2Serial 연결
ATmega168P의 경우 [ 편집 ]
참고자료:
ATmega168P 부트로더 설정[1]
모델은 ATmega168PA[2]로 동작 주파수는 현재 16MHz을 사용하고 있다.
보드는 다음과 같이 추가하였다.
[아두이노 설치 폴더]/hardware/arduino/avr/boards.txt############################################################## atmega168pext.name=Arduino ATmega168P atmega168pext.upload.tool=avrdude atmega168pext.upload.protocol=arduino #atmega168pext.upload.protocol=stk500 atmega168pext.upload.maximum_size=14336 atmega168pext.upload.speed=19200 atmega168pext.bootloader.tool=avrdude atmega168pext.bootloader.low_fuses=0xff atmega168pext.bootloader.high_fuses=0xdd atmega168pext.bootloader.extended_fuses=0x00 atmega168pext.bootloader.path=atmega atmega168pext.bootloader.file=atmega/ATmegaBOOT_168_diecimila.hex atmega168pext.bootloader.unlock_bits=0x3F atmega168pext.bootloader.lock_bits=0x0F atmega168pext.build.mcu=atmega168p atmega168pext.build.f_cpu=16000000L atmega168pext.build.core=arduino atmega168pext.build.variant=standard
부트로더가 굽기가 완료된 후, 아두이노 IDE에서 업로드는 보드 선택을 diecimila로 하면 된다. 경우에 따라 몇가지가 맞지 않는다면 적당한 보드를 선택해야 한다.
적용 예 [ 편집 ]
Rainbow Ring LED 모듈[3]
이때 아두이노 IDE에서의 보드 선택은 Arduino Duemilanove or Diecimila Arduino Duemilanove or Diecimila w/ ATmega168
ATmega8-16P의 경우 [ 편집 ]
ATmega8는 동작 주파수가 8MHz가 존재한다. 그러나 현재 대상은 16MHz 칩인 ATmega8-16PU이다. 따라서 주파수가 다른 것을 고려하여 환경 설정을 해야한다.
여기서 사용한 AVR은 ATmega8-16PU[4]이다. 16MHz 주파수로 동작할 수 있는 마이크로컨트롤러이다.
아두이노 보드 추가 [ 편집 ]
우선 부트로더가 장착되려면 해당 아두이노의 보드가 정의 되어야 한다. 기존에 설정되어 있다면 그대로 사용하면 되지만 없는 경우도 존재한다.
우선 아두이노 보드를 추가하기로 한다. 이를 위해 다음과 같은 파일에 보드 내용을 추가했다.
[아두이노 설치 폴더]/hardware/arduino/avr/boards.txt############################################################## atmega8.name=Arduino ATmega8-16MHz atmega8.upload.tool=avrdude atmega8.upload.protocol=arduino atmega8.upload.maximum_size=7168 atmega8.upload.speed=19200 atmega8.bootloader.tool=avrdude atmega8.bootloader.low_fuses=0xdf atmega8.bootloader.high_fuses=0xca atmega8.bootloader.path=atmega8 atmega8.bootloader.file=atmega8/ATmegaBOOT-prod-firmware-2009-11-07.hex atmega8.bootloader.unlock_bits=0x3F atmega8.bootloader.lock_bits=0x0F atmega8.build.mcu=atmega8 atmega8.build.f_cpu=16000000L atmega8.build.core=arduino atmega8.build.variant=standard
이렇게 추가하고 저장하면 아두이노 IDE을 새로 실행해야 추가한 보드가 보인다.
아두이노 보드와 칩에 연결하고 굽기 [ 편집 ]
이제 ATmega8과 우노를 SPI 통신이 되도록 연결한다.
연결이 완료 되었으면 부트로더 굽기 단계를 실행한다.
아두이노 부트로더 목표 보드 선택 아두이노 부트로더 – 프로그래머 선택
이제 굽기 실행한다.
아두이노 부트로더 굽기 실행 – ATmega8-16PU
문제없이 완료 되었다면 다음과 같다.
아두이노 부트로더 굽기 완료
오류의 예 및 처리 방법 [ 편집 ]
플랫폼 설정에서 굽기 파라메터 설정 문제 – efuse설정 [ 편집 ]
부트로더 굽기에서 ATmega8의 efuse 설정 문제
이 문제는 arduino IDE 1.6.5에서 efuse설정 파라메터가 존재하므로 이것을 제거한다. ATmega8에서는 필요없는 파라메터이다.
[아두이노 설치 폴더]/hardware/arduino/avr/platform.txt############################################################## # Arduino AVR Core and platform. # —————————— # # For more info: # https://github.com/arduino/Arduino/wiki/Arduino-IDE-1.5—3rd-party-Hardware-specification name=Arduino AVR Boards version=1.6.8 # AVR compile variables # ——————— … # AVR Uploader/Programmers tools # —————————— tools.avrdude.erase.params.verbose=-v tools.avrdude.erase.params.quiet=-q -q tools.avrdude.erase.pattern=”{cmd.path}” “-C{config.path}” {erase.verbose} -p{build.mcu} -c{protocol} {program.extra_params} -e -Ulock:w:{bootloader.unlock_bits}:m -Uefuse:w:{bootloader.extended_fuses}:m -Uhfuse:w:{bootloader.high_fuses}:m -Ulfuse:w:{bootloader.low_fuses}:m
AVR Uploader/Programmers tools항의 tools.avrdude.erase.pattern=”{cmd.path}” “-C{config.path}” {erase.verbose} -p{build.mcu} -c{protocol} {program.extra_params} -e -Ulock:w:{bootloader.unlock_bits}:m -Uefuse:w:{bootloader.extended_fuses}:m -Uhfuse:w:{bootloader.high_fuses}:m -Ulfuse:w:{bootloader.low_fuses}:m
이 부분을 제거하고 -Uefuse:w:{bootloader.extended_fuses}:m 저장한다.
그러나 이렇게 고치고 나면 다른 칩이나 아두이노 보드 적용에 문제될 수도 있다. 끝나면 복귀하는 것이 좋을 것이다. 다른 방법은
tools.avrdude.
을 다른 툴을 만들면 된다.
tools.avrdude1.
등으로 이름을 정하고 전체 내용을 복사한 다음 필요한 부분만 수정하면 된다.
boards.txt에서 위에 설정한 툴을 사용할 수 있다:
atmega8.bootloader.tool=avrdude1
잘못된 아두이노 보드(AVR 칩) 선택 문제 [ 편집 ]
아두이노 부트로더 굽기에서 잘못된 AVR 칩 선택 오류
이 문제는 칩이 보드 선택이 잘못 되었다. 다시 선택하고, 굽기 실행한다.
같이 보기 [ 편집 ]
Bootloader | Arduino Documentation
Bootloader
The bootloader is a small piece of software that allows uploading of sketches onto the Arduino board. It comes preprogrammed on the microcontrollers on Arduino boards.
LAST REVISION: 07/28/2022, 09:33 AM
What’s a Bootloader?
Microcontrollers are usually programmed through a programmer unless you have a piece of firmware in your microcontroller that allows installing new firmware without the need of an external programmer. This is called a bootloader.
Not Using a Bootloader
If you want to use the full program space (flash) of the chip or avoid the bootloader delay, you can burn your sketches using an external programmer.
Burning the Bootloader
To burn the bootloader, you’ll need to buy an AVR-ISP (in-system programmer), USBtinyISP or build a ParallelProgrammer. The programmer should be connected to the ICSP pins (the 2 by 3 pin header) – make sure you plug it in the right way. The board must be powered by an external power supply or the USB port.
Make sure you have the right item selected in the Tools | Board menu. Then, just launch the appropriate command from the Tools > Burn Bootloader menu of the Arduino environment. Burning the bootloader may take 15 seconds or more, so be patient.
Bootloading an Arduino Mini
Here are some instructions on bootloading the Mini, thanks to Gian Pablo Vilamil.
It Still Doesn’t Work! (Parallel Programmer on Windows XP)
Windows XP may be polling your parallel port and disrupting the bootloader burning process. You’ll need this registry patch:
Copy 1 [HKEY_LOCAL_MACHINE\SYSTEM\ControlSet001\Services\Parport\Parameters] 2 “DisableWarmPoll”=dword:00000001
Versions of the Bootloader
There are different versions of the bootloader – both in order to work on different hardware and because it has changed over time.
The current bootloaders (i.e. the ones included in Arduino 0009) are almost identical for the Diecimila and NG (with ATmega168). They both run at 19200 baud and take up 2 KB of flash memory on the ATmega168. The only differences is the time the bootloader waits for a new program to arrive and the number of times it flashes the pin 13 LED when it starts. Because of the automatic reset on the Diecimila, its bootloader only waits a very short amount of time (less than a second) – to save time, it also flashes the pin 13 LED once. The NG bootloader waits about 6-8 seconds and flashes the LED three times.
The bootloader that actually shipped on the Arduino NG is slightly different. It enables the internal pullup resistor on pin 6, and doesn’t enable the internal pullup on the RX pin. Nor does it timeout upon receiving invalid data, so if you send data to it immediately after it resets, your sketch will never start.
The Arduino BT bootloader does some initial configuration of the Bluetooth® module.
The ATmega8 bootloader only takes up 1 KB of flash. It does not timeout when it receives invalid data, you need to make sure that no data is sent to the board during the 6-8 seconds when the bootloader is running.
Some ancient versions of the bootloader run at 9600 baud (instead of 19200). In order to successfully upload sketches to boards with this bootloader, you’ll need to change the serial.download_rate in your preferences file to 9600.
Third parties have also worked on the bootloader. This page is link to some other bootloader development
How Does it Work?
The “Burn Bootloader” commands in the Arduino environment use an open-source tool, avrdude. There are four steps: unlocking the bootloader section of the chip, setting the fuses on the chip, uploading the bootloader code to the chip, and locking the bootloader section of the chip. These are controlled by a number of preferences in the Arduino preferences file.
For the ATmega8 bootloader, these are:
bootloader.atmega8.programmer (default value: stk500) is the protocol used by the bootloader.
bootloader.atmega8.unlock_bits (default value: 0xFF) is the value to write to the ATmega8 lock byte to unlock the bootloader section.
bootloader.atmega8.high_fuses (default value: 0xca) is the value to write to the high byte of the ATmega8 fuses.
bootloader.atmega8.low_fuses (default value: 0xdf) is the value to write to the low byte of the ATmega8 fuses.
bootloader.atmega8.path (default value: bootloader) is the path (relative to the Arduino application directory) containing the precompiled bootloader.
bootloader.atmega8.file (default value: ATmegaBOOT.hex) is the name of the file containing the precompiled bootloader code (in bootloader.path).
bootloader.atmega8.lock_bits (default value: 0x0F) is the value to write to the ATmega8 lock byte to lock the bootloader section (so it doesn’t get accidentally overwritten when you upload a sketch).
For the ATmega168, these are (where
< BOARD >
bootloader.atmega168- < BOARD > .programmer (default value: avrispmkii) is the protocol used by the bootloader.
.programmer (default value: avrispmkii) is the protocol used by the bootloader. bootloader.atmega168- < BOARD > .unlock_bits (default value: 0x3F) is the value to write to the ATmega168 lock byte to unlock the bootloader section.
.unlock_bits (default value: 0x3F) is the value to write to the ATmega168 lock byte to unlock the bootloader section. bootloader.atmega168- < BOARD > .extended_fuses (default value: 0x00) is the value to write to the high byte of the ATmega168 fuses.
.extended_fuses (default value: 0x00) is the value to write to the high byte of the ATmega168 fuses. bootloader.atmega168- < BOARD > .high_fuses (default value: 0xdd) is the value to write to the high byte of the ATmega168 fuses.
.high_fuses (default value: 0xdd) is the value to write to the high byte of the ATmega168 fuses. bootloader.atmega168- < BOARD > .low_fuses (default value: 0xff) is the value to write to the low byte of the ATmega168 fuses.
.low_fuses (default value: 0xff) is the value to write to the low byte of the ATmega168 fuses. bootloader.atmega168- < BOARD > .path (default value: bootloader168) is the path (relative to the Arduino application directory) containing the precompiled bootloader.
.path (default value: bootloader168) is the path (relative to the Arduino application directory) containing the precompiled bootloader. bootloader.atmega168- < BOARD > .file (default value: ATmegaBOOT168 < BOARD > .hex) is the name of the file containing the precompiled bootloader code (in bootloader.path).
.file (default value: ATmegaBOOT168 .hex) is the name of the file containing the precompiled bootloader code (in bootloader.path). bootloader.atmega168- < BOARD > .lock_bits (default value: 0x0F) is the value to write to the ATmega168 lock byte to lock the bootloader section (so it doesn’t get accidentally overwritten when you upload a sketch).
Source Code
is either “diecimila” or “ng”):
The AVR bootloader source code and SAMD bootloader source code are available.
아두이노 UNO 보드를 이용해서 부트로더 굽기
부트로더를 직접 굽는 날이 올줄이야…
아두이노 Pro Mini 보드를 제작할 일이 생겨서 부트로더를 구울 기회(?)가 생겼습니다. 주문했던 ISP Programmer 모듈이 도착하지 않아 부랴부랴 아두이노 UNO 보드를 이용해서 부트로더를 구웠습니다.
이리저리 자료를 찾아봤는데.. 맘에 쏙 드는 자료가 잘 없었네요. 가장 유용하게 쓸만한 자료는 아두이노 공식 페이지에서 제공하는 자료입니다.
http://arduino.cc/en/Tutorial/ArduinoISP
(여기서는 아두이노 UNO 보드를 이용해서 아두이노 Pro Mini 3.3v – 8MHz 보드를 굽는 방법을 설명합니다.)
Programmer 보드와 Target 보드
아두이노 보드를 이용해 부트로더를 구울 때 가장 중요한 것은 Programmer 보드와 Target 보드를 구분하는 것입니다.
Programmer 보드는 부트로더를 굽기위해 사용할 아두이노 UNO 보드를 말합니다. Programmer 보드에 일단 부트로더 굽기용 스케치(펌웨어)를 올리고 이것을 이용해 연결된 다른 보드의 부트로더를 굽습니다.
Target 보드는 부트로더를 구울 대상입니다. 직접 제작한 호환 보드일 수도 있고, ATMEL 칩으로 브레드보드 위에 만든 보드일 수도 있겠죠.
사전작업 – Programmer 보드에 스케치 올리기
일단 아두이노 UNO 보드에 부트로더 굽기에 사용할 스케치(펌웨어)를 업로드 해야 합니다. 아래 순서로 진행합니다.
아두이노 UNO를 PC에 연결
COM 포트가 잡히면 [도구 – Serial Port] 에서 선택
에서 선택 [도구 – Board] 메뉴에서 Arduino UNO 선택 (Programmer 보드)
메뉴에서 Arduino UNO 선택 [파일 – 예제 – ArduinoISP] 선택
선택 [파일 – 업로드]
아두이노 UNO 보드에 펌웨어를 올려야하니까 보드 종류를 Arduino UNO(Programmer 보드)로 선택해야 합니다. 업로드가 정상적으로 완료되면 일단 UNO 보드와 PC의 연결을 해제합니다.
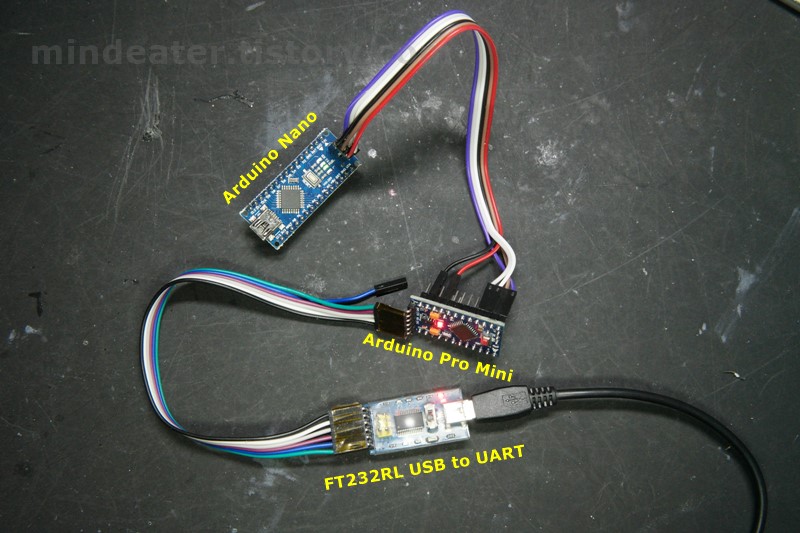
Programmer 보드 – Target 보드 연결
위 그림은 아두이노 공식 페이지에서 제공하는 연결 방법입니다. 주의하실 점은 아래가 Programmer 보드이고 위가 Target 보드라는 점입니다!!
5V, GND, D11, D12, D13 (SPI) 핀들이 서로 연결되고, Programmer 보드의 D10 핀이 Target 보드의 Reset 핀으로 연결됩니다.
제 경우에는 아두이노 Pro Mini 3.3v 보드의 부트로더를 굽기 때문에 5V 핀 대신 (3.3v – VCC) 핀을 서로 연결했습니다.
부트로더 굽기
아두이노 UNO 보드를 연결
[도구 – Board] 메뉴에서 [Arduino Pro or Pro Mini (3.3v, 8MHz) w/ ATmega328] 선택 ( Target 보드 종류를 여기서 선택합니다 !!!)메뉴에서 선택 [도구 – Serial Port] 에서 아두이노 UNO 보드의 COM port 선택
에서 아두이노 선택 [도구 – 프로그래머] 에서 Arduino as ISP
에서 [도구 – 부트로더 굽기] 실행
부트로더 굽기 완료가 에러메시지 없이 뜨면 성공입니다. 아마 13번 핀에 연결된 내장 LED 가 깜빡일겁니다. 기본으로 간단한 Blink 예제가 올라가 있을테니까요.
주의사항
아두이노 공식 페이지의 설명에서는 아두이노 Duemilanov(단종된 보드;;)를 사용합니다. 아두이노 UNO 보드를 이용해서 부트로더를 올리는 경우는 auto reset 기능 때문에 부트로더 굽기가 실패한다고 합니다. 이 경우는 Target 보드의 GND-Reset 핀 사이에 10uF 커패시터를 달아주면 된다고 합니다.(부트로더 굽기용 펌웨어 올린 후에) ==> 그런데 제 경우에는 이 작업없이도 부트로더 굽는데 성공했습니다. 혹 실패하시는 분은 참고하세요.
Note for Arduino 1.0: 아두이노 UNO 보드에 올릴 펌웨어 (ArduinoISP code)를 약간 바꿔줘야 합니다. heartbeat() 함수를 찾아서 그 안에 있는 “delay(40);” 부분을 “delay(20);” 으로 변경해 줍니다. 이 부분도 조금 이상한게… Arduino 1.o 이 아두이노 IDE 버전을 말하는거 같은데.. 제가 사용한 Arduino IDE v1.0.5 r2 버전에서는 이미 delay(20)으로 되어 있었습니다. 여하튼 문제가 생길 때 참고하세요.
So you have finished reading the 아두 이노 부트 로더 topic article, if you find this article useful, please share it. Thank you very much. See more: 아두이노 isp, 아두이노 퓨즈 비트, 아두이노 제작, Arduino without bootloader