
You are looking for information, articles, knowledge about the topic nail salons open on sunday near me 유니티 라인 렌더러 on Google, you do not find the information you need! Here are the best content compiled and compiled by the https://chewathai27.com/to team, along with other related topics such as: 유니티 라인 렌더러 유니티 2d 라인렌더러, 유니티 라인 렌더러 원, 유니티 라인렌더러 여러개, 유니티 라인렌더러 메테리얼, 유니티 라인 렌더러 애니메이션, 유니티 2D 선 그리기, 유니티 라인 렌더러 텍스처, 유니티 라인렌더러 콜라이더
Table of Contents
알레폰드의 IT, 전자, 전기 이모저모
- Article author: 202psj.tistory.com
- Reviews from users: 47821
 Ratings
 - Top rated: 3.2
- Lowest rated: 1
- Summary of article content: Articles about 알레폰드의 IT, 전자, 전기 이모저모 Line Renderer는 3D 공간에서 두 개 이상의 점의 배열을 가지고 각각의 사이에 직선을 그립니다. 따라서, 하나의 라인 렌더러 컴포넌트를 사용하여 1개의 … …
- Most searched keywords: Whether you are looking for 알레폰드의 IT, 전자, 전기 이모저모 Line Renderer는 3D 공간에서 두 개 이상의 점의 배열을 가지고 각각의 사이에 직선을 그립니다. 따라서, 하나의 라인 렌더러 컴포넌트를 사용하여 1개의 … ================================= ================================= ================================= 라인 렌더러 Line Renderer는 3D 공간에서 두 개 이상의 점의 배열을 가지고 각각의 사이에 직선을 그..
- Table of Contents:
프로퍼티
세부정보
팁
티스토리툴바
라인 렌더러 – Line Renderer – Beatchoi
- Article author: beatchoi.github.io
- Reviews from users: 43734 Ratings
- Top rated: 4.1
- Lowest rated: 1
- Summary of article content: Articles about 라인 렌더러 – Line Renderer – Beatchoi 라인렌더러는 3D 공간에서 설정된 꼭지점 들을 연결하는 직선을 그립니다. 유니티3D 에디터에서. 프로젝트에서 빈 게임 오브젝트를 생성합니다. 빈 게임 … …
- Most searched keywords: Whether you are looking for 라인 렌더러 – Line Renderer – Beatchoi 라인렌더러는 3D 공간에서 설정된 꼭지점 들을 연결하는 직선을 그립니다. 유니티3D 에디터에서. 프로젝트에서 빈 게임 오브젝트를 생성합니다. 빈 게임 … 유니티 라인 렌더러 기초
- Table of Contents:
라인 렌더러 알아보기
유니티3D 에디터에서
Line Renderer Component
Azure Playfab
Setting
Addressables
Unity3D
Azure Blob
Azure Playfab
Unity3D

[Unity] 유니티 라인렌더러 두 오브젝트 간 유동적으로 선 긋기 Unity LineRenderer, Flexibly stroking between two objects. linerenderer.setposition
- Article author: ssscool.tistory.com
- Reviews from users: 38597 Ratings
- Top rated: 3.7
- Lowest rated: 1
- Summary of article content: Articles about [Unity] 유니티 라인렌더러 두 오브젝트 간 유동적으로 선 긋기 Unity LineRenderer, Flexibly stroking between two objects. linerenderer.setposition Line Renderer 두 점 사이 선 긋기. 안녕하세요 정보처리마법사 입니다. 이번 포스팅의 주제는 두 오브젝트 간 유동적으로 라인 그리기에 관한 내용입니다 … …
- Most searched keywords: Whether you are looking for [Unity] 유니티 라인렌더러 두 오브젝트 간 유동적으로 선 긋기 Unity LineRenderer, Flexibly stroking between two objects. linerenderer.setposition Line Renderer 두 점 사이 선 긋기. 안녕하세요 정보처리마법사 입니다. 이번 포스팅의 주제는 두 오브젝트 간 유동적으로 라인 그리기에 관한 내용입니다 … [Unity] 유니티 라인렌더러 두 오브젝트 간 유동적으로 선 긋기 Unity LineRenderer, Flexibly stroking between two objects. linerenderer.setposition Line Renderer 두 점 사이 선 긋기. 안녕하세요 정보처..정보처리마법사
- Table of Contents:
![[Unity] 유니티 라인렌더러 두 오브젝트 간 유동적으로 선 긋기 Unity LineRenderer, Flexibly stroking between two objects. linerenderer.setposition](https://img1.daumcdn.net/thumb/R800x0/?scode=mtistory2&fname=https%3A%2F%2Fblog.kakaocdn.net%2Fdn%2FcKpcNA%2FbtqEsD55eDQ%2F1J7H76TzT4JNr9Dv4mWgNK%2Fimg.jpg)
Line Renderer – 유니티3D ( Unity3D ) – 오픈위키
- Article author: openwiki.kr
- Reviews from users: 26576 Ratings
- Top rated: 3.5
- Lowest rated: 1
- Summary of article content: Articles about
Line Renderer – 유니티3D ( Unity3D ) – 오픈위키 Line Renderer 는 3D 스페이스에서 2개 이상의 포인트의 배열을 취하고 서로 사이에 하나의 직선을 그립니다. 하나의 라인 렌더러 컴포넌트는 하나의 간단한 직선에서 … … - Most searched keywords: Whether you are looking for
Line Renderer – 유니티3D ( Unity3D ) – 오픈위키 Line Renderer 는 3D 스페이스에서 2개 이상의 포인트의 배열을 취하고 서로 사이에 하나의 직선을 그립니다. 하나의 라인 렌더러 컴포넌트는 하나의 간단한 직선에서 … 유니티,unity - Table of Contents:
Properties
Details
Hints
연결문서
See more articles in the same category here: https://chewathai27.com/to/blog.
알레폰드의 IT, 전자, 전기 이모저모
728×90
반응형
=================================
=================================
=================================
라인 렌더러
Line Renderer는 3D 공간에서 두 개 이상의 점의 배열을 가지고 각각의 사이에 직선을 그립니다. 따라서, 하나의 라인 렌더러 컴포넌트를 사용하여 1개의 직선에서 복잡한 나선형까지 그릴 수 있습니다. 선은 반드시 연속적인 상태로 되어 있습니다. 2개 이상의 완전히 별도의 라인을 그리려면, 각각 자신의 라인 렌더러를 가진 여러 GameObject를 사용해야 합니다.
라인 렌더러는 1픽셀의 가는 선은 렌더링하지 않습니다. 폭이 있고, 텍스처를 붙일 수 있는 빌보드 선을 렌더링합니다. Trail Renderer와 같은 라인 렌더링용 알고리즘을 사용합니다.
프로퍼티
프로퍼티:기능:
Materials 이 목록의 첫 번째 메테리얼이 선을 렌더링하는 데 사용됩니다. Positions 연결할 Vector3 점의 배열. Size 이 선에서의 세그먼트의 수. Parameters 각 선에 대한 파라미터 목록 : StartWidth 첫 번째 선의 위치에서의 폭. EndWidth 마지막 선의 위치에서의 폭. Start Color Color at the first line position. Note: This has no effect unless the attached material uses a vertex shader. End Color Color at the last line position. Note: This has no effect unless the attached material uses a vertex shader. Use World Space 활성화하면 오브젝트의 위치가 무시되고, 선이 월드의 원점 주변에서 렌더링됩니다.
세부정보
라인 렌더러를 만들려면 다음 단계를 수행합니다.
GameObject->Create Empty 를 선택한다. Component->Effects->Line Renderer 를 선택한다. 라인 렌더러에 텍스처 또는 Material 을 드래그 합니다. 메테리얼 파티클 쉐이더를 사용하는 데 이상적입니다.
팁
라인 렌더러는 하나의 프레임에 모든 정점을 배치할 필요가 있는 경우의 효과로 사용하기에 적합합니다. *이 선은 Camera 를 이동과 함께 회전하는 것처럼 보이는 경우가 있습니다. 이것은 의도적인 것입니다.
를 이동과 함께 회전하는 것처럼 보이는 경우가 있습니다. 이것은 의도적인 것입니다. 라인 오브젝트는 GameObject에서 유일한 렌더러여야 합니다.
=================================
=================================
=================================
출처: https://seonbicode.tistory.com/22
이 글은 LineRenderer Component 를 사용하여 Unity(C#) 화면에 선을 그리는 방법에 대한 흥미로운 내용을 담고 있습니다.
Unity Documentation 는 here 에서 아주 명확한 방법으로 그것을 설명하기 위하여 작성되어 있습니다.
그러나 실행 시 사용되는 스크립트, 즉 예제를 추가하는 방법에는 어떤 정보가 없습니다.
기본적인 이해를 돕기 위해 이 곳에 예제를 작성해봅니다.
using UnityEngine;
using System.Collections;
public class DrawLineTest : MonoBehaviour {
private LineRenderer line;
private Vector3 mousePos;
private Vector3 startPos;
private Vector3 endPos;
// Update is called once per frame
void Update ()
{
if (Input.GetMouseButtonDown(0))
{
if (line == null)
createLine();
mousePos = Camera.main.ScreenToWorldPoint(Input.mousePosition);
mousePos.z = 0;
line.SetPosition(0, mousePos);
line.SetPosition(1, mousePos);
startPos = mousePos;
}
else if (Input.GetMouseButtonUp(0) && line)
{
if (line)
{
mousePos = Camera.main.ScreenToWorldPoint(Input.mousePosition);
mousePos.z = 0;
line.SetPosition(1, mousePos);
endPos = mousePos;
addColliderToLine();
line = null;
}
}
else if (Input.GetMouseButton(0))
{
if (line)
{
mousePos = Camera.main.ScreenToWorldPoint(Input.mousePosition);
mousePos.z = 0;
line.SetPosition(1, mousePos);
}
}
}
// Following method creates line runtime using Line Renderer component
private void createLine()
{
line = new GameObject(“Line”).AddComponent();
line.material = new Material(Shader.Find(“Diffuse”));
line.SetVertexCount(2);
line.SetWidth(0.1f, 0.1f);
line.SetColors(Color.black, Color.black);
line.useWorldSpace = true;
}
// Following method adds collider to created line
private void addColliderToLine()
{
BoxCollider col = new GameObject(“Collider”).AddComponent();
col.transform.parent = line.transform; //Collider is added as child object of line
float lineLength = Vector3.Distance(startPos, endPos); //length of line
// size of collider is set where X is length of line, Y is width of line, Z will be set as per requirement
col.size = new Vector3(lineLength, 0.1f, 1f);
Vector3 midPoint = (startPos + endPos) / 2;
col.transform.position = midPoint; // setting position of collider object
// Following lines calculate the angle between start Pos and endPos
float angle = (Mathf.Abs(startPos.y – endPos.y) / Mathf.Abs(startPos.x – endPos.x));
if ((startPos.y < endPos.y && startPos.x > endPos.x) || (endPos.y < startPos.y && endPos.x > startPos.x))
{
angle *= -1;
}
if (angle != angle) // check NaN
{
Destroy(line.gameObject); // NaN? Destroy gameObject
}
else // Not NaN
{
angle = Mathf.Rad2Deg * Mathf.Atan(angle);
col.transform.Rotate(0, 0, angle);
}
}
}
script 를 저장한 후 Unity 로 돌아갑니다.
인제 Scene 을 실행을 하면 화면에 아무것도 없는 것을 보고 실망을 했을 수 있습니다.
하지만 당신은 이미 Line 을 만들 수 있습니다!
화면에서 오른쪽 버튼을 누른 채 드래그를 하면 Line 이 생성되는 것을 볼 수 있습니다.
감사합니다~
=================================
=================================
=================================
출처: https://hyunity3d.tistory.com/587
FPS 게임에서나 당구 게임에서 레이저 효과를 구현하려고 한다.
유니티 내에 제공하는 LineRenderer 라는 컴포넌트에서 이것을 지원해준다.
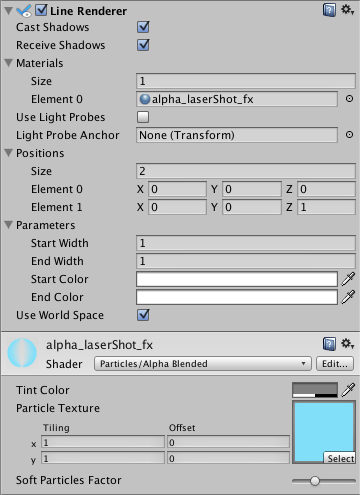
먼저 LineRenderer 컴포넌트를 빈 게임 오브젝트에 설치한다.
컴포넌트에서 Materials 를 설정해 줄수 있고
Positions 로 처음 위치 마지막 위치를 설정해 줄수도 있다.
그리고 선 길이도 설정해줄수 있다.
아래 스크립트를 붙이고 메트리얼도 유니티에서 제공되는 기본 파티클 메트리얼을 하나 입혀보자.
using UnityEngine;
using System.Collections;
public class lineRendererTest : MonoBehaviour
{
private LineRenderer lineRenderer;
// Use this for initialization
void Start ()
{
//라인렌더러 설정
lineRenderer = GetComponent
(); lineRenderer.SetColors(Color.red, Color.yellow);
lineRenderer.SetWidth(0.1f, 0.1f);
//라인렌더러 처음위치 나중위치
lineRenderer.SetPosition(0, transform.position);
lineRenderer.SetPosition(1, transform.position + new Vector3(0,10,0));
}
// Update is called once per frame
void Update ()
{
}
}
아래 그림처럼 처음위치(0,0,0) 에서 위로 쭉 레이저 같은 선이 생기는 것을 볼수 있다.
출처: https://hyunity3d.tistory.com/587 [Unity3D]
반응형
728×90
=================================
=================================
=================================
출처: https://funfunhanblog.tistory.com/117
유니티) 포물선 궤적그리기
포탄을 날리거나 포탄 궤적을 보여주기 위해 사용된다.
유니티에서는 Line Renderer을 이용해봤다.
나는 포탄궤적이 아닌 캐릭터가 날아갈 점프 궤적을 그리는데 이용했다.
스크립트
셋팅
playerPlane : 라인이 그려질 plane(땅)의 위치를 셋팅해준다. 궤적이 시작하는 위치
마우스로 캐릭터 방향바꾸기 글에서 학습한적이 있었다.
https://funfunhanblog.tistory.com/40 (평면을 결정하는 최소 조건)
targetPoint는 포물선이의 끝점이된다. (내 게임에서는 노란색 circle에서 최종 위치를 받아온다)
체크
Raycast를 통해 마우스가 위치하는 곳을 가져온다.
center : 시작벡터와 착지위치벡터의 합에 1/2은 위치가 포물선의 중간위치가 된다.
targetRotation : 라인위치와 최종위치를 빼면 포물선의 방향백터를 구할 수 있다.
(벡터OA -벡터 OB = 벡터BA) center가 아닌 캐릭터의 위치로 계산해도됨)
Physics.Linecast : 포물을 그리는 라인에 물체가 걸리면 부딪힌 지점을 넘겨준다.
실제로 궤적(라인)을 그리는 부분
theArc : 두 벡터 사이를 원하는 간격으로 보간 부분
(이해를 못함.. 이쪽은 공부가 필요하다)
lineRenderer.SetPosition : 위에서 구해준 라인의 벡터들의 위치를 설정
학습참고 : http://maedoop.dothome.co.kr/660
=================================
=================================
=================================
출처: https://answers.unity.com/questions/8338/how-to-draw-a-line-using-script.html
How to draw a line using script
void DrawLine(Vector3 start, Vector3 end, Color color, float duration = 0.2f)
{
GameObject myLine = new GameObject();
myLine.transform.position = start;
myLine.AddComponent();
LineRenderer lr = myLine.GetComponent();
lr.material = new Material(Shader.Find(“Particles/Alpha Blended Premultiply”));
lr.SetColors(color, color);
lr.SetWidth(0.1f, 0.1f);
lr.SetPosition(0, start);
lr.SetPosition(1, end);
GameObject.Destroy(myLine, duration);
}
=================================
=================================
=================================
출처: https://answers.unity.com/questions/1571674/multiple-lines-in-3d-using-linerenderer-in-one-scr.html
Multiple Lines in 3D using LineRenderer in one Script
Hi there,
so I want to draw lines between different GameObjects in 3D.!
I have two fbx-models with body parts. Those models are moving. The lines to be drawn should be between eg: LeftForeArm of the one Model, and the LeftForeArm of the other model. There needs to be lines between all the body components between model 1 and model 2.
What I know so far: I can only use one static LineRenderer in one script. I need to dynamically create a List with LineRenderers for all body parts – but I cant figure it out myself!
This is the initialization code snippet:
private void drawingLinesInitialization()
{
// Line Renderer Initialization
LineRenderer lineRendererLeftForeArm = gameObject.AddComponent();
//Line Renderer Colors / Materials
lineRendererLeftForeArm.material = new Material(Shader.Find(“Sprites/Default”));
//Line Renderer Width
lineRendererLeftForeArm.widthMultiplier = 0.05f;
/*
* A simple 2 color gradient with a fixed alpha of 1.0f.
* ColorGradient retrieved from Unity example:
* https://docs.unity3d.com/ScriptReference/LineRenderer.SetPosition.html at the 14.11.2018
*
*/
float alpha = 1.0f;
Gradient gradient = new Gradient();
gradient.SetKeys(
new GradientColorKey[] { new GradientColorKey(c1, 0.0f), new GradientColorKey(c2, 1.0f) },
new GradientAlphaKey[] { new GradientAlphaKey(alpha, 0.0f), new GradientAlphaKey(alpha, 1.0f) }
);
lineRendererLeftForeArm.colorGradient = gradient;
}
This is the code I have so far for one comparison:
IEnumerator coroutineDrawingSystem()
{
while (true)
{
//Debug.Log(“Coroutine Drawing System called”);
//Getting Components:
LineRenderer lineRendererLeftForeArm = GetComponent();
//Checking if GameObjects are initialized and then drawing
if (cLeftForeArm != null && lLeftForeArm != null)
{
// Update position of the two vertex of the Line Renderer
lineRendererLeftForeArm.SetPosition(0, cLeftForeArm.transform.position);
lineRendererLeftForeArm.SetPosition(1, lLeftForeArm.transform.position);
} else
{
Debug.Log(“Some Transforms of objects are not initialized!”);
}
yield return new WaitForSeconds(timeBetweenLineRenderDrawing);
}
}
=================================
=================================
=================================
*기타관련링크
– https://ssscool.tistory.com/347
=================================
=================================
=================================
728×90
반응형
라인 렌더러 – Line Renderer
Addressables
이번 포스팅에서는 Addressable Asset System을 활용하여 에셋을 로드해 봅니다.
Addressable Asset System은 에셋을 조금 더 효율적으로 관리하기 위한 시스템으로
기존의 Asset Bundle을 기반으로 작동합니다.
프로젝트의 에셋을 관리함으로서 전체 프로젝트의 용량을 줄이거나 효율적으로 수정할 수 있습니다.
이번 포스팅에서 Azure Blob을 통해서 에셋을 로드해 봅니다.
Unity3D
프로젝트를 생성하고 Package Manager 에서 Addressables 패키지를 설치합니다.
<01. Addressables 다운로드 >
이번엔 로드할 에셋을 만들어봅니다.
단순한 Cube 오브젝트를 생성하여 Prefab 으로 만들어 줍니다.
계층구조창의 Cube 오브젝트는 제거하고 프로젝트 창의 Cube 프리펩을 선탁합니다.
다음과 같이 Inspector 창에서 Addressable 항목에 체크해줍니다.
<02. Addressables 객체 설정 >
그리고 다음과 같이 Addressable 의 Group 창을 띄워줍니다.
<03. Addressables Group 창 >
Addressable Groups 창에서 Default Local Group 항목의 드롭다운버튼을 눌러 확인해보면
위에서 체크한 Cube 오브젝트가 등록되어 있습니다.
추후에는 에셋들을 그룹화하여 관리할 수 있습니다.
<04. Addressables Group >
Azure Blob
네트워크 스토리지에 빌드된 에셋을 업로드하기 위해 Azure Blob 을 활용해 봅니다.
Azure 에 가입하고 로그인 후 blob 을 검색해서 스토리지 계정 항목을 클릭합니다.
<05. Azure Blob >
그리고 상단 +만들기 버튼을 클릭하여 스토리지 생성 창으로 넘어갑니다.
저장소 계정 생성 창에서 다음과 같이 작성한 후 아래 검토 + 만들기 버튼을 누르고 만들기 버튼을 한번 더 만들어줍니다.
<06.07. Azure Blob >
기다리면 배포가 완료됩니다. 아래 `리소스로 이동` 버튼을 눌러줍니다.
<08. Azure Blob 저장소 계정 배포 >
좌측 탭에서 `컨테이너`항목을 선택합니다.
<09. Azure Blob 저장소 계정 선택 >
좌측 상단 `+컨테이너` 항목을 클릭합니다. 우측에서 컨테이너 이름을 소문자로 정하고 아래 공용 엑세스 수준을 `Blob`으로 변경합니다.
<10. Azure Blob 컨테이너 생성 >
생성된 컨테이너를 우클릭하고 `컨테이너 속성`을 선택합니다. 그리고 나오는 창의 `URL`항목을 복사합니다. 해당 URL이 배포된 에셋을 다운로드 받는 경로입니다.
<11. URL 복사 >
## Unity 3D 유니티 3D로 돌아와서 `Addressables Group`창을 확인합니다. 상단 `Profile: Default`항목을 클릭하고 `Manage Profiles`항목을 클릭합니다. `Addressables Profiles`창에서 `Remote` 항목을 `Custom`으로 변경하고 두번째 `Remote.LoadPath` 항목에 방금 복사한 URL을 붙여넣습니다.
<12. Addressables Profiles >
프로젝트 창에서 `AddressableAssetSettings`을 선택합니다. 우측 인스펙터 창에서 `Content Update` 항목에서 `Build Remote Catalog`항목을 체크합니다. 아래에 `Load Path` 항목이 방금 붙여넣은 경로와 같은지 확인합니다.
<13. Addressable Asset Settings >
프로젝트 창에서 `Default Local Group`을 선택합니다. 우측 인스펙터 창에서 `Content Packing and Loading`항목에서 `Build and Load Paths` 항목을 `Remote`로 변경합니다. 마찬가지로 하단 경로가 방금 붙여넣은 경로와 같은지 확인합니다.
<14. Default Local Group >
이제 에셋을 빌드합니다. `Addressables Groups`창에서 `Play Mode Script`항목을 클릭하고 하단 3번째 `Use Existing Build`항목을 클릭합니다. 그리고 동일한 창에서 `Build`항목을 클릭하고 `New Build` -> `Default Build Script`항목을 클릭하여 빌드를 진행합니다.
<15. Asset Build >
다음과 같은 경로에 에셋이 빌드가 됩니다.
<16. Build 완료 >
## Azure Blob 아까 `Azure Blob`에서 생성한 컨테이너로 가서 위 빌드한 파일들을 업로드해줍니다. 상단 `업로드`버튼을 클릭하고 해당 파일을 업로드합니다.
<17. 번들 업로드 >
## Unity 3D #### Script `AddressableLoad.cs` 스크립트를 생성하고 다음과 같이 작성합니다. “`ruby using System.Collections; using System.Collections.Generic; using UnityEngine; using UnityEngine.AddressableAssets;
[Unity] 유니티 라인렌더러 두 오브젝트 간 유동적으로 선 긋기 Unity LineRenderer, Flexibly stroking between two objects. linerenderer.setposition
반응형
[Unity] 유니티 라인렌더러 두 오브젝트 간 유동적으로 선 긋기 Unity LineRenderer, Flexibly stroking between two objects. linerenderer.setpositionLine Renderer 두 점 사이 선 긋기.
안녕하세요 정보처리마법사 입니다.
이번 포스팅의 주제는 두 오브젝트 간 유동적으로 라인 그리기에 관한 내용입니다.
먼저 하이어라키창에 Cube 두 개를 생성해줍니다. 이름은 Cube1, Cube2 로 하였습니다.
Cube1에 Line Renderer 컴포넌트를 추가하였습니다.
아래 Add Component 버튼을 눌러서 추가 하시면 되겠습니다.
그리고 머테리얼을 하나 까~ 맣게 만들어서 위 스샷에 보이는 Element 0, 1 에 넣었습니다.
스크립트는 Cube1 에 연결하였습니다.
아래의 소스코드와 같이 해주시면 되겠습니다.
그라데이션이 등은 다루지 않았습니다.
Ctrl + C , Ctrl + V
1 2 3 4 5 6 7 8 9 10 11 12 13 14 15 16 17 18 19 20 21 22 using UnityEngine; public class TestDrawLine : MonoBehaviour { LineRenderer lr; Vector3 cube1Pos, cube2Pos; private void Start() { lr = GetComponent < LineRenderer > (); lr.startWidth = .05f; lr.endWidth = .05f; cube1Pos = gameObject.GetComponent < Transform > ().position; } void Update() { lr.SetPosition( 0 , cube1Pos); lr.SetPosition( 1 , GameObject.Find( “Cube2” ).GetComponent < Transform > ().position); } } Colored by Color Scripter cs
검은 선이 잘 그어지군요.
이상으로 포스팅을 마칩니다. 감사합니다.
잘 못 된 정보가 있으면 말씀해주세요.
공감버튼 클릭은 작성자에게 큰 힘이 됩니다. 행복한 하루 되세요.
“파트너스 활동을 통해 일정액의 수수료를 제공받을 수 있음”
반응형
So you have finished reading the 유니티 라인 렌더러 topic article, if you find this article useful, please share it. Thank you very much. See more: 유니티 2d 라인렌더러, 유니티 라인 렌더러 원, 유니티 라인렌더러 여러개, 유니티 라인렌더러 메테리얼, 유니티 라인 렌더러 애니메이션, 유니티 2D 선 그리기, 유니티 라인 렌더러 텍스처, 유니티 라인렌더러 콜라이더